Avision AP30 Series User Manual Download Page 16

Installation 


Removing the Tapes of the Toner 

Cartridge 


Important! 

When you unpack the machine, a toner cartridge has been packed 

separately besides the machine.    Please remove the package cushion 
and tapes on the toner cartridge before using it. 


Installing the Toner Cartridge 


Please follow these steps to install the toner cartridge


1.


Unpack the new toner cartridge. 
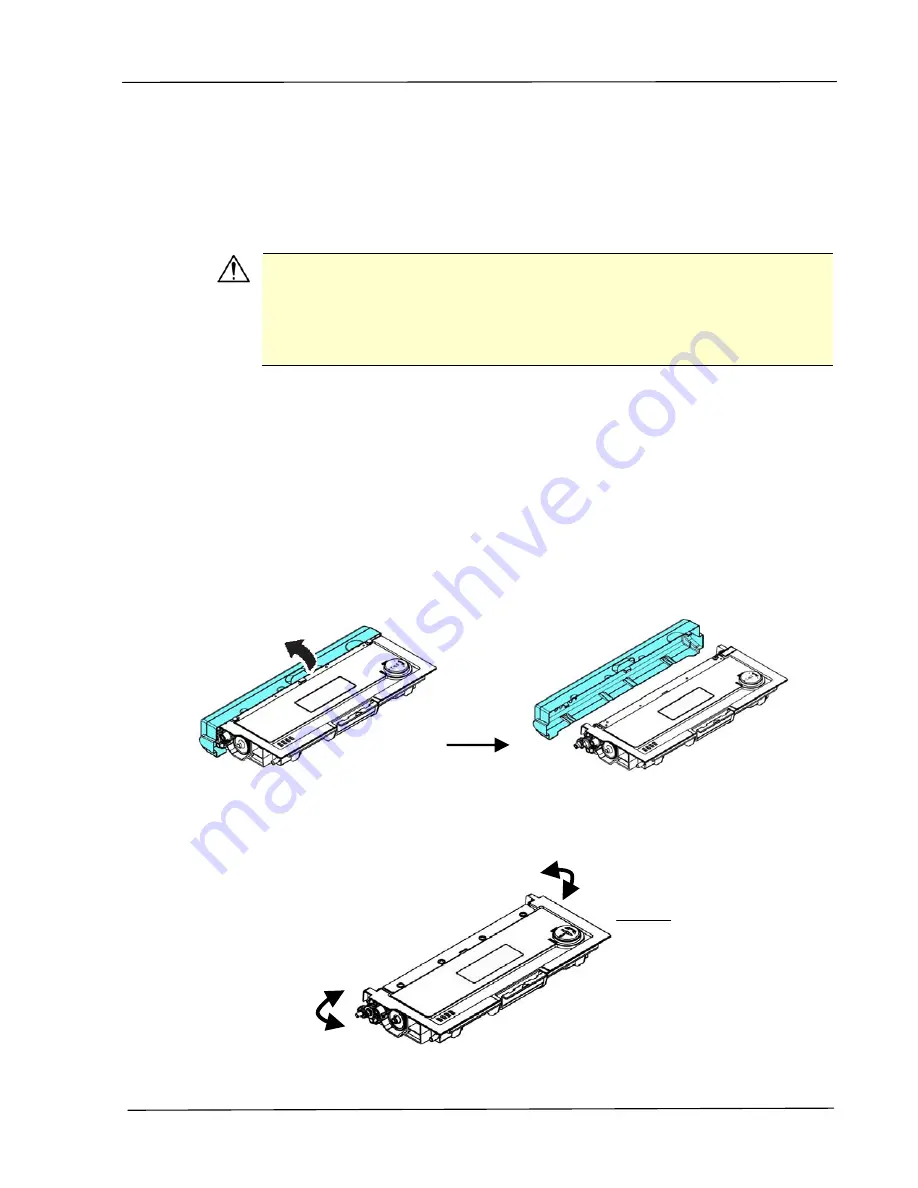
2.


Remove the protective cover. 


3.


Tilt the toner cartridge up and down and then right and left 10 times to 

distribute the toner evenly inside the toner cartridge. 


Toner 

Cartridge


Summary of Contents for AP30 Series

Page 1: ...A4 Digital Printer AP30 Series User s Guide Avision Inc...

Page 2: ...damage to property Important Indicates operational requirements and restrictions Please read and follow these instructions to ensure a proper operation and to avoid damage to the machine Note Indicate...

Page 3: ...ice the machine smells after a period of frequent or extended use Do not modify this product as a fire electrical shock or breakdown could result If the product employs a LSU printhead the LSU beam so...

Page 4: ...are registered trademarks of Microsoft Corporation in the United States and or other countries Other product names used herein are for identification purposes only and may be trademarks of their respe...

Page 5: ...the following measures Reorient or relocate the receiving antenna Increase the separation between the equipment and receiver Connect the equipment into an outlet on a circuit different from that to wh...

Page 6: ...uter so that the interface cable can easily reach between the device and the computer Do not place or store the device Outdoors Near excessive dirt or dust water or heat sources In locations subject t...

Page 7: ...cts on the unit It may cause unbalance and the device may fall down This may result in injury Store the AC Power cord USB cable bundled out of the reach of children to avoid the risk of injury Keep pl...

Page 8: ...sed for local and network printing up to A4 size Features This product provides the following features to make your print out more efficient and effective Print on Both Sides Prints two pages one on e...

Page 9: ...4 size Print Multiple Pages on a Single Sheet Prints two or four pages of the original on a single sheet of paper A maximum of 16 pages can be printed on a single sheet of paper Print Watermark Print...

Page 10: ...Overview 3 External View The Front View 1 Output Tray 4 Front Cover 2 Handle of the Front Cover 5 Paper Stopper 3 Main Paper Tray 6 Control Panel 6 5 1 2 4 3...

Page 11: ...User s Guide 4 The Rear View 1 USB Port Type A to USB flash disk 4 Power Receptacle 2 USB Port Type B to PC 5 Rear cover 3 LAN Port 6 Handle of the Rear Cover 5 1 6 2 3 4...

Page 12: ...Overview 5 Package Contents Main unit Software CD Printer Driver User Manual USB Cable Toner Cartridge Power Cable...

Page 13: ...error LAN LED Indicate LAN connection Power button Short press to turn on the printer Long press to turn off the printer Power Ready LED Turn solidly on when the printer is turned on Cancel Button Pr...

Page 14: ...signed by your network administrator or by DHCP Server Note 1 DHCP server With DHCP Dynamic Host Configuration Protocol a host can automatically be given a unique IP address each time it connects to a...

Page 15: ...ation Space Please reserve the following operation space Machine dimension 404 x 380 x 205 mm WxDxH Removing the Packing Materials Remove the packing materials including plastic bags and tapes for pro...

Page 16: ...ove the package cushion and tapes on the toner cartridge before using it Installing the Toner Cartridge Please follow these steps to install the toner cartridge 1 Unpack the new toner cartridge 2 Remo...

Page 17: ...clothing or other fabric wipe off the toner with a dry cloth Wash the items in cold water and dry them in the shade To prevent the toner cartridge from damage do not expose it more than several minut...

Page 18: ...until you hear it lock into place 5 Hold the handle of the drum and toner cartridge assembly and insert the assembly to its original place 6 Press down the handle of the toner cartridge to fix the to...

Page 19: ...User s Guide 12 Installing the Paper Stopper Gently lift the paper stopper and its extension to collect the paper Paper Stopper...

Page 20: ...y To insert paper to the main paper tray 1 Fan your paper first to ensure that the pages do not stick together 2 Align the edges of the documents by tapping the bottom of the stack against the table t...

Page 21: ...User s Guide 14 3 Lift the handle of the main paper tray and then pull out the main tray 4 Push the width guide tab and move the width guide to the correct position for the paper size being loaded...

Page 22: ...the correct position for the paper size being loaded 6 If you want to load a sheet of paper larger than the length of A4 press down the first length adjustment latch and at the same time slide the man...

Page 23: ...move the tray back to the original A4 length press down the second length adjustment latch and at the same time slide the manual tray to the left 7 Load the paper stack with the Printing Side Facing D...

Page 24: ...pages 70 g m plain paper Paper size A4 210 x 297 mm A6 105 x 148 mm A5 148 x 210 mm B6 125 x 176 mm B5 176 x 250 mm Letter 216 x 279 mm Legal 216 x 356 mm Custom Size 76 2 x 127 mm 216 x 356 mm 3 x 5...

Page 25: ...er stack so that the top page is now on bottom and then reload it to the paper tray Pack and seal the remaining paper with the original packaging and store the paper in a dark and dry location away fr...

Page 26: ...9 Loading the Manual Tray To insert paper to the manual tray 1 Hold the handle of the manual tray and pull it down to open the manual tray 2 Pull out the tray extension to fit your desired paper lengt...

Page 27: ...together 4 Align the edges of the documents by tapping the bottom of the stack against the table top Rotate the stack 90 degrees and repeat 5 Load the paper stack with the print side Facing UP as ill...

Page 28: ...or media which we have recommended Make sure to fan your paper before loading it to the paper tray If there are instructions about the printing side on the package of your paper please follow the inst...

Page 29: ...ct the other end to an appropriate power outlet Turning On The Printer To turn on the printer press the power button located on the control panel Ready LED will be lit Note When the product is not in...

Page 30: ...function 1 Connect one end of your network cable to an available port of your Ethernet Hub 2 Connect the other end to the LAN port at the back of the product as shown Note To obtain the IP address pre...

Page 31: ...installing the printer s driver 1 Insert the supplied CD into your CD ROM drive The installation menu appears as shown below 2 Click Install Printer Driver and follow the on screen instructions to ins...

Page 32: ...low the on screen instruction to complete the installation 6 When the Finish dialog box appears click Finish to complete If you have successfully installed the printer s driver you will find a printer...

Page 33: ...l Scanner Driver and Printer Driver and follow the on screen instructions to complete the installation of the program 3 When the Setup Type dialog box appears check TCP IP and click Next to continue I...

Page 34: ...lly and all the product s host names found in the network will be displayed in the box of the Automatic Search Use your mouse to choose your desired host name to be connected 5 During installation the...

Page 35: ...oduct in a wired network You may also define your network connection via the web page See more details in the subsequent section Customize System s Settings via the Embedded Web Page in Chapter 5 1 Ma...

Page 36: ...Address Subnet Mask and Gateway field respectively 6 If you have assigned a specific IP enter your domain name server and WINS server as well and then click Update Setting to update the IP information...

Page 37: ...n a wireless network You may also define your network connection via the web page See more details in the subsequent section Customize System s Settings via the Embedded Web Page in Chapter 5 To wirel...

Page 38: ...ask and Gateway field respectively 6 Click Join a Wi Fi network and the currently connected wireless networks will be displayed Select the wireless network you want to connect and then enter the secur...

Page 39: ...menu select All Programs the AP30 Series Printer and then Uninstall Driver Or from the Start menu select Control Panel Add or Remove Programs the AP30 Series Printer and then Remove 2 Follow the instr...

Page 40: ...ndicator will stop flashing and become steadily on To turn off the scanner press the Power button for about 3 seconds the Power LED will be off Installing the Printer Driver NOTE The screens in this s...

Page 41: ...lcome window 5 If you wish to change the default installation disk click Change Install Location or click the Install button to continue installing the program 6 Log in with a password that has admin...

Page 42: ...to add more AP30 printer enter the IP address again and then click Add to continue 10 When the The installation was successful screen appears click the Close button to close the installation 11 Remov...

Page 43: ...User s Guide 36 Or click System Preferences icon on your dock and then Print Scan 13 You can find an AP30 printer has been added in your printer list...

Page 44: ...k System Preferences and then Print Scan Or click System Preferences icon on your dock and then Print Scan 2 Click and then Add Other Printer or Scanner to add the printer 3 A dialog appears listing p...

Page 45: ...he printer by its IP address While entering the IP address by clicking the IP icon be sure to include the address with 9101 for example 192 168 1 100 9101 4 Locate the printer driver by clicking the a...

Page 46: ...led on your computer Select your printer and click OK Your Print Using option will display the printer you have selected 6 Click the Add button to add the printer Now your printer will be in the list...

Page 47: ...SA6 the copy can be started and in a second the front side and rear side of your ID card are printed in one side of a sheet Knowing the Scan Module Removing the Mylar Locate the mylar for the reserved...

Page 48: ...can Module 1 Note two reserved holes on the side wall beneath the operational panel and fasten the scanning module with two fixing screws as shown 2 Connect the USB cable to the USB port on rear side...

Page 49: ...the front side and the rear side of your ID card will be copied in one side of a sheet Note Only one card can be inserted at one time The scan module does not allow to be fed more than one card at a...

Page 50: ...e machine The product s settings can be customized via the product s embedded web page How to customize the product s settings via these two methods will be described in the following sections Note Wh...

Page 51: ...define your Wi Fi connection type via the web page 1 Refer to the preceding section to setup the product s network settings 2 Open your browser and type the product s IP address on the URL address fo...

Page 52: ...address Wi Fi IP Displays the Wi Fi IP address Wi Fi Mac Displays the Wi Fi Mac address Wi Fi SSID Displays the Wi Fi SSID name Toner Remain Displays the toner remain of the toner cartridge System Usa...

Page 53: ...by selecting Wi Fi WPS button To enable the WPS connection of your access point please refer to the user s guide of your access point Network Filter Specify if you wish to enable or disable the Networ...

Page 54: ...r pad after replacement Click immediate to reset count Tray 1 pad Manual Tray Pad V Mag Adjustmnet Choose to adjust the vertical magnification rate of the printer 0 4 0 2 0 0 2 0 4 Wi Fi Connection Wi...

Page 55: ...Item Description Mode Display the default mode Choice Up Down left Right Front Rear Density Display the default density level Default 4 range 1 7 Position Adjustment Vertical Horizontal Adjust the pri...

Page 56: ...server address for the product Alternate DNS Server Sets up the alternate DNS server address for the product Preferred WINS Server Sets up the preferred WINS server address for the product Alternate W...

Page 57: ...address for the product Preferred WINS Server Sets up the preferred WINS server address for the product Alternate WINS Server Sets up the alternate WINS server address for the product Domain Name Sets...

Page 58: ...rk making IP address management an easier task for network administrators If the DHCP server is available from your network you do not need to enter TCP IP subnet mask gateway and DNS information Inst...

Page 59: ...n Knowing the Product s Default IP Address to get the product s IP address from the DHCP server 2 Open your browser 3 Type the product s IP address on the URL field of your browser For example 10 1 23...

Page 60: ...r Properties Dialog Box Windows To display the Printer Driver Properties dialog box 1 Click Start on the system tray and choose Printers and Faxes 2 Right click the product s printer name and choose P...

Page 61: ...out tab the Watermark tab the Duplex tab and the More tab The contents of each tab will be explained in the following sections The Basic Tab The Basic tab contains settings for Orientation Copies Effe...

Page 62: ...ted first and vice versa Effect Picture Mode If the picture in your document does not print clearly click Picture Mode to improve its quality Text as Black Print color text in pure black Density Click...

Page 63: ...B6 Legal Letter User Define Tray Choose the tray from which your paper should be fed Choice Auto Manual Tray Main Tray Auto means automatically select the paper tray which is available priority 1 manu...

Page 64: ...ut Paper Size N up N up Choose number of pages to be printed on a single sheet of paper Choice Off 2up 2 in 1 4 up 4 in 1 9 up 9 in 1 16 up 16 in 1 Border Choose if you wish to add border around each...

Page 65: ...en Down Down then Left Right then Down Down then Left Down then Right Left then Down Output Paper Size User Define Scale You can reduce or enlarge your printed image using the Slider Bar Scaling rate...

Page 66: ...rint watermark only on the first page Clear the check box will print watermark on all pages Text Choose and click New Add to add new watermark text Click the Edit button to change or the Remove button...

Page 67: ...e Name your watermark text This name will be shown in the Watermark text list String Enter your watermark text such as confidential important and so on Typeface Choose your font type for your watermar...

Page 68: ...cessfully the watermark name will be shown in the Text list Editing a current watermark text To edit a current watermark text 1 Choose the waternark name that you wish to edit from the Text list 2 Cli...

Page 69: ...rk image Size Specify the size of your watermark image Choice Actural Size Fit to Page Tile Position Choose the position of your watermark image Choice Top Left Top Center Top Right Center Center Left...

Page 70: ...e Image list 2 Click the Edit button The Watermark Edit dialog box appears 3 Change your settings for the selected watermark image and choose OK to complete Removing a current watermark Image To remov...

Page 71: ...paper Choice Flip Horizontal Flip Vertical Duplex Flip Horizontal Check to flip the duplex document on the left edge Flip Vertical Check to flip the duplex document on the bottom edge Note The duplex...

Page 72: ...option is provided to set the amount of time the printer waits for data to come from computer during a job If the data stream pauses for longer than the specified number of seconds the job is cancell...

Page 73: ...an change the following printer settings when you print from your computer Choosing Page Setup Options Open your document and then click File then Page Make sure Avision XXXX Printer where XXXX is you...

Page 74: ...options click the disclosure arrow on the printer options Cover Page You can make the following cover page settings Print Cover page If you want to add a cover page to your document use this function...

Page 75: ...border use this function Choice None Single hairline Single Thin Line Double Hairline Double Thin Line Two Sided Choice Off Long Edge binding Short Edge binding When using Two Sided printing you can s...

Page 76: ...t Edge binding Landscape Note The duplex feature supports only page sizes of A4 B5 and letter with paper weight between 60g m2 and 105g m2 Reverse Page Orientation Check Reverse Page Orientation to re...

Page 77: ...r tray which matches the paper size of your document Paper Handling Collate pages Your printer can sort multiple copy jobs For example if you print two copies of a three page document and you choose n...

Page 78: ...Choice Plain Paper Thin Paper Thick Paper Laser Paper CardStock Bond Envelope Only available in the manual tray for one side printing Toner Save Allows you to print your document using the toner savi...

Page 79: ...User s Guide 72 TextEdit Print Header and Footer If you wish to print header and footer use this function Rewarp contents to fit page Adjust contents to fit your page AP30 Series Printer...

Page 80: ...ring the Printer s Driver 73 Preview Auto Rotate Check to automatically rotate your image to fit your paper Scale Enlarge or reduce your image Choice Print Entire Image Fill Entire Paper AP30 Series P...

Page 81: ...software program When you send the print job a dialog box appears briefly on the screen You can cancel the print job from the dialog box If several requests have been sent to the product through your...

Page 82: ...rs in succession Or Windows Vista using the default Start menu view Choose Start Control Panel Hardware and Sound Printers in succession Or Windows 7 Choose Start Control Panel Hardware and Sound Devi...

Page 83: ...d information for a wireless access point such as an SSID network name and a security key password For details contact your Network Administrator or refer to the manual for the wireless access point A...

Page 84: ...er has been connected to the product via the USB cable Make sure the power adapter has been connected and the product has been turned on The Network Setup Tool is an application to configure the setti...

Page 85: ...ou may check DHCP to obtain the IP address directly from the DHCP server 4 Select the wireless network you want to connect from the SSID box Enter the security key if necessary 5 Click Update to start...

Page 86: ...hased for free from an application store such as Google Play 1 Select same wireless network as your printer On your mobile device tap Settings Wi Fi and choose the same network name SSID of your print...

Page 87: ...Guide 80 3 Select your printer Select AP30 Series at AP30 from the printer list 4 Open the file which you want to print Open the file you want to print 5 Choose Print from the menu and select your pr...

Page 88: ...Documents from a Mobile Device 81 6 Choose print settings and print If you do not need to change print options tap Print to send the print job If you need to change print options continue to the next...

Page 89: ...s may vary depending on the app and printer selected The following print options may display Number of Printed Copies Tap Copies to enter your desired copy count if you want to print more than one cop...

Page 90: ...the option you prefer Portrait or landscape may be options offered depending upon the app or printer Defining the Page Range In the print settings menu to print multiple pages tap Pages and then selec...

Page 91: ...iPad 2 Tap Settings and then open Wi Fi Select the network same with your printer 3 Open the picture or the document that you want to print Tape the Share icon and then the print icon 4 Tap Select Pr...

Page 92: ...Printing Documents from a Mobile Device 85 AP30 series at xxxx...

Page 93: ...er Status Monitor is available when the printer is connected directly to a host computer via the USB port or a network port Printer Status Monitor is installed when you install the printer driver as d...

Page 94: ...ess bar to access the latest data of the specified printer C Delete Errors Delete all the error messages D Save Errors to CSV Save error message to a CSV file E All Users Jobs Check the box to show Al...

Page 95: ...show the information of the paper tray and the consumables parts such as Drum Unit Toner Cartridge The Consumables window k IP for a Shared Printer Click here to enter the IP for a shared printer to g...

Page 96: ...n Status Monitor window Language Displays the language of the window Status Alert Update Time Display in Pop up Window Define the interval to refresh the printer error status Choice 1 5 10 minute Cust...

Page 97: ...n Toner low 200032 Toner that remains is lower than 10 The machine can still perform printing or copying function yet with poor quality Drum near end 200043 Drum that remains is lower than 10 Call the...

Page 98: ...The fax board is not installed or damaged Restart PRINTER or call service to replace the fax board Motor error 000001 Press button to erase or call service When PRINTER is booted the scanner and print...

Page 99: ...busy with current job Wait until current job is completed Buffer full Job abort Memory is not enough to process the scanned images Buffer full Print scanned images 1 Cancel job 2 Memory is not enough...

Page 100: ...to clear jam paper Paper jam 200326 Please open front cover and pull drum unit out to clear jam paper Paper jam 200327 Please open front cover and pull drum unit out to clear jam paper Paper jam 2003...

Page 101: ...the handles of the front cover on both sides as illustrated Rear Cover Open the rear cover by pulling the handle of the rear cover as shown Duplex Tray Pull the duplex tray beneath the rear cover out...

Page 102: ...hese steps to remove the jammed paper 1 Open the Front Cover and the Rear Cover 2 Pull down the Fuser Path as indicated 3 Pull down the Release Arm on both sides 4 Slowly remove the jammed paper 5 If...

Page 103: ...0 Printer runtime error 201651 Firmware error 201701 Printer MB NVRAM reading error 201702 Printer MB NVRAM writing error 201703 Printer MB NVRAM reading error while comparing 201704 Printer MB NVRAM...

Page 104: ...sture absorption Light print entire page 1 Make sure that the toner cartridge is fully installed 2 Make sure that the Toner Save setting is turned off in the printer driver 3 Try using a different typ...

Page 105: ...ner cartridge Dirty background entire page 1 The paper might not meet the printer s specifications for example the paper is too thin 2 Check if there is enough toner in the toner cartridge If not plea...

Page 106: ...the error occurs again contact the service personnel Loose toner 1 If you have observed a rougher texture on one side of your paper try printing on the smoother side 2 The paper might not meet the pr...

Page 107: ...369 FAX 1 510 739 6060 E MAIL support avision labs com Web Site http www avision com China Area Shanghai Technical Support Center 7A No 1010 Kaixuan Road Shanghai 200052 P R C TEL 86 21 62816680 FAX 8...

Page 108: ...30K copies paper may not feed smoothly or noise occurs during paper feeding Follow the procedure below to clean the Pad in the Cassette You need to prepare cotton swab 1 Remove all paper in the casset...

Page 109: ...defective image of regular interval Follow the procedure below to clean the drum unit 1 Turn off the power and remove the power cord from the power outlet 2 Open the front cover by pulling the handles...

Page 110: ...Maintaining the Product 103 3 Remove the toner cartridge from the drum unit as shown 4 Clean the drum unit with a clean and soft cloth Drum unit Toner Cartridge Drum unit Clean this area...

Page 111: ...essage through the printer monitoring program Avision Status Monitor Buy a new toner cartridge and have it ready before you receive Replace Toner message Note The drum unit and the toner cartridge are...

Page 112: ...ing the Product 105 2 Lift the handle of the drum unit and toner cartridge assembly and gently remove the assembly 3 Remove the toner cartridge from the drum unit as shown Drum unit Toner Cartridge Dr...

Page 113: ...inside the toner cartridge 4 Install the new toner cartridge to the drum unit Warning Be careful not to inhale toner To avoid print quality problems DO NOT touch the toner rollers If toner gets on yo...

Page 114: ...be aligned with the arrow on the drum unit If it is not printed pages may have a vertical stripe 6 Hold the handle of the toner cartridge assembly and insert the toner cartridge assembly to its origi...

Page 115: ...g program Avision Status Monitor Buy a new toner cartridge and have it ready before you receive Replace Drum Unit message Follow these steps to replace the toner cartridge Removing the Drum Unit and t...

Page 116: ...Maintaining the Product 109 4 Remove the toner cartridge from the drum unit as shown Drum unit Toner Cartridge...

Page 117: ...n place Note If toner gets on your clothing or other fabric wipe off the toner with a dry cloth Wash the items in cold water and air dry Do not dispose of the toner cartridge Put the used toner cartri...

Page 118: ...print out time 11 seconds A4 SEF standard tray Warmup Time 25 seconds Recommended monthly print volume 1 500 pages Maximum monthly print duty cycle 15 000 pages Paper capacity 10 pages 70 g m plain pa...

Page 119: ...operation system Windows XP Windows 7 Windows 8 Windows 10 Dimemsion WxDxH 404 x 380 x 205 mm 15 9 x 14 9 x 8 in Weight 8 5 kg 18 73 lb Power source 100 120Vac 60Hz 12A Or 220 240Vac 50 60Hz 6 5A Pow...

Page 120: ...2 2 483GHz subject to local regulations 802 11n 20MHz 40MHz Number of Selectable Channels 802 11b g 13 channels Data Rate 802 11n up to 150Mbps 802 11b DSSS 11Mbps 802 11g OFDM 54Mbps Transmit Power E...

Reviews: