Avio iP-40 User Manual Download Page 6

E-

Safety Precautions

 CAUTION

•  Installation

•  Avoid installing the projector in places where it may be exposed to:
-  On tables, etc., that are vulnerable to heat.
-  Strong vibrations
-  Soot or steam
-  Direct sunlight or near a heater (35°C/95°F or higher)
-  High humidity or dust
-  Extreme cold (0°C/32°F or lower)
-  Strong magnetic or electric field generated from a nearby appliance
-  Wobbling on an unstable surface

•  Do not block the air vents.

•  Do not block the air vents with cloth or an object.
  When you put anything around the unit, be sure to ensure a space of 10 cm/4 inches or more between the unit and the 

air vent. Be sure to prevent paper or cloth from blocking the air vent at the bottom of the unit. If blocked, the internal tem-
perature may increase, resulting in malfunctions.

•  Do not bump the projector.

•  Avoid bumping the projector when moving or handling. Shocks can cause damage.

•  Care of the projector

•  To prevent risk of accidents, always disconnect the power plug before cleaning the projector.
•  Clean the lens surface with a commercial blower or lens cleaning paper.
  Wiping with tissue paper or a handkerchief can damage the lens.
•  To clean the cabinet, operation panel, and glass surface, wipe gently with a soft cloth. For particularly dirty spots, soak 

the cloth in a neutral detergent mixed in water, wring out well and wipe off the dirt, then use a dry cloth to wipe dry.

•  Do not wipe the projector with any volatile solvent such as benzine or thinner.
  Solvents can cause surface deformation or flaking of the paint.
  If using an impregnated cloth, follow the instructions of the cloth.

•  Avoid scratching the glass surface.

•  Take care not to scratch the glass surface of the scanner with hard or pointed objects.
  Scratches on the glass may distort the projected image.
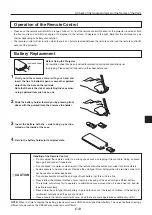
•  Battery

•  When inserting battery in the remote control, note the polarity (plus and minus signs) and insert correctly as indicated. In-

serting a battery in a wrong direction can cause rupture or leakage, and could result in fire and injury or soil the surround-
ing area.

•  Do not use coin battery other than the type specified for the equipment. Incorrect battery usage could result in rupture or 

leakage, and could cause fire and injury.

•  Do not heat, break open, burn, or immerse the battery. Battery rupture or leakage could cause fire and injury.
•  Perchlorate Material-special handling may apply.
  See www.dtsc.ca.gov/hazardouswaste/perchlorate/index.cfm.

•  Dew condensation

•  Abruptly moving the unit to a place where there is a great temperature difference causes dew condensation on the main 

unit. 

  Projection under a dew condensed state causes a failure.

•  Servicing and cleaning

•  Have the internal components cleaned by a retailer about once a year. There is a risk of fire or faulty operation if the 

inside of the projector gets dusty and is not cleaned for a long time. For best results, the projector should be serviced be-
fore the wet season brings damp conditions. Cleaning charges are at the discretion of the retailer.

•  If not using the projector for a long period:

•  If you do not plan to use the projector for a long time, disconnect the power cable for safety.

•  Disposal

•  Follow the recommendations of your local authority when disposing of the projector.

•  Transporting the projector

•  Use the special packaging when transporting the projector. The manufacturer cannot accept responsibility in the event of 

damage or accident if other packaging is used.

•  Use the special packaging no more than two times. Repeated usage reduces the shock absorbency of the packaging and 

can lead to damage or accident.

•  Contact the retailer if you require new packaging.

Summary of Contents for iP-40

Page 1: ...ber AVIO Intelligent Projector iP 40 A Proposal for New Presentations Intelligent Projector User s Manual O N S T A N D B Y L A M P C O V E R T E M P F R E E Z E O F F F R E E Z E C AP TU R E P O R T...

Page 2: ...ilt nur in den gegenw rtigen Mitgliedsstaaten der Europ ischen Union Au erhalb der Europ ischen Union Falls Sie gebrauchte elektrische oder elektronische Ger te au erhalb der Europ ischen Union entsor...

Page 3: ...A Proposal for New Presentations Intelligent Projector User s Manual iP 40 English Deutsch Fran ais...

Page 4: ...n in use or when stored Expressive color pictures High resolution 4 130 000 pixel CCD camera is built in It provides faithful and clear reproduction of the detailed neutral tones of color documents wi...

Page 5: ...tor during operation The powerful rays passing through the lens could damage the eyes Do not put the projector in unstable places Do not put the projector in unstable places such as on unstable desks...

Page 6: ...Scratches on the glass may distort the projected image Battery When inserting battery in the remote control note the polarity plus and minus signs and insert correctly as indicated In serting a batte...

Page 7: ...re near Do not use the rack unless the casters are locked when placing the projector on a rack with casters Doing so may cause the projector to move or roll over resulting in injury Do not turn the la...

Page 8: ...s E 22 Adjusting the Tilt Slant E 22 Regular Operation E 23 Select the Input E 23 Changing the Orientation of the Projection Image E 23 Enlarging and Reducing the Projection Image E 24 Adjusting the B...

Page 9: ...trol iP 40 User s Manual PC connection cable 2 m No USB cable is included with the iP 40BE Pull out the sheet before use iP Viewer Software Quick Reference Only included with the iP 40SE U s e r s m a...

Page 10: ...e See Page E 11 Air intake vent Air filter Air is drawn into the projector from here There is an air filter to prevent dust from entering the inside of the projector See Page E 50 Tilt adjustment leve...

Page 11: ...sensor Document reading area The document or printed mate rial that you wish to project in the OHP mode is placed here See Page E 34 Power input connector Plug in the power cable here See Page E 21 O...

Page 12: ...it causes the product or SD memory card to fail Only for iP 40SE 7 USB connector This connector is used for USB connections with a per sonal computer iP 40SE only NOTE The L R sound is issued from th...

Page 13: ...r open Power has been switched OFF because of the alarm Lamp burned out Lamp usage exceeds 2 000 hours Red Orange Off Internal problem Red Off Red Temperature fault Fan fault Green Flashing red Off La...

Page 14: ...3 8 SET POINTER Button During menu display this button advances the menu to the next level This button finalizes the setting at the time of item selection See Pages E 33 and 36 This button displays a...

Page 15: ...been inserted for protection during transportation prior to shipping Please pull out and remove the sheet before use Insulation sheet Handling of the Remote Control Do not subject the remote control...

Page 16: ...21 Switch Off the Power See Page E 21 4 Switch on the power of the personal computer or video equipment 5 Properly adjust the projection image to the screen See Page E 15 6 Select the input equipment...

Page 17: ...to direct sunlight or the light of direct illumination When light hits the screen the screen show a white cast and will be difficult to watch In a bright room the curtains should be drawn or blinds c...

Page 18: ...a notebook computer and the image is displayed on the LCD screen of the notebook computer a proper display might not be obtained on projection screen Switching off the display of the notebook compute...

Page 19: ...DEO BLUE VIDEO GND NC Connecting Macintosh Computers When the monitor output is set to the VGA port mini D SUB 15 pin mount the PC connection cable included with the main unit An optional Apple video...

Page 20: ...List for Connection Problems with the Personal When the Image of the Personal Computer Screen Is Not Projected The screen of the personal computer is correct but the image is not projected properly P...

Page 21: ...Horizontal Frequency KHz Vertical Frequency Hz Supported NTSC RGB 15 7 60 No PAL SECAM RGB 15 6 50 No PC 98 Normal 1 640 400 24 8 56 Yes PC 98 Hi 640 400 31 5 70 Yes VGA GR1 640 480 31 5 60 Yes VGA G...

Page 22: ...nal When a condition in which a signal has not been input continues for 15 minutes or longer the lamp is turned off automatically This only functions when the auto power off mode is set to ON See page...

Page 23: ...on CAUTION TE ST RG B S V L R AU DI O US B AC IN AC IN TE ST RG B V L R US B AU DI O MEM OR Y O N S TA N D BY LA M P C O VE R T E M P FR E E ZE O FF FR EE ZE C AP TU RE R O TA TI O N IN P U T TR A N S...

Page 24: ...height has been reached Rotating the lowest portion of the tilt foot permits fine adjustments to be made The tilt foot are lengthened by rotated to the left and shortened by rotated to the right O N S...

Page 25: ...For instructions on selecting the PC input see page E 39 NOTE The input mode at starting time will be the same as it was the last time the projector was switched off When the icon is displayed either...

Page 26: ...he magnification can be adjusted from none to approximately 25x length ratio approx 5x when the input is set to OHP 16x length ratio approx 4x when the input is set to PC or 6 25x length ratio approx...

Page 27: ...om the main unit s control panel Operation with the Remote Control Adjust using the BRIGHTNESS buttons Projection image becomes brighter Projection image becomes darker To change the brightness perfor...

Page 28: ...y used More than 66 of the memory capacity used Saving disabled SD memory card storage SD saving Memory full state For USB connection Transferring the image in the incorporated memory makes the saved...

Page 29: ...till image of OHP will result in a return of the zoom magnification and position to the original condition If the input button on the main unit or the OHP PC or video button on the remote control unit...

Page 30: ...es 17 18 19 20 21 22 23 24 25 26 27 28 Example of 28 images captured and displayed as a list Operation with the Remote Control Operation with the Pro jector freeze capture LED orange Operation with th...

Page 31: ...n is projected vertically even when it is displayed laterally in the reduced size screen This operation is available only by the Remote control When feeding the page choose Next forwards on the menu 1...

Page 32: ...the other page Operation at the main unit freeze capture LED orange Operation with the Remote Control INPUT FREEZE OFF ROTATION TRANSFER ON STANDBY LAMP COVER TEMP FREEZE CAPTURE Operation with the Re...

Page 33: ...choose an intended image 8 Projecting terminating the OHP image Press the remote control FREEZE OFF button or OHP button To capture the SD memory card choose OHP before capturing the image For how to...

Page 34: ...ent video Press the ROTATION button When the input is set to OHP Use the input selec tor to select PC then press the ROTATION button ON STANDBY LAMP COVER TEMP FREEZE OFF FREEZE CAPTURE ROTATION INPUT...

Page 35: ...le from the main unit s control panel Operation with the Remote Control Press the SCROLL buttons See Page E 35 for information about the form color and size of the pointer NOTE If the brightness is ad...

Page 36: ...document cover is closed NOTE The document can be projected even when the document cover has not been closed however in this instance unnecessary items may be projected which will make the image diffi...

Page 37: ...color Brightness Language selection Pointer size Red Projection mode Mute mode Blue Economy mode Computer input Sharpness Auto power off Color mode Lamp usage time Sync adjustment Input signal PC inp...

Page 38: ...m contents Names and Functions of the Menu Parts Menu tab Switches to the various menus when selected Adjustment bar Indicates the adjustment condi tion according to the increase or decrease of the ba...

Page 39: ...an example 1 Press the MENU button and display the menu 2 Select Settings with the SCROLL buttons Each press of the SCROLL button switches the menu one step in the sequence of Pointer Screen Image ad...

Page 40: ...while checking the projection im age SCROLL button Each press causes the numerical value to decrease The lower portion of the projection im age becomes narrower SCROLL button Each press causes the num...

Page 41: ...can be stored but the picture quality is high Standard When this is selected more images can be stored but the picture quality is not as good SD format Execute formatting of the SD mem ory card The f...

Page 42: ...d files are saved is erased Erase 1 sheet in history The currently displayed history im age is deleted and the next history image is displayed When a single image selected from the list of OHP history...

Page 43: ...arpness of the im age is enhanced Menu Description Image adjustment This performs the settings and adjustments related to the projected image When OHP input has been selected Red Red color adjustment...

Page 44: ...im age is enhanced Sub menu Video Select only valid when the input is set to VIDEO This selects the input signal system Auto detects the signal system automatically NTSC 3 58 NTSC 4 43 SECAM PAL B G...

Page 45: ...appearance of a portion of the image Please see Page E 19 for details The keystone correction adjustment range will differ depending on the video signal system When the keystone adjustment is performe...

Page 46: ...brightness of the lamp will be approximately 80 The lamp ser vice life will be extended OFF High brightness mode The brightness of the lamp will be 100 There will be a bright screen Auto power off Whe...

Page 47: ...jector in an operation ambient temperature of 0 C 32 F to 35 C 95 F Are the ventilation vents blocked Rearrange the setup location of the projector and separate the projector from surrounding objects...

Page 48: ...5 C 95 F Are the ventilation vents blocked Breakdown of an internal circuit could be the problem Please use the projector in an operation ambient tempera ture of 0 C 32 F to 35 C 95 F Rearrange the se...

Page 49: ...me indicated on the menu screen is the time calculated by converting the usage times in the high brightness and eco modes to the equivalent in the high brightness mode Because of this if you always us...

Page 50: ...out 4 Install a new lamp unit Take the lamp unit and press it into the projector Check that the two positioning prongs on the bottom of the lamp unit are securely fit into the two holes Tighten the 2...

Page 51: ...and projection will start The power plug is plugged into a power outlet and only the ON STANDBY LED is lit red Do not reset the lamp usage time without replacing the lamp The likelihood of the lamp ru...

Page 52: ...opposite order to attach Press the air filter A firmly in all the way to the back Press the air filter cover B in until a click is heard NOTE The air filter can be purchased together with the lamp uni...

Page 53: ...exposed to illumination or other light Is the remote control IR sensor blocked Is an inverter device located close by E 4 13 E 13 E 13 E 13 At the time of personal computer input selection the positi...

Page 54: ...y details as possible Date of purchase Your Name Your Address Telephone number Product name and model No written on the label at the bottom of the projector Repair Service Notation of the date of prod...

Page 55: ...actual object projection unit Scanner 4 13 million pixel color CCD camera Scanning size 288 mm x 216 mm 11 3 in x 8 5 in PC AnalogRGBInput Signal system Separate Signal System Video signal Analog 0 7...

Page 56: ...ons Preparations Before connecting check that the projector s power is turned off 1 Connect the computer and projector with the RGB cable This connection is not required if you simply want to view the...

Page 57: ...E 55 Power cable for Singapore...

Reviews: