background image

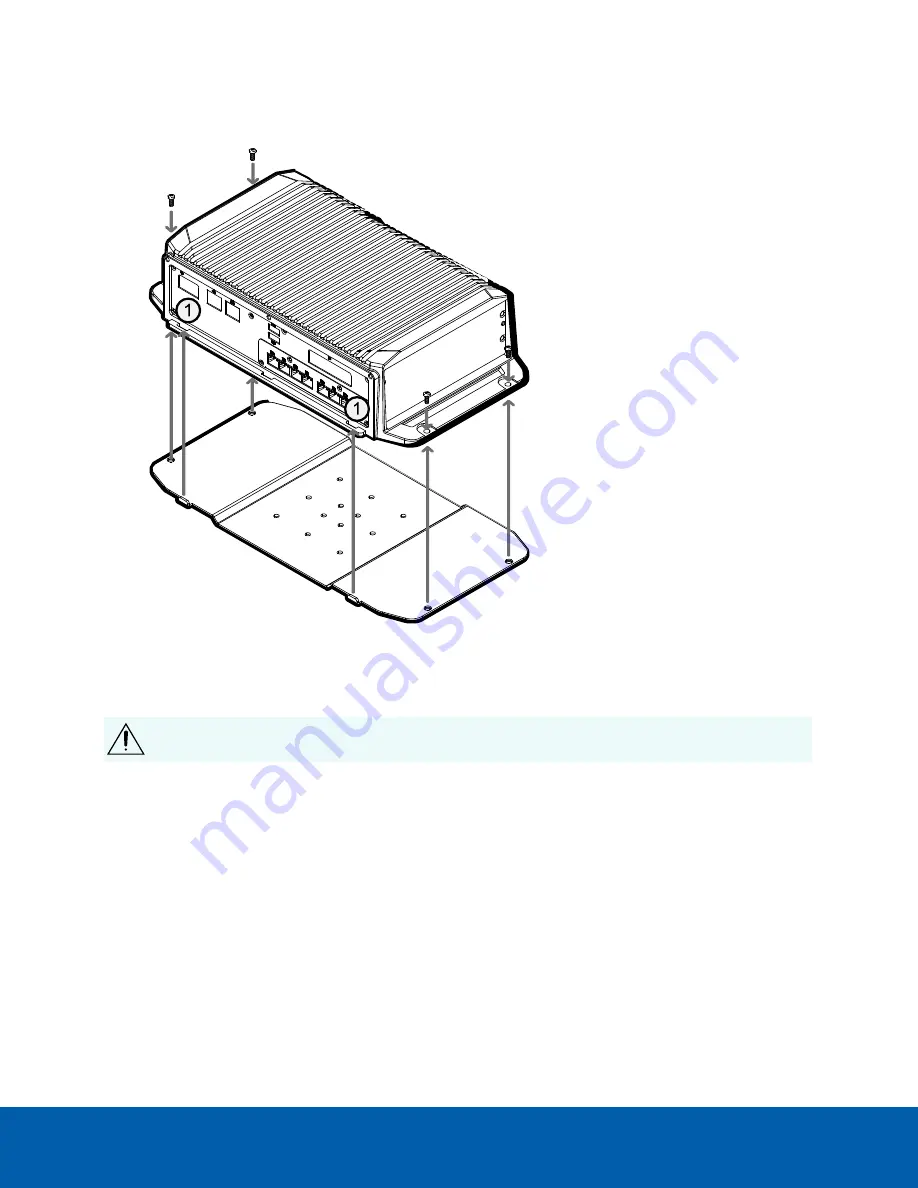
3. Mount the appliance on the mounting plate with the front and rear correctly oriented with the DIN rail

bracket using the 4 (four) round-head screws provided in the plastic bag labeled

DIN rail#2

, as shown

below.

j

Indicates the slots on the rear of the appliance into which the tabs on the mounting plate fit.

4. Clip the appliance to the DIN rail with the DIN rail bracket on the mounting plate correctly aligned so

the front panel LED indicators are visible and the rear panel connections are accessible.

CAUTION —

The device must be mounted as instructed or any issues that arise will not be covered

by the warranty.

Mounting an ACC ES Rugged 8-Port Appliance

13

Summary of Contents for ACC VMA-RPA-RGD-8P2

Page 1: ...User Guide Avigilon ACC ES Rugged 8 Port Appliance VMA RPA RGD 8P2 and VMA RPA RGD 8P4...

Page 2: ...icitly and in writing no license is granted with respect to any copyright industrial design trademark patent or other intellectual property rights of Avigilon Corporation or its licensors This documen...

Page 3: ...PoE Port Status 17 Manage ACC Services 18 Enable ACC Client Users to Archive Video 18 Provide Server Logs and System Logs for Support 19 Manage Device Settings 19 Change the ACC ES Rugged 8 Port Appli...

Page 4: ...lace the Web Certificate 35 Upload a Trusted CA Certificate 37 Upgrade the Firmware 38 Using the Software Reset Button 40 Restoring Factory Default Settings 42 Replacing the Storage SSD 44 Troubleshoo...

Page 5: ...tions The appliance features l A PoE switch to connect and power IP cameras l Built in server to run the Avigilon Control Center Server Software l Video analytics engine to enable classified object de...

Page 6: ...4 four round head screws to attach the ACC ES Rugged 8 Port Appliance to the mounting plate in a plastic bag labeled DIN rail 2 Important For compliance to UL 62368 1 if the ACC ES Rugged 8 Port Appli...

Page 7: ...The power from the battery in the holder maintains the appliance s internal time and date settings and BIOS settings in the CMOS memory If the time and date settings on the appliance become unreliable...

Page 8: ...bE Ethernet connection to link to other PoE switches and cameras 4 USB 2 0 ports 5 PoE switch component Connect cameras to the 10 100 speed PoE switch component to power the cameras and record video T...

Page 9: ...a web interface accessed from any Windows Mac or mobile device using any of the following web browsers l Mozilla Firefox browser version 3 6 or later l Google Chrome browser 8 0 or later l Microsoft E...

Page 10: ...plink only No Static or DHCP assigned Unconnected leave as DHCP Camera LAN Uplink and connected cameras will use Zeroconf IP addresses Camera LAN Uplink only Yes Unconnected leave as DHCP Static DHCP...

Page 11: ...onnectors 2 Mark the locations of the screw holes on the surface 3 Drill holes for the anchors and insert the anchors into the wall If you are using wood concrete or masonry screws drill holes as appr...

Page 12: ...ed in the plastic bag labeled DIN rail 1 The tabs on the back of the of the appliance fit into the slots on one side of the bracket only jIndicates the tabs on the mounting plate which fit in to the s...

Page 13: ...ts on the rear of the appliance into which the tabs on the mounting plate fit 4 Clip the appliance to the DIN rail with the DIN rail bracket on the mounting plate correctly aligned so the front panel...

Page 14: ...ND To make a permanent power connection unswitched connect both the ACC and VCC wire to the positive side of the power source Connect the ground wire to the ground side of the power source To connect...

Page 15: ...ord not how secure your password is A complex password is recommended The page refreshes and you are prompted to log in 5 Enter administrator as the username and your new password The Dashboard panel...

Page 16: ...files provided with the ACC Client software or the Avigilon ACC Client User Guide available from the Avigilon website Throughout this section the term device is used to identify the recorder Starting...

Page 17: ...n the right of the Server Management title bar Viewing PoE Port Status The PoE panel displays a status for each port in the Status column Statuses include the following Green Powered A PoE device is c...

Page 18: ...ports is updated l In the RTP Ports pane enter the Base value to use for the UDP ports and click Apply The range of ports available for RTP is updated Important These changes can only take effect aft...

Page 19: ...the logs to display the information that you need 1 In the drop down list select the type of logs that you need l For the Server Logs o Exception Logs o FCP Logs o Server Logs o WebEndpoint Logs l For...

Page 20: ...tes on page 35 Change the ACC ES Rugged 8 Port Appliance Administrator Password You can only change the password not the default administrator username for Server Management 1 On the navigation bar cl...

Page 21: ...f if you do not use an NTP server Note The default set of NTP servers is always present in the Servers list However this list is only used if NTP is enabled and not provided by your DHCP server The de...

Page 22: ...connections of the device Two network connections are supported one for a corporate network and one for a camera network Note The corporate network and the camera network must be on different IP subne...

Page 23: ...ed by connected devices The default setting for all ports is Auto This setting automatically detects and budgets the amount of power required by the device connected to the port For each port you can...

Page 24: ...ick Apply After you click Apply allow the system to reboot when the following message is displayed Applying changes may power cycle PoE powered devices Server Management automatically refreshes the sc...

Page 25: ...time 3 Enter text in the Filter field to apply a filter to the log listings 4 Click the Sync button to display the updated logs Providing Device Logs for Support 25...

Page 26: ...in the same site You can install the latest version of the ACC Client software on a network workstation with network access to the Internet 1 Open a web browser from a network workstation with networ...

Page 27: ...pport software Once your license is activated you can immediately use the new licensed features Connect to Avigilon Cloud Services After activating your ACC software you can connect your ACC site to t...

Page 28: ...ey click Remove Last Key l To clear all the product keys click Clear 5 Click Activate Now 6 Click OK Offline Activation Offline licensing involves transferring files between a computer running the ACC...

Page 29: ...er an error while activating a previously deactivated license this may be the issue Contact Avigilon Technical Support for help You can deactivate individual licenses and activate them on a different...

Page 30: ...nactive and must be reactivated to confirm system changes If you do not reactivate the affected licenses the site will stop normal operations 1 In the New Task menu click Site Setup 2 Click the site n...

Page 31: ...4 In the License Management dialog box click Apply 5 Select the bin file and click Open 6 Click OK to confirm your changes Reactivating a License 31...

Page 32: ...N1 Alarm Inputs Active Low inputs To activate connect the Input to the Ground pin GND To deactivate leave disconnected DI2 IN2 DI3 IN3 DI4 IN4 DI5 IN5 DI6 IN6 GND_DI1_2_3 Ground pin for Inputs 1 2 and...

Page 33: ...PoE Swich Left Yellow On Port is delivering PoE power Off Port is not delivering PoE power Blinking Port is not delivering PoE power but PoE camera is connected Right Green On Network link is present...

Page 34: ...s the amount of power loss in the cable is known use the following estimates l If the device uses less than or equal to 16 W expect 2 5 W of power loss l If the device uses more than 16 W expect 4 5 W...

Page 35: ...rver and receives a certificate identifying the Google Mail server The ACC software verifies the certificate by confirming the CA that signed the Google Mail certificate is from the system level list...

Page 36: ...does not accept the CSR use the certificate issuer s preferred method to generate the CSR 2 After you receive the crt file containing the new certificate from the certificate issuer save it to a loca...

Page 37: ...trusted CAs to the ACC software when it tries to access the mail server The certificate cannot be verified unless a certificate signed by that CA is uploaded to the User Certificate Authorities tab o...

Page 38: ...d 8 Port Appliances in a site at the same time Refer to the procedure for upgrading servers in a site in the Help files provided with the ACC Client l You can use the Server Management page using the...

Page 39: ...vice will reboot several times during the upgrade The Web UI Communication Lost message appears while the device is rebooting The process takes several minutes When the device has rebooted the connect...

Page 40: ...deos will not be lost The reset button is located behind the locked panel on the front of the ACC ES Rugged 8 Port Appliance To reset the appliance 1 Unlock and open the front panel using the provided...

Page 41: ...has resumed a Access the Server Management page sign in page and log in For more information see Starting and Stopping Server Management on page 16 b On the Storage panel of the web interface launch p...

Page 42: ...amed factory_restore 2 Insert the USB memory drive into any of the USB ports 3 If the appliance is part of a merged Site or parent child Site family configuration a Remove it from the Site before doin...

Page 43: ...reenter the correct IP address via its web UI It is highly recommended to be in the same IP subnet as the other servers in the ACC Site b If the appliance is not part of a merged Site activate its li...

Page 44: ...settings for the appliance after you configure it so that they can be restored if you ever need to replace the storage SSD Whether replacing a failed SSD or a functioning one some downtime is required...

Page 45: ...he navigation bar For more information see Monitoring and Disconnecting the Storage SSD on page 21 c On the Storage panel of the web interface launch page click The status changes to and changes to in...

Page 46: ...SD c Put the tray onto the sliding drawer d Push the blue tab inwards until you hear a faint click as the SSD physically connects to the appliance The status of the SSD in the Storage panel of the web...

Page 47: ...ning messages that differ slightly depending on the browser If the browser is l Chrome Click Advanced on the first screen and Proceed to IP address unsafe on the second screen l Firefox Click Advanced...

Page 48: ...ommand arp a 3 Scroll through the response and look for the IP address corresponding to the MAC address If none of the above suggestions resolve the problem contact Avigilon Technical Support Network...

Page 49: ...and software and firmware upgrades visit avigilon com support Technical Support Contact Avigilon Technical Support at avigilon com contact Limited Warranty Avigilon warranty terms for this product are...

Reviews: