background image

AVG-UHMS44 


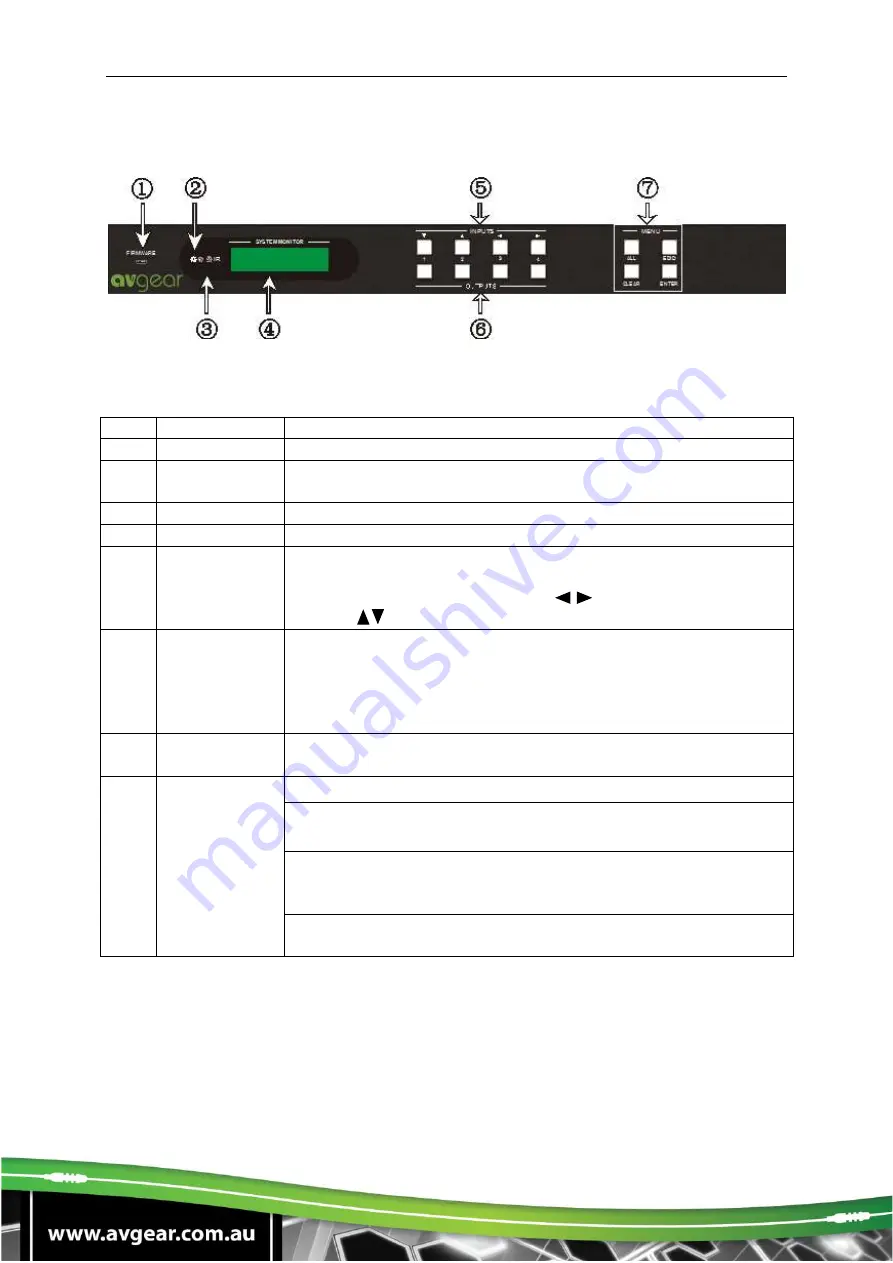
3. Product Appearance of the AVG-UHMS44 

3.1. Front Panel 


No. 

Name 

Description 


Firmware 

Micro USB port for updating firmware 


Power 
Indicator 

Illuminates red when power on. 


IR 

In-built IR sensor, receive IR signals sent from IR remote. 


LCD Screen 

Displays real-time operation status. 


INPUTS/ 
Menu buttons 

Normal mode: Back-lit buttons, ranging from "1" to "4". 
Inquiry mode (buttons 1~4): Press “ENTER” for more than 3 
seconds to enter this mode. Dial     to select different 
menus, 

 to select different options. 


OUTPUTS 
buttons/ 
EDID 
Management 
buttons 

Normal mode: Back-lit buttons, ranging from "1" to "4". Output 
1~2 support synchronous local HDMI output. 
EDID Programming mode: press and hold EDID button for 3 
seconds or more to enter this mode, in this mode, button 1, 2 
are used to switch to the previous/ next EDID data. 


Function 
buttons 

ALL

: Select all inputs/ outputs.


Function 
buttons 

ALL

: Select all inputs/ outputs.


EDID 

management button: Enable input port to manually 

capture and learn the EDID data of output devices.


CLEAR: 

Withdraw an operation like switching output channel, 

learning EDID data before it comes into effect. Meanwhile, 
the matrix will return to its previous status. 

ENTER:

 Confirm operation. Press and hold it for 3 seconds to 

enter into Inquiry mode. 


Note:

 Pictures shown in this manual are for reference only. 

Summary of Contents for AVG-UHMS44

Page 1: ... for 8m via the HDMI port 35m via the HDBT port 4 x HDBaseT outputs for transmission up to 70m at 1080p and 35m at 4Kx2K on a single CAT5e 6 cable Supports PoC LCD indicator shows real time I O connection status switching status HDCP status and output resolution Controllable via front panel RS232 IR and TCP IP Supports bi directional IR RS232 control Built in GUI for TCP IP control Powerful EDID m...

Page 2: ...ation instruction only and not to be used in a maintenance capacity The functions described in this version are current as at March 2015 Any changes of functions and operational parameters will be updated in future manual versions Please refer to your dealer for the latest product details Version 1 0 1 3 15 ...

Page 3: ...sed to extreme hot or cold temperatures 3 This unit will generate heat during operation please ensure that you allow adequate ventilation to ensure reliable operation 4 Please disconnect the unit from mains power if it will be left unused for a long time 5 Please DO NOT try to open the casing of the equipment DO NOT attempt to repair the unit Opening the unit will void the warranty There are high ...

Page 4: ...Connection 5 1 1 EDID Management 5 1 2 Inquiry 5 1 3 Clear Operation 5 1 4 IR Control 5 2 Usage of IR Remote 5 2 1 IR Operations 5 2 2 RS232 Control 5 3 Connection with RS232 Communication Port 5 3 1 Installation of the RS232 Control Software 5 3 2 Basic Settings 5 3 3 RS232 Communication Commands 5 3 4 RS232 Control Modes 5 3 5 Control via a 3rd Party Device Locally 5 3 6 Bi directional RS232 Con...

Page 5: ... management and HDCP 1 2 Features Supports HDMI 1 4 4Kx2K 1080p 3D HDCP1 4 compatible supports manual HDCP management and is auto detection Transmits 4Kx2K signal for 8m via HDMI port 35m via HDBT port 4 HDBaseT outputs for transmission up to 70m at 1080p and 35m at 4Kx2K on a single CAT5e 6 cable Supports PoC LCD indicator shows real time I O connection status switching status HDCP status and out...

Page 6: ...2 cable 1 x IR Receiver 4 x Plastic cushions 4 x Screws 1 x IR remote 1 x Power Adapter DC 24V 2 5A 8 x Pluggable Terminal Blocks 4 x IR Converting Cables 12V 1 x User manual Note Please confirm if the product and the accessories are all included if not please contact your dealer ...

Page 7: ...Back lit buttons ranging from 1 to 4 Output 1 2 support synchronous local HDMI output EDID Programming mode press and hold EDID button for 3 seconds or more to enter this mode in this mode button 1 2 are used to switch to the previous next EDID data Function buttons ALL Select all inputs outputs Function buttons ALL Select all inputs outputs EDID management button Enable input port to manually cap...

Page 8: ...ceiver the communication protocol must be the same with AVG UHMS44 HDMI HDMI output port connect with HDMI displayers deliver same input signals with HDBaseT ports split HDMI output for local monitoring HDBaseT Works with HDBaseT receivers such as HD300 It can extend AV IR and RS232 signal to 70m distance Meanwhile it can provide power for the receivers which support PoC AUDIO HDMI de embedded ste...

Page 9: ...rence systems television broadcast education banking and security institutions etc 4 2 Usage Precautions 1 System should be installed in a clean environment with temperature and humidity maintained to within equipment specification 2 All of the power switches plugs sockets and power cords should be insulated and safe 3 All devices should be connected before power is turned on 4 3 Connection Diagra...

Page 10: ...cluded IR remote via its built in IR sensor or through external IR receiver connected to the IR IN IR EYE IR ALL IN port The IR signal can be transmitted bi directionally between AVG UHMS44 and far end receivers Step 7 Connect a DC 24V power adapter to the AVG UHMS44 Note IR receivers connected to IR IN IR ALL IN should have a carrier If not send RS 232 command 0900 or 0901 to activate native carr...

Page 11: ...ral outputs Operation input output output ENTER Example Switch input 2 to output 2 4 3 To select an input to all outputs Operation input ALL ENTER Example select input 1 to all outputs Note Indicators of the pressed buttons will blink green for three times if the switching is done then turn off If the switching has failed they will be off immediately 5 1 2 EDID Management AVG UHMS44 features EDID ...

Page 12: ...Output Button EDID Data 1 1080P 3D 2CH 2 1080P 3D Multichannel 3 1080P 2D 2CH 4 1080P 2D Multichannel 5 3840x2160 2D 30Hz 6 4096x2160 2D 30Hz Press and hold EDID for 3 seconds to enter EDID programming mode in this mode use output buttons 1 2 to switch among the 5 embedded EDID data Then press ENTER to confirm programming Format Press and hold EDID for 3 seconds INPUTS OUTPUTS 1 2 ENTER Operations...

Page 13: ...atus of inputs Y means the corresponding port is connected with input device N means not Check the connection status of outputs Y means the corresponding port is connected with output device N means not Correspondence between inputs and outputs Shows the correspondence between the 4 inputs and 4 outputs Check if the input is with HDCP Y means the input signal is with HDCP N means not Check if the ...

Page 14: ... standby mode Input channels range from 1 4 buttons 5 8 are not available corresponding IR signal switched synchronously when switching input channels Menu buttons ALL EDID and CLEAR have the same functions as front panel buttons Please refer to 4 1 Front Panel Button Control for details Navigation buttons ENTER Confirm button OUTPUTS buttons 5 8 are not available In normal mode output channel sel...

Page 15: ...correspond with 4 HDMI input ports separately in default mode a Sending command reference to 4 3 RS232 Control x1 R x2 x1 Corresponding to the 4 IR OUT ports of the matrix the IR transmitter connected to this port can be placed at IR receiving area of output device or AVG UHMS44 itself x2 Corresponding to the zone receive IR signal from HDBaseT receiver with IR IN port connects with IR receiver nu...

Page 16: ...cing mode and then IR signal can be transferred to IR OUT port 3 IR control setting Controlling a far end output device from local point Connect an IR receiver with IR carrier to the IR IN port of AVG UHMS44 users can control far end output displayer via its IR remote from local In that case the IR signal is transferred via twisted pair Only the corresponding IR OUT port can emit control signals t...

Page 17: ...m a remote receiver location It is also possible to control local source devices with their IR remote from remote too When using the IR signal received by the HDBaseT receiver will be transmitted to the corresponding IR OUT port of the AVG UHMS44 See below Control local device from remote ...

Page 18: ...ed 5 Gnd Ground 6 N C Unused 7 N C Unused 8 N C Unused 9 N C Unused 5 3 2 Installation Uninstallation of RS232 Control Software Installation Copy the control software file to the computer connected with the Matrix Uninstallation Delete all the control software files in corresponding file path 5 3 3 Basic Settings Firstly connect the UHMS44 with an input device and an output device Then connect it ...

Page 19: ...se set the parameters of COM number baud rate data bit stop bit and the parity bit correctly only then will you be able to send command in the Command Sending Area Parameter Configuration area Monitoring area indicates whether the command sent works Command Sending area ...

Page 20: ...mands x All Transfer signals from the input channel x to all output channels X To All X 1 4 All Transfer all input signals to the corresponding output channels respectively like 1 1 2 2 All Through All Switch off all the output channels All Closed x Transfer signals from the input channel x to the output channel x X Through X 1 4 x Switch off the output channel x X Closed X 1 4 x Switch on the out...

Page 21: ...ot cut off the power supply to HDBaseT receivers press other buttons or send other commands to start STANDBY Y X Z HDCP management command Y is for input value I or output value O X is the number of the port if the value of X is ALL it means all ports Z is for working status value 1 or 0 Y X Z Y I O X 1 4 or ALL Z 1 0 DigitAudioON x Enable HDMI audio output of port x X 1 2 3 4 enable this port X 5...

Page 22: ...her but taken without action to corresponding HDBaseT receiver And its command function will be effective almost at the same time when you send the command PWON for item c or PWOFF for item d Note A E are for port 1 B F are for port 2 C G are for port 3 D H are for port 4 X is for baud rate its value ranges from 1 to 7 1 2400 2 4800 3 9600 4 19200 5 38400 6 57600 7 115200 is for data max 48 Byte Y...

Page 23: ...nections of HDBaseT ports Please send the EDID file EDID x y Set the EDID data of input port x to built in EDID No y y 1 5 correspond to the 5 embedded EDID data separately EDID x y UpgradeIntEDID x Upgrade one of the 5 embedded EDID data x is the serial number for EDID data 1 1080P 3D 2CH 2 1080P 3D Multichannel 3 1080P 2D 2CH 4 1080P 2D Multichannel 5 3840x2160 2D 30Hz When the switcher gets the...

Page 24: ...rrier Carrier native Force carrier 9964 Check the IP address IP 192 168 0 178 default 9971 Check the connection status of the inputs In 01 02 03 04 Connect Y Y Y Y 9972 Check the connection status of the outputs Out 01 02 03 04 Connect Y Y Y Y 9973 Check the HDCP status of the inputs In 1 2 3 4 HDCP N N N N 9974 Check the HDCP status of the outputs Out 1 2 3 4 HDCP N N N N 9975 Check the I O conne...

Page 25: ...RS232 port or you can just connect any one of the HDBaseT receiver s RS232 port with PC RS232 command can be transmitted to the AVG UHMS44 via the twisted pair By using RS232 control software and with the right specification settings you are able to control the AVG UHMS44 Controlling the AVG UHMS44 from local PC Control the AVG UHMS44 from local Controlling the AVG UHMS44 from a remote device Cont...

Page 26: ...trolled device and connecting the RS232 port of corresponding HDBaseT receiver with controlled device or PC the RS232 signal is able to be transmitted bi directionally Control far end device locally Connect the RS232 3 pin pluggable terminal block port in any zone to PC and connect the controlled RS232 device 3rd party device to the corresponding same zone as PC receiver see below Control far end ...

Page 27: ...ateway is 192 168 0 1 and Serial Port is 8080 IP Gateway can be changed as you need Serial Port cannot be changed Controlled by Single PC Connect a computer to the HDBT port of the AVG UHMS44 and set its IP address and gateway to the same IP and gateway as the AVG UHMS44 s Default 192 168 0 178 Same IP and gateway as the switcher ...

Page 28: ...teway to the same as the AVG UHMS44 s Do please remember the PC s original IP address and gateway Step 3 Set the AVG UHMS44 s IP address and gateway to the same IP section as the router Step 4 Set the PC s IP address and gateway as the original one Step 5 Connect the AVG UHMS44 and PC s to the router PC s within the LAN are able to control the AVG UHMS44 asynchronously 5 4 2 GUI for TCP IP control...

Page 29: ... interfaces Main Interface shown after logging in provides intuitive I O connection switching See the screenshot below The button matrix displays every possible connection between every input and output users can make connections by clicking corresponding buttons Buttons 1 9 at the right bottom corner provides quick saving and recall for overall connection status Users Display or modify credential...

Page 30: ...AVG UHMS44 If there is any modification press Save to restore the settings or press Cancel to withdraw Interface Set title bar label LCD readout and button labels press Save to save the settings ...

Page 31: ...k and Gateway Note Log in as user access main interface only 5 4 3 GUI Update GUI for AVG UHMS44 supports online updating at http 192 168 0 178 100 Type the username and password the same as the GUI log in settings modified password will be available only after rebooting to log in the configuration interface After that click Administration at the source menu to get to Upload Program as shown below...

Page 32: ...you are able to upgrade it through the update exe file Copy the exe file to the PC in controlled and double chick the program to upgrade the firmware When the program is running normally it will enter into the interface as shown in the next figure please press the button and choose the upgrade file downloaded and then press the button It is ready to upgrade When updates all are done it will appear...

Page 33: ... manual HDCP management Audio General Output Signal Stereo audio Digital audio Output Connector 4 3 pin pluggable terminal blocks 4 Coax RCA Stereo Output Earphone output distortion 0 1 32Ω 70mW 1KHz 0 1 16Ω 105mW 1KHz support PCM Coax Output Supports PCM Dolby Digital DTS DTS HD Frequency Response 20Hz 20KHz Control Parts Control Ports 4 IR OUT green 4 IR IN black 1 IR EYE black 1 TCP IP female R...

Page 34: ...AVG UHMS44 7 Panel Drawing ...

Page 35: ... front panel buttons Front panel buttons are locked Send command Unlock or select unlock in GUI interface to unlock Cannot control the device via IR remote Flat Remote Battery Change battery Faulty Remote Send it to authorized dealer for repairing Beyond the effective range of the IR signal or not pointing at the IR receiver Adjust the distance and angle and point right at the IR receiver The IR r...

Page 36: ...ers Type in correct RS232 communication parameters Baud rate 600 Data bit 8 Stop bit 1 Parity bit none Broken RS232 port Send it to authorized dealer for checking Static becomes stronger when connecting the video connectors Bad grounding Check the grounding and make sure it is connected well Cannot control the device by RS232 IR remote front panel buttons The device has a previous fault Send it to...

Reviews: