background image

Button 

Function 

11. Hang up* 

End the call. 

12. Battery compartment cover 

Press (toward down) it to open for battery installation. 

Function requires AVer PTZApp 

Remote Controller Battery


[Note] 

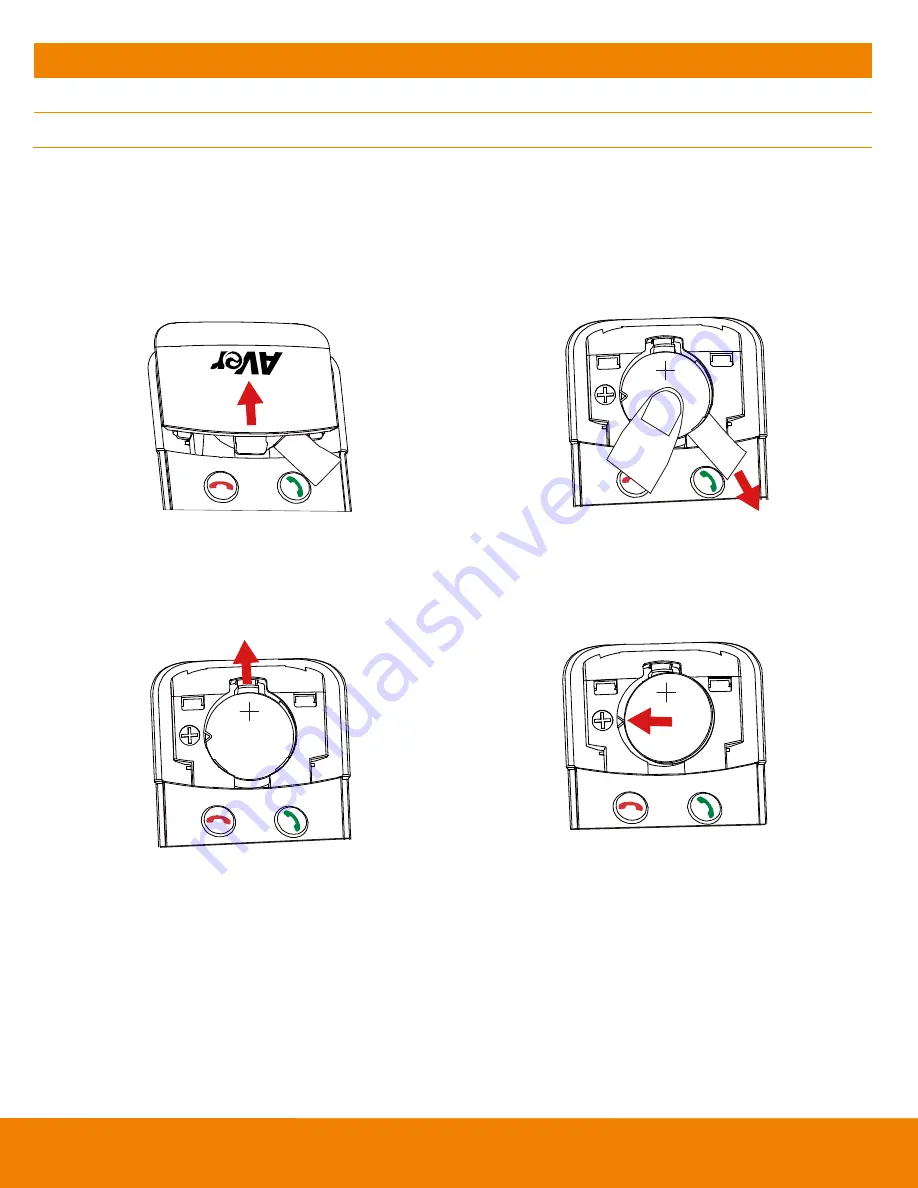
Remove the battery film tab before first use. 

1.  Push and press remote cover toward back end. 

2.  Lightly touch battery and completely pull out 

the film tab blocking the battery. 

1.


2.


To replace the battery. 

1.  Press clip holder toward back end to release 

the battery. 


2.  Place new CR232 b side up under the       

triangle contact and clip. 


Summary of Contents for VC322

Page 1: ...VC322 User Manual ...

Page 2: ...et on a circuit different from that to which the receiver is connected Consult the dealer or an experienced radio TV technician for help FCC Caution Any changes or modifications not expressly approved by the party responsible for compliance could void the user s authority to operate this equipment DISCLAIMER No warranty or representation either expressed or implied is made with respect to the cont...

Page 3: ...cool and dry place Do not throw away used batteries in the trash Properly dispose used batteries through specially approved disposal methods Remove the batteries if they are not in use for long periods of time Battery leakage and corrosion can damage the remote control Dispose of batteries safely and through approved disposal methods Do not use old batteries with new batteries Do not mix and use d...

Page 4: ... Camera 2 Speakerphone 2 Remote Controller 3 Remote Controller Battery 4 Setup VC322 5 Device Connection 5 Using cable retainer 6 Use VC322 7 Make a Video Call 7 LED Indicator 7 AVer PTZApp 8 Install AVer PTZApp 8 Use AVer PTZApp 8 Full Screen Mode 14 ...

Page 5: ... Camera 2 Speakerphone 3 Power plug Power adapter 4 Remote Controller 5 USB cable 6 Speakerphone cable 7 Cable retainer x4 8 Quick start guide The power plug will vary depending on the standard power outlet of the country where it is sold ...

Page 6: ...2 Product Introduction Camera 1 2 3 4 5 6 1 IR Sensor 4 Camera in port 2 Power indictor 6 USB port 3 Power port Reset button Speakerphone 1 2 3 4 1 Camera out port 3 Mute 2 Volume down 4 Volume up ...

Page 7: ...osition and three times for preset 3 position 5 Preset Press to get back to home position that user has set Move camera to desired position Press and hold the preset button until saved message is displayed on screen Select preset position button 0 3 to save current camera position 6 Mute Unmute Speakerphone Mute Unmute the speakerphone 7 Zoom in Zoom out Increase Decrease the camera zoom 8 Volume ...

Page 8: ...emote Controller Battery Note Remove the battery film tab before first use 1 Push and press remote cover toward back end 2 Lightly touch battery and completely pull out the film tab blocking the battery 1 2 To replace the battery 1 Press clip holder toward back end to release the battery 2 Place new CR232 battery side up under the triangle contact and clip ...

Page 9: ... cable to connect the camera and speakerphone refer to diagram above 2 Use USB cable to connect to your laptop PC refer to diagram above 3 Connect the power to the camera and camera head will rotate and the camera power indictor will light up If the video signal is weak please connect to the USB port on the back side of the computer ...

Page 10: ...ypeTM Microsoft LyncTM Google Hangout Cisco WebEx GoToMeetingTM WebRTC and etc select VC322 as your video and audio device Using cable retainer Fix the USB cable to prevent speakerphone fall 1 Paste the cable retainer on the desktop position 1 or side of desk position 2 2 Open the cable retainer 3 Place the USB cable into cable retainer 4 Secure the cable retainer to prevent cable off Position 1 P...

Page 11: ...r guide You can now make your call 4 The VC322 is a plug and play conference camera The system requires no special drivers but we do recommend installing the AVer PTZApp for a better user experience For information on how to install and use the AVer PTZApp refer to the AVer PTZApp section in this user manual LED Indicator Camera Status LED Starting Camera head is rotating Normal live video Solid b...

Page 12: ...t will be displayed on your video application interface Click on it to accept the plug in your video application can now be control by AVer PTZApp and remote control If you have the Skype plug in checked during the installation a plug in request will be displayed in Skype Click on the Skype plug in request to accept the plug in this enables and funcationality on the Remote Control 2 During your vi...

Page 13: ...nected to this PC Mac PTZApp is running you can click on the drop down list to select other AVer VC or CAM device Function icon Click it to switch to the function s page PTZ To control the camera direction zoom in and out and to enable disable the backlight compensation during your video call The remote controller selection function is not support for VC322 ...

Page 14: ...alues click the Factory Default button Diagnostic Utility To display the S W and F W version and the devices connection status You can also test the camera and speakerphone status and update the firmware of the camera Minimize Minimize the app to system tray To quit the application right click the icon on the system tray and select Quit ...

Page 15: ...e sure all are correct and well connected Normal Un normal Connection diagnostic Display devices connection status If the AVer PTZApp has detected that some of the devices camera speakerphone and laptop PC are not connected well the diagram will display an X on the device to indicate the connection has a problem If the camera is in use by another application it will display Can t start video warni...

Page 16: ...live video Also you can adjust the camera direction and view of the zoom in out To leave the page click the Abort Diagnostic button Test Speakerphone Click to check the speakerphone status It will require the user to record a short message and play it back to ensure the speakerphone is working ...

Page 17: ...l be downloaded first then the new firmware will be uploaded to camera Note Before updating the new firmware to the camera please make sure camera and laptop PC are all well connected and stay connected during the entire process Download new firmware Update new firmware to camera 4 To update the firmware manually click Manual Update and locate the new firmware to start the process Troubleshooting ...

Page 18: ...se to the right corner bottom of the video screen and a icon is displayed on video screen Click icon and video screen will switch to full screen mode In full screen mode user can use direction panel to control camera direction Click icon can go back to normal screen view ...

Reviews: