background image


30 

3.12 

Customize Definitions of the Mouse 

To re-define the mouse: 

1.


Click the 

Setup

 button 

 and in the 

Setup

 dialog box, select 

Input Setting

 in the left pane. 

Then click on the 

Mouse 

icon on the left pane. 

2.


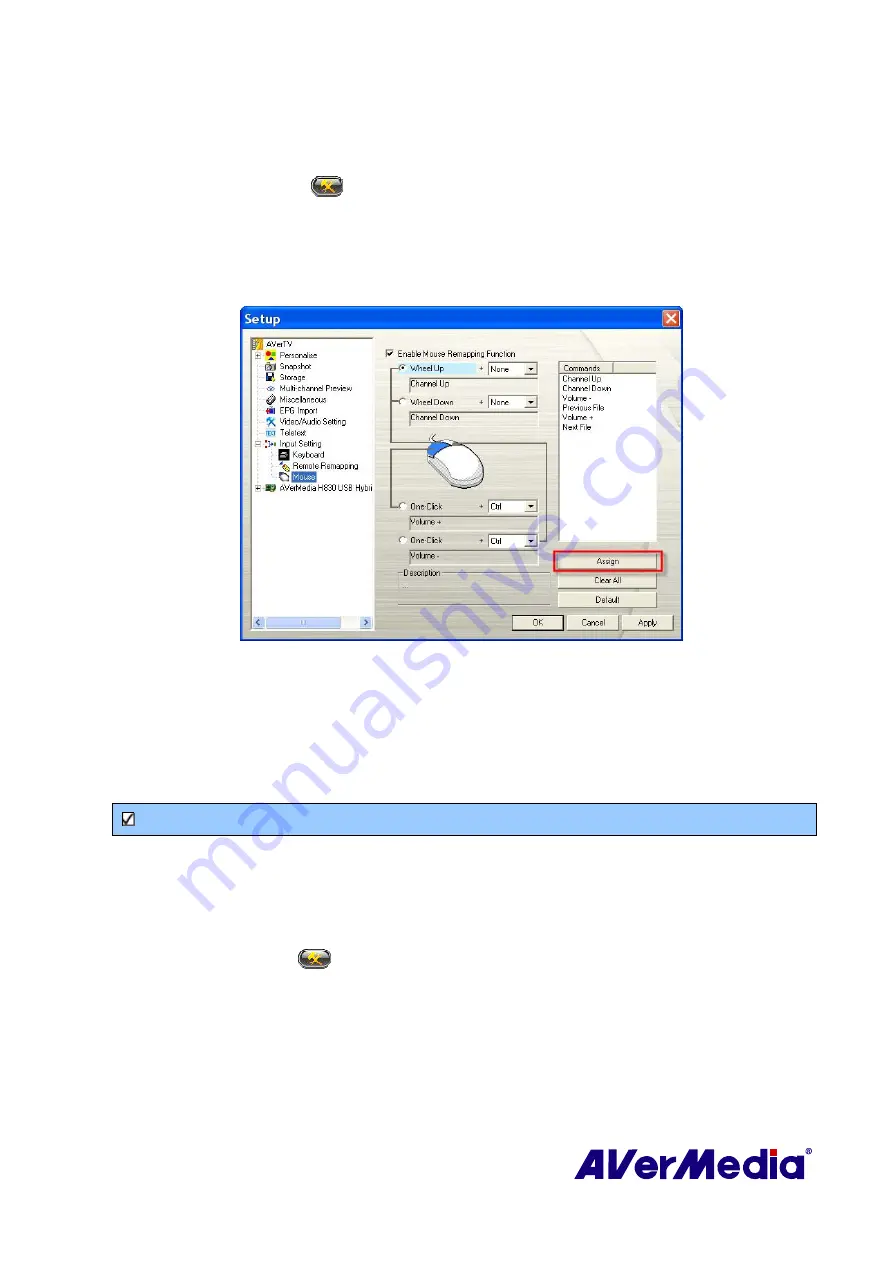
To re-define a function for a certain button, select 

Wheel Up

Wheel Down 

or 

One-Click

 and the 

desired item from the drop down list. Then choose a new command from the right pane of the 
dialog box. Then click 

Assign


(This picture is only for reference.)


3.


Click 

Apply

 to save the settings. 

4.


Click 

Clear All 

to


delete all definitions of the mouse or click 

Default

 to revert to the factory 

setting.


3.13 

Customize Definitions of the Keyboard (Hot Keys) 


Note

: It is recommended to use an unassigned key to use as your new keys

.


You can use the default hot keys or create your own hot keys. 

To re-define the shortcut keys: 

1.


Click the 

Setup 

button 

. In the 

Setup

 dialog box, choose the

 Input Setting

, and click the 

Keyboard

 icon on the left pane. 

2.


Choose the signal status from the 

Category

 drop down list. 

3.


Choose a command that you want to specify a new hot keys. 

4.


Assign hotkey combination to the command that you use most often and then click 

Assign

. Or you 

can click 

Remove

 to delete hotkeys. 

Summary of Contents for AVerTV 6.3

Page 1: ...r reliability however no responsibility is assumed for inaccuracies The information contained in this documentation is subject to change without notice COPYRIGHT 2009 by AVerMedia TECHNOLOGIES Inc All rights reserved No part of this publication may be reproduced transmitted transcribed stored in a retrieval system or translated into any language in any form by any means without the written permiss...

Page 2: ...5 4 Remote Control Buttons Model 4 RM JX 20 3 5 5 Remote Control Buttons Model 5 RM KS 21 3 5 6 Remote Control Buttons Model 6 RM KV 22 3 6 Resizing the TV Monitor Window 25 3 7 Always on Top 25 3 8 Setting Windows Power Options 25 3 9 Minimize the Application 27 3 10 Change Definitions of the Remote Control Buttons 28 3 11 Customize the Remote Control Source Button 29 3 12 Customize Definitions o...

Page 3: ...6 4 3 1 Scanning Channels 56 4 3 2 Scanning Channels For Advanced Users 57 4 3 3 Customize Video Record Settings 59 4 3 4 Using the EPG Function 61 4 3 5 Fine Tuning Color of the Display 63 4 3 6 Enabling Subtitle Function 63 4 4 Adding and Deleting Program Lists 64 4 5 Selecting a TV Radio Channel 66 4 6 Creating Channel Groups 66 4 7 Adjusting Volume 67 4 8 Specifying A Channel Name or Descripti...

Page 4: ...trolling Optional 87 5 14 Viewing RDS Information Optional 88 Chapter 6 TimeShift 89 6 1 TimeShift Controls 89 6 2 Customizing TimeShift Settings 89 6 3 Using the TimeShift Function 91 Chapter 7 PVR 92 7 1 PVR Controls 92 7 2 Recording Settings 93 7 3 Using the Recording Function 93 7 4 Playing the Recorded Programs 93 7 5 Picture in Picture Display 95 Chapter 8 Image Capture 96 8 1 Before Capturi...

Page 5: ...Files 111 EPG File Mapping Index File idx 111 Editing AVerMedia EPG File Format avr 113 Satellite Internet Access for Windows XP only 116 Universal DVB Plug in for Microsoft Vista MCE only 118 Video Gaming Plug in for Microsoft Vista Windows 7 MCE only 119 Video Quality Enhancement Plug in for Microsoft Vista Windows 7 MCE only 120 ...

Page 6: ... using AVerTV 6 application Product Name AVerTV Hybrid Volar HD Model No H830 TV System Digital TV DVB T ATSC DVB S Analog TV NTSC PAL SECAM Audio Mode Stereo Mono SAP FM Radio Support Not Support Remote Control Support Model 1 RM HR Model 2 RM FP Model 3 RM JC Model 4 RM JX Model 5 RM KS Model 6 RM KV Not Support External Signal Source S Video Composite Not Support Others Teletext MHEG 5 UK only ...

Page 7: ...apter 8 Chapter 9 Chapter 10 Chapter 11 Appendix Hot Keys Editing EPG Import Files Satellite Internet Access Universal DVB Plug in for Microsoft XP Vista MCE only Video Gaming Plug in for Microsoft Vista Windows 7 MCE only Video Quality Enhancement Plug in for Microsoft Vista Windows 7 MCE only Note DVB is a registered trademark of the DVB Project ...

Page 8: ...s your favorite ball games soaps or game shows anymore because the TimeShift function performs background recording of a TV program This means you can return and watch from the part of the program where you left off To enjoy high quality TV or radio programs AVerMedia product is your best choice Please be noted that the functions or the remote control mentioned in this manual may vary depending on...

Page 9: ...s choose AVerMedia AVerTV 6 and then click AVerTV 6 Another way is to double click the AVerTV 6 program icon on the desktop Or you can double click the AVerQuick launcher located at the lower right corner of the screen Note AVerQuick allows to set the desired default application which means you can choose either AVerTV 6 or AVer MediaCenter as the default application when double clicking AVerQuick...

Page 10: ...he programs without scanning channels However if the location you choose is Others you still need to scan for channels For details please refer to the section Scanning Channels This picture is only for reference 3 2 1 Scanning for Analog Digital Programs 1 Choose your desired signal input Digital TV Analog TV or FM Radio on the left pane of the Setup dialog box Note Before choosing the signal inpu...

Page 11: ...ram Scan to search for available channels programs in your area This picture is only for reference 5 After scanning the active TV channels will be listed inside the box Click Apply to save the scanned channels Note Digital channels that are in red text indicate they are locked channels eg Adult channels 6 To exit the current dialog box click OK ...

Page 12: ...7 7 If you choose FM Radio or Digital TV in step 1 just repeat step 3 6 to complete the program scanning ...

Page 13: ...tup dialog box 2 Choose the switch type that is used by your satellite system This picture is only for reference 3 From the Satellite drop down list under Input 1 Input 2 Input 3 and or Input 4 choose the correct satellite Then click Apply to save the settings This picture is only for reference ...

Page 14: ...on if your LNB device is this type Custom When you choose this option click Edit to configure your own LNB information such as specifying an LNB name its frequency type input range etc For related data refer to the documentation that comes with your LNB device 5 Select Programs under the Digital TV icon on the left pane and click Program Scan to start the scanning process This picture is only for ...

Page 15: ... None This picture is only for reference If you choose Custom in step 3 above please keep doing the followings steps for setup 1 Click Edit to configure the satellite information 2 In the Satellite Information dialog box type in the satellite s name in the Satellite box This picture is only for reference 3 Specify the frequencies that you want to scan for available satellite programs ...

Page 16: ...se this option Universal Ku Band LNB or C Band LNB Choose this option if your LNB device is this type Custom When you choose this option click Edit to configure your own LNB information such as specifying an LNB name its frequency type input range etc For related data refer to the documentation that comes with your LNB device 6 Repeat steps 1 to 6 if you need to configure Input 2 Input 3 etc Then ...

Page 17: ...w Hide Video Frame 4 Stop 11 Minimize 5 TimeShift 12 Full Screen 6 Record 13 Exit 7 Volume The Control Panel provides button controls for selecting channels adjusting volume capturing images and more It has a panel display that shows the current channel number and channel name To display or hide the Control Panel click the button located at the lower left corner of the TV Monitor ...

Page 18: ...Timeshift mode Move backward in intervals 6 Change Video Source Switch between analog TV digital TV or S video 7 Radio Source Switch between FM radio and DVB T radio Only access to DVB T Radio Broadcast not Digital Audio Broadcast system 8 Audio Mode Switch between available audio modes 9 Teletext View Teletext PAL SECAM Closed Caption NTSC information 10 EPG View EPG information digital TV analog...

Page 19: ...ings Customize the TimeShift function 25 Program List Display the and adjust color volume and so on 26 Slider Playback Speed List Playback mode Right click on the slider to select playback or fast forwarding speed 27 Time Display Spectrum Analyze Display time and spectrum analyze Click on the time area on the panel to switch between time and spectrum analyze display 28 Channel Display Display and ...

Page 20: ...orner of the screen choose Setting Remote control tab and select check boxes next to the device name Please check your supported remote control model before activating this function 3 5 1 Remote Control Buttons Model 1 RM HR 1 2 3 4 5 6 7 Button Description 1 Power Turn on off the application 2 VOL Volume up down 3 Source Switch between available signal sources 4 Numeric Buttons Select a TV channe...

Page 21: ...al time TV or Radio mode 10 Forward Advance the playback Jump to the Teletext page of the corresponding color according to this button 11 SLEEP Go to the next file in the playlist Set the time to put your computer in Stand By or Hibernate mode Jump to the Teletext page of the corresponding color according to this button 12 MENU Display or hide the Control Panel 13 EPG Launch the Electronic Program...

Page 22: ...tton 18 Record Switch to PVR mode and record the current program or video into your hard drive 19 MUTE Turn on off the sound 20 CH Go up or down to the next active channel 21 SNAPSHOT Capture the on screen image to a bitmap file 22 DISPLAY Display information 23 SOURCE Switch between available signal source ...

Page 23: ...rding End the TimeShift mode and return to real time TV or FM mode 10 Forward Advance the playback Jump to the Teletext page of the corresponding color according to this button 11 Next File Go to the next file in the playlist Set the time to put your computer in Standby or Hibernate mode Jump to the Teletext page of the corresponding color according to this button 12 AUTOSCAN Display or hide the C...

Page 24: ...tton 17 Record Switch to PVR mode and record the current program or video into your hard drive 18 MUTE Turn on off the sound 19 CH Go up or down to the next active channel 20 SNAPSHOT Capture the on screen image to a bitmap file 21 DISPLAY Display information 22 TV FM Switch between available signal sources ...

Page 25: ...us file in the playlist Set the time to bring your computer out of Stand By or Hibernate mode Jump to the Teletext page of the corresponding color according to this button 13 Stop End the Playback or recording End the TimeShift mode and return to real time TV or Radio mode 14 Play Play the last recorded or played file 15 Record Switch to PVR mode and record the current program or video into your h...

Page 26: ... 7 Forward Advance the playback 8 Stop End the Playback or recording End the TimeShift mode and return to real time TV or Radio mode 9 Play PAUSE Play the last recorded or played file Freeze the playback 10 DISPLAY Display information 11 EPG Launch the Electronic Program Guide DVB T only 12 VOL Volume up down 13 CH Go up or down to the next active channel 14 Numeric Buttons Select a TV channel Und...

Page 27: ...te Control Buttons Model 6 RM KV Button Description 1 Turn on off the application 2 Turn off on the sound 3 Use numeric buttons to select a channel 4 Display TV in full screen 5 Change between available audio modes ...

Page 28: ... to this button 10 View Teletext Close Caption information 11 View EPG information This function is only available for digital TV 12 Record the current program 13 Play the selected file or temporarily freeze the playback 14 Go to the previous item in the playlist Set the time to bring your computer out of Stand By or Hibernate mode This function is only available for AVerTV 6 15 Move backwards in ...

Page 29: ...n is only available for AVer MediaCenter Teletext Mode Jump to the teletext page of the corresponding color according to this button 24 Channel up and channel down 25 Go back to the previous page This function is only available for AVer MediaCenter 26 Go to the main menu This function is only available for AVer MediaCenter Exit from CI CA Information dialog This function is only available for the ...

Page 30: ... Power Options This option allows you to put your computer in Stand By or Hibernate mode power off exit the application or log off from the computer while you are away from the computer Note Stand By Stand By is a state in which your monitor and hard disks turn off so that your computer uses less power Hibernate Hibernation is a state in which your computer shuts down to save power but first saves...

Page 31: ...an execution time 3 The time setting will be displayed on the TV monitor For details please see the description below Time setting mode Description Sleep 30 60 90 120 Minute s Your computer will go into Stand By or Hibernate mode in 30 60 90 120 minutes Now Your computer will go into Stand By or Hibernate mode in about 10 seconds Cancel Your computer will return to original settings 4 You can choo...

Page 32: ... system tray notification area click the Setup button and in the Setup dialog box click Miscellaneous icon on the left pane Then Select the To minimize application to the system tray check box Or clear the check box to simply minimize the application to a taskbar button This picture is only for reference ...

Page 33: ...ght pane of the dialog box drag the desired command and drop it on the remote button which you want to change the definition This picture is only for reference 3 Click Apply to save the settings 4 Click Clear All to delete all definitions of the remote control or click Default to revert to the factory setting Note For the following situations please select RM_USB_FP from the Type drop down list to...

Page 34: ...d in the Setup dialog box select Input Setting in the left pane Then click on the Remote Remapping 2 Select the signal source that you want from the Remote Control Source 3 Click the UP or DOWN button at the right side until the selected signal reaches the location you desire 4 Click Apply to save the settings Or click Default to revert to the factory setting This picture is only for reference ...

Page 35: ... Click Clear All to delete all definitions of the mouse or click Default to revert to the factory setting 3 13 Customize Definitions of the Keyboard Hot Keys Note It is recommended to use an unassigned key to use as your new keys You can use the default hot keys or create your own hot keys To re define the shortcut keys 1 Click the Setup button In the Setup dialog box choose the Input Setting and ...

Page 36: ...ned key to use as your new keys 3 14 Changing the OSD Attributes Click the Setup button and in the Setup dialog box click the Personalise icon on the left pane On this page you can customize the curtain effect LCD speed or appearance of the TV monitor and the control panel skin This picture is only for reference 1 Click the Setup button and in the Setup dialog box click on the Personalise icon on ...

Page 37: ...This picture is only for reference 4 Click Apply to save settings or click Cancel to abort without settings 3 15 Configurations Import and Export After setting up the device all configurations can be saved as a file adi Thus resetting up is unnecessary unless the adi file has been removed 1 To export the file of all configurations press Export button and the Save As Dialog will appear for users to...

Page 38: ...rol panel and then click Individual Channel Setting button 2 When a dialog box appears select Graphic Equalizer tab This picture is only for reference 3 Select Enable Graphic Equalizer check box to enable the function 4 Then choose the desired music style from the drop down list 5 If you just want to adjust sound effects of one specific channel select Configure the settings only for single channel...

Page 39: ...tem or Audio Mode from the drop down list The items in the drop down menu of Audio System and Audio Mode may differ based on the selected Video Standard 5 To apply the converted settings to all channels click Apply All button 6 Click Default button if you want to revert the factory settings 3 18 Customize Sound Card Settings Optional On the Sound Card setting page you can choose the available soun...

Page 40: ... In the Playback area select the output to use from the drop down menu This picture is only for reference 3 In the Record area on the same page you can select the input source to use from the drop down menu This picture is only for reference ...

Page 41: ...R can reduce color space transform costs and have better timing and synchronization mechanism that can balance CPU resource well To choose the video renderer you prefer 1 Click the Setup button and in the Setup dialog box click the Video Audio Setting icon on the left pane 2 In the Select Preferred Video Renderer area you can select preferred video renderer from the drop down list This picture is ...

Page 42: ...ystem if you choose Overlay Mixer the Aero Effect will be affected 2 You need to choose Overlay Mixer as the preferred video renderer to enable the function of display the live TV as your desktop wallpaper For more information please refer to the section Setting Live TV as Desktop Wallpaper 3 20 Setting Live TV as Desktop Wallpaper To set the live TV program as your desktop wallpaper just right cl...

Page 43: ...edia device in the left pane Note Make sure that your Country Region is correct a First select an available Avermedia device in the left pane b From the Region Country drop down list select your country or region c Click Apply to save the settings This picture is only for reference 2 Then select Analog TV On this page choose the TV option to search only for air channel select CATV to scan for cabl...

Page 44: ...e scanning progress from the progress bar After scanning the active TV Radio channels will be listed inside the box Click Apply to save the scanned channels This picture is only for reference 4 1 2 Scanning Channels For Advanced Users 1 Click Advance located at right lower corner in the Program Information section Then the Advance Program Configuration dialog box will appear This picture is only f...

Page 45: ... video and audio system If you want to revert to factory setting simply click Default button 4 1 3 Customize Video Record Settings To customize the video record settings please do the following 1 Click the Setup button and in the Setup dialog box click on the Analog TV icon on the left pane 2 Select the Record Format option 3 Determine the video file format to use for saving the recorded video fil...

Page 46: ...Or click Delete to remove the unwanted file format that you created 8 Click Apply to save the setting and click OK to exit the current dialog box To abort this operation click Cancel The WMA WMV MPEG 2 files are allowed to be customized For Advanced Users 1 Follow the previous steps but choose the WMA WMV or MPEG 2 file format in step 3 2 Click New In the Format dialog box select the WMA WMV MPEG ...

Page 47: ...the following Record Format dialog box This picture is only for reference 5 Here you can create your preferred video and audio configurations for video recording Then click SaveÆFinish 6 If you choose the MPEG 2 files you will see the following Video dialog box ...

Page 48: ...file will be saved in MPEG 2 format that is compliant with DVD standards Standard DVD frame size and frame rate are 720 x 480 pixels at 29 97 fps for NTSC and 720 x 576 at 25 fps for PAL AVI AVI is the most common video file format for playback on the computer It can be saved in uncompressed form if you want high quality video or compressed using any of the available codecs if you want to minimize...

Page 49: ... you to check the next succeeding program schedule and even the program schedules of the whole week For Analog TV the EPG needs to be imported manually Import analog EPG for the first time 1 If the EPG service is provided in your region country go to the TV website of your region country and download the EPG files ndx pdt avr 2 Click the Setup button and in the Setup dialog box click on the Analog...

Page 50: ...e refers to the TV programs of one channel Note After importing analog EPG for the first time the channels you ve chosen to import will be saved and listed in the EPG Mapping List However you still need to click on Import button to update and get the latest EPG information Note To see the imported EPG information just click the EPG button on the control panel to open the EPG window Note JTV format...

Page 51: ...ported EPG Note The Index file format idx can be edited by users For more information please refer to Chapter 12 Appendix Note After you import the index file you can still add more EPG files ndx pdt avr in the EPG Mapping List After clicking the Apply button all EPG files will be saved in the index you have chosen 4 1 5 Fine Tuning Color of the Display If the color or picture quality of the TV di...

Page 52: ... Sharpness until you get an accurate color 4 If you just want to adjust color of one specific channel select Configure the settings only for single channel and repeat step 3 To apply the converted settings to all channels click Apply All button 5 Click Default button if you want to revert to the factory settings ...

Page 53: ...desired option from the Video Quality Enhancement drop down list This picture is only for reference 4 If you just want to enhance video quality of one specific channel select Configure the settings only for single channel and repeat step 3 To apply the converted settings to all channels click Apply All button 5 Click Default button if you want to revert the factory settings 4 1 7 Using the De inte...

Page 54: ...49 This picture is only for reference 3 From the De Interlace drop down list try all the options to compare which can give you the best quality ...

Page 55: ...hannel data file sdx downloaded from the Internet into the application and then scan the stored frequencies for the latest digital satellite programs 1 Click the Setup button and in the Setup dialog box select an available AVerMedia device in the left pane Note Make sure that your Country Region is correct a First select an available AVerMedia device in the left pane b From the Region Country drop...

Page 56: ... box will appear Type in the desirable name and click OK This picture is only for reference 4 Click Import and the Import dialog box will appear This picture is only for reference 5 Click Browse and the Open dialog box will appear 6 Choose the desired channel data and click Open ...

Page 57: ...am name For duplicated program data the program names will be replaced by the imported data Import to satellite s frequency table The option will add the frequencies stored in the imported file into the selected satellite s frequency table Note It is highly recommended to choose Import to satellite s frequency table and then re scan the channels to obtain the latest program data This is because th...

Page 58: ... picture is only for reference Note All programs automatically classify into two categories Digital TV and Digital Radio Select Digital TV to display TV programs select Digital Radio to display radio programs ...

Page 59: ...n is correct a First select an available AVerMedia device in the left pane b From the Region Country drop down list select your country or region c Click Apply to save the settings This picture is only for reference 2 Then select Digital TV 3 Click Edit next to the satellite name where you want to add new frequencies The Satellite Information dialog box will appear 4 Specify the correct frequency ...

Page 60: ... click Modify To delete a single frequency Select the frequency that you want to remove and click the Remove button located on the lower left corner To delete the whole frequency table Click the Remove button located on the upper right corner 4 Click OK to exit the dialog box 4 2 4 Scanning Channels For Advanced Users 1 Click Advance located in the lower right corner of the Program Information sec...

Page 61: ...down list select your country or region c Click Apply to save the settings 2 Then select Digital TV 3 Click New and the Program List dialog box will appear Type in the desirable name and click OK 4 Then Click Program Scan to start the scanning process The application comes with a default frequency table therefore the application will use this table to search for active channels programs If you wan...

Page 62: ...annels 4 3 2 Scanning Channels For Advanced Users 1 Click Advance located at right lower corner in the Program Information section Then the Advance Program Configuration dialog box will appear This picture is only for reference 2 When there are channels missing from the channel memory select All Frequencies or Single Frequency ...

Page 63: ... be patient 3 Once you select Single Frequency you need to specify the correct Frequency for example 533000 KHz and Bandwidth 4 Then click Scan 5 After scanning new active channels programs will be memorized and listed in the left pane of the dialog box 6 Click Apply to save the scanned channels ...

Page 64: ... can choose Audio Only for sound recording This picture is only for reference 4 Click Apply to save the setting and click OK to exit the current dialog box To abort this operation click Cancel The WMA WMV files are allowed to be customized For Advanced Users 1 Follow the previous steps but choose the WMA or WMV file format in step 3 2 Click New In the Format dialog box select the WMA WMV file form...

Page 65: ...n create your preferred video and audio configurations for video recording Then click SaveÆFinish 6 Click Apply to save the setting and click OK to exit the current dialog box Note To determine the length of recording and to choose a destination folder in which to save the recorded audio please refer to the section titled Record Settings in Chapter 6 ...

Page 66: ...show the current and succeeding program information This picture is only for reference Our EPG window also allows you to preset a schedule for watching or recording programs Just select your favorite programs and click Record button or the Active TV Application button And the system will execute your command on schedule If the EPG data contains multiple languages you can click button to switch EPG...

Page 67: ...lect Using standard EPG time to adjust the EPG time according to Greenwich Mean Time This picture is only for reference Note If the EPG overview area is too small to display enough information click the bar to display more EPG overview area Click the bar again to show the EPG detail area This picture is only for reference ...

Page 68: ...ast Hue Saturation and Sharpness until you get an accurate color 4 If you just want to adjust color of one specific channel select Configure the settings only for single channel and repeat step 3 To apply the converted settings to all channels click Apply All button 5 Click Default button if you want to revert to the factory settings 4 3 6 Enabling Subtitle Function If your local broadcasters prov...

Page 69: ...ontinue the scanning process 5 Available channels will then be listed in the Program Information and now you can delete the unwanted programs by clearing the check box This picture is only for reference 6 Click Apply to save the setting and click OK to exit the current dialog box Or you can click Cancel to revert to the original settings OR If you don t want to scan programs every time creating a ...

Page 70: ...ton and in the Setup dialog box click the Analog TV or Digital TV icon on the left pane 2 From the program drop down list select the name of the group that you want to remove 3 Click Delete to remove the selected program list ...

Page 71: ...ric buttons to get your desired channel number OR Click the Program List button When the Program Panel appears select the Display Mode button Choose the desired program list from the drop down list and then double click on the desired channel This picture is only for reference Note Locked channels eg Adult channel are in red text 4 6 Creating Channel Groups To add a new channel group 1 Click the P...

Page 72: ...Adjusting Volume On the Control Panel click and drag your mouse over the Volume meter to increase or decrease the volume level You can also press the keys on the numeric keypad to adjust the volume OR 1 Right click on the TV monitor When a pop up menu appears select Individual Channel Setting Or click Program List button on the control panel and then click Individual Channel Setting button 2 When ...

Page 73: ... TV icon on the left pane 2 Under the Name column double click the text box of the channel you want to assign a name or description 3 Type in the channel name or description then press Enter OR 1 Click the Setup button and in the Setup dialog box click the Analog TV or Digital TV icon on the left pane 2 Click Advance located at right lower corner in the Program Information section Then the Advance...

Page 74: ...lick Analog TV or Digital TV icon on the left pane 2 Click Advance located at right lower corner in the Program Information section Then the Advance Program Configuration dialog box will appear This picture is only for reference 3 Type the desired name in the Program List Name text box 4 Press Apply to save the setting and click OK to exit the dialog box Or press Cancel to abort the saving ...

Page 75: ...am Configuration dialog box will appear This picture is only for reference 3 In the Program Information section select the unwanted channel and then click Delete This channel will be removed and that means you won t be able to access these programs anymore This picture is only for reference OR If you just want to skip a certain channel do the following 1 First select the unwanted channel in the Pr...

Page 76: ... feature To hide the edges of the picture z Right click on the TV Monitor and choose OverScan to enable it OR 1 Right click on the TV monitor When a pop up menu appears select Individual Channel Setting Or click Program List button on the control panel and then click Individual Channel Setting button 2 When a dialog box appears select Video tab This picture is only for reference 3 Use and to adjus...

Page 77: ...OverScan setting to one specific channel select Configure the settings only for single channel and repeat step 4 7 To apply the converted settings to all channels click Apply All button 8 Click Default button if you want to revert the factory settings 9 Clear Overcan check box if you want to disable overscan function You can see the difference from the pictures below Before using OverScan function...

Page 78: ...unction the people and the scenery in the image shall not be distorted To enable magic video effect function Right click on the TV monitor When a pop up menu appears select Enable Magic Video Effect You can see the difference from the pictures below Original Image Before using Magic Video Effect function After using Magic Video Effect function Note The Magic Video Effect function can only be enabl...

Page 79: ...g on these channels To select the channels for preview 1 Click the Setup button and in the Setup dialog box select an available Avermedia device in the left pane Then select Analog TV or Digital TV 2 On this page you can choose the channels for preview by clicking and adding beside the check box Clear if you want to delete the channels from the preview channel list This picture is only for referen...

Page 80: ...ck on that channel or use the arrow button of your keyboard and then press Enter You will then be tuned in to that channel 5 Or click the right mouse button or press ESC to return to the originally selected TV channel To modify the multi channel preview settings 1 Click the Setup button and in the Setup dialog box select Multi Channel Preivew on the left pane 2 Here you can determine preveiw cell ...

Page 81: ...re you can select Video Format and Audio Format from the drop down list Note Basically the higher source resolution and smaple rate you have the better visual and audio quality you get however it may consume larger amounts of CPU resources Please adjust it based on your PC hardware 4 Click Apply to save the setting and click OK to exit the current dialog box This picture is only for reference ...

Page 82: ...nction provides a variety of sound effects 1 Right click on the TV monitor When a pop up menu appears select Individual Channel Setting Or click Program List button on the control panel and then click Individual Channel Setting button 2 When a dialog box appears select Sound Mixer tab This picture is only for reference 3 Choose the desired sound effects from the drop down list 4 Then use or the sl...

Page 83: ...nction Gain Use to increase or to decrease the video output signal strength White Peak Recommended to enable it Enabling White Peak can avoid extreme or abnormal video luminance Color Peak Recommended to enable it Enabling Color Peak can avoid extreme or abnormal video color Log Pause AGC Recommended to enable it AGC Automatic Gain Control Enabling Log Pause AGC can avoid altering non video data A...

Page 84: ...Shift Pause 2 Channel Loop 17 Stop 3 Dot 18 Play Pause 4 Mute 19 Record 5 Backward 20 Help 6 Video Source 21 Setup 7 Radio Source 22 Program List 8 Audio Mode 23 Frequency Channel Selection 9 TEXT RDS It may vary depends on your device and your living area 24 Signal Strength 10 Info Display Area Spectrum Analyze 25 Signal Status Enable or Disable Repeat Play 11 Play List 26 RDS 12 Schedule 27 Chan...

Page 85: ...e left pane Then select FM Radio 2 Click New and the Program List dialog box will appear Type in the desirable name and click OK Note For Russian users clicking New to create a program list before scanning is a prerequisite step 3 Click Scan All active channels will be automatically scanned and memorized This picture is only for reference 4 To terminate the scanning click Stop 5 Click Apply to sav...

Page 86: ...s follow these procedures To manually rescan specific FM radio channels 1 Click the Setup button and in the Setup dialog box click FM Radio icon on the left pane 2 Enter the channel frequency that you want to start scanning in the text box This picture is only for reference 3 Select 0 01 MHz 0 05MHz or 0 1MHz as your tuning increment 4 Click to scan upward or to scan downward from the selected cha...

Page 87: ...e volume level You can also press the keys on the numeric keypad to adjust the volume OR 1 Right click on the TV monitor When a pop up menu appears select Individual Channel Setting Or click Program List button on the control panel and then click Individual Channel Setting button 2 When a dialog box appears select Audio tab 3 Use and to adjust the system volume or the device volume This picture is...

Page 88: ...2 In the Program column click the unwanted channel The check mark will be removed indicating that the channel will be excluded from your channel list and that you won t be able to access and hear them through the Channel Up Down button 5 7 Adding a Radio Frequency If the desired channel cannot be found through scanning follow the instructions below 1 Click the Setup button and in the Setup dialog ...

Page 89: ... your keyboard to specify the desired radio frequency numbers Use the numeric keys on the remote control to get your desired radio frequency numbers Note Under FQ mode there are three ways to key in the frequency numbers For instance to get the frequency of 91 7 MHz simply key in 91 7 917 or 9170 Under FQ mode if you click Frequency Up Down buttons on the Control Panel the radio frequency will inc...

Page 90: ... channel group do the following To add a new program list 1 Click the Setup button and in the Setup dialog box click FM Radio icon on the left pane 2 Click New and the Program List dialog box appears Type in a program name and click OK 3 Now you can start to scan FM radio channels and manage the scanned FM data for this new program list For more information refer to How to Auto Scan FM Radio Chann...

Page 91: ...to delete the unwanted group simply click Delete 5 12 Customize Audio Recording Settings To customize audio recording settings 1 Click the Setup button and in the Setup dialog box select an available Avermedia device in the left pane and choose FM Radio 2 Then select Record Format You can choose default format as your audio file format Or you can click New to create your own file format For file f...

Page 92: ...ation click Cancel Note To determine the length of recording and to choose a destination folder in which to save the recorded audio please refer to the section titled Recording Setting in Chapter 6 5 13 Sound Controlling Optional This function provides a variety of sound effects 1 Right click on the TV monitor When a pop up menu appears select Individual Channel Setting Or click Program List butto...

Page 93: ... converted settings to all channels click Apply All button 7 Click Default button if you want to revert the factory settings 5 14 Viewing RDS Information Optional RDS Radio Data System is an international standard for transmitting the digital data along with FM Radio signal An RDS capable radio can display name of the station program types local traffic information or commercials etc To view RDS i...

Page 94: ... to move to any part of the recorded program 3 Forward Click to skip forward in intervals 4 Stop Click to terminate recording and return to the live program 5 TimeShift Pause Click to perform background recording of the live program and play it back simultaneously Click to temporarily freeze the playback 6 Setup Allows you to Autoscan channels Create channel groups Configure snapshot settings Cust...

Page 95: ...e new settings and click OK to exit the current dialog box Or click Cancel to use the original settings To customize the file quality 1 Click the Setup button and in the Setup dialog box click the Analog TV FM Radio icon on the left pane 2 Then click Timeshift icon 3 If you want to save the video file select the Keep TimeShift Files check box 4 Here you can determine the buffer size video size bit...

Page 96: ...how you wish to watch or listen then release the mouse button 3 You can also click the Backward button to move backward in fixed intervals until you reach the part where you left off 4 To advance forward and skip some parts of the recording for example TV commercials drag the slider tab to the right You can also click the Forward button to move forward in fixed intervals 5 To temporarily pause the...

Page 97: ...ider tab to move to any part of the recorded file 3 Play List Click to create a playlist of video files to play back 4 Forward Click to switch to the next playback speed level 5 Play Previous File Click to go to the previous video file in the playlist 6 Play Next File Click to go to the next video file in the playlist 7 Stop Click to stop recording or playback 8 Play Pause Click to play back Click...

Page 98: ...ne the destination folder Click to choose a folder you want 6 Click Apply to save the settings and click OK to exit the current dialog box To abort this operation click Cancel 7 To determine the file format please refer to the section titled Customizing Video Recording Settings in chapter 3 or Customizing Audio Recording Settings in chapter 4 Note To hide the sound of the TV program when recording...

Page 99: ... all to delete all files in the playback list This picture is only for reference To repeat playback of the recorded video files 1 Right click the TV monitor select Playback and choose Repeat Once or Repeat All to enable the function To disable the repeat function just select Repeat Off 2 Or right click the repeat icon on the Control Panel In the pop up menu point to Repeat Once Repeat All or Repea...

Page 100: ...function Position Description Top left Corner Display the PIP window on the top left corner Top right Corner Display the PIP window on the top right corner Bottom left Corner Display the PIP window on the bottom left corner Bottom right Corner Display the PIP window on the bottom right corner Movable Resize the PIP window and separate it from the main window By default you will be able to play bac...

Page 101: ...he Album will then appear displaying thumbnails of the captured images BUTTON 1 Wallpaper 2 Save as 3 Remove 4 Remove All To capture another image click the Snapshot button on the Control Panel again New thumbnails will be added to the Album as you capture more images By double clicking on the thumbnails you can view images in a full screen window with default image viewer To display the captured ...

Page 102: ...ose Choose 24 bit to capture image in 16M colors Choose 8 bit to capture image in 256 colors 4 Click Browse to scan for folders and select a destination location for saving the image Then specify a file name for saving the captured image This picture is only for reference 5 Choose the image size In the Size section select the Standard option and choose a desirable image size from the drop down lis...

Page 103: ...surement unit from the Unit drop down list You can specify any image size you want The maximum capture size can be 1600 1200 6 Click OK to save the image Click Cancel if you do not want to save the image 8 3 Multiple Image Sequence Capture To capture a continuous sequence of images do the following 1 Click the Setup button In the Setup dialog box click the Snapshot icon on the left pane ...

Page 104: ...e if you specify 10 seconds an image will be captured every 10 seconds 4 On this page you can choose the file format and destination folder file name format and image resolution in advance 5 Click Apply to save the new settings and click OK to exit the current dialog box Or Click Cancel if you do not want to change the settings 6 Click the Snapshot button on the Control Panel to start capturing ...

Page 105: ...may not be available if there is no such service provided in your region or country 9 1 Customize the Display Mode 1 Click the Setup button and in the setup dialog box click the Teletext icon in the left pane 2 From the Display Mode drop down list choose Other Window Display to open a new Teletext window or choose Main Window Display to overlay the Teletext window on the TV monitor 3 Select the Tr...

Page 106: ... 2 Toolbar It includes buttons that gives quick access to perform certain frequently used functions from the Menu Bar 3 Status Bar Status bar is located at the lower left corner of the window It contains a short text message or explanation of the currently selected menu command 4 Title Bar This is located at the top of the window It contains the current displayed page number or in hexadecimal page...

Page 107: ...etext Window float over the top of other applications Teletext File Switches between the Teletext file which is opened from the previously saved file and the most recent Teletext information 9 4 LED Lamp Different LED color indicates different state Left LED Lamp Gray The system does not receive the Teletext broadcast data Green The system is receiving the Teletext broadcast data Right LED Lamp Gr...

Page 108: ...opy from the Edit menu Alt E C or press Ctrl C 3 You can then paste the contents of the Teletext page in TXT or BMP format to a document you are working with Saving a Teletext Page Some Teletext pages include a number of subpages If the file has subpages Teletext will also save the existing subpages 1 A Teletext page can be saved using one of the following ways To automatically save the file using...

Page 109: ...dialog box select the file containing the teletext page you want and click Open Opening Another Teletext Window To open another teletext window choose New Window from the File menu or press Ctrl W Closing the Active Teletext Window Choose Close Window from the File menu or press Ctrl L to close the active Teletext page window ...

Page 110: ...t indicates the schedule will be executed at a preset time Once the application starts to execute a scheduled task the system will clear the check mark automatically If you want to skip the schedule temporarily just clear the check box Schedule Management This displays a list of preset schedules you have created Modify Select a preset schedule and click this button to make changes Delete Click thi...

Page 111: ...elect Timeshift Note If you select Silent Record when the application is performing the recording task the icon will appear on the task bar the lower right corner of the screen To immediately watch or listen to the TV FM program which is being recorded just double click this icon 8 In the After Record Schedule it automatically switches to the selected power control mode when the schedule recording...

Page 112: ...e on Once Daily or Weekly Choose Once to perform schedule at a preset day and a preset time Choose Weekly to perform schedule every week at a preset day and time Choose Everyday to perform schedule everyday at a preset time 11 If you choose Activate AVerTV in step 4 click Insert to complete the settings If you choose Record or Silent Record you need to do the following 12 Click the Advance icon 13...

Page 113: ...se make sure that you have already connected to the Internet To do this 1 Right click on the TV monitor window When a menu list pop up choose About as shown at right 2 When an information dialog box appear click to access the product information webpage Or you can click to connect to our technical support webpage 3 To exit the current dialog box click www avermedia com ...

Page 114: ...reen F6 Display OSD information Display information on the TV monitor F8 Multi Channel Preview Press to perform Multi Channel Preview function on your numeric keypad Volume Press to increase or decrease the volume level LEFT RIGHT ARROW Rewind Fast Forward Press to rewind or fast forward for playback and TimeShift A Audio Mode Choose between available languages D Show Hide TV Monitor Panel Toggles...

Page 115: ...g Teletext page Page Down Next page Go to the succeeding Teletext page Home Home page Go the Teletext home page Note To customize the definitions of the Keyboard Hot Keys please refer to the section Customize Definitions of the Keyboard Hot Keys ...

Page 116: ...ements and Attributes All the keywords are case sensitive Statement aver_epg_mapping country name country ISO3 region location analog ch no channel number file_format file format number file name ch analog country aver_epg_mapping Tag Description aver_epg_mapping Indicating this file contains the mapping table of channels and EPG data analog Indicating all configurations in this tag are for analog...

Page 117: ...y name is based on ISO 3166 alpha 3 Example 1 First create a file named MyEpg idx 2 Then edit the file as below aver_epg_mapping country name RUS region Москва analog ch no 1 file_format 2 ch1 ndx ch ch no 2 file_format 2 ch2 ndx ch ch no 3 file_format 2 ch3 ndx ch analog country aver_epg_mapping ...

Page 118: ...MMDDHHMMSS start end start time YYYYMMDDHHMMSS end type program type number type parentrating parental rating parentrating program ch averepg Tag Description averepg Indicating this file contains EPG data ch Put all channel information inside this tag program Put all program information inside this tag description Optional The description of program content title Program name start The start time ...

Page 119: ...ype Optional 5 Youth 11 Special Parentrating Optional The programs can be watched or listened above this age You can fill 0 for all ages Note The abbreviation of country name is based on ISO 3166 alpha 3 Example 1 First create a file named MyEpg idx 2 Then edit the file as below Assume start time 2008 4 15 6 00 PM 200804151800 Assume end time 2008 4 15 7 30 PM 200804151930 ...

Page 120: ...ilable travel lines description start 200804151800 start end 200804151930 end type 2 type parentrating 12 parentrating program program title Live NBA title description Sports description start 200804151930 start end 200804152000 end type 4 type parentrating 0 parentrating program ch averepg ...

Page 121: ... the desired name in the Service Name text box 3 In the Switch Type section choose the type that is used by your satellite system 4 In the LNB MHz section configure your own LNB information such as input range 5 In the Tuner section specify the correct frequency symbol rate and polarization 6 In PID section enter the correct PID value If there are PID values missing it is recommended to use Auto D...

Page 122: ...es you to have an ISP account and a Modem for sending commands to the Internet Q Should I pay for Satellite Internet Access A The charge for the service will be mainly determined by your Internet Service Provider ISP For details about the fee rate please contact your ISP Q Why can t I activate Satellite Internet Access A You cannot activate AVerTV 6 AVer MediaCenter and Satellite Internet Service ...

Page 123: ...V Satellite PCI AVerTV Satellite Hybrid FM are shipped with a Universal DVB plug in program for Windows XP or Vista Media Center Edition MCE providing you to watch or record DVB S programs and analog programs for AVerTV Satellite PCI AVerTV Satellite Hybrid FM directly under MCE UI ...

Page 124: ... S Video signal source or play games in Vista MCE platform Playing games with MCE may cause delay but you can choose Video Gaming Plug In to avoid it and enjoy real time game play 1 1 Start the Media Center in Vista 2 2 Select Online Media Î program library 3 3 Select Video Gaming Plug In 4 4 Select the video source you want to view via Video Gaming Plug In 5 5 Click button to view images in a ful...

Page 125: ... program library in Online Media This function enables you to adjust the Brightness Contrast Hue Saturation and Sharpness until the image color is accurate The setting you made will be applied to Analog TV and composite S Video signal source 1 1 Start the Media Center in Vista 2 2 Select Online Media Î program library 3 3 Select Video Quality Enhancement Plug in 4 4 Select the item you want to adj...

Page 126: ... 4 Decrease the item value by 1 Reset the item value back to its default Increase the item value by 1 Increase Brightness and Hue values by 16 Increase Contrast and Saturation values by 8 Increase Sharpness value by 4 Increase Brightness and Hue values by 32 Increase Contrast and Saturation values by 16 Increase Sharpness value by 8 6 6 Click button to reset all items back to their default setting...

Reviews: