background image


To turn OFF the cellar, unlock the control panel then press the 

 button and hold 2 seconds.  


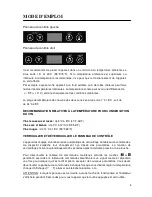
Temperature Control and Display 


1.  When the unit is plugged in all of the display and indicators will light for 3 seconds and an audible 

beep will be heard. 

2.  The temperatures in left zone and right zone can be independently controlled and displayed. 

3.  The temperature in either zone can be controlled between 39°F to 65°F (4°C to 18°C). (The zone 

temperature may have a tolerance of +/-5°F (+/-3°C) from setting depending on different loading 
and ambient conditions.) 


Indicators Lights 


  When lit, the 

 indicator light indicates that all of the control pads are locked and no 

adjustment can be made to that zone. 

  When lit, the 


indicator light indicates that the corresponding zone is in the refrigeration cycle 

(compressor is running).  The   indicator will go off once the desired temperature is reached. 

Note:


The   light will remain on and the compressor may continue to run for several 

minutes after the desired temperature is reached.


Lock and Unlock


The lock feature is designed to prevent the settings of your wine cooler from being adjusted 
accidentally. In order to adjust any of the settings you must unlock the control panel by pressing the   

“lock” pad for approximately 3 seconds. Once the unit is unlocked an audible beep will be heard and the 

 “lock” indicator light will go out.  

 
If no selection is made to adjust the unit in approximately one minute the control panel will automatically 
return to the “lock” mode. 

 
To lock the unit manually press the   “lock” pad.


Temperature setting 


  Unlock the control panel by pressing the   pad for approximately 3 seconds. Once the control 

panel is unlocked an audible beep will be heard and the 


indicator will go out. 


  Under normal conditions the temperature display indicates the current temperature of the 

corresponding zone. When adjusting the temperature, the temperature display will flash to 

indicate that the temperature is being adjusted. 


  The temperature in both left zone and right zone can be set independently by pressing 


(warmer) or 

 (colder) pads that correspond to desired zone. The temperature range of both 

zones can be set between 39°F to 65°F (4°C to 18°C) +/- 3°C. (+/-5°F) 


  When the pad 

 (warmer) or 

 (colder) is pressed, the temperature displayed will increase 

or decrease in an increment of one degree.  If the pad 

 (warmer) or 

 (colder) is pressed 

and held for 2 seconds, the temperature displayed will increase or decrease in a speed of one 
degree per half second.  


  Once you have adjusted the left or right zone to the desired temperature, release the 

temperature pad. At this time the temperature displayed will flash for approximately 3 seconds 
to confirm the selected temperature. Once the display stops flashing the temperature display 

will indicate the current temperature of that zone. 

 
Note: 

The temperature display can be changed between Celsius and Fahrenheit by simultaneously 

19 

Summary of Contents for LBWC-42SD

Page 1: ...BWC 42SD To ensure proper use of this appliance and your safety please read the following instructions completely before operating this appliance Pour une utilisation optimale de cet appareil ainsi qu...

Page 2: ...ILISER VOTRE APPAREIL 5 INSTRUCTIONS D INSTALLATION 5 INSTALLATION 5 INSTALLATION INTEGREE 6 MISE A LA TERRE 6 7 CARACTERISTIQUES 7 MODE D EMPLOI 8 REGLAGE DE TEMP RATURE 8 LUMIERES 8 VERROUILLAGE 8 N...

Page 3: ...ar unit pour conversion en centre de breuvage SPECIFICATIONS Mod le LBWC 42SD Description du produit Refroidisseur a vin unit de breuvages 24 encastrable No Mod le LBWC 42SD Largeur Hauteur Profondeur...

Page 4: ...ontenues dans ce manuel sous la section installation Lorsque vous utilisez un appareil lectrique il convient de toujours d observer les pr cautions de base afin de r duire le risque de choc lectrique...

Page 5: ...u es par du personnel non qualifi Une utilisation de type commerciale annulera toute garantie INSTALLATION AVANT D UTILISER VOTRE APPAREIL 1 Retirez l emballage ext rieur et int rieur Lisez le mode d...

Page 6: ...e de la figure A afin de permettre l ouverture compl te de la porte et le plein acc s aux tablettes escamotables 2 Si l appareil est install entre des cabinets sans cadres une languette ou un panneau...

Page 7: ...n appuyant sur l interrupteur partir du panneau de commandes Les appareils sont munis d crans LED haute efficacit pour offrir durabilit et conomie d nergie DEUX ZONES DE TEMP RATURE L appareil comport...

Page 8: ...ns secs et blancs de 7 C 12 C 45 F 53 F Vins rouges de 14 C 18 C 59 F 65 F VERROUILLER ET D VERROUILLER LE PANNEAU DE CONTR LE L appareil est quip d un m canisme automatique de verrouillage du tableau...

Page 9: ...le cellier arr tera son cycle de refroidissement mais ne coupera pas le courant Si l appareil est d branch teint ou qu il y a une panne de courant il faudra attendre entre trois et cinq minutes avant...

Page 10: ...Grandes vacances si l appareil ne sera pas utilis pendant plusieurs mois enlever tout le contenu et d brancher Nettoyez et s chez compl tement l int rieur Pour pr venir la formation possible de conden...

Page 11: ...ntendre des gargouillis provenant du fluide qui circule dans les conduits La contraction et la dilatation des murs int rieurs peuvent produire des craquements et des cliquetis Les ventilateurs partent...

Page 12: ...E STANDING OR BUILT IN INSTALLATION 13 14 ELECTRICAL CONNETION 14 APPLIANCE FEATURES 15 OPERATING YOUR APPLIANCE TEMPERATURE CONTROL DISPLAY 16 TEMPERATURE SETTING LIGHTS 16 17 LOCK SETTING 16 CARE AN...

Page 13: ...f Wine Storage 8 Flat Chrome Shelf Beverage Storage SPECIFICATIONS Model LBWC 42SD Product Description 24 Stainless Steel Built In Wine Beverage Center Model No LBWC 42SD Width Height Depth Unit Dimen...

Page 14: ...ate a fire hazard or an explosion Save these instructions PRIOR TO USE THE UNIT SHOULD BE POSITIONED AND INSTALLED PROPERLY BY FOLLOWING THE INSTRUCTIONS CONTAINED IN THIS MANUAL WHEN YOU USE AN ELECT...

Page 15: ...erly 14 Never allow children to operate play with or crawl inside the appliance 15 WARNING Risk of child entrapment 16 Before throwing out the appliance remove all doors from the unit and leave the sh...

Page 16: ...The cutout dimension illustrated in figure A allows for door swing and access to the pull out shelves when installed as a built in appliance If installing between frameless cabinets a wide filler str...

Page 17: ...TEMPERATURE ZONES There are two zones in this appliance and each zone has its independent temperature control and display Each of the two zones can be used to store wine bottles or beverages Each of...

Page 18: ...S Rose and sparkling wines 5 C 8 C 41 F 46 F Dry white wines 7 C 12 C 45 F 53 F Red wines 14 C 18 C 59 F 65 F CONTROL PANELS Wine cellar control panel Left Side Beverage center control panel Right Sid...

Page 19: ...t will go out If no selection is made to adjust the unit in approximately one minute the control panel will automatically return to the lock mode To lock the unit manually press the lock pad Temperatu...

Page 20: ...er and colder for approximately 3 seconds This unit cannot be in Lock mode to perform this operation Interior Light To turn on off the interior light press the Light pad The unit cannot be in the Lock...

Page 21: ...ket seal clean to keep the unit running efficiently The outside of the appliance should be cleaned with mild detergent and warm water Dry the interior and exterior with a soft cloth Dust or anything e...

Page 22: ...iance to cool down completely Temperature inside the appliance is too cold Temperature control is set too cold Turn the control to a warmer setting and allow several hours for the temperature to stabi...

Reviews: