Owner Installation Instructions
NeoSlider
TM
- Sliding Gate Opener NES-500 / NES-800
25
Fig E.6
Fig E.7
E- Diagnostic Tools
F - Memory Tools
Fig F.1
G- Transmitter Editing
Appendix
Selection Of ID or Serial Number Display
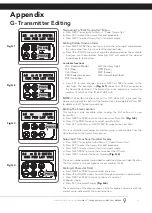
a. Press NEXT to navigate to the Menu 1 ”Code Transmitter”.
b. Press SET to enter the transmitter edit procedure.
c. Press NEXT to enter transmitter list and edit mode.
d. Press NEXT/PREV to move the cursor over the ID field.
e. Press NEXT to reveal the Serial Number
(Fig. G.3).
The serial number display is provided for additional means of identification.
The transmitter in this example has serial number 12345.
Editing A Character Field
a. Press NEXT or PREV to move select character.
b. Press UP or DOWN arrows to scroll through and select a new character.
c. Press NEXT or PREV to move to the next character.
d. Repeat step b.
e. Press SET to record changes
(Fig. G.4)
.
The second line of the display shows a list of available characters with the
current value indicated at the cursor position
.
Navigating To “Edit Transmitter” Menu
a. Press NEXT to navigate to Menu 1 “Code Transmitter”.
b. Press SET to enter the transmitter edit procedure.
c. Press NEXT to enter transmitter list and edit mode.
Editing Button Function Field
a. Press NEXT or PREV to move the cursor to the left or right and between
the top and bottom lines to select the desired field.
b. Press UP or DOWN arrows to change the displayed value. The available
functions are shown below. Selecting OFF will prevent the opener
responding to that button.
Available functions
VAC (Vacation Mode)
LGT (Courtesy Light)
STP (Stop)
OPN (Open)
CLS (Close)
SWP (Swipe)
PED (Pedestrian access)
OSC (Open/Stop/Close)
OFF (No action)
c. Press SET to save changes or press NEXT or PREV to move to the
next field. The example in
(Fig. G.1)
shows that PED is assigned to
the transmitter button 2. The transmitter in the example is transmitter
number 12 which has the ID label AB Smith.
NOTE:
If all button functions are set to OFF, when SET is pressed, the
opener will prompt to confirm if the transmitter is to be deleted. Press SET
to delete or EXIT to continue editing.
Editing The Store Location
This feature is only available when coding the first button of a new
transmitter.
a. Press NEXT or PREV to move the cursor over Store No.
(Fig. G.2)
b. Press UP or DOWN arrows to select new Store No.
c. Press SET to Confirm or NEXT/PREV to move to the next field.
This is useful when managing transmitters using a scheme which ties the
store location to the transmitter’s owner.
Fig G.1
Fig G.2
12
ID
A B SMITH
OSC PED LGT VAC
PRESS
PRESS
14
ID
A B SMITH
OSC PED LGT VAC
PRESS
PRESS
Fig G.3
Fig G.4
14
SN
12345
OSC PED LGT VAC
PRESS
14
ID
B B SMITH
OSC PED LGT VAC
PRESS


