background image


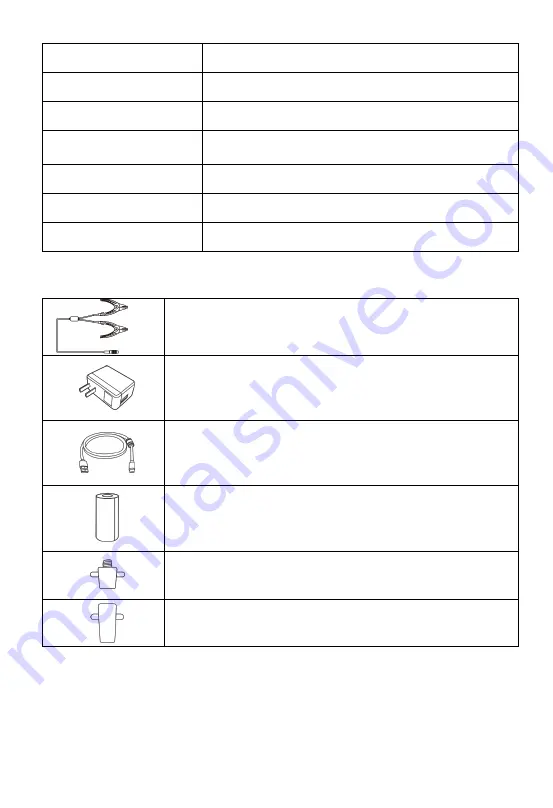
2.3 Other Accessories 


Battery Clamp Cable 

Connects tester to battery 


Power Adapter


Together  with  the  USB  cable,  connects  the  unit  to  an 
external DC power port for power supply. 


USB Cable 

Together with the power adapter, connects the unit to an 
external DC power port for power supply. 


Paper Roll (2pcs) 

Used for thermal printer to print out reports 


Battery Side Post Terminal Type S (2 pcs) (optional) 

Connects the battery posts and the clamps 


Battery Side Post Terminal Type T (2 pcs) (optional) 

Connects the battery posts and the clamps 


Supply Current 

150 mA @ 12 V DC 

Operating Temperature 

-10°C to 50°C (14 ° F to 122 ° F) 

Storage Temperature 

-40°C to 80°C (-40 ° F to 176 ° F) 

Dimensions (L x W x H) 

89.89  mm  (3.53”)  x  46.78  mm  (1.84”)  x  21  mm 
(0.82”) 

Weight 

70.7 g (0.156 lb.) 

Built-in Battery 

3.7 V Lithium Battery 

Light 

White LED 

Summary of Contents for OTOFIX BT1

Page 1: ...nting Autel Intelligent Technology Corp Ltd reserves the right to make changes at any time without notice While information of this manual has been carefully checked for accuracy no guarantee is given for the completeness and correctness of the contents including but not limited to the product specifications functions and illustrations Autel Intelligent Technology Corp Ltd will not be liable for a...

Page 2: ...st procedures It is essential to perform tests in an appropriate and acceptable manner that does not endanger your safety the safety of others in the work area the device being used or the vehicle being tested Before using the device always refer to and follow the safety messages and applicable test procedures provided by the manufacturer of the vehicle or equipment being tested Use the device onl...

Page 3: ...ion time and can lead to serious personal injury or loss of life SAFETY WARNINGS Wear safety glasses and protective clothing NEVER smoke or allow a spark or flame in the vicinity of battery or engine Have plenty of fresh water and soap nearby in case battery acid contacts skin clothing or eyes If battery acid contacts skin or clothing wash immediately with soap and water If acid enters eye immedia...

Page 4: ...VCI 6 2 2 1 Function Description 7 2 2 2 Power Sources 8 2 2 3 Technical Specifications 8 2 3 OTHER ACCESSORIES 9 GETTING STARTED 10 3 1 POWER UP 10 3 1 1 Page Indicator and System Status Bar 11 3 1 2 Application Buttons 11 3 1 3 Drop down Menu 13 3 2 POWER OFF 14 3 3 TEST PREPARATION 14 3 3 1 Inspecting the Battery 14 3 3 2 Connecting to a Battery 14 IN VEHICLE TEST 16 4 1 START THE TEST 16 4 1 1...

Page 5: ...ON ONLY 33 8 1 AUTO SCAN 34 8 2 CONTROL UNITS 35 8 2 1 ECU Information 36 8 2 2 Read Codes 37 8 2 3 Erase Codes 38 MULTIMETER 40 9 1 SAFETY INFORMATION 40 9 2 GETTING STARTED 41 9 3 SCREEN LAYOUT AND OPERATION 42 9 3 1 Multimeter Icon 43 9 3 2 Digital Display 43 9 3 3 Main View Section 43 9 3 4 Measurement Type Selection 44 UPDATE 46 SETTINGS 48 DATA MANAGER 49 12 1 TEST RECORDS 49 12 2 WORKSHOP I...

Page 6: ...ON A COMPUTER OR MOBILE DEVICE 54 MAINTENANCE AND SERVICE 55 15 1 MAINTENANCE INSTRUCTIONS 55 15 2 TROUBLESHOOTING CHECKLIST 56 15 3 ABOUT BATTERY USAGE 56 15 4 SERVICE PROCEDURES 57 15 4 1 Technical Support 57 15 4 2 Repair Service 58 16 COMPLIANCE INFORMATION 59 17 WARRANTY 61 17 1 LIMITED ONE YEAR WARRANTY 61 ...

Page 7: ...ty of other modules and optional tools or accessories 1 1 Conventions The following conventions are used Bold Text Bold text is used to highlight selectable items such as buttons and menu options Example Tap OK Notes and Important Messages Notes A NOTE provides helpful information such as additional explanations tips and comments Example NOTE New Batteries reach full capacity after approximately 3...

Page 8: ...il address link Illustrations Illustrations used in this manual are samples the actual testing screen may vary for each vehicle being tested Observe the menu titles and the on screen instructions to make correct option selection Procedures An arrow icon indicates a procedure Example To use the camera 1 Tap the Camera button The camera screen opens 2 Focus the image to be captured in the view finde...

Page 9: ...er a new battery and perform advanced battery and electrical diagnostics The OTOFIX BT1 is also an advanced diagnostics tool that can identify faults in all systems and display live data relating to those faults The all systems diagnostics function is available by subscription The easy to use Android based touchscreen tool provides Wi Fi software updates as well as Wi Fi printing and sharing of th...

Page 10: ...e Port 2 Battery Clamp Cable Port 3 Micro SD Card Slot 4 Thermal Printer 5 Paper Exit 6 Power LED refer to Table 2 1 Power LED Description for details 7 Ambient Light Sensor detects ambient brightness 8 Lock Power Button press and hold to turn on and off restart the tool or tap to lock the screen 9 5 5 inch Touchscreen ...

Page 11: ...ower Sources The OTOFIX BT1 tester can receive power from the following sources Internal Battery Pack AC DC Power Supply IMPORTANT Do not charge the battery when the temperature is below 0 C 32 F or above 45 C 113 F Internal Battery Pack The OTOFIX BT1 is powered via its internal rechargeable battery which can provide sufficient power for about 6 hours of continuous operation if fully charged AC D...

Page 12: ...ion Item Description Operating System Android 9 0 Screen Display 5 5 LCD touchscreen with 720x1280 resolution Storage 32 GB Connectivity Wi Fi 802 11 a b g n ac USB 2 0 Type C BT 5 0 EDR Camera 8 Megapixel Input Voltage 5 V DC Working Current 450 mA at 7 7 V DC Internal Battery 7 7 V 3000 mAh CCA Range 100 to 3000 A Voltage Range 1 5 V to 36 V Working Temperature 0 C to 50 C 32 F to 122 F Storage ...

Page 13: ...please contact your local distributor or OTOFIX customer service 2 2 1 Function Description 1 Vehicle Data Connector 16 pin 2 Flashlight Power Button 3 Power LED 4 Vehicle Connection LED 5 USB Port VCI LED Description LED Color Description Power LED Yellow VCI is powered on and performing self check Green VCI is ready for use Flashing Red Firmware is upgrading ...

Page 14: ... AC DC Power Supply Vehicle Power The VCI device operates on 12 24 Volt vehicle power which is powered by the vehicle data connection port The device powers on whenever it is connected to an OBDII EOBD compliant data link connector DLC AC DC Power Supply The VCI device can be powered from a wall socket using the AC DC power adapter The flashlight on the VCI device can by powered by this way 2 2 3 ...

Page 15: ...cs Used for thermal printer to print out reports Battery Side Post Terminal Type S 2 pcs optional Connects the battery posts and the clamps Battery Side Post Terminal Type T 2 pcs optional Connects the battery posts and the clamps Supply Current 150 mA 12 V DC Operating Temperature 10 C to 50 C 14 F to 122 F Storage Temperature 40 C to 80 C 40 F to 176 F Dimensions L x W x H 89 89 mm 3 53 x 46 78 ...

Page 16: ...nd illustrations depicted in this manual may differ from the ones in your tool 3 1 Power Up Press and hold the Lock Power button on the left side of the tester to switch the unit on The system will boot up and display the Main Menu Figure 3 1 Sample OTOFIX BT1 Tester Main Menu ...

Page 17: ...tion A green check mark at the top right corner indicates the tool is connected to the battery while a red X icon indicates there is no connection VCI Connection Green check mark at the top right corner indicates the VCI device is connected while a red X indicates there is no connection 3 1 2 Application Buttons Descriptions of the application buttons are displayed below Table 3 2 Table 3 2 Applic...

Page 18: ...3 Multimeter Accesses the Multimeter function The multimeter is sold separately See Multimeter on page 40 Update Accesses system software update menu See Update on page 46 Settings Accesses the VCI Manager BAS Manager System Settings Menu and more See Settings on page 48 Data Manager Accesses the saved repair shop customer and vehicle data including detailed vehicle diagnostics and test records Se...

Page 19: ...Name Description Settings Quick access to the Settings function Bluetooth Enables Bluetooth connection Wi Fi Enables Wi Fi connection Flashlight Turns on off the flashlight Screenshot Captures a screenshot of the current screen Auto Brightness Adjusts the screen brightness automatically Logger Accesses the Log Collection function Restart Restarts the application Screen Brightness Slider Slides to ...

Page 20: ... the Lock Power button and tap Restart to reboot the system 3 3 Test Preparation 3 3 1 Inspecting the Battery Before starting a test inspect the battery for Cracking buckling or leaking If you see any of these defects replace the battery Corroded loose or damaged cables and connections Repair or replace as needed Corrosion on the battery terminals and dirt or acid on the case top Clean the case an...

Page 21: ...15 2 Connect the red clamp to the positive terminal and the black clamp to the negative terminal of the battery ...

Page 22: ...y the starter and the generator IMPORTANT A Disclaimer page will appear when accessing any function on the Home screen for the first time Please read the end user agreement and TAP Accept to continue If you tap Decline you will not be able to use the features properly 4 1 Start the Test Select In vehicle Test on the Home Screen An illustration displays the OBDII connector location Figure 4 1 Sampl...

Page 23: ... your VCI label and select the desired device for pairing 5 When paired successfully the connection status is shown as Paired and the vehicle connection LED will light solid blue Name Button Description Back Returns to the previous screen Home Returns to the Home Screen Battery Connection Displays the battery connection status The number on the icon indicates the real time voltage of the tested ba...

Page 24: ...previous screen The tab will move to the Vehicle information screen The VCI button on the top right corner of the screen displays a green check mark indicating the tester is connected to the VCI 4 1 2 Confirm Vehicle Information Figure 4 3 Sample Vehicle Information Screen ...

Page 25: ...ery Information tab will display from the bottom of the screen Figure 4 4 Sample Battery Information Screen Name Button Description AutoVIN After the VCI is connected to the device through the vehicle s OBD Data Link Connector DLC turn on the ignition The vehicle s VIN number will automatically be recognized Scan License Tap to scan license plate Scan VIN Tap to scan Vehicle Identification Number ...

Page 26: ...ation on the Vehicle information screen Tap the corresponding field to manually input the correct parameters if needed Tap Next to continue 4 2 Battery Test 11 The Clamp Connection Diagram will appear Follow the instructions to connect the clamp cables correctly and tap Next to continue Figure 4 5 Sample Battery Screen 12 Follow the on screen instructions check the boxes once listed tasks are comp...

Page 27: ...e bottom right corner of the button indicating the test results Battery Test Results The battery test results include a color coded result summary a list of test data and repair tips Table 4 2 Test Results Result Repair Tip Good Battery Battery is good Good Recharge Battery is good but insufficiently charged Recharge the battery Charge Retest Battery requires charge to determine its condition Bad ...

Page 28: ...ter Test 14 Follow the on screen instructions to complete the test Start the engine and let it idle The test results will display as follows Figure 4 7 Sample Starter Test Result Screen Name Description Report Tap to view the test data and results in report form Tap Print on the bottom of the screen to print the test report to the built in thermal printer Tap Email to send the test report to an em...

Page 29: ...o Low Low momentary discharge capacity Voltage Too Low Low battery storage capacity Not Started The starter is not detected for starting 4 4 Generator Test 15 Follow the on screen instructions to complete the test The test results will display as follows Figure 4 8 Sample Generator Test Result Screen ...

Page 30: ...nd The voltage adjuster is broken and needs replacement Ripple Too Large The commutation diode is broken No Output The cable is loose Some vehicles with power management systems do not provide path for charging due to the sufficient load capacity of the battery The generator or the voltage adjuster is broken and needs replacement NOTE To measure the current connect the current clamp Tap the Settin...

Page 31: ...tery types and standards are as follows Types FLOODED AGM AGM SPIRAL EFB and GEL Standards CCA SAE CA EN EN2 IEC DIN JIS MCA BCI and GB 5 1 Test Procedure 1 Connect the tester clamps to the battery terminals 2 Select the appropriate battery type rating standard and CCA value Tap Start Testing to start the test Figure 5 1 Sample Out vehicle Test Screen 3 The test results will display in a few secon...

Page 32: ... Battery Battery meets required standards Good Recharge Battery is good but low on charge Fully charge the battery Check for causes of low charge Charge Retest Battery requires charge to determine its condition Replace Battery Battery fails to meet industry accepted standards Bad Cell Battery fails to meet industry accepted standards ...

Page 33: ...ation To replace the battery 1 Tap the Help button at the bottom of each screen to read all the help information carefully before operation then follow the on screen instructions to complete the battery replacement Figure 6 1 Sample Help Screen 2 To save the vehicle s onboard data when the vehicle s battery is removed or disconnected it is recommended to use a memory saver optional accessory to co...

Page 34: ...28 Figure 6 2 Sample New Battery Test Results Screen 3 When the new battery test is completed tap Next to automatically proceed to Auto Registration in the Battery Reset section ...

Page 35: ...ery Reset Main Menu Screen 7 1 Auto Registration after battery replacement Auto registration is often used after the successful installation of a new battery including BMS reset and Electric appliance reset 7 1 1 BMS Reset The BMS reset feature enables you to register a new battery after battery replacement The BMS Reset function varies by vehicle make Please follow the on screen instructions to p...

Page 36: ...ration 7 1 2 Electric Appliance Reset When the vehicle power is interrupted in order to replace the battery and a memory saver has not been used position settings on some vehicle components will be lost These settings should be relearned The functions and related operations in Electric appliance reset vary by vehicle make Please follow the on screen instructions to perform the desired functions ...

Page 37: ...n The special function varies by vehicle make Functions other than battery reset are categorized as special functions Please follow the on screen instructions to perform the desired function Figure 7 4 Sample Reset Closed circuit Current Monitoring Cycle Screen BMW vehicles ...

Page 38: ...ation displays battery usage habits of drivers 3 Estimated current mileage comparison battery replacement determines the current battery life based on the previous vehicle mileage record All three test screens are comprised of three sections 1 Main view displays data in a waveform or bar graph 2 Data description provides brief descriptions of the test result 3 Suggestion offers suggestions on exis...

Page 39: ...t detection and access to live system data for numerous vehicle control systems such as engine transmission and ABS After choosing a diagnostic type Automatic selection or Manual selection on the Diagnostics main menu there are two options available when accessing the Diagnosis menu 1 Auto Scan starts scanning all available systems on the vehicle 2 Control Units displays a selection menu for all a...

Page 40: ...mprehensive scan of all the ECUs in the vehicle to detect faults and retrieve DTCs Figure 8 1 Sample Auto Scan Operation Screen 1 Progress Percentage indicates the test progress 2 Main Section 3 Function Buttons Main Section Column 1 displays the sequence numbers Column 2 displays the scanned systems Column 3 displays the diagnostic indicators describing test results ...

Page 41: ...n Buttons Name Description Save Saves the scanning results as a PDF document Report Displays the diagnostic data in report form Quick Erase Deletes codes A warning message will display to alert user of possible data loss when this function is selected OK Confirms the test results Continues with the system diagnosis after the desired system is selected by tapping the item in the Main Section Pause ...

Page 42: ...communication with the test vehicle 2 Identify the vehicle by selecting from the menu options 3 Select the Diagnostics section 4 Locate a system for testing by Auto Scan or through menu driven selections in Control Units 5 Select a diagnostic function from the Function menu 8 2 1 ECU Information This function retrieves and displays the specific information for the tested control unit including mod...

Page 43: ...n Screen 8 2 2 Read Codes This function retrieves and displays the DTCs from the vehicle s control system The Read codes screen varies by each vehicle model being tested The availability of freeze frame data for viewing varies by vehicle ...

Page 44: ... 4 Snowflake icon indicates freeze frame data is available for viewing Selecting this icon will display a data screen which looks and functions similar to the Read codes screen 8 2 3 Erase Codes After reading the retrieved codes from the vehicle and completing repairs use this function to erase the codes from the vehicle Before performing this function make sure the vehicle s ignition key is in th...

Page 45: ... DTCs and or freeze frame data will be deleted will display b Tap Yes to continue A confirmation screen will display when the operation is successful c Tap No to exit 3 Tap ESC on the confirmation screen to exit Erase codes 4 Return to the Function menu and tap Read codes to verify ...

Page 46: ...se immediately if you are concerned with any abnormal operations To prevent injury or death never ground yourself when taking electrical measurements Isolate yourself from ground by using dry rubber insulating mats to cover all exposed grounded metal Ensure all clothing including gloves are dry Stand on rubber mats when using tool Use the test leads or probes supplied with the product or compatibl...

Page 47: ...d explosive gas or vapor Do not tamper with or disassemble the multimeter connectors or accessories Internal damage will affect performance Before carrying out maintenance and cleaning of the multimeter make sure the unit is NOT connected to a power source vehicle or computer When cleaning the multimeter use a damp soft cloth with mild detergent Do not allow water to enter the multimeter casing 9 ...

Page 48: ...42 Figure 9 1 Sample Multimeter Connection Schematic 9 3 Screen Layout and Operation Tap the Multimeter icon on the main menu to view the multimeter page ...

Page 49: ... status with the tester A green check mark means that the tester and the multimeter are connected a red X means that the device and the tester are not connected 9 3 2 Digital Display This section displays the digital measurement results 9 3 3 Main View Section The main view section features a coordinate grid with the X axis representing the time duration and the Y axis representing the amplitude l...

Page 50: ...s a diode test of the electrical circuit Connectivity Determines whether a low impedance exits two points in the electrical circuit If the impedance is less than 100 ohms the circuit is closed otherwise the circuit is open NOTE 1 AC DC current is measured with clamps while AC DC voltage diode and connectivity are measured with probes 2 When selecting the Resistance measurement type the self calibr...

Page 51: ...45 Figure 9 3 Sample Schematic Diagram of Current Clamp ...

Page 52: ...ion displays when updates are available Ensure the tool is connected to a stable Wi Fi network and follow the on screen instructions to update software Tap into any available vehicle software to view vehicle model coverage Updates for previously installed software may display information regarding improved diagnostics and service functions Figure 10 1 Sample Update Main Screen 1 Upper Toolbar 2 Se...

Page 53: ...ection Left Column displays vehicle logos Middle Column displays the newest software version for update and information of the size and release date of the update package Right Column buttons vary by the operation a Tap Acquire to download and install the desired software b Tap the button to suspend the updating procedure c Tap Paused to continue updating ...

Page 54: ...ws you to check and update the firmware version and resources System settings Sets and adjusts the Wi Fi connection language date and time display and sound sleep mode cache clearing and factory reset About Displays information about the OTOFIX BT1 including device serial number password system version hardware version APP version BAS version BAS firmware version VCI firmware VCI software and capa...

Page 55: ...records There are six main functions available 12 1 Test Records This option stores records of test vehicle history including battery tests and diagnostics The diagnostics records also provide direct access to the previously tested vehicle and allow you to directly restart a diagnostic session without the need to perform vehicle selection Figure 12 1 Sample Diagnostics Test Records Screen ...

Page 56: ...are the files or print them out on your PC 12 5 Uninstall Apps This option allows you to manage the firmware applications installed on the Diagnostics System Selecting this option opens a management screen on which you can check all available vehicle diagnostic applications Select the vehicle firmware you want to delete tap the Delete button on the bottom of the screen to delete the firmware from ...

Page 57: ... replace the paper roll 1 Open the cover of the printer by gently lifting it upwards 2 Remove the spent roll if any 3 Insert a new paper roll 4 Pull the paper out past the cutter at the front of the printer While doing so make sure that the paper roll stays taut and doesn t unroll 5 Push the cover down to snap it closed For a clean tear pull the paper along the serrated edge ...

Page 58: ...one call the TeamViewer ID would be the phone number under which all TeamViewer Clients can be reached separately Computers and mobile devices that run TeamViewer are identified by a unique global ID The first time the Remote Desktop application is launched this ID is generated automatically based on the hardware characteristics of the tester The user cannot change the ID Make sure the tester is c...

Page 59: ...by downloading the TeamViewer program full version online http www teamviewer com Start the software on his her computer at the same time in order to provide support and take control of the OTOFIX BT1 remotely 4 Provide your ID to the partner and have them to send you a remote control request 5 A prompt will appear asking you to allow remote control on your device 6 Tap Allow to accept or Deny to ...

Page 60: ... code Enter the code and tap Sign up 6 The serial number and password fields will be filled automatically Tap REGISTER 14 2 Registration via an Internet Browser on a Computer or Mobile Device 1 Visit http pro otofixtech com 2 If you already have an Autel account sign In with your account ID and password if you are a new member to Autel click on the Create Autel ID button on the screen to create an...

Page 61: ... the tester may not work if the touch screen is moist or if you tap the touch screen with wet hands Do not store the devices in humid dusty or dirty areas Check the housing wiring and connectors for dirt and damage before and after each use At the end of each work day wipe the device housing wiring and connectors clean with a damp cloth Do not attempt to disassemble the tester or the VCI unit Do n...

Page 62: ...source or the battery is charged D When you are unable to charge the tester Your charger maybe out of order Contact your local distributor for assistance You may be attempting to use the device in an overly hot cold temperature Charge the device in a cooler or warmer area Your device may have not been connected to the charger properly Check the connector NOTE If the problems persist please contact...

Page 63: ... leakage or other hazards Avoid dropping the tester If the tester is dropped especially on a hard surface and the user suspects damage contact support The battery recharging time varies depending on the remaining battery capacity Battery life inevitably shortens over time Since over charging may shorten battery life remove the tester from its charger once it is fully charged Unplug the charger onc...

Page 64: ...utor 15 4 2 Repair Service If it becomes necessary to return your device for repair please download the repair service form from www otofixtech com and fill in the form The following information must be included Contact name Return address Telephone number Product name Complete description of the problem Proof of purchase for warranty repairs Preferred method of payment for non warranty repairs NO...

Page 65: ...easonable protection against harmful interference in a residential installation This equipment generates uses and can radiate radio frequency energy and if not installed and used in accordance with the instructions may cause harmful interference to radio communications However there is no guarantee that interference will not occur in a particular installation If this equipment does cause harmful i...

Page 66: ...This is because the device is designed to operate at multiple power levels so as to use only the power required to reach the network To avoid the possibility of exceeding the FCC radio frequency exposure limits human proximity to antenna should be minimized FCC Radiation Exposure Statement This equipment complies with FCC radiation exposure limits set forth for an uncontrolled environment This equ...

Page 67: ...he device Some states do not allow limitation on how long an implied warranty lasts so the above limitations may not apply to you This warranty does not apply to 1 Products subjected to abnormal use or conditions accident mishandling neglect unauthorized alteration misuse improper installation or repair or improper storage 2 Products whose mechanical serial number or electronic serial number has b...

Page 68: ...62 IMPORTANT All contents of the product may be deleted during the process of repair You should create a back up copy of any contents of your product before delivering the product for warranty service ...

Reviews: