background image

Installation Manual

AFADI01R-CH *** Faucet

Dimensions of fixtures are approximate and may vary ± 6mm (1/4”). Structure measurements must be verified against the unit to ensure proper fit.

Product images and specifications are for illustrative purposes only, product design may vary.

5

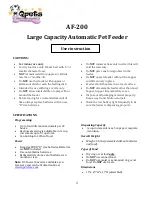
Cartridge Repacement

(1)

(2)

(3)

(4)

(5)

(6)

(8)

(7)

3A.

(1)

(2)

(3)

(4)

(5)

(6)

(7)

(8)

Handle

Cartridge Cover

Retaining Nut

Washer

Cartridge

Faucet

Set Screw

Cap

Shut off the water supply lines and then pull 

Handle 

(1)

 to turn the water on so it drains the 

Faucet (6)

.

To replace the 

Cartridge (5)

 remove the 

Cap (8)


that covers the 

Set Screw (7)

 and loosen the 

Set 

Screw (7)

.

Pull the 

Handle (1)

 off the 

Faucet (6)

.

Untighten the 

Cap (4)

 covering the 

Retaining Nut 

(5)

, and then unscrew the 

Retaining Nut (5)

 which 

holdes the 

Cartridge (5)

 into place.

Note the Orientation of the old cartridge, to place a 

new carridge in the same position.

Pull the old 

Cartridge (5)

 out and replace with a 

new one. Align the bottom pins on the Cartridge to 

fit into holes in the F

aucet (6)

.

3A.

Summary of Contents for AFADI01R-CH Series

Page 1: ...pproximate and may vary 6mm 1 4 Structure measurements must be verified against the unit to ensure proper fit PRODUCT SPECIFICATIONS ARE SUBJECT TO CHANGE WITHOUT NOTICE Installation Manual Model AFADI01R CH Faucet Aura Single Hole Lavatory Faucet Installation Manual ...

Page 2: ...check local building code IF SOLDERING REMOVE CARTRIDGES TO PREVENT DAMAGE Keep receipts proof of purchase and place of purchase for this product The receipt is required should it be necessary to request warranty parts MAINTENANCE CARE FOR YOUR AURA PRODUCTS To clean your faucet or accessory when necessary wash with a nonabrasive wet soapy cloth Then wipe dry with a soft towel or cloth Do not use ...

Page 3: ...for illustrative purposes only product design may vary Parts List 3 1 2 3 4 5 6 7 8 9 10 12 13 14 15 11 ITEM DESCRIPTION SKU QTY 1 Handle 1 2 Cartridge Cover 1 3 Retaining Nut 1 4 Washer 1 5 Cartridge 1 6 Aerator 1 5GPM 1 7 Mixer Body 1 8 Base 1 9 O Ring 1 10 Thread Pipe 1 11 Plastic Nut 1 12 Flexible Hose 2 13 Drain with Overflow 1 ITEM DESCRIPTION SKU QTY 14 Set Screw 1 15 Cap 1 16 17 18 19 20 2...

Page 4: ... 5 6 8 7 Top Body 3 1 4 Sink Drain Hole 2A 1 2 3 4 5 2 3 4 5 Hot In Cold In Drain Installation Faucet Installation 1B 1C 1A 1 2 3 4 5 6 1 2 3 4 5 6 7 8 Faucet Chrome Base Rubber Washer Metal Washer Plastic Nut Flex Hose Pop Up Drain Drain Curved Rubber Washer Bowl Rubber Washer Plastic Washer Brass Hexagonal Nut Rubber Washer Bottom Tube 1 Flex Hoses 6 Mounting Kit Faucet ATTENTION TIGHTEN HOSES B...

Page 5: ...t Screw Cap Shut off the water supply lines and then pull Handle 1 to turn the water on so it drains the Faucet 6 To replace the Cartridge 5 remove the Cap 8 that covers the Set Screw 7 and loosen the Set Screw 7 Pull the Handle 1 off the Faucet 6 Untighten the Cap 4 covering the Retaining Nut 5 and then unscrew the Retaining Nut 5 which holdes the Cartridge 5 into place Note the Orientation of th...

Reviews: