background image

26

En

glis

h

3) Select 

PASSWORD

 using the  LEFT or RIGHT buttons, then press

the ENTER button to enter the submenu.

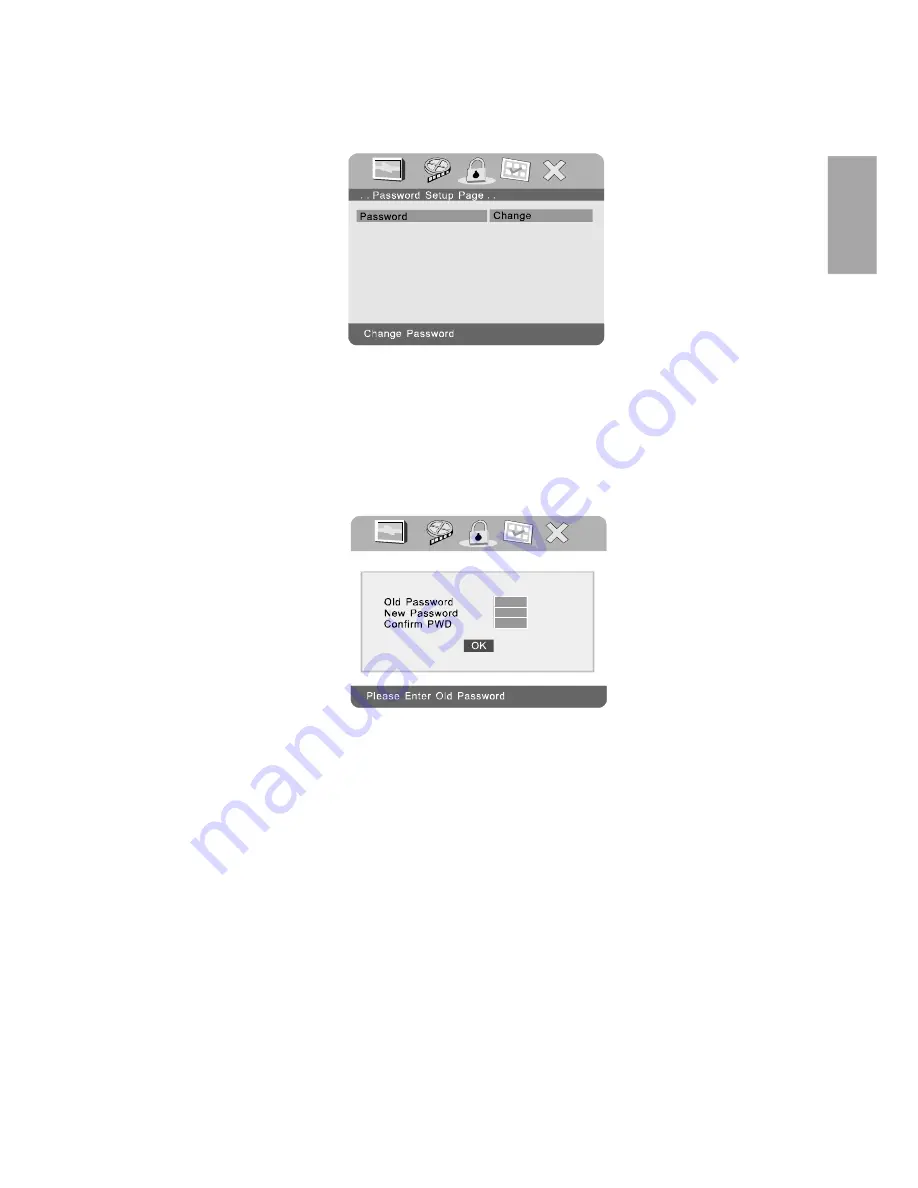
Press ENTER button twice to enter the PASSWORD CHANGE

PAGE. Input the Old  Password or the Default Password, the New

Password, and the Confirmed New Password. Press ENTER

button to confirm the change.

NOTE:

 The Default Password is 

3308

.  This password is always

effective even after you have selected your own pass-

word and changed it. To avoid  the possibility of others

using the default password to set the parental level and

change the password, you can record this default pass-

word in another area and delete it from this manual.

Some discs can be limited depending on the age of users

while some discs cannot.

Password Change Page Screen Display

Password Setup Page Screen Display

Summary of Contents for D1929B

Page 1: ...D1929B 9 inch Portable DVD Player Reproductor DVD Portátil de 9 pulgadas ...

Page 2: ...e blade or the third prong is provided for your safety If the provided plug does not fit into your outlet consult an electrician for replacement of the obsolete outlet l Protect the power cord from being walked on or pinched particu larly at plugs convenience receptacles and the point where they exit from the apparatus l Only use attachments accessories specified by the manufacturer l Use only wit...

Page 3: ...o not play your headset at a high volume Hearing experts advise against continuous extended play If you experience ringing in your ears turn down the volume or stop using the headset Do not use a headset while driving a motorized vehicle or riding a bike It may cause a traffic hazard and is illegal in many areas Even if your headset is an open air type designed to let you hear outside sounds don t...

Page 4: ...are designed to provide reasonable protection against harmful interference in a residential installation This equipment generates uses and can radiate radio frequency energy and if not installed and used in accordance with the instructions may cause harmful interference to radio communications However there is no guarantee that interference will not occur in a particular installation If this equip...

Page 5: ...u may need both the model number and the serial number In the space below record the date and place of purchase and the serial number Model No Date of Purchase Place of Purchase Serial No Connect the equipment into an outlet on a circuit different from that to which the receiver is connected Consult the dealer or an experienced radio TV technician for help In accordance with FCC requirements chang...

Page 6: ...Vehicle Installation 9 F Controls Indicators and Connectors 10 G Loading and Playing a Disc 11 H Basic Operation 12 I Menu 13 J Display 13 K PlayingAudio CDs 19 L Playing JPEG Files 20 M Connecting to Other Equipment 21 N Setup 22 O Specifications 30 P Rechargeable Built in Battery use 30 Q Troubleshooting 32 ...

Page 7: ...horized by Macrovision Corporation and is intended for home and other limited viewing uses only unless otherwise authorized by Macrovision Corporation Reverse engineering or disassembly is prohibited DVD Regional Code Your DVD player has been designed to process regional management information that is stored on DVD discs The regional code for your player is 1 The U S U S Territories and Canada Onl...

Page 8: ... one end of the DC Power adapter into the DC input jack on the unit then plug the other end into the vehicle power outlet Figure 1 3 To Charge the Built in Battery Plug one end of the AC to DC adapter into the DC jack on the side of the player as shown in Figure 1 then plug the other end into the 100 240V AC power outlet Make sure that the player s power slide switch is in the OFF CHG position the...

Page 9: ...nd place the DVD player on the bag beneath the elastic straps Ensure that the unit s corners are secured by the elastic straps 2 Secure the upper portion of the carrying bag to headrest support bars using the headrest strap Adjust the headrest strap until the bag is firmly secured 3 Secure the lower portion of the carrying bag to the vehicle seat back using the seat back strap Adjust the seat back...

Page 10: ... Screen Button 13 Previous Next Pause Stop Play Button 14 Menu Button 15 Up Down Left Right OK Button 1 Power LED 2 Remote Control Sensor 3 Cover Open Switch 4 Charge Indicator 5 DC 9 12V Input Jack 6 A V Out Jack 7 Headphone Jack 2 8 Headphone Jack 1 F Controls Indicators and Connectors 1 Unit View Refer to Figure 3 Figure 3 1 2 3 4 10 11 12 13 14 5 6 8 9 15 ...

Page 11: ...d PUSH TO CLOSE The unit will load the disc and start playing d Rotate VOLUME control to adjust the DVD player s volume e To stop playing a disc press the STOP button f To turn off the DVD player slide the POWER ON OFF switch to OFF Figure 4 1 SETUP Button 2 UP Button 3 PREVIOUS Button 4 ENTER Button 5 REVERSE LEFT Button 6 DOWN Button 7 NUMERIC Buttons 8 DISPLAY Button 9 ZOOM Button 10 SUB Button...

Page 12: ...ck or scene during playback Scan forward at 2 4 8 16 or 32x times speed Scan backward at 2 4 8 16 or 32x times speed Used forMenuNavigation Execute item or confirm setting Select item or setting Display the main menu of the disc Repeat playing title chapter or track Repeat a specific portion from point A to point B of the disc Display information title chapter track time etc Change the viewing ang...

Page 13: ...Playing Time and Remaining Time a During playback press the DISPLAY button to display the current Title Number 1 the total Number of Titles 2 the current Chap ter Number 3 the total Number of Chapters 4 and the elapsed playing Time for the title 5 The heading will disappear automati cally after 3 seconds if no buttons are pressed b Press DISPLAY button again to display the Remaining Time of the ti...

Page 14: ...n a fifth time to exit DISPLAY OFF will be displayed and will disappear automatically in 3 seconds NOTE To select the Chapter you want enter the number of the Chapter you want on the remote while in any display mode The information for Chapter and Title will be displayed and the number of the Chapter you selected will be highlighted Press ENTER button to confirm the selection Chapter Elapsed Time ...

Page 15: ...ubtitle language To turn subtitles OFF press the SUB button until SUBTITLE OFF is displayed The Subtitle display will disappear automatically if the SUB button is not pressed again within 3 seconds Angle Screen Display Subtitle 01 02 Subtitle Screen Display 2 Angle During playback of a disc press ANGLE button to display the avail able angles for discs containing multi angles with the current angle...

Page 16: ...t pressed within 3 seconds Audio Language Screen Display Some DVDs only allow access to this function through the DVD menu 5 Zoom During playback press ZOOM button to enlarge the picture by 2x 3x or 4X with the current zoom multiple Press ZOOM button one time the picture will be enlarged 2X Press ZOOM button a second time the picture will be enlarged 3X Press ZOOM button a third time the picture w...

Page 17: ...nt Screen Display b Press A B button a second time to set the Ending Point B and the player will repeatedly play the part between Point A and Point B A B Repeat Cancelled Screen Display A B Repeat Ending Point Screen Display c Press A B button a third time to cancel A B repeat and resume normal playback ...

Page 18: ...play the current chapter Chapter Repeat ON Screen Display b During playback press 1 ALL button again to repeatedly play the current title Title Repeat ON Screen Display c During playback press 1 ALL button a third time to repeat all chapters and titles All Repeat ON Screen Display ...

Page 19: ...epeat edly on the remote control to view disc time information The time information is displayed in the the following sequence CD Display Mode Single Elapsed The current track playing and the elapsed time on that track appears on the screen Single Remain The current track playing and the amount of time remaining on that track appears on the screen Total Elapsed The current track playing and the to...

Page 20: ...backward at 2x 4x 8x 16x 32x and normal speed L Playing JPEG Files 1 Load a JPEG disc onto the disc tray 2 A screen showing folders or picture files contained on the disc will be displayed automatically after loading 3 Press UP DOWN and ENTER button to select a folder or a picture If a picture is selected photo slideshow will start with the selected picture 4 Press the DOWN button to rotate the pi...

Page 21: ...to the AUDIO INPUT jacks on your TV or Monitor using an additional set of AV cable not included white left audio channel red right audio channel yellow video Figure 5 2 Connecting Headphones Not included Simply plug the headphones into either Headphone jack 1 or Headphone jack 2 on the left side of the DVD Player Refer to Figure 6 Figure 6 Plugging into Headphone jack 1 will disable the internal s...

Page 22: ...the player is connected to a normal TV and a wide picture is shown on the full screen NORMAL LB When the player is connected to a normal TV and a wide picture is shown on the screen with a black strip at both the top and bottom of the screen WIDE When the player is connected to a wide screen TV a wide picture is shown on the full screen Main SETUP Menu Screen Display TV Display Screen Display Gene...

Page 23: ...e screen will not display the Angle Mark icon NOTE Not all discs contain above features c Select OSD LANG using the DOWN button and then press the RIGHT button to enter the submenu Choose the language you desire as the display language Press the LEFT button to return General Setup Page Set Angle Mark On Off TV Display Wide Angle Mark Off Screen Saver On Last Memory On OSD Lang ENG General Setup Pa...

Page 24: ...utton and then press the RIGHT button to enter the submenu Choose Last Memory on or off using the UP DOWN buttons and then press ENTER button to confirm the setting Press the LEFT button to return Last Memory Screen Display ON During playback or in the pause mode if you open the disc tray and then close without changing a disc the unit will memorize the last playback status and resume playback fro...

Page 25: ...set the other items on this menu Press LEFT button to exit the VIDEO QUALITY SETUP menu 2 Select VIDEO QUALITY SETUP by using the LEFT RIGHT buttons press ENTER button to enter the VIDEO QUALITY SETUP PAGE Video Quality Setup Screen Display Brightness Screen Display Go To Video Setup Page Contrast Brightness Hue Saturation Video Quality Setup 00 00 00 00 Brightness Contrast Hue Saturation Video Qu...

Page 26: ...rm the change NOTE The Default Password is 3308 This password is always effective even after you have selected your own pass word and changed it To avoid the possibility of others using the default password to set the parental level and change the password you can record this default pass word in another area and delete it from this manual Some discs can be limited depending on the age of users wh...

Page 27: ...ct the audio language you desire using the UP or DOWN buttons then press ENTER button to confirm the setting Press LEFT button to return Preferred Audio Language Screen Display Preference Page Screen Display Preferred Audio Language Default Preference Page Parental Disc Menu ENG ENG Audio French Spanish English Italian Subtitle Off Go To Preference Page Preference Page Default Parental Disc Menu E...

Page 28: ...n guage you desire using the UP or DOWN buttons then press ENTER button to confirm the setting Press LEFT to return b Select SUBTITLE using the DOWN button then press ENTER button to enter the submenu Select the desired subtitle language or OFF using the UP or DOWN buttons then press ENTER to confirm the setting Press LEFT to return Preferred Subtitle Language Preferred Subtitle Language Default P...

Page 29: ...evels These are listed from the lowest level 1 KID SAFE to the highest level 8 ADULT Enter a 4 digit password then press ENTER button to confirm the parental level setting NOTE The level of 8 ADULT is the factory default d Select PARENTAL using the DOWN button then press ENTER button to enter the submenu Load Factory Setting Screen Display Load Factory Setting Preference Page Reset Disc Menu ENG E...

Page 30: ...ting 1800mAh 7 4V Manufacturer Great Power Battery Zhuhai Co Ltd P Rechargeable Built in Battery Use The DVD player utilizes a long life Li Polymer battery for portability Li Polymer batteries feature high storage capacity and low level of degradation This means the Li Polymer batteries do not have Memory Effect and thus can be recharged regardless of whether the battery is fully or only partially...

Page 31: ...t in order to maximize battery life 3 To charge the battery please connect the power jack directly into the DVD Player and leave connected until the red power indicator turns off Using and Maintaining Your Rechargeable Batteries 1 Please make sure you always use only the AC adapter included with the player to recharge your battery The battery can only be charged with the AC adaptor and will NOT ch...

Page 32: ...feature e g angles 3 The feature is not available at the moment 4 You ve requested a title or chapter number that is out of range Can t advance through a movie The icon appears on screen SOLUTION PROBLEM No sound or distorted sound Picture is distorted The disc might be damaged Try another disc It is normal for some distortion to appear during forward or reverse scan Some discs have sections that ...

Page 33: ...ies and Canada Only DVD discs that have regional codes of 1 or ALL for all regions can be played by your player The disc is dirty Clean it Condensation has formed Allow player to dry out Disc won t play Play starts but then stops immediately The descriptions and characteristics in this owner s manual are for the purpose of general reference only and not as a guarantee In order to provide you with ...

Page 34: ... mishan dling misuse neglect accident or by removal or defacement of the factory serial number barcodelabel s THE EXTENT OFTHE COMPANY S LIABILITY UNDERTHIS WARRANTY IS LIMITEDTOTHEREPAIRORREPLACEMENTPROVIDEDABOVEAND INNOEVENT SHALL THECOMPANY SLIABILITYEXCEEDTHEPURCHASEPRICEPAIDBYPURCHASERFORTHE PRODUCT This Warranty is in lieu of all other express warranties or liabilities ANY IMPLIED WARRAN TIE...

Page 35: ...chilla ancha o la tercera punta son suministradas parasu seguridad Si la clavija suministrada no se adapta dentro de su toma de corriente consulte a un electricista para que reemplace la toma de corriente obsoleta Proteja el cable de corriente de pisotones o machucones particularmente en las clavijas receptáculos de conveniencia y en punto donde salen del aparato Use solamente accesorios aditament...

Page 36: ...me en cuenta lo siguiente Noutilicesunuevoaudífonoaunaltovolumen Losexpertoseneloídoaconsejan contra la reproducción extendida continua Si usted experimenta zumbido en sus oídos baje el volumen o deje de utilizar elaudífono Nouseaudífonosmientrasconduceunvehículomotorizadoomontaenbicicleta Puede causar un riesgo de tráfico y es ilegal en muchas áreas Aún si su audífono es del tipo para uso al aire...

Page 37: ...bargo no hay garantía de que no ocurrirá interferencia en una instalación en particular Si este equipo causa interferencia dañina para la recepción de radio o televisión lo cual puede ser determinado encendiendo y apagando el equipo se sugiere al usuario tratar de corregir la interferencia mediante una o más de las medidas siguientes Reorientar o reubicar la antena receptora Aumentar la separación...

Page 38: ...an ICES 003 Cet appareil numérique de la classe B est conforme à la norme NMB 003 du Canada Información de servicio Este producto deberá recibir servicio sólo por parte de aquellos especialmente capacitados en técnicas de servicio adecuadas Para instrucciones sobre cómo obtener servicio consulte la garantía incluida en esta Guía Para su información Guarde su factura como prueba de compra para obte...

Page 39: ...en vehículo 9 F Controles Indicadores y Conectores 10 G Carga y reproducción de un isco 11 H Operación básica 12 I Menú 13 J Visualización 14 K Reproducción de CDs de Audio 19 L Reproducción de archivos JPEG 20 M Conexión a otro equipo 21 N Configuración 22 O Especificaciones 30 P Batería integrada recargable 30 Q Solución de Problemas 32 ...

Page 40: ...El uso de esta tecnología de protección de derechos de autor debe ser autorizado por Macrovision Corporation y está diseñado para uso en el hogar y otros usos de visualización limitados a menos que lo contrario sea autorizado por Macrovision Corporation La ingeniería reversiva o el desensamble están prohibidos Código regional DVD Su reproductor DVD ha sido diseñado para procesar información de adm...

Page 41: ... Figura 1 Conecte un extremo del adaptador de corriente CD en el receptáculo CD de la unidad luego conecte el otro extremo en la toma de corriente CD del vehículo 3 Para cargar la batería integrada Conecte un extremo del adaptador CA a CD en el receptáculo CD al lado del reproductor como se muestra en la Figura1 luego conecte el otro extremo en la toma de corriente 100 240 VCA Asegúrese de que el ...

Page 42: ...ras de soporte de la cabecera usando la banda de la cabecera Ajuste la banda de la cabecera hasta que la bolsa quede firmemente asegurada 3 Asegure la parte inferior de la bolsa de transporte al respaldo del asiento en el vehículo usando la banda para el respaldo del asiento Ajuste la banda para respaldo del asiento hasta que la bolsa quede firmemente asegurada bandas elásticas banda de la cabecer...

Page 43: ...trol de Volumen Arriba Abajo 10 Interruptor Encendido Apagado 11 Interruptor de cierre del panel LCD 12 Botón de pantalla panorámica 13 Botón Anterior Siguiente Reproducir Pausa Detener 14 Botón Menú 15 Botón Arriba Abajo Izquierda Derecha OK 1 LED de Encendido 2 Sensor IR 3 Interruptor de Apertura de Puerta 4 Indicador de Carga 5 Receptáculo DC 9 12V Entrada 6 Receptáculo AV Salida 7 Audífono 2 8...

Page 44: ...Después de conectar la corriente de la unidad encienda el reproductor DVD deslizando el interruptor POWER ON OFF a la posición ON El indicador de encendido estará en color verde b Abra la bandeja del disco deslizando el Interruptor de Apertura de Puerta y coloque un disco en la bandeja con el lado de la etiqueta hacia arriba c Cierre la bandeja presionando la charola marcada PUSH TO CLOSE la unida...

Page 45: ...ia durante la reproducción Explora hacia adelante a 2 4 8 16 ó 32x veces la velocidad Explora hacia atrás a 2 4 8 16 ó 32x veces la velocidad Usado para navegación de menú Ejecuta elemento o confirma configuración Selecciona elemento o configuración Visualiza el menú principal del disco Repite la reproducción de título capítulo o pista Repite una parte específica del punto A al punto B del disco V...

Page 46: ...n seleccionar opciones de reproducción de disco usando el menú de raíz del DVD J Visualización los contenidos visualizados varían de disco de a disco 1 TIEMPO DE REPRODUCCIÓN Y TIEMPO REMANENTE a Durante la reproducción presione el botón DISPLAY para visualizar el Número de Título 1 el total de Números de Títulos 2 el Número de Capítulo 3 el total de Números de Capítulos 4 y tiempo de reproducción...

Page 47: ...lir DISPLAY OFF se visualizará y desaparecerá automáticamente en tres segundos NOTA para seleccionar el Capítulo que usted quiere ingrese el número del Capítulo en el control remoto mientras está en cualquier modo de visualización La información de Capítulo y Título se visualizará y el número del Capítulo que usted seleccionó estará resaltado Presione ENTER para confirmar la selección Visualizació...

Page 48: ...roducción del disco presione SUB para seleccionar el idioma de subtítulo que usted desee con el número de Idioma de Subtítulo Actual 1 y el total de Números de Idiomas de Subtítulo 2 visualizados Si hay múltiples idiomas presione SUB otra vez para seleccionar otro idioma de subtítulo Para apagar los subtítulos presione el botón SUB hasta que SUBTITLE OFF se visualice La visualización de subtítulo ...

Page 49: ...o es presionado dentro de tres segundos Visualización en Pantalla Idioma de Audio Algunos DVDs sólo permiten acceso a esta función a través del menú DVD 5 ZOOM Durante la reproducción presione ZOOM para amplificar la imagen en 2x 3x ó 4X veces con el amplificador actual Presione ZOOM una vez la imagen será amplificada 2X Presione ZOOM una segunda vez la imagen será amplificada 3X Presione ZOOM una...

Page 50: ...Inicio b Presione A B una segunda vez para establecer el Punto Final B y el reproductor reproducirá repetidamente la parte entre el Punto A y el Punto B Visualización en Pantalla Repetir A B Punto Final c Presione A B una tercera vez para cancelar repetir A B y reanudar la reproducción normal Visualización en Pantalla Repetir A B Cancelado ...

Page 51: ...isualización en Pantalla Repetir Capítulo b Durante la reproducción presione 1 ALL otra vez para reproducir repetidamente el título actual Visualización en Pantalla Repetir Título c Durante la reproducción presione 1 ALL una tercera vez para repetir todos los Capítulos y Títulos Visualización en Pantalla Repetir Todo All ...

Page 52: ...esione repetidamente el botón DISPLAY en el control remoto para ver la información de tiempo del disco La información de tiempo del disco se visualiza en la siguiente secuencia Single Elapsed la pista actual en reproducción y el tiempo transcurrido en esa pista aparecen en la pantalla Single Remain la pista actual en reproducción y la cantidad de tiempo remanente en esa pista aparecen en la pantal...

Page 53: ...x 4x 8x 16x 32x y velocidad normal b Durante la reproducción presione tt para explorar hacia atrás a 2x 4x 8x 16x 32x y velocidad normal L Reproducción de archivos JPEG 1 Cargue un disco JPEG en la bandeja de discos 2 Una pantalla mostrando carpetas o archivos de imagen contenidos en el disco se visualizará automáticamente después de la carga 3 Presione el botón UP DOWN y ENTER para seleccionar un...

Page 54: ...onexión de los audífonos No incluido Simplemente conecte los audífonos en el receptáculo de audífono 1o en el receptáculo de audífono 2 en el lado derecho del reproductor DVD Refiérase a la Figura 6 Figura 6 La conexión en el receptáculo de audífono 1 inhabilitará las bocinas internas No incluido Receptáculo Clavija Color Video amarillo Audio izquierdo blanco Audio derecho rojo navegación y el bot...

Page 55: ...PLAY NORMAL PS cuando el reproductor esté conectado a una TV normal y una imagen panorámica se visualice en toda la pantalla NORMAL LB cuando reproductor esté conectado a una TV normal y una imagen panorámica se visualice en la pantalla con una franja negra tanto en la parte superior como en la inferior de la pantalla WIDE cuando el reproductor esté conectado a una TV de pantalla panorámica una im...

Page 56: ...rcar ángulo NOTA no todos los discos contienen las características anteriores c Seleccione OSD LANG usando el botón ABAJO y luego presione el botón DERECHA para entrar al submenú Elija el idioma que prefiera como el idioma en pantalla Presione el botón IZQUIERDA para regresar Visualización en Pantalla Marcar Ángulo Visualización en Pantalla Idioma en Pantalla OSD General Setup Page Set Angle Mark ...

Page 57: ...HA para entrar al submenú Elija activar o desactivar Última Memoria usando los botones ARRIBA ABAJO y luego presione ENTER para confirmar la selección Presione el botón IZQUIERDA para regresar ON durante la reproducción o en el modo pausa si usted abre la bandeja de discos y luego la cierra sin cambiar un disco la unidad memorizará el estado de la última reproducción y reanudará la reproducción de...

Page 58: ...sione ENTER Ajuste el Brillo presionando los botones IZQUIERDA o DERECHA Para salir de la Configuración de Brillo presione ENTER otra vez para regresar a la PÁGINA DE CONFIGURACIÓN DE VIDEO b Use la misma forma para configurar BRIGHTNESS para ajustar los otros elementos en este menú Presione el botón IZQUIERDA para salir del menú CONFIGURACIÓN DE CALIDAD DE VIDEO Go To Video Setup Page Contrast Br...

Page 59: ...edeterminada es 3308 Esta clave de acceso es efectiva siempre incluso después de que usted haya seleccionado su propia clave de acceso y la haya cambiado Para evitar la posibilidad de que otros usen la clave de acceso predeterminada para establecer el nivel paterno y cambiar la clave de acceso usted puede registrar esta clave de acceso predeterminada en otra área y borrarla de este manual Algunos ...

Page 60: ...UDIO usando el botón ABAJO luego presione ENTER para entrar al submenú Seleccione el idioma de audio que usted desea usando los botones ARRIBA o ABAJO luego presione ENTER para confirmar la selección Presione IZQUIERDA para regresar Preferred Audio Language Default Preference Page Parental Disc Menu ENG ENG Audio French Spanish English Italian Subtitle Off Go To Preference Page Preference Page Def...

Page 61: ... ARRIBA o ABAJO luego presione ENTER para confirmar la selección Presione IZQUIERDA para regresar NOTA la selección de idioma de subtítulo está disponible solamente para discos que sean grabados en los idiomas listados a continuación Si el idioma seleccionado no está disponible el reproductor reproducirá y visualizará en la pantalla el idioma original grabado contenido en el disco Preferencia Idio...

Page 62: ...luego presione ENTER para confirmar la configuración de nivel paterno NOTA el nivel 8 ADULT es el valor predeterminado de fábrica e Seleccione DEFAULT usando el botón ABAJO luego presione ENTER para entrar al submenú Presione ENTER para hacer que la selección regrese al modo establecido de fábrica NOTA la configuración paterna no es afectada por la función de restauración al valor predeterminado L...

Page 63: ...cnica 1800mAh 7 4V Fabricante Great Power Battery Zhuhai Co Ltd P Batería integrada recargable El reproductor DVD utiliza una batería Li Polímero de larga vida para portabilidad Las baterías Li Polímero proporcionan alta capacidad de almacenamiento y bajo nivel de degradación Esto significa que las baterías Li Polímero no tienen Efecto de Memoria y por lo tanto pueden ser recargadas independientem...

Page 64: ...e maximizar la vida de la batería 3 Para cargar la batería conecte el receptáculo de corriente directamente en el reproductor DVD y déjela conectada hasta que el indicador de corriente color rojo se apague Uso y mantenimiento de sus baterías recargables 1 Asegúrese de utilizar siempre exclusivamente el adaptador CA incluido con el reproductor para recargar sus baterías La batería puede ser cargada...

Page 65: ...tica por ejemplo ángulos 3 La característica no está disponible en el momento 4 Usted ha solicitado un título o número de capítulo que está fuera de alcance El disco puede estar dañado Intente con otro disco Es normal que alguna distorsión aparezca durante la exploración hacia adelante o reversa Algunos discos tienen secciones que prohíben la exploración rápida o el salto de capítulo y título Uste...

Page 66: ...s 1 o TODOS para todas las regiones pueden ser reproducidos en su reproductor El disco está sucio Límpielo Se ha formado condensación Permita que el reproductor se seque El disco no se reproduce La reproducción inicia pero luego se detiene inmediatamente SOLUCIÓN PROBLEMA Solución de Problemas Cont Las descripciones y características en este manual del propietario son con el objetivo de una refere...

Page 67: ...ción instalación inapropiada mal manejo mala utilización negligencia accidente o por remoción o borrado del número de serie de fábrica etiqueta s de código de barras LA EXTENSIÓN DE LA RESPONSABILIDAD DE LA COMPAÑÍABAJO ESTA GARANTÍAESTÁ LIMITADAALAREPARACIÓN O REEMPLAZO PROVISTOS ANTERIORMENTE Y EN NINGÚN CASO LA RESPONSABILIDAD DE LA COMPAÑÍAEXCEDERÁ EL PRECIO DE COMPRAPAGADO POR EL COMPRADOR PO...

Page 68: ...Audiovox Electronics Corporation 150 Marcus Boulevard Hauppauge NY 11788 www audiovox com 2009 Audiovox Electronics Corporation 128 8589 V 2 0 Printed in China ...

Reviews: