background image

18


3. Install the System Hardware

A. Designate the Switching Module Locations 

Determine the location for each switching module. Each module controls either four or eight products. 

•  Follow your system plan design to determine the location of the switching modules in the display fixture. If 

you are using bus cables provided by Audio Authority

®

, you may wish to connect all the modules that share 

the system bus with system bus cable, power up the system on a bench or table, and check the switching 

modules and control panel logic before actually installing the modules in your fixture. 

•  Mark the location of the switch modules near the center of the products they will serve. Modules will serve 

four electronic components, or eight speakers.  

•  Be sure to consider the two foot plug spacing if you are using pre-made factory bus cables. 

B. Determine Other Module Locations

In the following installation steps, ignore any references to modules that are not part of your system. 

•  Position the 980 System Module in the signal path immediately prior to the first module(s) in your Receiver 

Product Group. This position will allow you to feed analog audio signals from the output of your Source 

Product Group to the System Module which will then feed the low-level input signal to your Receiver Product 

Group. Do not route video or digital audio signals through the 980 module.

C. Mount the Modules

•  Use the screws provided with each module.

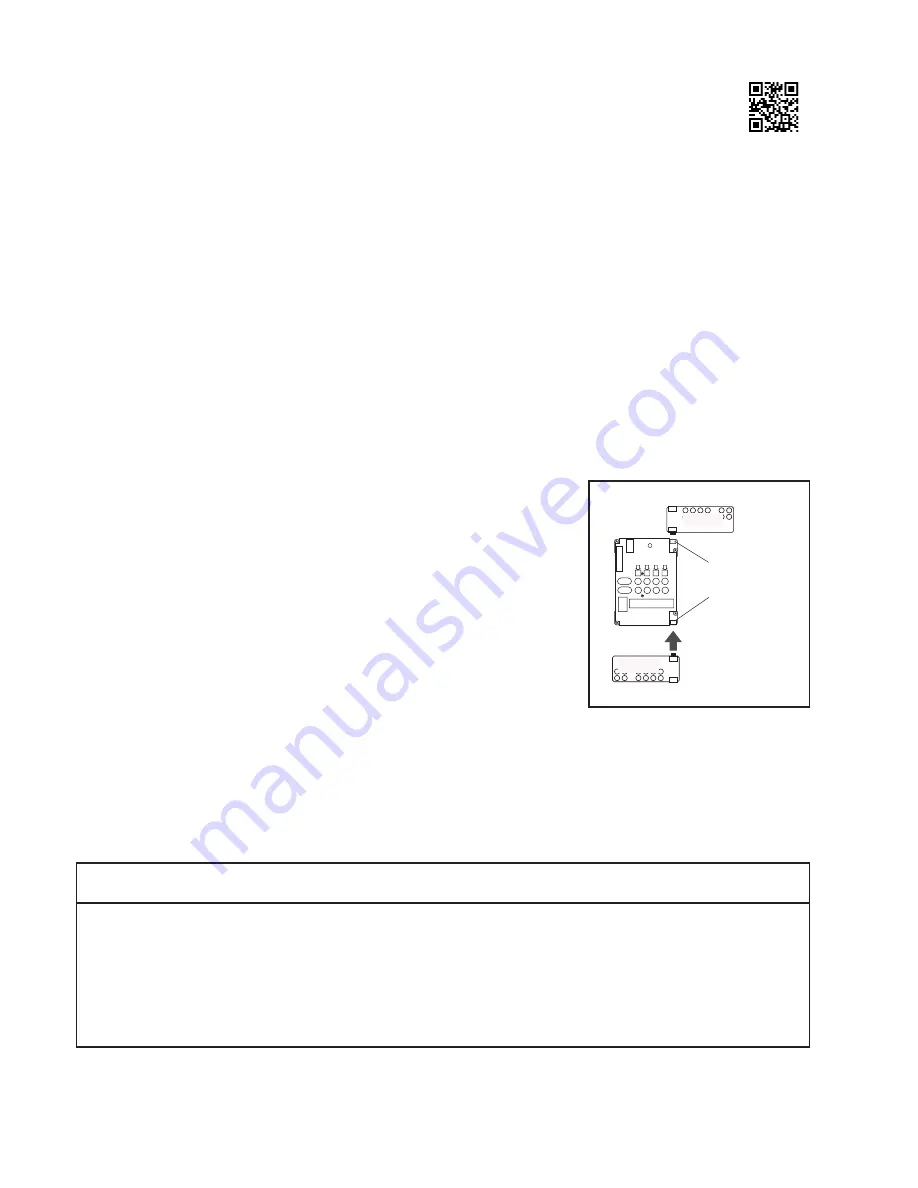
•  Connect any audio signal expander (“X” module) to its respective 

main switching module by plugging it directly into the bottom of the 

main module as shown. If you encounter difficulty with this procedure, 

call the factory. It is critical that any signal expander modules be 

connected to a header port on the main module labeled “Expand”  

or “Expansion.”

Do not plug an audio signal expander module to the header port labeled  “DC 

Expansion” on the top of 922, 940 or 942 modules (

See Figure 28.

)

4. Install the Bus Cables

Pre-assembled bus cables or the raw materials to make the necessary bus cables 

on the job site were included with your system purchase. Pre-assembled bus cables have connectors every two feet (RCA 

patch cords are available in lengths from three to twenty feet.) If you plan to make your bus cables on the job site, you’ll 

need connectors and the special bus assembly tool. 

If you are making your own bus cables, be very careful to follow the assembly instructions, especially concerning wire 

to connector polarity. Incorrect bus fabrication can cause system failure and damage! Several types of bus cables are 

available for specific purposes:


* The System and Speaker Bus extension cables allow you to join remote sections of the Access™ System with the main electronic component 
section of your display, as in the case of surround speaker modules in a home theater display fixture.


920X

920X

920X

942

RIGHT

WRONG

DC Port

Signal

Expander Port

Figure 28. 


Pre-assembled 

Cable for 

Plug for 

Assembly 

Cable Type 

Color Code 

Part Number 

Site Assembly 

Site Assembly 

Tool

System Bus 

yellow/red/blue/black 

802-307 

871-055 

916-0470 

762-011

Speaker Bus 

green/white/brown/gray 

802-186 

871-045 

904-172 

762-009

Low-level Bus 

RCA patch cords 

801-018 to 801-023  NA 

NA 

NA

System extension* 

yellow/red/blue/black 

802-323 

871-055 

916-0470 

762-011

Speaker extension* 

green/white/brown/gray 

802-309 

871-045 

904-172 

762-009

Module expander 

red/grey/purple/blue/green  802-177 

TECH TIPS

Summary of Contents for Access EZ 922

Page 1: ...Demonstration Network Home Audio and Video System Installation Manual...

Page 2: ......

Page 3: ...e imbedded within the Access System is not sold but rather licensed for this product specific use The original purchaser is licensed to use this software in this product and this application only Unde...

Page 4: ...for soundbars in wall speaker displays or any product category Your choice of button per product central control panel third party touchscreen or any combination of user interface Sophisticated Silen...

Page 5: ...k of buses between switching modules to activate that particular product position Selecting Products in the Access System Products can be selected in a system in different ways that can all be combine...

Page 6: ...lect Previous button to make instantaneous comparisons between products Two 906G Control Panels may be used in one system one 906G for each Product Group Product Select Buttons A product select button...

Page 7: ...e EDID table to present the preferred settings to a source device Signal Expander Modules Expander modules add channels to main switch modules They are circuit board products with no steel case 920X L...

Page 8: ...ereo analog inputs allowing PCM Bitstream Dolby TrueHD and DTS TruSurround Speaker Modules Model 932 Speaker Selector Module Model 932 controls one channel e g left or right of eight speakers Two 932...

Page 9: ...acks labeled IN OUT Surround Receivers Use one 945 module for the input output for every four receivers Figure 12 The analog audio bus connects the dedicated source to the 980 module and from there it...

Page 10: ...plains the basic switching configurations for a 2 channel display including several sources receivers and stereo speakers The architecture of Access makes it possible to design a system that fits your...

Page 11: ...pairs of speakers If you plan to use a 903 Control Panel you can demonstrate up to 99 products in each of eight Product Groups Bass Modules with Satellite Speakers Multi speaker packages or bass modul...

Page 12: ...module supports four products and each speaker module supports eight individual speakers To switch eight speaker pairs you need two 932 modules one for the right and one for the left For small systems...

Page 13: ...le For mono subwoofers use only one channel or use a Y adapter cable shown below to provide signal to both channels reducing hookup errors Add a Control Panel This system would have Product Select But...

Page 14: ...Audio Authority Account Manager can help you choose the user interface combination that best suits your needs Call 800 322 8346 903 Control Panel This full featured control panel offers all the sellin...

Page 15: ...packing list and your wiring diagram to determine how each component fits into your wiring plan Refer to the Access System Components section to help identify the various items 2 Addressing A Number t...

Page 16: ...0 45 48 10 19 1 89 96 10 19 1 49 52 10 19 2 97 99 10 19 2 53 56 10 19 3 57 60 10 19 4 61 64 10 19 5 65 68 10 19 6 69 72 10 19 7 73 76 10 19 8 77 80 10 19 9 81 84 20 29 0 85 88 20 29 1 89 92 20 29 2 9...

Page 17: ...be bypassed The Product Group will be bypassed when all the products in that group are unselected The bypass module is always the last module in the Product Group only the bypass module should have th...

Page 18: ...difficulty with this procedure call the factory It is critical that any signal expander modules be connected to a header port on the main module labeled Expand or Expansion Do not plug an audio signal...

Page 19: ...a green white brown gray cable Be careful to maintain correct polarity as shown in Figure 31 Install the Speaker Bus in the same way you installed the System Bus For stereo switching systems plug a 4...

Page 20: ...see audioauthority com hdmi demo for details The Subwoofer Output Bus is connected from one 945 to the next and finally ends up at the Subwoofer Product Group Figure 33 Video Bus from Sources loops ou...

Page 21: ...and on the right side Right For mono center channel speakers or mono high level subwoofers set the switch to Right Check signal bus routing Follow the physical path of signal buses from source group p...

Page 22: ...22 Model 906G Control Panel Model 903 Control Panel Product Select Buttons Custom Third Party Touchscreen...

Page 23: ...e locations and drill 7 64 2 5 mm holes for the screws Insert the appropriate slide in Product Group labels provided with a 903 control panel into the product group display windows to identify each co...

Page 24: ...Spk Elex Speakers or Electronics Set to Spk for controlling speaker groups and Elex for controlling soundbars AVRs or source devices D Mount the control panel using the four screws provided Do not ov...

Page 25: ...the switch between the Power and Com pins of the 980 s Remotes terminal block B Remote System Reset There is a System Reset button on the 980 that enables the user to reset the system in the unlikely...

Page 26: ...d observe the following test results on the Control Panel If you encounter any problems keep a note pad handy to record results as they are reported in the Control Panel windows 1 All display segments...

Page 27: ...ress disappears too quickly to write down press SECURE 88 SECURE to reboot the system and repeat the test d As each new group number appears in a Product Group window Product Group Figure 45 the Info...

Page 28: ...eaker section of the display The PSB lights up as soon as you plug it in showing both left and right speaker positions are selected 4 To select more than one speaker pair in a group press the PSB and...

Page 29: ...ect a source to an AC power outlet and its low level audio or A V outputs to a product position on the source module See Appendix B for hookup diagram Connect the source unit to the product position o...

Page 30: ...ive Product Groups B Adjust the product controls until you hear program material If none is heard Check for source material Satellite receiver DVD Blu ray music server etc Check your product selection...

Page 31: ...re not recommended to play more than one pair simultaneously Read each amp s documentation to determine the setting you should use To add a pair of speakers to the pair currently playing Long Press th...

Page 32: ...32...

Page 33: ...tration System with 906G Control Panel 37 Soundbar and A V Receiver Demonstration System with 906G Control Panel Appendix B Product Connection Diagrams 38 Audio Video Source Hookup Model 955 39 Stereo...

Page 34: ...or product hookups don t hesitate to call technical support at 800 322 8346 800 32 AUDIO 4 00 R Group No Module ID No Right Left 932 only System Bus Low Level Digital Audio Speaker Level Data Cable HD...

Page 35: ...32 932 932 932 945 945 945 945 945 945 945 Sources Receivers Right Front Speakers Right Surround Speakers Center Speakers Powered Subwoofers Left Surround Speakers Left Front Speakers 0 00 0 01 4 00 4...

Page 36: ...t shown Dedicated home theater receiver and speaker package for audio output Dedicated Video Monitor Sample Home Theater Speaker Package System 906G Control Panel PSBs are optional not shown Dedicated...

Page 37: ...gital Surround Sound Receiver Soundbar Soundbar Soundbar Soundbar Digital Surround Sound Receiver Digital Surround Sound Receiver Digital Surround Sound Receiver Video Monitor 0 00 0 01 Digital Audio...

Page 38: ...an A V source switched with the 955 module Most sources will use only one digital audio output There is no optical digital connection on the 955 use a coax output from digital audio sources or use the...

Page 39: ...p Number Setting Write switch settings in boxes Do Not Use these ports in Home Audio Applications Write SOURCES in this box Product Select Button Audio Authority Tech Support USA and Canada 800 322 83...

Page 40: ...Left Right Audio Output Note For these in line Product Groups a Bypass may be necessary Find Bypass in the Index Do Not Use these ports in Home Audio Applications Write EQUALIZERS in this box Product...

Page 41: ...evel Out or Processor Front Low Level Out Model 980B System Module In addition to SilenTouch the 980 performs several other system functions and provides a connection point for Control Panels and syst...

Page 42: ...plifiers To demonstrate receivers with more than two channels see the drawing for Dolby Digital and ProLogic Receivers Instructions for other types of two channel receiver or amplifier configurations...

Page 43: ...rs This drawing shows a powered subwoofer switched by a 922 Low Level Selector The Group address should be higher than the highest speaker Group address The mono subwoofer bus cable connects to the st...

Page 44: ...Output Position 4 Center Output Position 4 System Bus Connections 5 1 Channel Surround Sound This diagram shows connections to receivers with analog audio outputs digital audio inputs and a low level...

Page 45: ...d Left Right Position the switch to Left for left channel function and Right for either right channel or mono function if used for mono operation there will not be a corresponding L module 932 modules...

Page 46: ...ue connected to every Access module The System Bus carries the signals that control the selection of the components and perform various housekeeping functions among the modules in the system Speaker B...

Page 47: ...to position 3 its product select button must be connected to PSB position 3 When a bypass is required always use the fourth position see bypass Control Panels select positions through the System Bus a...

Page 48: ...to full working order and returned promptly to you at no charge using Ground transport services Other methods of shipment are available but at your expense If we determine the product s failure was d...

Page 49: ...nel to select products 6 Control Panels 6 D Demo Product Installation 29 Deselecting Products with PSBs 31 Diagnostics for 903 26 Digital Audio Adapters 7 DIP switches 17 Duplicate addresses 27 E EQ h...

Page 50: ...witch 25 Stereo switching system 10 Switch Settings S M B T D 17 Switching Modules definition of 47 System Bus 19 System Bus definition of 47 System Bus example wiring diagram 19 34 System bus extensi...

Page 51: ......

Page 52: ...148B 20151216 2048 Mercer Road Lexington Kentucky 40511 1071 800 322 8346 859 233 4599 Fax 859 233 4510 www audioauthority com support audioauthority com audioauthority com access_tips Tips Examples...

Reviews: