background image

Drives

35

General operation

RADIO, CD

NAME, TEL

NAV, INFO

CAR, SETUP

Applies to vehicles: with CD changer

CD changer

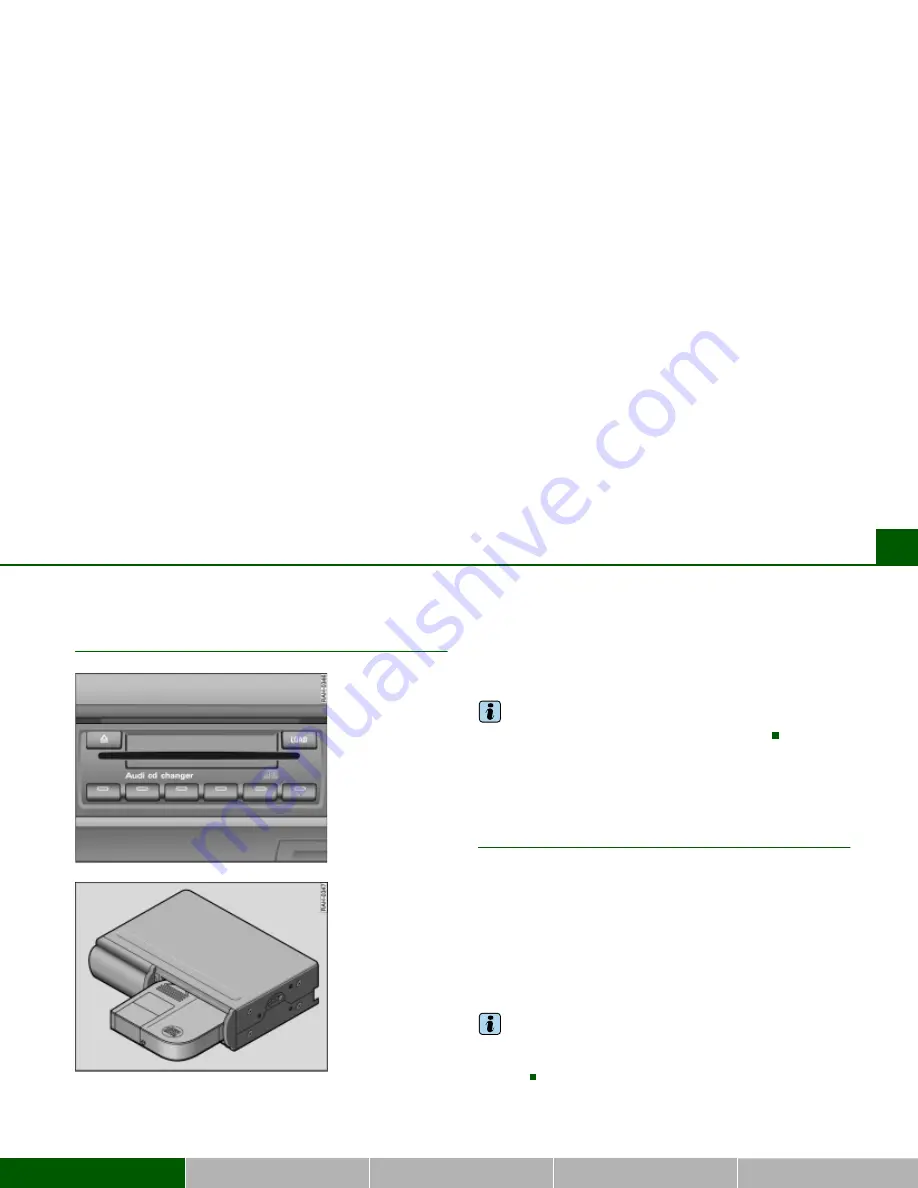
For technical reasons there are two different CD changers which are 
not available for all models.

·

Audi cd changer* in glove compartment 

Þ

fig.31

·

CD changer with cartridge* in trunk 

Þ

fig.32

The differences in operation of the external CD changer are limited 
to the different procedure when loading the CDs into the changer.

Tips

The CD changers are available as factory equipment.

DVD navigation drive

General

The DVD navigation drive 

Þ

page 36, fig.33 can read and play the 

navigation DVD, audio CDs (CD-A) and MP3 CDs compatible with the 
equipment.

An audio CD (CD-A) inserted in the drive is played using the CD func-
tion 

Þ

page 78. An MP3 CD inserted in the drive is played using the 

MP3 function 

Þ

page 83.

Important tips for handling the different data carriers can be found 
starting on 

Þ

page 48.

Tips

Navigation DVDs can be purchased from an Audi dealer. The dealer 
can also provide you with information about navigation DVD 
updates.

Fig. 31  Audi cd 
changer in glove 
compartment

Fig. 32  CD changer 
with cartridge in trunk

Summary of Contents for RNS-E

Page 1: ...Audi Navigation System plus RNS E 11 04 Audi Navigation Syste Operating Instr ...

Page 2: ...ations and specifications in this book are based on the most up to date information available at the time of printing All rights reserved May not be reproduced or translated in whole or in part without the written consent of AUDI AG Specifications are subject to change without notice BOSE is a registered trademark of Bose Corporation Editorial deadline 08 20 20 Tips This owner s manual is only man...

Page 3: ...igation All the settings can be made centrally using an easy to follow menu guide We recommend that you read this owner s manual carefully so that you quickly become completely familiar with all of the functions and possibilities of the system and are able to make full use of them while driving Should you have any further questions about the Audi Navigation System plus in your vehicle please direc...

Page 4: ... button Setup Radio FM AM range Satellite Digital Audio Radio Service Setup Satellite radio System information CD SD Introduction Source control button Main CD menu CD list control button Sound control button CD control button Setup CD Main MP3 menu MP3 list control button Sound control button MP3 ctrl control button Setup MP3 Adjusting sound settings Setting basic sound characteristics DSP Digita...

Page 5: ...tton Map control button Nav Info control button Setup Navigation Information INFO Introduction Main information menu CAR SETUP CAR Introduction SETUP Introduction Settings control button Sound control button Display control button Frequently Asked Questions FAQ Self help Warranty Alphabetical index 107 108 108 109 117 134 139 142 150 151 163 163 163 167 168 168 169 169 170 173 173 175 175 176 179 ...

Page 6: ...you to quickly find the information you need Sections The information in most sections apply to all vehicles However since the equipment level is not the same on all vehicles this book also contains sections which may not apply to your particular vehicle When this is the case the section will be identified for example Applies to vehicles with Audi cd changer This way you only have to read the sect...

Page 7: ...ote lets you know that something may cause damage to your vehicle or equipment for example damage to the CD player or that something could cause an accident for example a street could be slippery even if the temperature is around 40 F 5 C For the sake of the environment Text with this symbol contains important notes about the environ ment and how you can help protect it For the sake of the environ...

Page 8: ...6 ...

Page 9: ...7 General operation ...

Page 10: ...Overview 8 Fig 1 Navigation System plus control unit ...

Page 11: ...ange of equipment in the Audio Navigation System provides a wealth of potential entertainment and a wide variety of information in addition to navigation Carry out your settings in the Navigation System only when the vehicle is stationary Avoid using the Navigation System while you are driving so that you can devote your full attention to traffic Use the controls on the multi function steering whe...

Page 12: ...arefully and follow the instructions Select Accept by pressing the control knob once you have read the warning message Always observe this message to avoid jeopardizing your own safety and that of others Perform settings only when the vehicle is parked in order to devote your full attention to driving safety Once you have confirmed the warning message you may continue to adjust the Navigation Syst...

Page 13: ...n cause dents or scratches Switching on and off Automatic switching on and off The Navigation System switches on automatically after you turn on the ignition When you remove your key from the ignition lock the Navigation System will automatically switch off What happens when it is switched on When the system is switched on the start screen appears The output menu of the last selected main function...

Page 14: ... open or close the display Þ fig 5 Opening the display provides access to the DVD navigation drive and the two card readers for SD MMC memory cards Þ fig 5 The display can also be closed using the function button control buttons the control knob the button or the Forward Reverse button Þ page 9 The open display is automatically closed after about one minute Note If the display cannot be closed it ...

Page 15: ...he Navigation System can only be operated again only by entering the correct PIN This PIN is attached to the equipment card along with the equip ment number The PIN can be used for your equipment alone and cannot be changed Note The equipment card should be removed and kept in a safe place under no circumstances should it be kept in the vehicle This makes the Audi Navigation System unusable by thi...

Page 16: ...ng procedure Before you can enter the PIN again the electronic lock must be cancelled This happens automatically when the Navigation System has been switched on for about 60 minutes If you do not insert the ignition key into the lock the Navigation System switches off auto matically after 30 minutes When the Navigation System switches off automatically or is switched off the unlocking process is c...

Page 17: ...b Þ fig 7 Þ page 17 to make a selection in the Display 3 Press one of the control buttons Þ fig 7 Þ page 17 to open one of the submenus in the particular main func tion You can find the current submenus in the four corners of the display The four corners of the display correspond to the four control buttons that are posi tioned around the control knob 4 Press the button Þ fig 7 Þ page 18 to cancel...

Page 18: ...ress the function button again you usually go the particular main menu Þ page 20 Home function If you pressed the button in one of the main functions you can leave that Setup menu by pressing the button againÞ page 169 The Setup function works in conjunction with an already activated function button This opens special settings belonging to the main function just selected button button Running the ...

Page 19: ...the cursor up or down Pressing function Press the control knob Þ fig 9 to confirm the selection or entry If an arrow Þ page 29 fig 23 is visible in the lower or upper Display corner additional menu items can be called up by continuing to rotate the knob Þ page 29 Control buttons The control buttons are logically assigned to the corners of the screen Fig 9 Navigation System Control knob A 2 Fig 10 ...

Page 20: ... hierarchy within a main function A selection that has not been confirmed by pressing the control knob will be cancelled The button is available in every menu application Using the button you can also deactivate the active side menu in the navigation map display Þ page 144 Tips If you activate the function button Þ page 16 within a main func tion the system will automatically jump to the main menu...

Page 21: ... menu in the Navigation System display Main MP3 function is active Pressing the button calls up the next in the MP3 player If the button is held down fast forward is activated You can jump back to the previous track by pressing the button within the first 10 seconds of play time for a track After 10 seconds it jumps to the start of the track If the button is held down reverse is activated If you w...

Page 22: ...level for the specific main function This includes any sublevels that were opened This excludes Setup menus The history memory is erased when the system moves into standby mode An example You are currently on the Tuning radio menu and switch to the navigation menu by pushing the button If you press the button at this time you will not jump to the main radio menu but directly to the Tuning radio me...

Page 23: ...radio you can select the last next station from the station list using the or button on the multi function steering wheel with audio controls The volume can be adjusted in each active function Of course you can continue to use the audio functions from the Navigation System Tips If systems have not been installed in the vehicle the button on the multi function steering wheel assigned to that system...

Page 24: ...e volume Press the button Radio CD or MP3 Reduce volume Press the button Radio Frequency scan CD Load the previous CD if CD changer is installed MP3 Switch to previous available MP3 drive Press the button Radio Frequency scan CD Load the next CD if CD changer is installed MP3 Switch to next avail able MP3 drive a If the radio memory list is shown in the Navigation System display a radio station ca...

Page 25: ...n ing to Press and hold the button CD or MP3 Reverse Press the button Radio Select the next station on the radio station list a CD or MP3 Select the next track for the audio source you are listening to Press and hold the button CD or MP3 Fast forward button not applicable A A b A A b A B c A B c A E d Press the button Radio CD or MP3 Increase volume Press the button Radio CD or MP3 Reduce volume T...

Page 26: ...e you are listening to First press on left menu thumbwheel Radio Start station frequency scan forward Second press on left menu thumbwheel Radio Stop station fre quency scan Press and hold left menu thumbwheel CD or MP3 Fast forward button not applicable A A A A A A A B MODE Talk Button not applicable Roll right menu thumb wheel up or down Radio CD or MP3 Increase or reduce vol ume Press the right...

Page 27: ...wheel with audio operation version C Button Function description Operating mode Application Press the button Radio Select the previous station on the radio station list a CD or MP3 Select the previous track for the audio source you are listen ing to Pressandhold the button CD or MP3 Reverse Press the button Radio Select the next station on the radio station list a CD or MP3 Select the next track f...

Page 28: ...ss the button Radio CD or MP3 Reduce volume button not applicable a If the radio memory list is shown in the Navigation System display a radio station can be selected from the list using the left menu thumbwheel Button Function description Operating mode Application A C A D _ A F e ...

Page 29: ...ction is displayed Þ page 16 If you then press the button the appropriate main Setup menu is displayed Þ fig 21 You can open the main Setup menu from a main menu or a submenu For example if you press the button in the main navigation menu Þ fig 20 or in a navigation submenu Þ page 28 fig 22 you are shown the main Setup navigation menu Þ fig 21 The functions in that menu which can be performed are ...

Page 30: ...ay center Radio station or track lists are displayed in the center of the display in radio CD and MP3 operation In Navigation the individual desti nation mode is displayed In the main Setup menus a list of avail able functions is displayed Orientation symbols The different symbols in the display are used to select various addi tional functions Þ page 29 Submenu Fig 22 Display Navigation submenu Th...

Page 31: ...cursor designates a chosen line in a menu The arrows pointing up or down point to other menu points scrolling up down After a selection is made this arrow points to other available selections or possible settings Selected text Your choice will be highlighted in white text Þ fig 24 Fig 23 Section of display Orientation symbols A 1 A 2 A 3 Fig 24 Section of display Example of highlighted line ...

Page 32: ...y If required by the system the speller will automatically appear in the display Then the system offers independent of operating mode either the option of entering numbers Þ fig 25 or letters Þ fig 26 If necessary you can manually change from numbers to letters or from letters to numbers The illustrations Þ fig 25 and designated Þ fig 26 symbols with corresponding actions are listed in the followi...

Page 33: ...ield forward back 3 Switch between caps no caps OK Confirms an entry A Z Switches from number to letter entry Entry cursor Entry field Large image of the selected character function LIST Selecting a suggestion from the list 0 9 Switches from letter to number entry A 1 A 2 A 3 A 4 A 5 A 6 A 7 A 8 A 9 A 10 A 11 Space Ï Reference to list elements which match the current entries in the entry field sho...

Page 34: ... a letter number or character Select OK to close out the entry Deleting numbers letters and characters With the selection arrow select DEL by rotating the control knob Press the control knob and the last entry in the entry field will be deleted In some cases such as in navigation the selection of letters is limited by logical exclusion For example if you have entered part of a city in the speller ...

Page 35: ...l button with the Source function Select MP3 Press the control button with the MP3 ctrl function Rotate the control knob to select a function on the control wheel Þ fig 29 Confirm your selection by pressing the control knob The control wheel is divided into different segments The func tion of the segment depends on the current menu Tips You can find the description of the different control wheel f...

Page 36: ... button Þ page 12 fig 4 to open or close the display The drives are located behind the display Þ fig 30 The following drives are integrated in the Navigation System DVD navigation drive Þ page 35 Two MP3 card readers for SD or MMC memory cards Þ page 40 Tips An MP3 CD is a CD ROM on which MP3 files are stored Fig 30 Display open DVD drive and MP3 card reader î A 1 A 2 ...

Page 37: ...ilable as factory equipment DVD navigation drive General The DVD navigation drive Þ page 36 fig 33 can read and play the navigation DVD audio CDs CD A and MP3 CDs compatible with the equipment An audio CD CD A inserted in the drive is played using the CD func tion Þ page 78 An MP3 CD inserted in the drive is played using the MP3 function Þ page 83 Important tips for handling the different data car...

Page 38: ...drive The navi gation DVD is pulled in automatically If you are shown the message Please check navigation DVD in the display you cannot use the Navigation function Possible reasons are described starting on Þ page 51 If you are shown the message Navigation is being initialized in the display navigation is in the start phase As soon as this message disappears and a navigation menu is displayed you ...

Page 39: ...er duplications may not be made in some countries not even for personal use Please find out about and follow applicable copyright regulations As long as you yourself hold these rights for example to your own compositions and recordings or they were granted by the benefi ciary these restrictions naturally do not apply Storage medium MP3 CD CDs with stored MP3 files can be played on the integral MP3...

Page 40: ...display of artist and track name is limited to a total of 64 characters maximum The Navigation System recognizes playlists and can play MP3 files in the sequence established there The structure of the playlists must conform to m3u format The file names must have the exten sion m3u Tips Because of the diversity of CD R CD RW blanks and their different storage capacities function may be limited with...

Page 41: ...display of artist and track name is limited to a total of 64 characters maximum The Navigation System recognizes playlists and can play MP3 files in the sequence established there The structure of the playlists must conform to m3u format The file names must have the exten sion m3u Tips Because of the diversity of CD R CD RW blanks and their different storage capacities function may be limited with...

Page 42: ...is played using the CD function Þ page 78 An MP3 CD inserted in the DVD navigation drive is played using the MP3 function Þ page 83 Note Always keep the navigation DVD that you removed in a suitable jewel case e g CD case to protect the DVD from dirt dust particles scratches and other damage Þ page 48 Do not attach labels to the CDs Heat can cause the label to become detached in the drive jam the ...

Page 43: ...ength Files with longer file folder names are not played The file names for the MP3 files must have the extension mp3 MPEG 1 layer 3 format is supported by the MP3 player For compressing MP3 files we recommend a bit rate of at least 160 kbits s Fixed bit rates of 32 320 kbits s are supported In the case of MP3 files with a variable bit rate there may be a discrepancy between play time displayed an...

Page 44: ...tored on the card and they can be read by the MP3 player As long as the message Reading card Please do not remove appears in the display the memory card must not be removed from the drive If the memory card is removed from the drive there is a possibility that the data will be destroyed In this case the memory card can no longer be read and must be formatted If a memory card has been inserted and ...

Page 45: ...memory card Once the memory card has been removed the open display shows Empty As long as the message Reading card Please do not remove appears in the display the memory card must not be removed from the drive If the memory card is removed from the drive there is a possibility that the data will be destroyed In this case the memory card can no longer be read and must be formatted Tips Always keep ...

Page 46: ...d side up and straight one at a time into the CD tray The LEDs in each button will stop blinking once a CD has been loaded into the slot Loading the CD into a specific empty slot Press the button The LED in the button of any empty slot will start to blink If you want to load a CD into a specific slot you can also press a button where the LED is not lit and insert your CD Wait until the red LEDs on...

Page 47: ... the CD the CD will be pulled back into the CD changer automatically Tips The CD is played through the main CD SD function Þ page 78 If you have accidently inserted a CD upside down with the label side facing down the Display will show a read error message Never force the CDs into the CD tray The CD will be pulled into the CD changer automatically Do not use any non circular CDs for example Shape ...

Page 48: ...or to close the CD slot CD magazine slot Cartridge eject button CD Changer Magazine Þ fig 45 Upper side of the magazine Lower side of the magazine As a rule the CD changer and magazine are installed in the luggage compartment of most vehicles In other models they may be installed in a compartment in the rear side trim or behind the driver seat Please refer to your Owner s Manual for the exact loca...

Page 49: ...e magazine in the CD changer Open the sliding door of the CD slot Þ fig 46 Slide the magazine all the way in with the inscription disc on top While doing this the arrow on the maga zine must point towards the magazine slot Þ fig 46 Close the changer door After inserting the magazine you will hear a working noise from the CD changer The device is simply counting how many CDs are in the changer If t...

Page 50: ...Þ fig 48 Always insert the CDs straight in the CD slot with the printed side facing up Make sure you pay attention to the CD sequence on the right side of the magazine If you have not filled CD slots in the magazine Empty appears in the display when you select the Changer control button in the CD func tion Tips Always close the sliding cover after inserting the magazine to protect your CD changer ...

Page 51: ... them from dirt dust scratches or other damage Never expose CDs to direct sunlight Tips Do not let the CDs drop Tips Precautions with laser devices Laser devices are categorized according to DIN IEC 76 CO 6 VDE 0837 into safety classes 1 4 The laser devices in your Audi conform to safety class 1 The laser used in Class 1 is so low and so well shielded no danger exists with proper usage Tips Do not...

Page 52: ...our CDs are clean The following tips are also important Never use CDs which are damaged or defective Do not play CDs which are scratched or damaged Never leave your CD in direct sunlight They could warp Store them in their original cases Never play CD singles or CDs which are not round shape CDs Your CD player and CD changer can play and holdstandard CDs Do not play 3 inch single CDs CDs which are...

Page 53: ... You should not use a scratched or damaged navigation DVD To avoid damage never expose the navigation DVD to direct sunlight Always keep the navigation DVD in a suitable jewel case e g CD case Do not attach labels Do not attach labels to the navigation DVD Attaching labels can cause an imbalance If the labels are exposed to heat they can become detached and cause damage to the navigation DVD drive...

Page 54: ...D or MP3 CD is scratched There is condensation on the navigation DVD audio CD or MP3 CD The mechanism for the CD changer the navigation DVD drive or the MP3 card reader is malfunctioning Check the navigation DVD audio CD MP3 CD or SD MMC memory card for damage Clean the navigation DVD audio CD or MP3 CD by wiping it from the center toward the outside with a soft lint free cloth In cold weather and...

Page 55: ... 52 Tips If outside temperatures are unusually high or low navigation DVD CD playback may be temporarily unavailable A thermal switch has been installed to protect the navigation DVD CDs and the laser scanner ...

Page 56: ...Drives 53 General operation RADIO CD NAME TEL NAV INFO CAR SETUP ...

Page 57: ...54 ...

Page 58: ...55 RADIO CD ...

Page 59: ... fig 53 The following submenus are available in the radio function FM AM FM AM A 1 A 4 Control button functions Þ fig 53 Radio submenus Memory Memory list Band FM AM Satellite Radio XM Radio or Sirius Radio Sound Balance Fader Treble Bass DSPa b Volume settings Navigation info a Digital Signal Processing b Vehicles with a BOSE sound system in conjunction with an AudioPilot do not have a DSP functi...

Page 60: ... button Press the Band control button in the radio menu Select your desired frequency band Þ fig 54 by rotating the control knob Press the control knob to confirm your selection Radio Setup submenus Press the function button in the radio function FM AM range Þ page 65 Station reception Station display Delete stored stations Press the function button in the satellite radio func tion XM or Sirius Þ ...

Page 61: ...atellite Radio main menu is updated dynamically The title line of the Display shows you whether the radio station is operating in FM AM XM or Sirius The frequency band can be selected with Band control button Þ page 57 Tips The radio station currently set and the frequency band is shown in the instrument cluster display Radio station list on the FM band The FM station list is dynamic and adapts au...

Page 62: ...atellite Radio main menu is updated dynamically The title line of the Display shows you whether the radio station is operating in FM AM XM or Sirius The frequency band can be selected with Band control button Þ page 57 Tips The radio station currently set and the frequency band is shown in the instrument cluster display Radio station list on the FM band The FM station list is dynamic and adapts au...

Page 63: ...nother menu is currently being displayed In the main AM radio menu select Update station list with the control knob to update the list of radio stations Select the desired radio station All the AM stations that can be received are included at this time in the station list in this manually activated search The list is limited to a maximum of 30 stations If you are outside the transmission range for...

Page 64: ...the function button you can change the frequency band by pressing the Band control button Þ page 57 or by repeat edly pressing the function button Þ page 16 The ID number of the XM or Sirius satellite tuner can be displayed using the Setup function Þ page 68 If you have an XM tuner you may also display the ID number using the 000 Radio ID Þ fig 57 option in the main menu Tips To use the satellite ...

Page 65: ... available radio stations Þ page 58 the radio function gives you the option of collecting the radio stations that you want in a memory list The frequency band Þ page 57 is indicated in each case to the right of the station name Þ fig 58 When you save a new station an empty memory location will be offered automatically You may also select any other memory loca tion or you can replace one that is al...

Page 66: ...knob Press the control knob to set the desired station frequency Briefly pressing the control knob will change the frequency in small steps If you hold the control knob down the frequency changes more rapidly When you release the control knob the frequency adjustment stops When you have selected a radio station manually you are shown the station even after switching to the main Radio menu If you h...

Page 67: ...ing the control knob Press the control knob to begin automatic frequency search By briefly pressing the control knob you start automatic seek which stops at the next receivable frequency Since a station often broad casts on different frequencies e g Bayern 3 the seek stops at each of the receivable frequencies So Bayern 3 is found several times Saving stations STORE Fig 61 Radio Store station Fig ...

Page 68: ...stations Þ page 62 When you save a new station an empty memory location will be offered automatically You can also choose any other memory loca tion You can find additional information about radio stations starting on Þ page 61 In Setup radio you can delete saved radio stations from the memory list Þ page 67 Automatic station scan SCAN Fig 63 Radio SCAN function Press the Tuning control button in ...

Page 69: ... Station display Þ page 66 Delete stored stations Þ page 67 The sound and tuning settings and the brightness of the display can be entered using the control buttons Þ page 169 Tips We recommend that you enter these settings when the vehicle is stationary In this way you can be sure that you are not unneces sarily distracted from traffic when performing the procedures that follow Please note Þ page...

Page 70: ...at distant weaker stations or frequencies Station display FM AM range Ticker texts broadcast by radio stations can be stopped Fig 66 Setup Radio Station display Press the function button in the FM AM radio menu Select Station display Under Station display select on The texts names broad cast for the radio station currently selected are shown or Under Station display select off The texts names broa...

Page 71: ...io Radio Service Technical requirements In addition to the radio in your vehicle a tuner module has to be installed in order to be able to receive satellite programs At the present time tuners are available from these providers XM Satellite radio and Sirius Satellite radio If you would like to retrofit a tuner please consult your Audi dealer You can select Radio Satellite mode XM or Sirius Radio b...

Page 72: ...ce enabled at your provider you need the ID number of the tuner To show the ID number in the display Press the function button in the satellite radio menu Select Receiver serial number Þ page 70 fig 71 by rotating the control knob Press the control knob The ID number will appear on the Display Þ fig 68 XM ID number This number is an 8 character alphanumeric number The XM ID number can be called up...

Page 73: ...er pressing the function button you can change the frequency band by pressing the Band control button Þ page 57 or by repeat edly pressing the function button Þ page 16 Operating the Memory control button displays the memory list You may store stations from the FM AM and Satellite radio XM or Sirius bands Þ page 61 The explanations for the sound settings start with section Þ page 92 Tips The stati...

Page 74: ...er Þ page 68 Delete stored entries Þ page 73 The sound and tuning settings and the brightness of the display can be entered using the control buttons Þ page 169 Tips We recommend that you enter these settings when the vehicle is stationary In this way you can be sure that you are not unneces sarily distracted from traffic when performing the procedures that follow Please note Þ page 9 Notes on Tra...

Page 75: ...ns are listed by channel number in ascending order Tips The stations that are displayed in the station list can be filtered according to your personal desires as to type of program Þ page 72 Applies to vehicles with Satellite Digital Audio Radio Service Station info The two part informational text in the Display can be switched on and off Fig 72 Setup Radio Station info Press the function button i...

Page 76: ...n the satellite radio menu Select Category filter Under Category filter select individual filter options that are not to be active any longer and press the control knob The check after the filter option disappears Turning off all filters Press the function button in the satellite radio menu First select the filter option All categories and press the control knob so that a check appears after All c...

Page 77: ...n The following system messages can be displayed XM Satellite Radio Sirius Satellite Radio SETUP SETUP System mes sages Meaning ANTENNA No antenna is connected to the tuner or there are loose plug contacts on the antenna cable UPDATING Your system is being updating NO SIGNAL The tuner is presently not receiving any satellite signal LOADING Your provider is sending information which the system is c...

Page 78: ...CD and MP3 function by using the control button with the Source function Þ page 77 Selecting CD function Fig 74 Display Main CD menu example of a list of tracks Insert an audio CD into a drive Þ page 34 Press the function button Þ page 16 A main audio menu Þ fig 74 or the previously active function menu appears in the display If necessary press the control button with the Source function and selec...

Page 79: ...l button functions Þ page 74 fig 74 CD submenus CD list Audio CD Empty CD ROM CD unreadable Source CD MP3 Sound Balance Fader Treble Bass DSPa b Volume settings Navigation info a Digital Signal Processing b Vehicles with a BOSE sound system in conjunction with an AudioPilot do not have a DSP function In this case your vehicle is equipped with Dynamic Noise Compensation Þ page 94 CD control Forward...

Page 80: ...tons Þ page 17 to move to the appropriate submenus to Þ page 75 fig 75 The following submenus are available in the MP3 function CD SD A 1 A 4 Control button functions Þ page 74 fig 74 MP3 submenus MP3 list CD Card 1 Card 2 Navigation DVD Empty Audio CD ROM Unreadable Source CD MP3 Sound Balance Fader Treble Bass DSPa b Volume settings Navigation info a Digital Signal Processing MP3 ctrl Forward Re...

Page 81: ...nt by rotating and pressing the control knob Depending on vehicle equipment the following choices are avail able CD MP3 Various submenus are available depending on the equipment selected b Vehicles with a BOSE sound system in conjunction with an AudioPilot do not have a DSP function In this case your vehicle is equipped with Dynamic Noise Compensation Þ page 94 MP3 Setup submenus Press the functio...

Page 82: ...e main CD menu Þ fig 77 select the desired track on the active CD with the control knob The playing time of the track will be displayed after the track name If the vehicle has a CD changer you can select a CD using the CD list control button Þ page 79 An audio CD inserted into the DVD Navigation drive Þ page 35 is shown as CD 1 in the title line If your vehicle is equipped with a CD changer an aud...

Page 83: ... displayed Select your track as necessary The selected CD location appears in the title line If there is no CD in one of the slots in the changer Empty is displayed in the CD list Audio CDs CD A can also be played in the DVD Navigation drive If there is a CD changer in the vehicle an audio CD inserted in the DVD Navigation drive can be played over CD 7 Sound control button Sound settings Starting ...

Page 84: ...or Reverse by rotating the control knob Hold down the control knob The track advances or reverses for as long as you hold the control knob down CD track next previous Fig 80 CD Track next Press the CD control button in the CD menu Select Next Þ page 85 fig 87 or Previous by rotating the control knob Press the control knob The next or previous track will be played ...

Page 85: ...played one after the other in random order The tracks on the current CD are first played in random order After all the tracks have been played the next CD is loaded If you set Repeat in Setup CD for only a single CD only the tracks on the current CD will be played in random order If you have set Repeat for a single Track in Setup CD you cannot use random play The Scan function also cannot be used ...

Page 86: ...of the display can be entered using the control buttons Þ page 169 Tips We recommend that you enter these settings when the vehicle is stationary In this way you can be sure that you are not unneces sarily distracted from traffic when performing the procedures that follow Please note Þ page 9 Notes on Traffic Safety Repeating CD Press the function button Þ page 16 in the CD menu Select Repeat Þ fi...

Page 87: ... The playing time of the track will be displayed after the track name You can select an MP3 data carrier using the MP3 list control button Þ page 84 Tips If you open the display MP3 playback of the active data carrier is stopped The MP3 player can also stop when playing back individual MP3 tracks from a data carrier if they cannot be read In this case select another readable MP3 track on this data...

Page 88: ...in this drive or if the data carrier cannot be read MP3 CDs can be used as data carriers in the DVD Navigation drive and SD MCC memory cards can be used in the MP3 card reader The active drive appears in the title line Tips Not all MP3 CDs can be played For example it is possible that the MP3 files cannot be read by the MP3 player Þ page 37 Sound control button Sound settings Starting on Þ page 92...

Page 89: ...MP3 menu Select Forward Þ fig 86 or Rewind by rotating the control knob Hold down the control knob The track advances or reverses for as long as you hold the control knob down MP3 track next previous Fig 87 MP3 Track next Press the MP3 ctrl control button in the MP3 menu Select Next Þ fig 87 or Previous by rotating the control knob Press the control knob The next or previous track will be played ...

Page 90: ...layed first in random order and then the entire directory If you have entered Repeat in Setup MP3 for a Playlist Dir the tracks on the current playlist or the current directory are played in random order If With subdirectories is activated they are included in random play If you have entered Repeat of All playlists in Setup MP3 the tracks for all existing playlists for all data carriers are played...

Page 91: ...t be played or information cannot be read You can find additional hints starting on Þ page 37 Scan MP3 track SCAN Fig 90 MP3 Scanning tracks on a MP3 Press the MP3 ctrl control button in the MP3 menu By rotating and pressing the control knob select SCAN Þ fig 90 Pressing the control knob activates automatic track scan Each track on the MP3 data carrier will be played for a few seconds When the but...

Page 92: ...k display Þ page 90 Categ display Þ page 90 The sound and tuning settings and the brightness of the display can be entered using the control buttons Þ page 169 Tips We recommend that you enter these settings when the vehicle is stationary In this way you can be sure that you are not unneces sarily distracted from traffic when performing the procedures that follow Please note Þ page 9 Notes on Traf...

Page 93: ...k display Þ page 90 Categ display Þ page 90 The sound and tuning settings and the brightness of the display can be entered using the control buttons Þ page 169 Tips We recommend that you enter these settings when the vehicle is stationary In this way you can be sure that you are not unneces sarily distracted from traffic when performing the procedures that follow Please note Þ page 9 Notes on Traf...

Page 94: ...eated Function Track The MP3 track currently selected is repeated Tips The Repeat options can be combined with the Repeat and Random functions You can find more information in the description of the Random function Þ page 86 Subdirectories Fig 93 Setup MP3 Subdirectories activated Press the function button Þ page 16 in the MP3 menu Select Repeat Þ page 88 fig 92 Select Playlist Dir Select With sub...

Page 95: ...e If an MP3 data carrier has been inserted and not played the data from the ID3 tag are read in in the background If you start playback of an MP3 data carrier immediately the ID3 tag data are displayed for the track being played If there are no ID3 tags or if they have not been read no information about the tracks is displayed File name No information about the tracks is displayed Category display...

Page 96: ...lect Track display Þ page 90 fig 94 Select Track name Select Categ display on Þ page 90 fig 95 Information about the category of an MP3 track can be read from a previously stored ID3 tag In order for this function to be available Track name must be selected Þ page 90 ...

Page 97: ...n for the Sound function from an audio or Setup menu Select the desired sound setting e g Balance Þ fig 96 with the control knob Rotate the specific control knob in the sound adjustment menu e g Balance Þ fig 97 to set the sound character istic to your liking By pressing the control knob or the button the setting is imported and you leave the settings menu The Display Þ fig 97 shows the degree of ...

Page 98: ...r apply to the operating mode that is currently active in the Navigation System If you change the bass setting for example when playing a CD it will not affect radio or MP3 operation DSP Digital Signal Processing Fig 98 DSP GALA settings Press the control button for the Sound function from an audio or Setup menu Select DSP Select GALA Select one of the five levels or Select off to switch the funct...

Page 99: ... the vehicle interior detects both the noise level of the music playback and intrusive noises The intrusive noises are digitally analyzed and evaluated The system simultaneously ensures that the music playback level is increased by the frequen cies affected by intrusive noise so that music playback remains at a constant level for good listening Tips In the event of a malfunction in the AudioPilot ...

Page 100: ...EL NAV INFO CAR SETUP Tips If the volume is too high when the radio is turned on it will be reduced automatically to a level set at the factory If the volume is too low when the radio is turned on it will be increased automati cally to a level set at the factory ...

Page 101: ...96 ...

Page 102: ...97 NAME TEL ...

Page 103: ...e directory WARNING Pay attention first and foremost to your driving As the driver of the vehicle you have total responsibility for operating the vehicle safely Þ page 9 Notes on Traffic Safety Therefore when using the Navigation System functions make certain that you always have complete control of your vehicle Introduction Selecting NAME function directory Using the function button a user specif...

Page 104: ... address and for communication with this person These data can also be used for Navigation Þ page 136 You can store two navigation destinations for one directory entry one navigation destination for the business category and one navigation destination for the private category Þ page 103 You can open these stored navigation destinations in the Navigation menu using the control button with the Memor...

Page 105: ...t OK in the speller to confirm your entry Select additional data fields to enter the desired data Þ fig 103 First a name has to be entered All other data fields are greyed out and cannot be selected Þ fig 102 After you have entered a name you can enter the remaining data By selecting a data field a speller is automatically activated Þ page 30 which allows letters and numerals to be entered The ent...

Page 106: ...peller and select the entry from the list The directory card with all the stored data is displayed The entries found are displayed in the list They can also be edited subsequently Þ page 101 It is not absolutely necessary to enter a name in full to find it but this can reduce the size of the entry selection provided Tips You can also select a stored entry through the Show list function Þ page 102 ...

Page 107: ...displayed Select Show list Þ page 101 fig 104 All entries for the directory are listed You can select individual entries from this list to recall or to change the stored data e g navigation destination Þ page 101 Deleting individual directory entries Fig 107 Directory deleting an individual entry Press the function button Þ page 16 if another menu is currently being displayed Select Find entry or ...

Page 108: ... Fig 108 Directory Delete directory Press the function button Þ page 16 if another menu is currently being displayed Select Delete directory Þ fig 108 Confirm Are you sure you want to delete all entries from the directory with Yes All directories entries are deleted Setting directory navigation destination Fig 109 Directory Select category Fig 110 Directory Enter navigation destination for an entr...

Page 109: ...d one destination for the personal category If the Display as top destination function shows a check mark after it this function is active These navigation destinations are shown in the main navigation menu Þ page 133 under the menu item Start route guidance When you have entered the navigation destination and you press the button you are returned to the directory card and can enter additional dat...

Page 110: ...Telephone 105 General operation RADIO CD NAME TEL NAV INFO CAR SETUP Telephone General Telephone is not installed ...

Page 111: ...106 ...

Page 112: ...107 NAV INFO ...

Page 113: ...ever let yourself be distracted by the map display on the screen Þ page 9 Always remember that data on the Navigation DVD can differ from the actual situation because of insufficient data or because the road or traffic routing has changed since the area was mapped Do a reality check and ignore the navigation system recommendation if necessary Always remember that even if one way streets pedestrian...

Page 114: ...the mapping and your actual location Introduction General Fig 112 Display Example of navigation map The Audi Navigation System can help you to reach your destination without spending a lot of time studying maps During the trip you will receive information on vehicle location instructions for turning direction and distance to turn off present distance to destination and estimated time of arrival at...

Page 115: ... and satellite signals are analyzed The signals are transmitted by GPS satellites The acronym GPS stands for Global Positioning System The recorded information is transferred to the navigation system and then compared with the map material stored on the Navigation DVD In this way guidance to your destination can be calculated precisely To calculate guidance to your destination the navigation DVD h...

Page 116: ...itioning works in only one direction i e the navigation system receives data to determine vehicle location but does not broadcast data Navigation route guidance Fig 113 Navigation Example of screen in the Navigation System display Guidance for your route navigation is provided both visually and acoustically with voice messages Þ page 112 through a screen in the Navigation System display Þ fig 113 ...

Page 117: ...3 You can choose which language you want for the voice messages Þ page 170 WARNING If driving instructions run contrary to traffic laws the traffic laws always take precedence Tips During the announcement of a navigation prompt you can adjust the volume of the navigation prompt using the on off knob Þ page 19 on the Navigation System or the volume buttons or the right thumb wheel on the multi func...

Page 118: ... the instrument cluster Visual presentation in the instrument cluster display As soon as you have entered a route into the Navigation System and begun navigating guidance to your destination will also be displayed in the instrument cluster display Fig 116 Instrument cluster display Example of route guid ance presentation Display Short description Estimated time of arrival at destination or current...

Page 119: ... returns you to guidance You can find detailed information about the trip computer in the Owner s Manual Applies to vehicles with color instrument cluster display Visual presentation in the instrument cluster display Change of direction arrow Bar graph countdown bars decreasing in size indi cate how the distance to the immediate turn off point is decreasing the bar graph is not shown until a chang...

Page 120: ...ton again returns you to guidance You can find detailed information about the trip computer in the Owner s Manual Selecting navigation function The navigation functions can be selected with the function button Fig 120 Display Main navigation menu Display Short description Distance remaining to next turn point Estimated time of arrival at destination or current stopover Directional arrow Location d...

Page 121: ...ation function NAV A 1 A 4 Control button functions Þ page 115 fig 120 Navigation submenus Memory Previous destinations Top categories Load from directory Store in directory Load route Store route Delete route Route Route with stopover Route without stopover Route list Route criteria Avoid route from here Map Zoom Map side menu Nav Info Location data street or city where appli cable Latitude longi...

Page 122: ...without stopovers Þ page 139 After you have decided on the type of guidance with without stopovers you can enter a destination over different routes Entering destination data in the entry menu Þ fig 121 is handled in the same way in single destination and route planning mode Navigation submenus Press the function button in the NAV function Þ page 151 Map scheme day night Orientation Map type Map c...

Page 123: ...avigation Region selection Entering destina tion Section Region Þ page 118 Region selection Street within a region Þ page 123 Destination input street City Þ page 125 Entering street city with spe cial characters Special destination Þ page 126 Special destination input Telephone number for a special destina tioin Þ page 126 Special destination input Map coordinates Þ page 128 Destination input on ...

Page 124: ...ig 123 by rotating and pressing the control knob When selecting a country destination data street city and catego ries that was previously stored in the destination entry menu is deleted Entering single destination Route without stopover Fig 124 Navigation Entering the destination using the speller Press the function button Þ page 16 If necessary Press the control button with the Route func tion a...

Page 125: ...ty select Street after selecting the country in the destination entry menu Selection Special destination in city By selecting a special destination in the specified city tourist attrac tions or public facilities e g hospital movie theater can be selected directly as a destination If you would like to find a particular special destination indepen dently of the city select Special destination after ...

Page 126: ... input on map to set more detailed destina tion criteria Enter stopovers by means of Add stopover 1 Add stopover 2 or Add stopover 3 Select Start route guidance Þ page 129 After you have started route guidance the calculated route plan with all the various information is initially shown as an overview on the map Confirm route guidance by pressing the control knob You can find additional informatio...

Page 127: ...the crosshairs horizontally and vertically you can set a new destination Þ page 149 If additional detailed information is available for the selected point on the map you can display it using the Detail info function Using the Set as stopover function you can also set the destination from the map as a stopover Þ page 139 You can also Save to directory the selected map destination By inputting a str...

Page 128: ... page 117 fig 121 select another Region Þ page 118 from the list by rotating and pressing the control knob or confirm the region already being shown This deletes all existing entries in the desti nation input menu Þ page 117 fig 121 Select Street Þ page 117 fig 121 and enter the street name using the speller or In the speller display select LIST Þ fig 126 and select the street from the list Select...

Page 129: ...treet number Þ page 128 Destination input city Fig 128 Navigation Entering the destination using the speller Fig 129 Navigation More information about destination In a destination input menu Þ page 117 fig 121 enter another Region as applicable Þ page 118 Select City Using the speller enter the desired city Þ page 119 fig 124 and confirm the city entry with OK or In the speller display select LIST...

Page 130: ...splayed to select a destination the crosshairs are in the center of the city in question By moving the crosshairs horizontally and vertically you can set a new destination Þ page 149 If additional detailed information is available for the selected point on the map you can display it using the Detail info function You can select the Set as destination function if you have set the route guidance wit...

Page 131: ...er additional data for your route and start the route Þ page 129 Using the number speller you can input the special characters e g hyphen apostrophe or period For example if you would like to input the street MAIN STREET first enter the letters MAIN using the letter speller Then switch to the number speller Þ page 125 fig 130 to input the hyphen The letters STREET are entered after switching back ...

Page 132: ...a immediately surrounding the current vehicle position This function is especially useful for planning stopovers for example to find the nearest restaurant The list of special destinations displayed is sorted in ascending order according to distance as the crow flies to your location The distance displayed for special destinations can differ considerably from the driving distance Selection In vici...

Page 133: ...s Destination input on map Fig 133 Navigation Destination on the map Fig 134 Navigation Setting map point as destination In a destination input menu Þ page 117 fig 121 enter another Region as applicable Press the Map control button Press the control knob to switch to the map side menu Þ page 144 Change the scale if necessary Þ page 146 Activate the crosshairs Þ page 149 in the active side menu by ...

Page 134: ... can also select the stopovers from the map If you have not activated Route with stopover this function cannot be selected greyed out Selection Save to directory The selected map position can also be imported into the directory You can assign this position to an existing directory entry or open a new entry With a new entry first input a name using the speller Then you can input additional data on ...

Page 135: ... guidance you are shown the route with the different stopovers and various information in the overview Þ page 132 Entered destinations can be saved Þ page 135 and Þ page 137 Route criteria Þ page 141 can be changed at anytime during guid ance and the route will be recalculated If you do not complete route guidance you started this route guid ance will be continued the next time the vehicle is star...

Page 136: ...on and started route guid ance the system switches automatically to route selection display The route highlighted after the automatic switch to map display is the route which was calculated according to the criteria Þ page 141 that you set For example if you set fast in the Route criteria the route with the shortest estimated arrival time is highlighted after switching automatically to the map dis...

Page 137: ...ce to destination Estimated time of arrival at destination Starting point highlighted Highlighted stopover 1 on the map Highlighted stopover 2 on the map Highlighted stopover 3 on the map Final destination highlighted on map Orientation Scale Changing Interrupting route guidance Press the function button or press the button Select Stop route guidance Change the information if necessary Select Star...

Page 138: ...estination input menu Þ page 117 fig 121 select the top destination desired from the list below the menu item Start route guidance Select Start route guidance If you have activated the Display as top destination Þ fig 138 func tion when making entries in the directory Þ page 135 or Þ page 103 they are listed Þ page 136 in a destination input menu Þ page 117 fig 121 under the menu item Start route ...

Page 139: ...omatically Select your desired entry Select Start route guidance Tips There may be entries which cannot be displayed fully in the display because they contain too many letters and are too long If you select one of these entries using the control knob a second window will open up after a few seconds You will be given addi tional information about the selected entry in this window The list of previo...

Page 140: ...ording to distance from your present location The following top categories are available Parking lot Parking garage Gas station Audi service Hospital Tips If no top special destination is found for the category selected there is no top special destination from this category in your vicinity or no top special destination from this category exists on the navigation DVD Store in directory The current...

Page 141: ...ation entered is assigned to this entry If you already have a destination assigned to an directory entry the new destination will overwrite the old destination Addresses saved as top destinations are displayed in the destina tion input menu and can be selected there Þ page 133 Tips Route plans route with stopovers can be stored using the Store route function Þ page 137 Administration of the direct...

Page 142: ...estination and stop overs and can be loaded again as a new destination Þ page 137 The route plan can be changed at any time after input is complete Select a destination from the route plan by rotating and pressing the control knob Then you can select Change Move Delete or Drive to now Þ page 137 If you have selected the Drive to now function and you would not like to edit the route route guidance ...

Page 143: ...n or stopover can be deleted If you delete a destination the system will automatically select a stopover and make that your new destination Drive to now You can drive directly to the selected final destination or stopover If you do not want to edit the saved route the route will be saved in the memory when Start route guidance is activated and the current vehicle location will be used as the start...

Page 144: ...e navigation menu If you would like to visit stopovers on the way to your final destination select Route with stopover Þ fig 146 and enter your driving route with stopover and destina tion addresses into the Route plan Þ page 121 If you want the Navigation System to take you to your final destination without stopovers select Route without stopover and enter the address of your destination Þ page 1...

Page 145: ...ation Tips If you switch to the Navigation function and you are shown the menu for Route planning Þ page 139 fig 146 you are in route guid ance with stopovers If you would like to navigate directly to a final destination select and confirm Route without stopovers in the menu for the Route function Route list Fig 147 Navigation Route list Press the Route control button in the navigation menu Select...

Page 146: ...nimize With Ferry minimize an attempt is made not to include any stretch which includes a ferry connection when calculating the route Toll road Comprises the options include and minimize With Toll road minimize an attempt is made when calculating the route not to include any stretch which includes a road which you have to pay to drive on Time restrict Comprises the options include and minimize Wit...

Page 147: ...stem does not calculate an alternate route local conditions are making this impossible If the recommended detour route is not followed the system automatically calculates a new route from the current position without given further consideration to the previously closed section Map control button General There are various displays for maps and information with different options possible Fig 149 Nav...

Page 148: ...lie in an IPD area the Navigation System will guide you up to the start of the IPD area In the IPD area you will be guided by directional arrows If your route guidance includes an IPD area you will be advised of this by a voice message when route guidance starts It is possible that there are unforeseen traffic regulations on the way to the desti nation Tips Route guidance is additionally shown by ...

Page 149: ... arrows in the instrument cluster display Þ page 113 or Þ page 114 Tips An underpass or a tunnel is shown by broken lines on the map display up to a scale of 0 5 mile Map display with active side menu The map display can be changed through the active side menu Fig 152 Navigation Map display with active side menu Press the Map control button in the navigation menu Press the control knob to switch t...

Page 150: ... side menu activation you can switch back and forth between direction of travel and North Fig 153 Navigation Map orientation North in the active side menu Press the Map control button in the navigation menu Press the control knob to switch to the side menu Rotate the control knob to the first map menu item Þ fig 153 By pressing the control knob you can switch back and forth between orientation Nor...

Page 151: ...ve again Þ page 153 When you make the selection North the map is oriented to the North Þ page 145 fig 153 The vehicle always remains in the center of the display When you make the selection Drive the vehicle symbol is oriented pointing upward The map rotates around the vehicle An active map side menu is deactivated again by pressing the button Þ page 144 Zoom map Fig 154 Navigation Adjusting zoom ...

Page 152: ... 155 Rotate the control knob counterclockwise to zoom into the map smaller scale display of details or Rotate the control knob clockwise to zoom out of the map larger scale more overview You are shown the scale Þ page 146 fig 155 in the side menu Press the button Þ page 18 to leave the map side menu The scale can be set from 50 m to 600 km When you change the scale with the side menu active this c...

Page 153: ...over or Save to directory You can set the point marked at the time by the crosshairs as a desti nation or stopover or save it to the directory If additional detailed information is available for the selected point on the map you can display it using the Detail info function You can also specify a new point on the map by moving the crosshairs Þ page 149 This new point can then be Set as destination...

Page 154: ...Press the control knob to switch to the side menu Rotate the control knob to the fourth menu item Press the control knob the horizontal line in the crosshairs is highlighted in white Þ fig 158 Rotate the control knob to the desired point Press the control knob the vertical line in the crosshairs is highlighted in white Þ fig 159 By pressing the control knob you can switch back and forth between ho...

Page 155: ...v Info control button in the navigation menu You are shown the final destination or next stopover with address estimated time of arrival and distance Þ fig 160 Rotate the control knob to the left The data for the next stopovers or the destination are displayed Rotate the control knob to the right The data for your current location with its geographical data and the number of receivable satellites ...

Page 156: ...ion main menu page one Fig 163 Setup Navigation main menu page two In a navigation menu press the Þ page 16 func tion button to open the main Setup menu for the naviga tion function Þ fig 162 Press the button again to close the main Setup menu again The following settings are possible in Setup Navigation Map scheme Þ page 152 Orientation Þ page 153 Map type Þ page 154 Map contents Þ page 155 Voice...

Page 157: ...recommend that you enter these settings when the vehicle is stationary Please noteÞ page 9 Map scheme The map display can be changed according to driving conditions day night Fig 164 Setup Navigation Night map Press the function button Þ page 16 in the navi gation menu Select Map scheme Select day night or auto day The map display contains all topographical details The background is shown light Th...

Page 158: ...eam lights are turned on Map orientation Fig 165 Setup Navigation Map orientation North Press the function button Þ page 16 in the navi gation menu Select Orientation Select north dir of travel or auto north The map display is always oriented north the directional arrow on the vehicle symbol rotates accordingly Þ fig 165 dir of travel The vehicle symbol points to the top The map rotates accordingl...

Page 159: ...a tion for a current route plan The destination is marked with a desti nation flag When you select this type of map the North Þ page 153 orientation is set automatically to make it easier to orient yourself Current position The current vehicle location is displayed The orientation of the map matches the settings in Setup for navigation Þ page 153 Overview When you select this type of map the entir...

Page 160: ...k mark will appear after each filter option Turning off individual filter options Press the function button Þ page 16 in the navi gation menu Select Map content Under Map content select the individual categories that should no longer be active and press the control knob The check mark after the corresponding category is no longer displayed Turning off all filters Press the function button Þ page 1...

Page 161: ...ark Þ fig 168 The voice commands are given during route guidance Delete previous destinations Press the function button Þ page 16 in the navi gation menu Select Delete previous destinations Þ fig 168 Bestätigen Sie Are you sure you that want to delete the previous destinations with Yes The entire list of previous destinations is deleted Turn list During route guidance upcoming changes of direction...

Page 162: ...the turn Estimated distance to each recommended turn or to destination The name underneath the three line Turn list shows you the road you are presently driving on Tips If you have activated the Turn list and freeway information Þ page 157 you are shown the list of freeway information on free ways Þ fig 170 and the Turn list on other roads Þ page 156 fig 169 Highway info When driving on freeways a...

Page 163: ...tion can be displayed Freeway interchanges Freeway exits Parking areas Filling stations and rest areas Times of less than one minute until you reach the event are not shown The name underneath the three part table shows you the freeway secondary road and street names for the current location Tips If you have activated the Turn list Þ page 156 and freeway informa tion you are shown the list of free...

Page 164: ...you would like to activate the Intersection map function you first have to deactivate the Auto intersection zoom function These two functions are mutually exclusive Tips The map is oriented to driving direction Þ page 153 when switching to zoom mode Auto intersection zoom The map displays in zoom mode at intersections Fig 173 Setup Navigation Auto intersection zoom activated Press the function but...

Page 165: ...hown in the instrument cluster display Þ fig 175 If the system recognizes the road the road on which you are presently driving is also shown Version information Press the function button Þ page 16 in the navi gation menu Select Version information Þ fig 174 The software version for the Navigation DVD in use is shown Tips You can obtain information on updates for the Navigation DVD at an Audi deale...

Page 166: ... provides a simulation of the route you entered This allows you to effectively plan and display your destination by showing specific map content Þ page 155 or route criteria Þ page 141 Map type Position 3D Þ page 154 is not shown in Demo mode If you have selected map type Position 3D the simulation is shown in map type current position Set position direction Fig 177 Setup Navigation Input position...

Page 167: ...ecommend entering the data for the starting point into a desti nation input menu Þ page 117 fig 121 before you select the Set position direction That way the system will jump to the point entered in the map display It is easier to set the location on the map from this point You can search for the starting point using the crosshairs Þ page 149 You can enter the starting point manually to calculate ...

Page 168: ...e information as in the main function once the control button for the Nav Info is pressed Main information menu Information data Location and destination information can both be displayed Fig 179 Info Displaying the destination Press the function button to display the main information menu Þ fig 179 You are shown the destina tion or next stopover with address estimated time of arrival and distance...

Page 169: ...ion with the following data Destination Stopovers Estimated time of arrival Distance to destination Location of your vehicle Geographic location of your vehicle latitude longitude Received satellites The last navigation announcement will also be repeated Tips If you press the button within the Info function you can program sound and tuning settings using the control buttons and adjust the brightne...

Page 170: ...Information INFO 165 General operation RADIO CD NAME TEL NAV INFO CAR SETUP ...

Page 171: ...166 ...

Page 172: ...167 CAR SETUP ...

Page 173: ...ll be displayed If you select the Version function in the main Car menu the hard ware and software status for the Audi Navigation System plus will be displayed Tips If you press the button within the Car function you can program sound and tuning settings using the control buttons and adjust the brightness for the display Þ page 169 CAR SETUP ...

Page 174: ...ready pressed The main Setup menu Þ fig 180 which is part of the main function e g radio is displayed Press one of the control buttons in a Setup main menu Þ page 17 to go to the submenus for the Setup function in the example Radio to Þ fig 180 The Setup menu operates in conjunction with a function button already pressed Þ page 16 and opens additional menu items for the main function Radio CD MP3 ...

Page 175: ...exts for the Navigation System are changed to the selected language The language for the audible navigation commands are also changed The following languages can be selected Control button functions Þ page 169 fig 180 Setup submenus Settings Menu language Distance unit Time Date format Factory settings Delete user data Sound Balance Fader Treble Bass DSPa b Volume settings Navigation info a Digita...

Page 176: ...not be selected Setting distance unit km miles Fig 182 Setup Distance unit Press the Settings control button in the Setup menu Select Distance unit Select from the units miles or km Time Date format Time of day and date can be adjusted through the preset formats Fig 183 Setup 12h time format setting Setting time format Press the Settings control button in the Setup menu Select Time Date format Þ f...

Page 177: ...he time and date are received via the GPS In this case GPS shows under the menu item Time source GPS time can be set through the menu item GMT Tips If the instrument cluster source should not be available please contact an Audi dealership or authorized facililty Factory settings Settings can be reset to prespecified default settings in this function Fig 184 Setup Settings factory settings Press th...

Page 178: ... data previous destina tions radio memory list are deleted Sound control button Sound settings The explanations for the sound settings start with section Þ page 92 Display control button Switch off display Fig 185 Setup Switch off display Switch off display Press the Display control button in the Setup menu Select Switch off display Þ fig 185 The display is switched off the systems for navigation ...

Page 179: ...ect Brightness Þ page 173 fig 185 Rotate the control knob to change the brightness of the display The brightness of the display adjusts automatically to ambient light In addition the brightness of the display can be regulated with the general adjustment for instrument lighting and with the Brightness function in the Navigation System Tips You can find more information about adjusting the instrumen...

Page 180: ...D MP3 the Random function does not start although you have activated Random The Random function depends on the setting in Repeat Þ page 81 or Þ page 86 Name Directory only the data field Name can be selected in the directory and the remaining data fields are shown greyed out Before all the data fields can be accessed the name first has to be entered in the directory Þ page 100 Navigation you are n...

Page 181: ...ny external damage Exchange service After expiration of the warranty equipment requiring repair will be exchanged for overhauled equipment at replacement value with an exchange part warranty This is dependent upon whether there is no damage to the housing and no unqualified persons have attempted to make repairs Tips In a warranty case or in the event of an exchange the device card with the PIN nu...

Page 182: ...Frequently Asked Questions FAQ 177 General operation RADIO CD NAME TEL NAV INFO CAR SETUP ...

Page 183: ...178 ...

Page 184: ...179 Alphabetical index ...

Page 185: ...7 Forward Reverse button 18 Function buttons 16 Return button 18 C Cancelling electronic lock 14 Cancelling lock 14 Car General Function button 168 Version 168 Category display 90 Category filter Satellite radio 72 CD Sound control button 92 Source selection 77 CD CD control Forward reverse 80 Mix Random 81 Scan track 81 Track next previous 80 CD CD list CD selection 79 CD General 74 CD changer 35...

Page 186: ...ent 149 Cursor 29 D Date format 171 Delete directory 103 Delete previous destinations 156 Delete stored stations FM AM range 67 Delete stored stations Satellite radio 73 Delete user data 173 Demo mode 161 Destination input from the map 128 Route plan 121 Single destination 119 Street regional 123 124 126 Street city with special characters 125 Details MP3 86 Directory Main menu 99 Directory naviga...

Page 187: ...ncy band Radio 57 Frequently Asked Questions 175 Function buttons Car 168 CD SD 74 75 FM AM 56 General description 16 INFO 163 Name 98 Navigation 115 Setup 169 Telephone 105 G GALA 93 General information 10 General safety precautions 9 GPS Global Positioning System 110 H Handling CDs 51 Handling the navigation DVD 51 Highway info 157 Hints on DVD operation Adhesive labels 50 Cleaning tips 50 Handl...

Page 188: ...ton CD SD 75 Loading a memory card 41 Loading MP3 CD 38 Main menu 83 MMC memory cards 40 MP3 ctrl control button 85 MP3 list control button 84 MP3 player 37 Removing a memory card 42 SD memory cards 40 Selecting a track 83 Setup 88 Sound 92 Source control button 77 Storage medium MP3 CD 37 MP3 MP3 ctrl 85 Forward reverse 85 MIX Random 86 NAME Details 86 Scan track 87 Track next previous 85 MP3 MP3...

Page 189: ...VD 36 Main menu 117 Map control button 142 Memory control button 134 Nav Info 150 Operation 110 Route control button 139 Route guidance 109 Safety precautions 108 Setup 151 Version information 160 Voice information 156 Navigation Map Additional information 155 Auto intersection zoom 159 Colors 152 Content 155 Cross hairs 144 Crosshairs 149 Day nigh view 152 Destination display 144 Destination orie...

Page 190: ...Information data 150 Load destination 136 Load from directory 136 Load route 137 Memory control button 134 Navigation DVD 110 Presentation of information 130 132 Previous destinations 134 Region selection 118 Route criteria 141 Route list 140 Route plan 137 138 139 Route plan information before starting route guidance 132 Route with stopover 121 Route without stopovers 119 Save route 137 Saving de...

Page 191: ...tup Satellite radio 70 Sorting stations Satellite radio 70 Sound 92 Station display FM AM range 66 Station info Satellite Radio 71 Station reception FM AM range 65 System information Satellite Radio 73 Ticker text FM AM range 66 Tuning control button 62 Radio Memory Saving stations 61 Radio Sound See Sound 92 Radio Station lists AM band 59 Calling up memory list 61 Delete stored stations FM AM ran...

Page 192: ...fo 71 Station list 69 Technical requirements 67 SCAN MP3 track 87 Scanning a CD track 81 Station scan FM AM range 64 Screen settings Brightness 174 SD memory cards 40 Seek mode FM AM range 63 Selected text 29 Selecting route 130 Selecting source See Audio source selection 77 Self help 175 Set position direction 161 Setting distance unit 171 Setting the language 170 Setting the menu language 170 Se...

Page 193: ...lite radio 70 Station display FM AM range 66 Station info Satellite Radio 71 Station reception FM AM range 65 Ticker text FM AM range 66 Shape CDs 49 Show list 102 Single destination before starting route guidance 130 Sorting stations Satellite radio 70 Sound Basic sound characteristics 92 DSP Digital Signal Processing 93 Dynamic noise cmpensation 94 Dynamic noise compensation 94 GALA 93 Volume se...

Page 194: ... on operating your CD changer Adhesive labels 49 CD rings 49 Cleaning your CDs 49 Labels 49 Shape CDs 49 Tips on playing your CDs 49 Top categories 134 Top destination 133 Track display 90 Track next previous CD 80 MP3 85 Tuning FM AM range 62 Turn list 156 U User friendly radio coding 13 V Vehicle orientation 145 153 Verical movement cross hairs 144 Version 168 Version information 160 Vertical mo...

Reviews: