background image

16

Step 4:

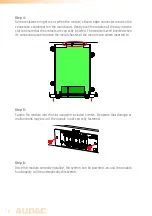
Some resistance might occur when the module’s board edge connector reaches the 
connection counterpart on the main board. Gently push the module all the way into the 
slot to ensure that the contacts are correctly inserted. The module is well inserted when 
its connection panel touches the metal chassis of the main device where inserted to.

Step 5:

Fasten the module into the slot using the included screws. Be aware that damage or 
malfunctions may occur if the module is not correctly fastened. 

Step 6:

Once the module correctly installed, the system can be powered-on and the module 
functionality will be automatically discovered.

Summary of Contents for IMP40

Page 1: ...IMP40 User Manual www audac eu ...

Page 2: ...h care and is as complete as could be on the publication date However updates on the specifications functionality or software may have occurred since publication To obtain the latest version of both manual and software please visit the Audac website www audac eu ...

Page 3: ... Equipment WEEE 7 Chapter 1 Connections and connectors 8 Connection standards 8 Chapter 2 Overview IMP40 9 Chapter 3 Using the IMP40 10 Database updates 10 Module screen 10 Station selection 11 USB backup 12 Settings screen 12 Chapter 4 Installing the IMP40 15 Chapter 5 Additional information 17 IP basics 17 Technical specifications 19 Notes 20 ...

Page 4: ...4 ...

Page 5: ...hannel hopping or music stops When the connection is interrupted automatic switching to inserted media carriers USB drives avoids unpleasant silences in background music applications The audio stream will be automatically and seamlessly restored afterwards It synchronizes with the vTuner database which contains over 30 000 channels allowing selection on different criteria such as genre location la...

Page 6: ... NOT INSTALL THIS UNIT NEAR ANY HEAT SOURCES SUCH AS RADIATORS OR OTHER APPARATUS THAT PRODUCE HEAT DO NOT PLACE THIS UNIT IN ENVIRONMENTS WITH A HIGH LEVEL OF DUST HEAT MOISTURE OR VIBRATION THIS UNIT IS DEVELOPED FOR INDOOR USE ONLY DO NOT USE IT OUTDOORS ONLY USE ATTACHMENTS ACCESSORIES SPECIFIED BY THE MANUFACTURER UNPLUG THIS APPARATUS DURING LIGHTNING STORMS OR WHEN UNUSED FOR LONG PERIODS O...

Page 7: ...llection point or recycling centre for electrical and electronic waste Do this to make sure that the product is recycled in an environmental friendly way and help to protect the environment in which we all live CAUTION The symbols shown are internationally recognized symbols that warn about potentional hazards of electrical products The lightning flash with arrowpoint in an equilateral triangle me...

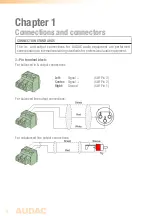
Page 8: ... equipment are performed corresponding to international wiring standards for professional audio equipment 3 Pin terminal block For balanced in output connections Left Signal XLR Pin 3 Center Signal XLR Pin 2 Right Ground XLR Pin 1 For balanced line output connections For unbalanced line output connections ...

Page 9: ...3 pin terminal block connectors The audio output available on this connector allows it to be fed to any amplifier or pre amplifier 2 Ethernet RJ45 connector The Ethernet connection implemented using an RJ45 type connectors This Ethernet connection works as the audio stream input of the IMP40 Hereby it shall get connected to any LAN network with internet access for reaching the database and audio s...

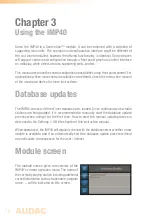
Page 10: ...n device for more instructions Database updates The IMP40 comes with the vTuner database pre loaded Since continuously new radio stations are being added it is recommended to manually start the database update process when using it for the first time How to start the manual update process is described in the Settings DB info chapter of this instruction manual When operational the IMP40 will regula...

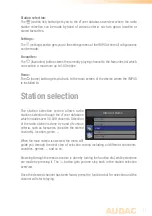
Page 11: ...on selection screen allows radio stations selection though the vTuner database which includes over 30 000 channels Selection of the radio station is done by hand of various criteria such as favourites includes the stored channels location genre When the main criteria is selected the menu will guide you through the next step of selection criteria including all different continents countries genres ...

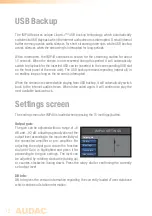
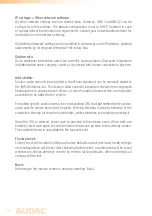
Page 12: ...ess loop as long as the stream is interrupted When the stream is recovered while playing from USB backup it will automatically switch back to the internet audio stream When interrupted again it will continue to play the next available backup track Settings screen The settings menu for IMP40 is loaded when pressing the settings button Output gain The gain can be adjusted within a range of 8 dB and ...

Page 13: ...d where all network settings can be customized DEFAULT NETWORK SETTINGS DHCP ON IP address Assigned by DHCP Subnet mask Assigned by DHCP Gateway Assigned by DHCP DNS 1 Assigned by DHCP DNS 2 Assigned by DHCP IP Settings DHCP In default configuration the DHCP function for the IMP40 is enabled whereby the IP address and other network settings are automatically assigned through the DHCP server in you...

Page 14: ...dcast streams from corporate headquarters to various branch offices or specific audio streams which are not public accessible to be added to the system For adding specific audio streams the corresponding URL shall get entered to the system and a specific stream name shall be given Entering this data is done by selection of the characters through turning the function dial while selections are made ...

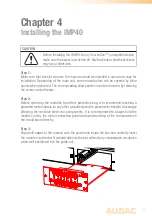
Page 15: ...emoved by releasing the screws on both ends Step 2 Before removing the modules from their protective bag we recommend touching a grounded metal chassis or any other grounded point to prevent electrostatic discharges affecting the sensitive electronic components It is recommended to always hold the module card by the metal connection panel and avoid touching of the components on the circuit board d...

Page 16: ...ectly inserted The module is well inserted when its connection panel touches the metal chassis of the main device where inserted to Step 5 Fasten the module into the slot using the included screws Be aware that damage or malfunctions may occur if the module is not correctly fastened Step 6 Once the module correctly installed the system can be powered on and the module functionality will be automat...

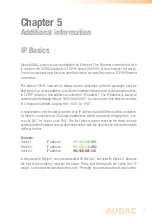
Page 17: ...1 As you can see this address consists of 4 separate numbers ranging from 000 to 255 In simple terms only the latest number of an IP address can be different within a network so there is a maximum of 254 unique addresses within a network ranging from xxx xxx xxx 001 to xxx xxx xxx 254 The first three numbers must be the same to make communication between several devices possible else the devices c...

Page 18: ...168 000 xxx If your network is using a different IP range the AUDAC products will not be accessible from your network You can change the IP address of the AUDAC products to make them work properly in your network This can be done in the settings menu and is described extensively in the Settings chapter of this user manual Ask your network administrator for help if you are not familiar with network...

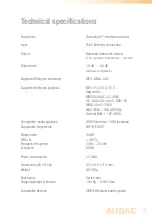
Page 19: ...MP3 V1 0 V2 0 V2 5 Ogg vorbis MPEG4 2 AAC LC PNS HE AAC v2 Level 3 SBR PS WMA 4 0 4 1 7 8 9 WAV PCM IMA ADPCM General MIDI 1 SP MIDI Compatible media playback USB Flash drive HDD external Compatible filesystems FAT16 FAT32 Signal noise 94 dB THD N 0 07 Frequency response 20 Hz 20 kHz Crosstalk 80 dB Power consumption 1 5 Watt Dimensions W x H x D 87 x 34 5 x 114 mm Weight 0 070 Kg Packaging Carton...

Page 20: ...20 Notes ...

Reviews: