


XDS-PRO (PRO1R, PRO4R & PRO1S, PRO4S) Satellite Receivers - User Guide Rev. A R830001-2106
6-1
MONITOR AND CONTROL INTERFACE
ATX
Confidential & Proprietary
MONITOR AND CONTROL INTERFACE
6. Monitor and Control Interface
The XDS-PRO receivers are equipped with multiple methods for viewing and changing receiver settings. The M&C Console
Port on the back of the receiver can be used for this purpose.
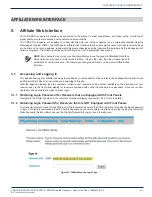
6.1 Setting up a Console Connection
To set up a console interface from your computer to the receiver:
•
Connect a standard serial cable from the serial port on your computer to the port labeled “Console” on the back of
the receiver.
•
Open HyperTerminal from the Start Menu: Start > All Programs > Accessories > Communication > HyperTerminal.
•
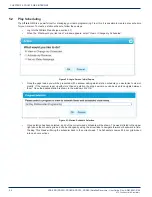
In the Connection Description dialog, enter a description representative of the receiver model you’re connecting
to (e.g. – “XDS-PRO1S Receiver”, or “XDS-PRO4S” – something that will help you identify the connection) as the
connection Name, and select a connection Logo. Press “OK”.
•
In the Connect to dialog, select “COM1” (of, if the serial cable is connected to a different port, the name of the correct
port) in the “Connect using” drop down list.
•
In the COM1 Properties dialog, select 115200 in the “Bits per second” drop-down list, 8 in the “Data bits” drop-down
list, “None” in the “Parity” drop down list, 1 in the “Stop bits” drop-down list, and Hardware in the “Flow control” drop
down list. (Some terminal emulators require the “no” setting for flow control.) Press “Apply” and then press “OK”.
You are now ready to communicate with the XDS-PRO receiver via the console you have created. There are a variety of typed
commands that the receiver responds to. By default, the console is not logged into the receiver, and as such the console will
have a very limited set of commands to use. Without logging in, the user can only use status commands and may not change
any receiver settings. To log in, use the following account:
•
TECH: The tech account has full access to every command the receiver has to offer. Only use the account when
trouble-shooting the receiver or performing technical diagnostics.
◦
Username: tech
◦
Password: radio
To log into either of these use the LOGIN command, detailed below in Section 6.2.
6.2 Console Commands
Tasks are performed through the console via commands. The syntax for any command is the name of the command, followed
by a comma separated list of one or more option command arguments. Below is a list of all commands available along what
command arguments are required and what the command does. Some commands are only available under the “tech” profile.
Please refer to your quick start guide for directions on how to login with these accounts.
6.2.1 Tech Account Commands
This section will outline those commands that are available to the Tech account only.
BACKLIGHT Command:
Allows the user to turn the LCD backlighting on and off. The syntax for this is
BACKLIGHT
[ON/
OFF].
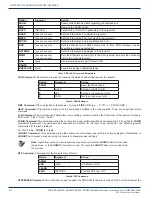
E0 and E1 Commands:
The
E0
and
E1
commands change various settings for the first and second Ethernet ports respectively.
The syntax for these commands is shown in Table 2.
CHAPTER 6:


