


5
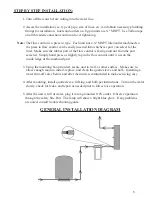
STEP BY STEP INSTALLATION:
1. Turn off the water before cutting into the water line.
2. Assess the installation (i.e. type of pipe, size of lines, etc.) and obtain necessary plumbing
fittings for installation. Inlets and outlets on 8 gpm units are
3/4
" MNPT. Use Teflon tape
on all threaded connections and avoid over tightening.
Note:
The flow control is a press in type. Each unit has a
3/4
" MNPT inlet/outlet machined so
the press in flow control can be easily inserted into whichever port you select for the
inlet. Make sure the rubber part of the flow control is facing outward from the port
selected. Simply hand press or slightly tap in the flow control until it sits on the
inside ledge of the machined port.
3. Using the mounting box provided, secure unit to wall, or other surface. Make sure to
allow enough room to install, replace, and clean the quartz sleeve and bulb. Installing a
water shut-off valve before and after the unit is recommended to make servicing easy.
4. After mounting, install quartz sleeve, O-Ring, and bulb per instructions. Turn on the water
slowly, check for leaks, and repair as needed prior to full service operation.
5. After the unit is full of water, plug it into a grounded 110V outlet. Observe operation
through the safety Site Port. The lamp will show a bright blue glow. If any problems
are noted, consult trouble shooting guide.
GENERAL INSTALLATION DIAGRAM
Summary of Contents for Safe Lite SL-2V
Page 16: ...16 WIRING DIAGRAM...
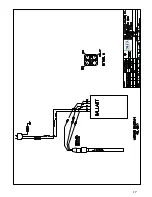
Page 17: ...17...
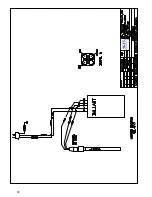
Page 18: ...18...
Page 19: ...19 DRAWING AND PART NUMBERS...
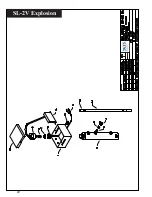
Page 20: ...20 SL 2V Explosion...
Page 22: ...22 SL 8V Explosion...


