


Setting Up Your t68WD
Positioning Your t68WD
13
2.1 Positioning Your t68WD
There are two ways to position your t68WD:
•
Put it on a desk or a desired place
horizontally
.
•
Mount it on
the back of a monitor
using a VESA mount kit.
NOTE
•
The VESA mount kit is an optional accessory for your t68WD. Your package may not
contain a VESA mount kit. Contact your dealer if needed.
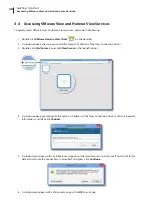
To mount your t68WD on the back of a monitor, please follow the steps below:
Step 1:
Understand Your VESA Mount Kit for t68WD
Step 2:
Mount Your t68WD
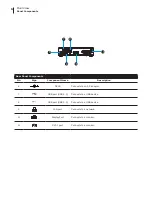
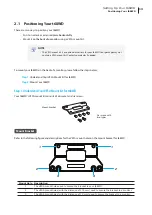
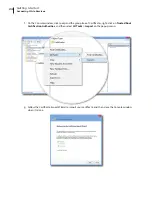
Step 1: Understand Your VESA Mount Kit for t68WD
Your t68WD’s VESA mount kit consists of a bracket and six screws.
Mount Bracket
Refer to the following figure and descriptions for the VESA mount holes on the mount bracket for t68WD.
Mount Hole Description
1
The VESA mount holes used to secure the bracket to your t68WD.
2
The VESA mount holes (with the distance of 100 mm) used to secure the bracket to a monitor.
3
The VESA mount holes (with the distance of 75 mm) used to secure the bracket to a monitor.
Six screws with
two types
Mount bracket
2
1
1
2
3
3
Summary of Contents for t68WD
Page 1: ...Atrust t68WD Thin Client User s Manual Internal Draft 0 01 2015 Atrust Computer Corp...
Page 2: ...UM t68WD EN 15110915...
Page 8: ...vi...
Page 12: ......
Page 20: ...Overview 10...
Page 22: ......
Page 26: ...Setting Up Your t68WD 16...
Page 28: ......
Page 40: ...Getting Started 30...
Page 42: ......
Page 130: ...Configuring Client Settings 120...
Page 132: ......
Page 136: ...126...
Page 138: ...128...
Page 139: ...UM t68WD EN 15110915...
Page 140: ......


