4
C
ONNECTING
:
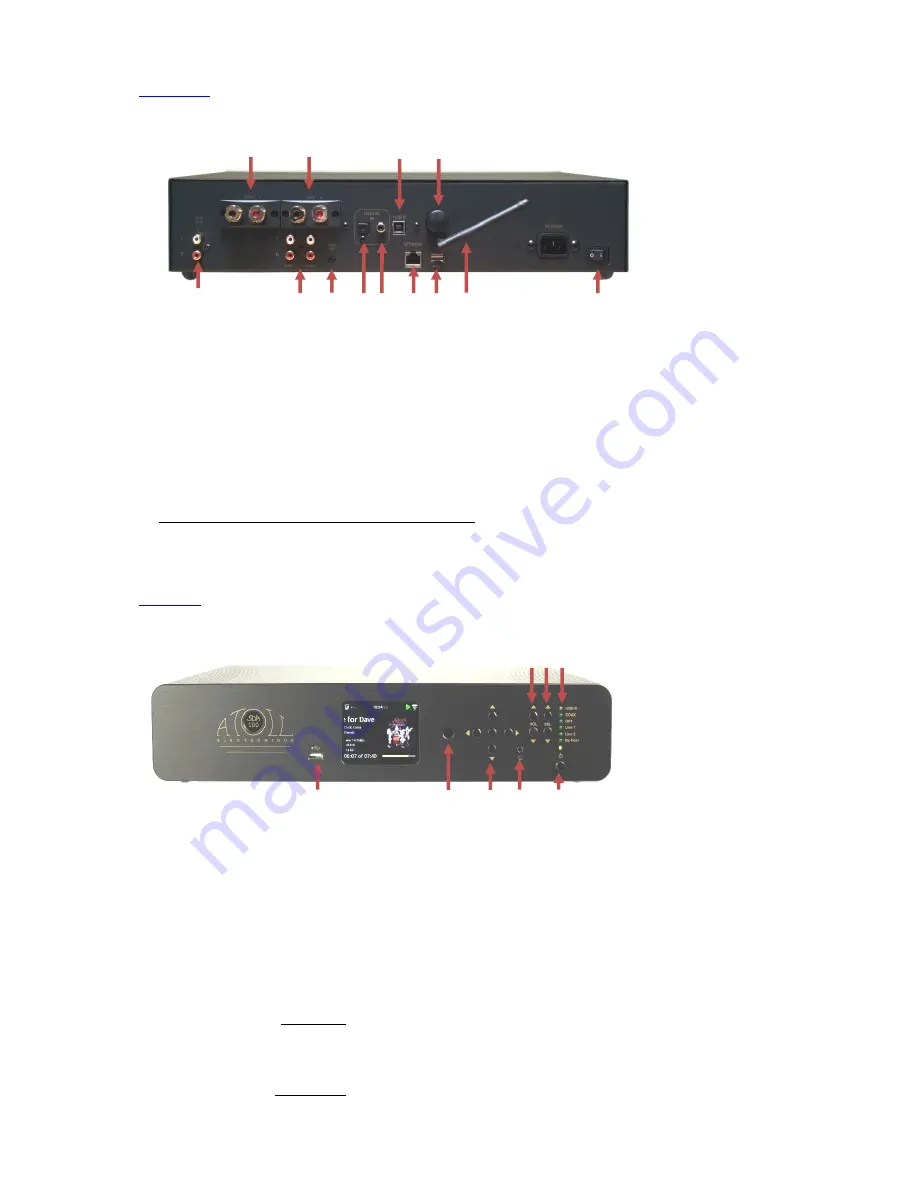
Rear view of Appliance:
1- Right channel Output
7- Trigger Output
2- Left channel Output
8- Optical digital Input
3- USB-B type Input (computer)
(*)
9- Coaxial digital Input
4-Bluetooth receiver
10- Ethernet link Input (RJ45)
5- Analog Outputs
11- USB-A type Input (Hard disk, USB key)
6- Analog Inputs (x2)
12- Wifi Antenna
13-
On/Off switch
(*)
Your appliance is equipped with a High-Res. asynchronous USB Input (B type). It will be possible to use it only when you’ll
have downloaded the appropriate driver on your computer (see separated flyer). Download this driver at:
http://www.atoll-electronique.com/convertisseur-dac.php
To avoid any troubles in the transfer of High Resolution files (24bits/192kHz), we recommend to use a USB interconnect with
ferrite.
F
UNCTIONS
:
Front view of Appliance:
14- Volume c&- keys and selection 17- USB-A type Input
of By-pass mode.
18- Remote control receiver
15- Inputs selections keys
19- Menus control keys
16- Inputs led selection
(1)
20- Headphones Outputs (jack 3.5)
(2)
21- On/Off key & stand-by led indicator
(3)
(1)
By default, when all selection led are off, the listening source is the Streamer.
(2)
Plugging the Headphones in the jack cuts the speakers Outputs.
(3)
2 stand-by mode are possible:
Short Stand-by:
with a short press on key 21, allows to switch off the display and all inputs. When you’ll put
you’re the streamer ON, you’ll conserve the selected source and the same volume level.
It is also possible to get over this stand-by directly from the iOS or Android apps by pressing the volume control
key.
Long Stand-by:
with a longer press on key 21 (3 sec.), the stand-by cuts all functions. When you’ll put the SDA
ON the volume will start at 0 (time of re-starting is longer).
1
2
3
4
5
6
7
8 9 10 11 12
13
14 15 16
17
18
19
20
21


