background image

Manual, Tool Changer, QC-110
Document #9620-20-B-110 Series Base Tool Changer-26

Pinnacle Park • 1031 Goodworth Drive • Apex, NC 27539 • Tel: 919.772.0115 • Fax: 919.772.8259 • 

www.ati-ia.com

 • Email: 

[email protected]


B-53

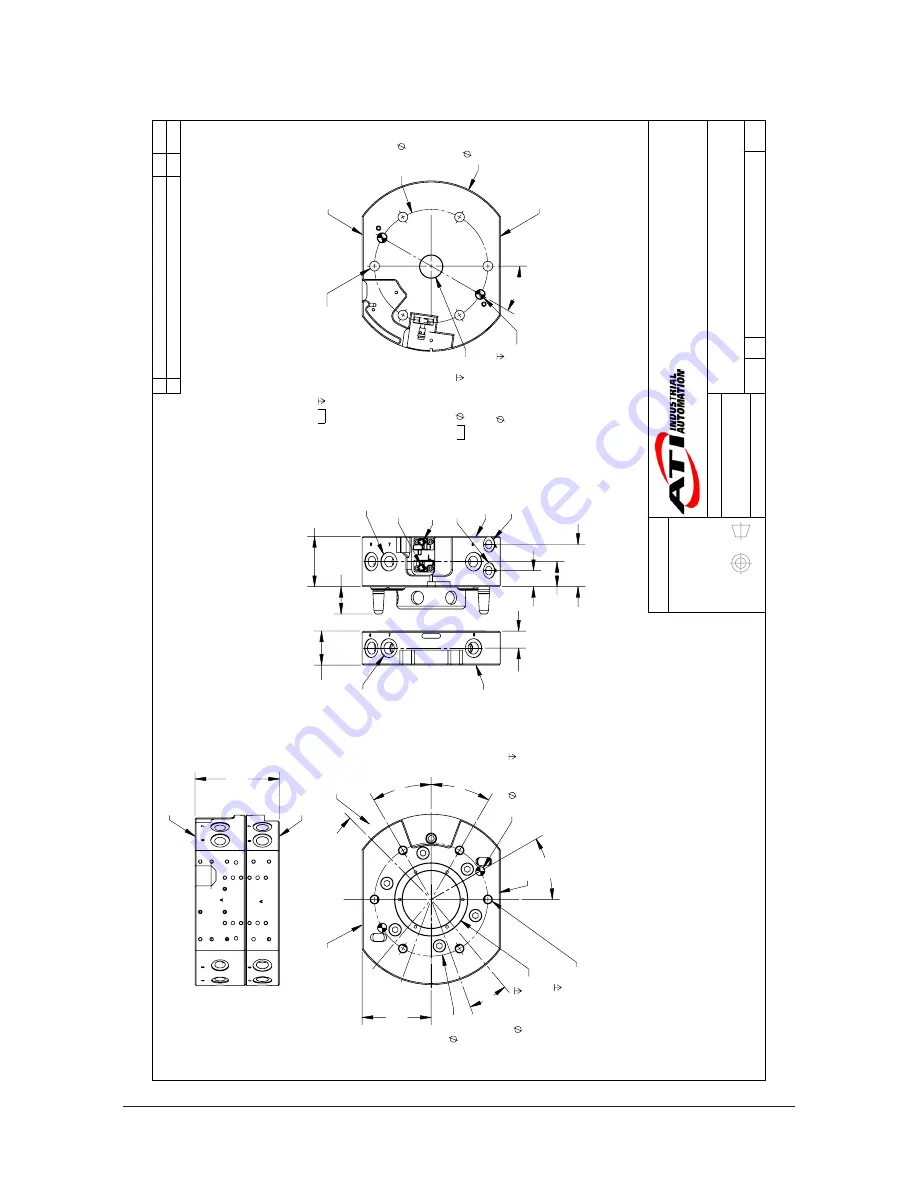
8.4  QC-110 Tool Changer, G 1/4 BSPP Ports

3rd ANGLE PROJECTION

30.2 Pin

37.7 Tool

55.4 Master

18.9

 17.8 

 27.7 

 46.6 

8X G1/4

Pneumatic Thru Ports

8X G1/4 Pneumatic Thru Ports

(B)

(A)

G1/8

Lock Port

G1/8

Unlock Port

Lock Sensor

Unlock Sensor

25 H7 

3.8

Note 3

 B.C. 

125 

188

Master & Tool

6X Thru Holes for M10 SHCS

15.5 From Far Side Equally Spaced

Customer Interface

2X 

10 (Slip Fit) 

12

Equally Spaced

Customer Interface

Note 3

 30° 

Master Side

(projection only)

Flat A

Flat B

80

 H7 

4

Customer Interface

Note 4

15°

20°

 Typ.

 30° 

 30° 

76.2 Typ.

 B.C 

125 

 30° 

Tool Side

(projection only)

Flat A

Flat B

8

7

6

5

4

3

2

1

Pneumatic Port I.D.

6X M10X1.5 

20

Equally Spaced

Customer Interface

2X 

10 H7 

6

Equally Spaced Customer Interface

93.1

Coupled

(A)

(B)

Notes:

The -Sx in the Master part number indicates the Lock/Unlock sen

sor option. 

1.

Multiple sensor options are available. Ready to Lock sensing is available.

2.

No options for a boss size. Must use the two Ø10 dowel holes fo

r alignment.

3.

Center recess inserts available for several sizes.

4.

Part Numbers Shown: (A) Master: 9120-110AM-000-000-Sx-G14 (B) Tool: 9120-110FT-000-000-G14

Rev.

Description

Initiator

Date

05

ECO 14275; Updated to show current Master Side configuration

SZJ

7/26/2016

B

1:2.5

1

3

REVISION

NOTES:  UNLESS OTHERWISE  SPECIFIED.

DO NOT SCALE DRAWING.   ALL DIMENSIONS ARE IN  MILLIMETERS.

DRAWN BY:

CHECKED BY:

D. Swanson 6/5/09

D. Wagner 6/10/09

TITLE

SCALE

SIZE

DRAWING NUMBER

PROJECT #

SHEET       OF 

9630-20-110-G14


05

PROPERTY OF ATI INDUSTRIAL AUTOMATION, INC. NOT TO BE REPRODUCE

D IN ANY 

MANNER EXCEPT ON ORDER OR WITH PRIOR WRITTEN AUTHORIZATION OF A

TI.

1031 Goodworth Drive, Apex, NC 27539, USA Tel: +1.919.772.0115      Email: [email protected] Fax: +1.919.772.8259      www.ati-ia.com ISO 9001 Registered Company


QC-110 Tool Changer with 1/4 BSPP Ports

Summary of Contents for QC-110 Series

Page 1: ...odule with J16 Pattern Removal B 11 2 9 Pneumatic Connections B 12 2 9 1 Valve Requirements and Connections for the Locking Mechanism B 12 2 10 Electrical Connections B 13 2 10 1 PNP Type Lock and Unl...

Page 2: ...6 Serviceable Parts B 33 6 1 Common Parts Alignment Pins Rubber Bushings and Master plates B 33 6 2 Current Model 9120 110xM 000 000 S0 B 33 6 3 Current Models with PNP Sensors 9120 110xM 000 000 SM S...

Page 3: ...picks up the customer tooling a pneumatically driven locking mechanism couples the two plates The patented fail safe locking mechanism utilizes a multi tapered cam with ball locking technology to ensu...

Page 4: ...T port connections are available to supply air pressure for coupling and uncoupling the Tool Changer There are 8 3 8 NPT G 3 8 BSPP Rc 1 4 BSPT or G 1 4 PSPP port connections available for pass throug...

Page 5: ...oling or a tooling interface plate There are 8 3 8 NPT G 3 8 BSPP Rc 1 4 BSPT or G 1 4 PSPP port connections available for pass through air for supplying air to tools Figure 1 2 Tool Plate Assembly 3...

Page 6: ...e this can cause damage to equipment or personal injury The mounting fasteners must be flush or below the mating surfaces of the Master and Tool plates Head of Mounting Fastener Must Be Flush or Below...

Page 7: ...d Master plate to mount flush Two dowel pins or a single dowel pin along with a boss recess used as alignment features Flush Correct Mounting of Master Plate Master Plate Interface Plate Dowel pins th...

Page 8: ...nt the Master plate to the IP is supplied with the IP The fasteners to mount the IP or the Master plate directly to the robot is customer supplied 4 Connect utilities to the appropriate modules and Ma...

Page 9: ...erface plate and Tool Boss and two dowel pins as alignment features can be difficult to align and can damage equipment Gap Incorrect Mounting of Tool Plate single dowel pin along with a If the custome...

Page 10: ...reads see Table 2 1 NOTICE If an ATI tool interface plate is used fasteners to mount the Tool plate to the tool interface plate may be supplied with the tool interface plate The fasteners to mount the...

Page 11: ...M4 mounting fasteners 6 Secure module with 4 M4 mounting fasteners using a 2 5 mm or 3 mm hex key Refer to Table 2 1 for proper torque for your specific mounting fasteners 7 Remove the all protective...

Page 12: ...alve adapter module The valve adapter module has an integrated solenoid valve and only requires the customer to supply a single air source to the valve adapter A customer supplied 2 position 4 way or...

Page 13: ...00 SFB 9120 110AM 000 000 SG 9120 110AM 000 000 SGH 9120 110AM 000 000 SM 9120 110AM 000 000 SMH 120 110AM 000 000 SM1 and 120 110AM 000 000 ST Table 2 2 PNP Current Sourcing Description Value Voltage...

Page 14: ...ollowing part number designator SV RTL sensors are not available for this model Example 9120 110AM 000 000 SV Table 2 4 PNP Current Sourcing Description Lock and Unlock Sensors Value Voltage Supply Ra...

Page 15: ...XHP222 Special is a NLGI 2 lithium complex grease with molybdenum disulfide The robot should be programmed to minimize misalignment during coupling and uncoupling Additionally the tool stand should b...

Page 16: ...locking process is complete before moving the robot CAUTION If air pressure is lost during operation ATI s patented fail safe design prevents the Tool plate from being released Do not use the Tool Cha...

Page 17: ...ertical position only 3 A sufficient delay must be programmed between unlocking valve actuation and robot motion so that the unlocking process is complete and the Tool plate is fully released before m...

Page 18: ...pecified Ideally the tool should be hanging vertically in the tool stand so that gravity assists to uncouple the Tool plate from the Master plate during unlocking It is possible to design tool stands...

Page 19: ...tenance steps for all utility modules Table 4 1 Maintenance Application s Tool Change Frequency Inspection Schedule General Usage Material Handling Docking Station 1 per minute Weekly 1 per minute Mon...

Page 20: ...1 Place the Tool in a secure location 2 Uncouple the Master and Tool plates 3 Turn off and de energize all energized circuits e g electrical air water etc 4 Use a clean rag to thoroughly remove any lu...

Page 21: ...ral coating of lubricant to the ball bearings the male coupling inside and out and the alignment pins Figure 4 4 Apply Lubricant to Locking Mechanism Apply Lubricant on Inner Surface of Male Coupling...

Page 22: ...ld Debris Blackened Pins 5 If debris or darkened pins are present use a vacuum to remove the debris and clean using a nylon brush ATI Part Number 3690 0000064 60 NOTICE Do not use an abrasive media cl...

Page 23: ...not moving freely in the male coupling Clean and lubricate as needed to restore smooth operation see Section 4 2 Cleaning and Lubrication of the Locking Mechanism and Alignment Pins The control signal...

Page 24: ...in and around contact pins Contact Pin worn or damaged V ring seal damaged allowing debris into contact pins Replace V ring seal refer to Section 5 2 1 V ring Seal Replacement 5 2 Service Procedures...

Page 25: ...Master plate using a 4 mm hex key If alignment pin cannot be removed using the hex key in the tip go to step 5 If alignment was remove go to step 6 Figure 5 2 Alignment Pin Removal Ratchet Wrench 4 m...

Page 26: ...ication of the Locking Mechanism and Alignment Pins 10 If repairs are complete return circuits to normal operation Figure 5 4 Alignment Pin Removal Ratchet Wrench 4 mm Hex Key Socket Alignment Pin Ass...

Page 27: ...cation 2 Uncouple the Master and Tool plates 3 If you are testing or replacing the Lock sensor make sure the QC 110 is in the locked position if you are replacing the Unlock sensor make sure the QC 11...

Page 28: ...ol Changer body as shown in Figure 5 7 11 Secure the sensor assembly using the 2 M3 socket flat head screws Tighten to 12 in lbs 1 4 Nm 12 Connect the Lock and or Unlock sensor cable connector to the...

Page 29: ...on 2 Uncouple the Master and Tool plates 3 Turn off and de energize all energized circuits e g electrical air water etc 4 Depending on the robot and interface plate used the Tool Changer Master plate...

Page 30: ...to the Tool Changer body and tighten to 60 in ozs 0 4 Nm 15 Route the sensor cable into the cable channel of the Master plate 16 Install the cable retaining plate 17 Apply Loctite 222 to the M3 socket...

Page 31: ...nd valve module 6 Remove the control signal module from the air valve adapter Module refer to Figure 5 10 7 Unscrew the Lock Unlock RTL sensor cable connector from the control signal module 8 Remove t...

Page 32: ...r body 17 Reinstall the valve module to the Master plate be sure that the cables are routed through the cable channel of the valve module 18 Reinstall the control signal module to the valve module 19...

Page 33: ...or 3 8 Bushing 4 1 9120 110xM 000 000 QC 110 Sleeveless Master Assembly NPT 4 1 9120 110xM 000 000 E QC 110 Sleeveless Master Assembly Euro 4 1 9120 110xM 000 000 G14 QC 110 Sleeveless Master Assembly...

Page 34: ...llow 6 2 4000 0000020 00 Male Female 6 mm Hex Standoff 8 mm Length M3 7 1 3700 20 4217 QC 110 Cable Retainer Cap 8 2 3500 1258010 11 M3 0 5 x 10 mm Socket Flat Head Cap Screw Black Oxide Table 5 6 912...

Page 35: ...00 SP RD1 1 Item No Qty Part Number Description 4 1 8590 9909999 190 NPN Prox Sensor Flat Pack 2m Lg Straight Pico Threaded Connector 5 1 3500 1258010 15A M3X10 Socket Flat Head Cap Screw Class 10 9 B...

Page 36: ...Current Model with NAMUR Sensors 9120 110xM 000 000 SV 1 2 Table 5 11 9120 110xM 000 000 SV 1 2 Item No Qty Part Number Description 1 2 9005 20 2271 Lock Unlock Sensor Assembly 25 Degree Orientation...

Page 37: ...6 6 Current Models 9120 110xM 000 000 SM1 1 2 Table 5 12 9120 110xM 000 000 SM11 Item No Qty Part Number Description 1 2 9005 20 2402 Sensor Carrier PNP 4mm Smooth Barrel 2M Hardwired Straight M8 Con...

Page 38: ...2 8590 9909999 34 Turck Prox PNP True 2mm Range Quick Disc 2 2 8590 9909999 63 90 Degree Cable PKW 3Z 6 S90 3 1 8590 9909999 123 PNP Flat Pack Proximity Sensor RTL 4 1 3500 1258010 15A M3X10 Socket F...

Page 39: ...00 000 SGH SEH 1 2 Table 5 15 9120 110xM 000 000 SGH Item No Qty Part Number Description 1 1 9000 20 1066 PNP Flat Pack Proximity Sensor RTL 2 2 8590 9909999 34 Turck Prox PNP True 2mm Range Quick Dis...

Page 40: ...919 772 8259 www ati ia com Email info ati ia com B 40 6 9 Discontinued Models 9120 110xM 000 000 SMH 1 2 Table 5 17 9120 110xM 000 000 SMH Item No Qty Part Number Description 1 1 9000 20 1283 Prox C...

Page 41: ...3 1 9120 C 3PF90 3PM90 0030 Picofast Cordset 3 Pin Female Right Angle Threaded to 3 Pin Male Right Angle LED Threaded 0 30 m 4 1 9120 C 3PF90 3PM90 0022 Picofast Cordset 3 Pin Female Right Angle Threa...

Page 42: ...rent Models 9120 110xT 000 000 1 Table 5 19 9120 110xT 000 000 Item No Qty Part Number Description 1 1 9120 110FT 000 000 QC 110 Tool Assembly 80mm Recess NPT 1 1 9120 110FT 000 000 R QC 110 Tool Asse...

Page 43: ...icron or better Coupling Force 80 psi 2 730 lbs 1 235 kg Axial holding force Recommended Max Moment X Y Mxy 6 940 in lbs 784 Nm Maximum recommended working load for optimum performance of the Tool Cha...

Page 44: ...Flat B 8 7 6 5 4 3 2 1 Pneumatic Port I D 93 1 Coupled B A Notes The Sx in the Master part number indicates the Lock Unlock sensor option 1 Multiple sensor options are available Ready to Lock sensing...

Page 45: ...1 B 1 2 2 3 REVISION NOTES UNLESS OTHERWISE SPECIFIED DO NOT SCALE DRAWING ALL DIMENSIONS ARE IN MILLIMETERS DRAWN BY CHECKED BY D Swanson 5 13 09 D Wagner 5 21 09 TITLE SCALE SIZE DRAWING NUMBER PROJ...

Page 46: ...VISION NOTES UNLESS OTHERWISE SPECIFIED DO NOT SCALE DRAWING ALL DIMENSIONS ARE IN MILLIMETERS DRAWN BY CHECKED BY D Swanson 5 13 09 D Wagner 5 21 09 TITLE SCALE SIZE DRAWING NUMBER PROJECT SHEET OF 9...

Page 47: ...I D 2X 10 H7 6 Equally Spaced Customer Interface 93 1 Coupled B A Notes The Sx in the Master part number indicates the Lock Unlock sensor option 1 Multiple sensor options are available Ready to Lock...

Page 48: ...B 1 2 2 3 REVISION NOTES UNLESS OTHERWISE SPECIFIED DO NOT SCALE DRAWING ALL DIMENSIONS ARE IN MILLIMETERS DRAWN BY CHECKED BY S Jeffers 12 12 16 M Gala 12 23 16 TITLE SCALE SIZE DRAWING NUMBER PROJEC...

Page 49: ...ION NOTES UNLESS OTHERWISE SPECIFIED DO NOT SCALE DRAWING ALL DIMENSIONS ARE IN MILLIMETERS DRAWN BY CHECKED BY S Jeffers 12 12 16 M Gala 12 23 16 TITLE SCALE SIZE DRAWING NUMBER PROJECT SHEET OF 9630...

Page 50: ...B 8 7 6 5 4 3 2 1 Pneumatic Port I D 93 1 Coupled A B Notes The Sx in the Master part number indicates the Lock Unlock sensor option 1 Multiple sensor options are available Ready to Lock sensing is av...

Page 51: ...3 REVISION NOTES UNLESS OTHERWISE SPECIFIED DO NOT SCALE DRAWING ALL DIMENSIONS ARE IN MILLIMETERS DRAWN BY CHECKED BY D Swanson 6 9 09 D Wagner 6 10 09 TITLE SCALE SIZE DRAWING NUMBER PROJECT SHEET...

Page 52: ...ES UNLESS OTHERWISE SPECIFIED DO NOT SCALE DRAWING ALL DIMENSIONS ARE IN MILLIMETERS DRAWN BY CHECKED BY D Swanson 6 9 09 D Wagner 6 10 09 TITLE SCALE SIZE DRAWING NUMBER PROJECT SHEET OF 9630 20 110...

Page 53: ...ly Spaced Customer Interface 93 1 Coupled A B Notes The Sx in the Master part number indicates the Lock Unlock sensor option 1 Multiple sensor options are available Ready to Lock sensing is available...

Page 54: ...3 REVISION NOTES UNLESS OTHERWISE SPECIFIED DO NOT SCALE DRAWING ALL DIMENSIONS ARE IN MILLIMETERS DRAWN BY CHECKED BY D Swanson 6 5 09 D Wagner 6 10 09 TITLE SCALE SIZE DRAWING NUMBER PROJECT SHEET...

Page 55: ...ES UNLESS OTHERWISE SPECIFIED DO NOT SCALE DRAWING ALL DIMENSIONS ARE IN MILLIMETERS DRAWN BY CHECKED BY D Swanson 6 5 09 D Wagner 6 10 09 TITLE SCALE SIZE DRAWING NUMBER PROJECT SHEET OF 9630 20 110...

Reviews: