background image

Manual, Control Module, PROFINET, DL12
Document #9620-20-C-DL12-06

Pinnacle Park • 1031 Goodworth Drive • Apex, NC 27539 • Tel: 919.772.0115 • Fax: 919.772.8259 • 

www.ati-ia.com

C-22

8.  Connect the 5‑pin power cable and PROFINET cable connectors to the module.

9.  Remove the 5 mm set screw from the FE ground terminal using a 3 mm hex key.

10. Connect the ground to the FE grounding terminal using a M5 customer supplied fastener.

11. Set the Tool‑ID. Refer to 

Section 3.8—Setting the Tool‑ID.

12. After the procedure is complete, resume normal operation.

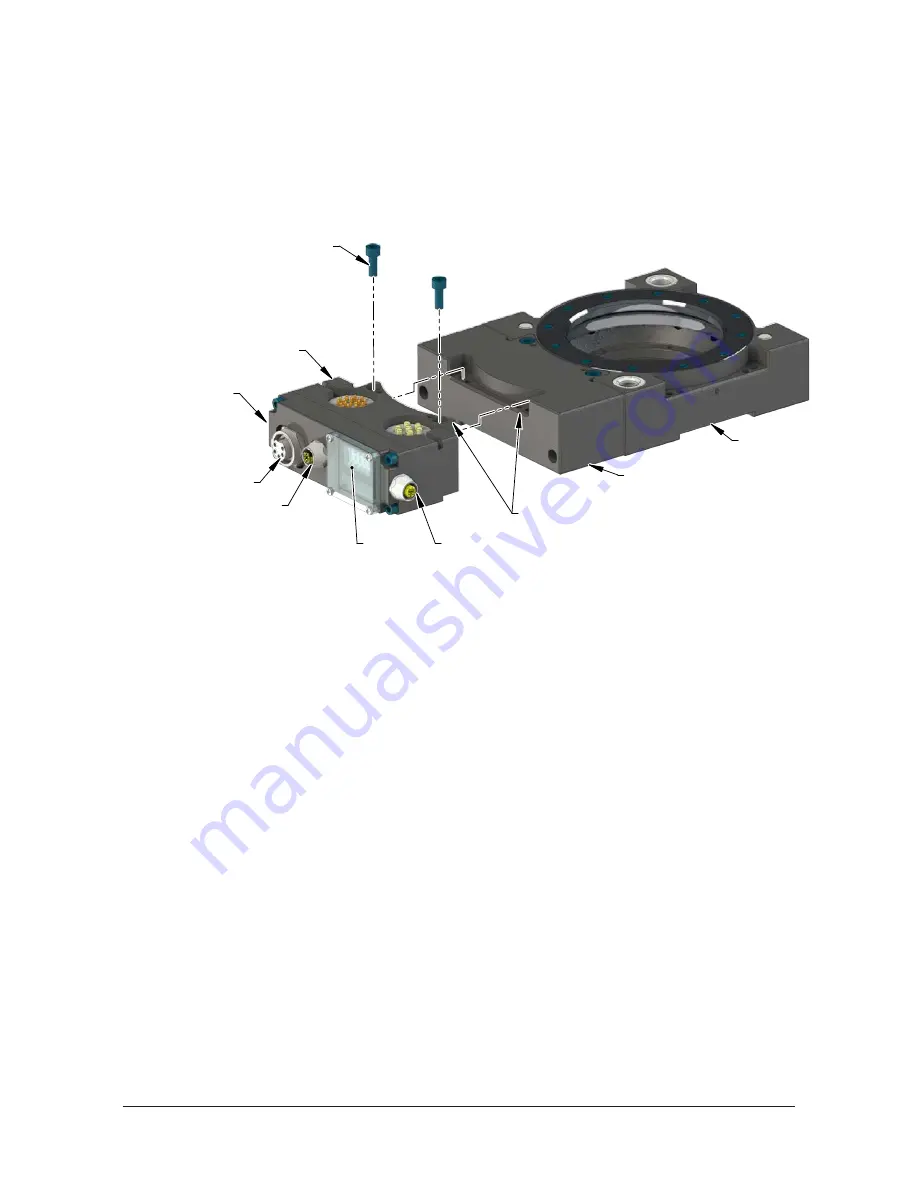
Figure 3.2 —Tool Module Installation

Tool Changer

Valve Adapter on Tool Side
(9121-JR4-T Shown)

Use Ledge Mounting Feature
to Properly Align Module

(2) M6 Socket Head Cap Screw

DL12 Tool Module

Safety Switch Connection

Tool-ID

Power Connection

PROFINET Connection

FE Ground Connection

With M5 Set Screw

(Not Visible)

3.4  Tool Module Removal

Tools required:  5 mm Allen wrench (hex key)

1.  Place the Tool in a secure location.

2.  Uncouple the Master and Tool plates.

3.  Turn off and de‑energize all energized circuits (e.g. electrical, air, water, etc.).

4.  Disconnect the safety switch cables from the module.

5.  Disconnect the 5‑pin power cable and PROFINET cable connectors from the module.

6.  Disconnect the ground from the FE grounding terminal.

7.  Set the Tool‑ID. Refer to 

Section 3.8—Setting the Tool‑ID

.

8.  Support the module and remove the (2) M6 socket head cap screws and lift up on the module until it 

clears the guide pin.

3.5  PROFINET Interface

The PROFINET interface parameters and I/O bitmaps employed in the modules are found in 

Section 2.1.1—

PROFINET Interface Information


of the manual. These should be thoroughly understood prior to operating 

the Tool Changer. A detailed operational sequence is provided in 

Section 4.4—Recommended Sequence of 

Operation.

3.6  Utility Schematic

Refer to drawings in 

Section 9—Drawings

 of this manual for customer interface and wiring details for the 

Master/ Tool modules.

3.7  Electrical Connections

Refer to drawings in 

Section 9—Drawings

 of this manual for electrical connection and pin/signal 

information.

Summary of Contents for 9121-DL12-M

Page 1: ...C 14 2 1 5 Reset To Factory Push Button C 15 2 2 Arc Prevention Circuit C 15 2 2 1 Arc Prevention Circuit Behavior during Coupling C 15 2 2 2 Arc Prevention Circuit Behavior during Uncoupling C 16 2 3 Tool Module C 17 2 4 Safety System C 18 3 Installation C 20 3 1 Master Module Installation C 20 3 2 Master Module Removal C 21 3 3 Tool Module Installation C 21 3 4 Tool Module Removal C 22 3 5 PROFI...

Page 2: ... 6 Lock Unlock Sensor Fault C 27 4 3 7 PRESSURE DISCONNECTED C 27 4 3 8 Pressure Too High C 27 4 3 9 Pressure Too Low C 27 4 3 10 SYSTEM IS UNSAFE C 27 4 3 11 TOOL ID ERROR C 27 4 3 12 UNSAFE LATCH C 27 4 3 13 UNSAFE UNLATCH C 28 4 3 14 VALVE ERROR C 28 4 3 15 Error Recovery Sequence C 29 4 4 Recommended Sequence of Operation C 30 5 Maintenance C 36 5 1 Pin Block Inspection and Cleaning C 37 6 Tro...

Page 3: ...latch Output An input indicating a short circuit overload condition exists with the Unlatch Output Ethernet Switch An Ethernet network component connecting multiple communication partners with each other FE Functional Earth GSDML File A special kind of XML based Device Description File used by PROFINET to automatically obtain the device characteristics Latch Lock The output supplied to the ATI Mas...

Page 4: ...t from the Master node reporting the values from the Tool ID switch on the Tool module Unlatch Unlock The output supplied to the ATI Master module to uncouple the Tool Changer Unlatch Enable Indicates it is safe to proceed with an unlatch request Unlocked A proximity sensor input indicating that the coupling mechanism is in the Unlocked position The UNLOCKED bit in the PROFINET bitmap will only be...

Page 5: ...aded pin blocks Flexible V ring seals surround the pin blocks and are water resistant but not water proof Refer to Figure 1 1 To avoid unintentional Tool release the power for the Unlatch valve is routed through a safety switch connector A safety switch must be connected to support this function Refer to Section 2 4 Safety System 1 1 Master Module The module has the following connectors 1 integrat...

Page 6: ... Valve Adapter Proximity Sensor Connector 3 Pin Female M8 Common Ledge Mounting Feature DL12 Tool Module DL12 Master Module 1 2 Tool Module The module has the following connectors 1 5 pin female M12 safety switch connector 1 4 pin female M12 D coded PROFINET connector 1 4 pin male minifast power connector The module requires a JR4 T tool adapter to align the Master and Tool modules and mounts to t...

Page 7: ...Table 2 1 PROFINET Interface Parameters Parameter Description DCP supported Fast Startup supported Used Protocols subset UDP IP ARP ICMP Ping Topology recognition LLDP SNMP V1 MIB2 physical device VLAN and priority tagging yes Context Management by CL RPC Minimum cycle time 2 ms Baud rate 100 MBit s Data transport layer Ethernet II IEEE 802 3 A GSDML file for the Master node is available from our ...

Page 8: ...h SSO_2 3 SSO_2 Input from safety switch that indicates it is safe to unlatch the Tool Should always agree with SSO_1 4 SS Pulse Missing Is high if the SSO inputs are jumpered or shorted 5 UNSAFE_LATCH User attempted to latch when unsafe 6 Unsafe Unlatch Unlatch Rejected Due to Unsafe Condition Present 7 SYSTEM_IS_ UNSAFE Any APx_COMM_ERROR APx_MISMATCH_ERROR APx_ SAFETY_ERROR sets this bit 2 0 V1...

Page 9: ... unlatch pressure lower than the minimum system rating 4 Tool ID Switch1 Bit1 N A 5 Tool ID Switch1 Bit2 6 Tool ID Switch1 Bit4 7 Tool ID Switch1 Bit8 4 0 Tool ID Switch2 Bit1 1 Tool ID Switch2 Bit2 2 Tool ID Switch2 Bit4 3 Tool ID Switch2 Bit8 4 Tool ID Switch3 Bit1 5 Tool ID Switch3 Bit2 6 Tool ID Switch3 Bit4 7 Tool ID Switch3 Bit8 5 0 Tool ID Switch4 Bit1 1 Tool ID Switch4 Bit2 2 Tool ID Switc...

Page 10: ...rding a safety critical motion or AP1 sees Unlatch_ valve_control_2 is different than expected 6 AP1_INP_ MISMATCH AP1 detects that AP2 reports different input values than AP1 sees 7 MEMORY_FAILURE N A 8 0 Reserved 1 Reserved 2 Reserved 3 Reserved 4 Firmware Version Mismatch 5 Reserved 6 Reserved 7 Reserved 9 0 AP2_Mismatch_ Error 1 AP2_Comm_Error AP1 lost communication to AP2 2 AP2_Memory_ Failur...

Page 11: ...2 V2Relay 3 AP2_SSFAULT 4 Unlatch_Valve_ Control_2 5 Valve_Position 6 AP2_Version_Error 7 AP2_Safety_Error 11 0 Pressure Reading Bit 8 1 Pressure Reading Bit 9 2 Unused 3 4 5 6 7 12 0 Pressure Reading Bit 0 1 Pressure Reading Bit 1 2 Pressure Reading Bit 2 3 Pressure Reading Bit 3 4 Pressure Reading Bit 4 5 Pressure Reading Bit 5 6 Pressure Reading Bit 6 7 Pressure Reading Bit 7 Notes These bits s...

Page 12: ...4 5 6 7 15 0 to 7 Reserved Notes These bits should be mapped for customer use These bits should be mapped for ATI diagnostic use Table 2 3 I O Bitmap Robot Outputs to 9121 DL12 M Byte Bit Name Description Function 0 0 Latch Request Lock 1 Unlatch Request Unlock 2 Unused Does not need to be mapped 3 Clear Errors Reset errors allow affected I O to be reactivated 4 Reserved 5 Unused Does not need to ...

Page 13: ...n The Bus Failure BF status LED is identified on the module as BF It provides PROFINET status information Refer to Table 2 5 for an outline of this LED s operation Table 2 4 SF status LED Status LED Function Note No Power Off No power applied Check if the voltage is between 20 4 and 28 8 VDC Operational1 Green solid Normal operation Fault Red solid The fault Internal Diagnostic Error has occurred ...

Page 14: ... the Ethernet but there is currently no data exchange activity Active RX TX Red flashing Green solid There is sporatic data exchange activity with the Ethernet PROFINET connection established Red solid Green solid There is continuous data exchange activity with the Ethernet Table 2 7 Ethernet 2 E2 Tool Side LED Status LED Function Note No Link Off The Tool module has no connection to the Ethernet ...

Page 15: ... Prevention Circuit makes it possible to couple uncouple without switching power off and prevents damage to the contacts In the DL12 module the Arc Prevention Circuit controls the ON OFF status of the following two power signals Input and Logic power US1 Output power US2 2 2 1 Arc Prevention Circuit Behavior during Coupling The behavior of the Arc Prevention circuit during coupling can be more cle...

Page 16: ... Circuit will turn off US1 and US2 power The power off time delay between the UNLATCH command and the switching off of power designated T3 in the diagram is less than 100 ms Some time after power is turned off and the Master and Tool begin to separate electrical contact between Master and Tool Pin Contacts will be lost This occurs with a delay designated T4 in the diagram after the UNLATCH command...

Page 17: ...ush button switches are provided on the Tool module for setting of a Tool ID number If the plastic window and seal above the Tool ID switches are removed ensure the seal and window are re positioned correctly to prevent a leakage path to the module inside The Tool ID is available to the Master within 250 ms from the time the changer is coupled otherwise a Tool ID_Error shall be set in the bit map ...

Page 18: ...fe to execute an Unlatch command The processors are linked by hardwired I O If one processor detects a condition that differs from the other processor its control logic declares a fault preventing the Unlatch output When the Tool is positioned safely in the tool stand or storage location the safety switch outputs close the V1 and V2 Relays that allows the Unlatch command to pass from the Applicati...

Page 19: ...Jxx Valve Adapters with Dual Double Solenoid Valve Pass Through Proximity and Pressure Sensors for detailed information on the dual double solenoid valve functionality CAUTION It is required to use a PLe rated non contact safety switch such as the Euchner CES AP with the module Use of unapproved switches will void the PLd safety rating Contact ATI before using another safety rated switch Figure 2 ...

Page 20: ...2 DL12 Device Replacement Procedures for instructions Refer to Figure 3 1 Tools required 5 mm Allen wrench hex key Supplies required Clean rag Loctite 242 1 Place the Tool in a secure location 2 Uncouple the Master and Tool plates 3 Turn off and de energize all energized circuits e g electrical air water etc 4 Clean the mounting surfaces 5 Place the module into the appropriate location on the valv...

Page 21: ...ect the 5 pin power cable and PROFINET cable connectors from the module 6 Disconnect the valve adapter Proximity Sensor Cable from S1 and valve adapter Pressure Sensor Cable from S2 connections on the module 7 Disconnect the ground from the FE grounding terminal 8 Support the module and remove the 2 M6 socket head cap screws and lower the module until it clears the guide pin 3 3 Tool Module Instal...

Page 22: ... a secure location 2 Uncouple the Master and Tool plates 3 Turn off and de energize all energized circuits e g electrical air water etc 4 Disconnect the safety switch cables from the module 5 Disconnect the 5 pin power cable and PROFINET cable connectors from the module 6 Disconnect the ground from the FE grounding terminal 7 Set the Tool ID Refer to Section 3 8 Setting the Tool ID 8 Support the m...

Page 23: ...red Phillips screw driver Figure 3 3 Setting the Tool ID Decrease Digit Increase Digit Set Tool ID to an Unique 1 Digit Number for each Tool Window 4 M3 Captive Head Screw SW5 SW1 SW5 SW1 1 Loosen the 4 M3 pan head captive screws and remove Tool ID window 2 Use a non conductive tool e g plastic stylus to press on the Tool ID push buttons to increase or decrease the digit value from 0 to 9 Set the ...

Page 24: ...made The LED behavior is affected by the control signal module Table 4 1 Sensor Cable LED Behavior for Common Tool Changer Positions Tool Changer Position Sensor cable LED Behavior Unlocked Tool Changer Master plate free of stand with no Tool plate attached RTL R1 Sensor ON OFF ON ON Unlock U Sensor RTL R2 Sensor ON OFF ON OFF Lock L Sensor Ready to Lock Tool Changer Master plate with Tool plate p...

Page 25: ...d Output Power within operating range 20 4 28 8 V Air pressure within operating range 60 100 psi UNLATCH bit is off LATCH bit is off 4 2 4 RTL1 and RTL2 Proximity sensor inputs that indicate the Tool Changer Master is close to the Tool It is recommended that these inputs be used to indicate when it is okay to couple the Tool Changer These proximity sensors are installed in the Master body and sens...

Page 26: ...er US2 at the ATI Master module US1 power must be between 20 4 V and 28 8 V otherwise the Tool Changer will NOT latch or unlatch 4 2 13 V1 Relay and V2 Relay V1 Relay is a normally open relay driven to closure by Channel 1 of the Safety Switch SSO1 Similarly the V2 Relay is driven to closure by Channel 2 of the Safety Switch SSO2 Both of these inputs must be high when the Tool Changer is in the to...

Page 27: ...orrect pressure and then applying the Clear Errors 4 3 9 Pressure Too Low If the module detects the air pressure below 60 psi then the Pressure Too Low bit is set The error can be reset by supplying air at the correct pressure and then applying the Clear Errors 4 3 10 SYSTEM IS UNSAFE Any safety related error Application Processor communication errors input output mismatch errors safety switch err...

Page 28: ...s an unsafe unlatch command This condition is monitored immediately after an UNLATCH command and will disable the Unlatch and turn off Unlatch immediately If UNLATCH is inadvertently held high during a power cycle the UNSAFE_UNLATCH error will be generated This error bit will be reset when a new UNLATCH command is received UNLATCH command removed and reapplied and the UNLATCH_ ENABLE conditions ar...

Page 29: ...r on at the same time No Yes only during Unlatch Correct error or Clear Errors Bit PRESSURE_ DISCONNECTED Pressure Sensor not connected Yes Clear Errors Bit PRESSURE_TOO_HIGH Air supply to valve adapter too high No Yes only during Unlatch Clear Errors Bit PRESSURE_TOO_LOW Air supply to valve adapter too low No Yes only during Unlatch Clear Errors Bit TOOL_ID_ERROR TOOL ID timeout error No Rising e...

Page 30: ...e of the stand or storage location the Tool Changer is uncoupled and the Tool Changer locking mechanism is fully retracted unlocked condition The Tool is by itself in the Tool stand No error or fault conditions exist a The following inputs are ON i Unlocked ii US1 Power Input Power and US2 Power Output Power Must remain on at all times iii Tool ID invalid all 1 0xFFFF iv Everything is OK b The fol...

Page 31: ...ossible issues 2 Robot with Master move into the Tool and are parallel within 0 06 to 0 15 of the Tool The module contact pins are touching but the RTL sensors have not sensed the targets on the Tool Figure 4 4 Master Moves into Tool and is parallel at 0 06 RTL R1 Unlock U RTL R2 Lock L Green LED Power Yellow LED Switch Made 0 06 Away SF LED is Green Could see Red Flashing But should turn Green E2...

Page 32: ...ilure and Bus Failure LEDs or Section 2 1 4 Ethernet 1 and Ethernet 2 LEDs for possible issues 4 Couple the Tool Changer a Pulse the Latch ON minimum 500 ms b The Unlocked input turns OFF a short time later indicating piston travel Subsequently the Locked input turns ON indicating that the coupling operation is complete c Power becomes available on the Tool and the Tool Power is On bit becomes ON ...

Page 33: ...ure LEDs or Section 2 1 4 Ethernet 1 and Ethernet 2 LEDs for possible issues 5 Robot moves away from the Tool stand with the Tool Changer coupled a The Safety Switch becomes deactivated and the SSO_1 SSO_2 V1RELAY and V2RELAY inputs turn OFF b Unlatch Enabled input turns OFF c Everything is OK bit is ON 6 Normal operation with Tool attached a The following inputs are ON i Locked ii US1 Power Input...

Page 34: ...nto the Tool stand with the Tool Changer coupled Everything is OK bit is ON a When the Tool is returned to the stand the Safety Switch becomes activated and the SSO_1 SSO_2 V1RELAY and V2RELAY inputs turn ON b Unlatch Enabled turns ON indicating that it is safe to uncouple the Tool Changer 8 Uncouple the Tool Changer Check that Unlatch Enabled is ON If Unlatch Enabled is OFF reset errors according...

Page 35: ... 1 4 Ethernet 1 and Ethernet 2 LEDs for possible issues 9 Robot and Master move away from the Tool are parallel and between 0 06 to 0 15 of the Tool a The Safety Switch becomes deactivated and the SSO_1 SSO_2 V1RELAY and V2RELAY inputs turn OFF b Everything is OK input is ON 10 Normal operation With Tool In stand a The following inputs are ON i Unlocked ii US1 Power Input Power and US2 Power Outpu...

Page 36: ... used in dirty environments e g welding or deburring applications limit the exposure of the Tool Changer Idle Tool assemblies should be covered to prevent debris from settling on the mating surface Also the Master assembly should be exposed for only a short period of time during Tool change and down time Under normal conditions no special maintenance is necessary however perform periodic inspectio...

Page 37: ...ed Pins 5 If debris or darkened pins exist remove debris using a vacuum and clean using a nylon brush ATI Part Number 3690 0000064 60 NOTICE Do not use an abrasive media cleaners or solvents to clean the contact pins Using abrasive media cleaners or solvents will cause damage to the contact surface or cause pins to stick Clean contact surfaces with a vacuum or non abrasive media such as a nylon br...

Page 38: ...rt is properly vented Refer to Pneumatic Connection section of the Tool Changer Manual for valve requirements Incorrect valve operation Check valve for proper operation Refer to Pneumatic Connection section of the Base Tool Changer Manual for valve requirements Signals are mapped incorrectly Verify that signals are mapped and are communicating properly Refer to Section 9 Drawings for electrical sc...

Page 39: ...cement procedures are covered in the following section 6 2 1 Seal Replacement Parts required Refer to Section 9 Drawings The seal protects the electrical connection between the Master and Tool module If the seal becomes worn or damaged it must be replaced 1 Place the Tool in a secure location 2 Uncouple the Master and Tool plates 3 Turn off and de energize all energized circuits e g electrical air...

Page 40: ...id valve adapter prior to installing the module in order to remove any debris that may be present 3 Using the ledge feature place the module to a dual double solenoid valve adapter mounting surface Align the module with the valve adapter using the dowels in the bottom of the ledge feature 4 If fasteners do not have pre applied adhesive apply Loctite 242 to the supplied M6 socket head cap screws In...

Page 41: ...stem Failure SF LED Reset Button Reset to Factory Settings 2 M3 Captive Head Screw Window 11 Re install the window and tighten the M3 pan head captive screws 12 Disconnect the 5 pin power cable to the connectors on the module 13 Connect the M12 cable and the 5 pin power cable to the connectors on the module 14 The new module may be found using the default PROFINET station name and configured to th...

Page 42: ...t Number Description 3500 1066020 21A M6 x 20 Socket Head Cap Screw SS ND Microspheres 0 3 uncoated lead thds 5 7 coated thds IFI525 7 2 Tool Module Mounting Fasteners Table 7 2 Tool Module Mounting Fasteners Part Number Description 3500 1066016 15A M6 x 16 Socket Head Cap Screw DIN 912 A4 S S 316 ND Ind Microspheres Epoxy Yellow 0 3 uncoated lead thds 5 7 coated thds 7 3 Accessories Table 7 3 Acc...

Page 43: ...Pin D Coded M12 Female Integrated Tool Changer I O 4 M8 3 pin female connectors supporting Tool Changer Locked Unlocked and Ready to Lock proximity sensors Integrated Connection to valve adapter Diagnostic Sensors M8 3 pin female connectors supporting Valve Adapter proximity sensor M8 4 pin female connectors supporting Valve Adapter pressure sensor Integrated Connection to Valve Adapter 4 pin Pin ...

Page 44: ...upport TSI on the Tool and 5 Independent Switch Tool ID Mates with DL12 Master Default Configuration for Tool ID 5 Independent Tool ID switches each reading a 0 9 position all factory set to Tool Position 1 Connector s Power 5 Pin Minifast 7 8 Male PROFINET 4 Pin D Coded M12 Female Connection to Switch M12 5 pin female connector supporting connection to RFID based Safety Switch Electrical Rating P...

Page 45: ... 5 Pin Male Turck RSF 50 Notes Pin block signal assignments are shown on Sheet 2 1 Connector pin designations are shown on Sheet 3 2 Electrical schematic of DL12 Master and Tool is shown on Sheet 4 3 Schematic notes are on Sheet 5 Serviceable parts are shown on Sheet 6 4 REV DESCRIPTION INITIATOR DATE 06 Changed do to ECO 16730 Added a lock nut and washer to guarantee connector orientation SEZ 4 3...

Page 46: ...Pin Dowel Pin 1 2 3 4 5 6 7 8 9 10 11 12 13 14 15 16 17 18 19 1 2 3 4 5 6 7 B 1 2 2 6 REVISION NOTES UNLESS OTHERWISE SPECIFIED DO NOT SCALE DRAWING ALL DIMENSIONS ARE IN MILLIMETERS DRAWN BY CHECKED BY W Berrocal 8 4 16 A Takla 8 5 16 TITLE SCALE SIZE DRAWING NUMBER PROJECT SHEET OF 9630 20 DL12 160426 1 06 PROPERTY OF ATI INDUSTRIAL AUTOMATION INC NOT TO BE REPRODUCED IN ANY MANNER EXCEPT ON ORD...

Page 47: ...ector 7 8 5 Pin Male See Table 6 1 2 3 4 5 Connector orientation guaranteed DETAIL G SCALE 2 1 Profinet Connector 3 4 1 2 Key DETAIL D SCALE 1 5 1 5 4 3 2 1 3 4 1 2 5 Profinet Connector M12 4 Pin Female Note connector orientation See Table 7 Power Connector 7 8 5 Pin Female Note connector orientation See Table 6 B 1 2 3 6 REVISION NOTES UNLESS OTHERWISE SPECIFIED DO NOT SCALE DRAWING ALL DIMENSION...

Page 48: ... CHECKED BY W Berrocal 8 4 16 A Takla 8 5 16 TITLE SCALE SIZE DRAWING NUMBER PROJECT SHEET OF 9630 20 DL12 160426 1 06 PROPERTY OF ATI INDUSTRIAL AUTOMATION INC NOT TO BE REPRODUCED IN ANY MANNER EXCEPT ON ORDER OR WITH PRIOR WRITTEN AUTHORIZATION OF ATI 1031 Goodworth Drive Apex NC 27539 USA Tel 1 919 772 0115 Email info ati ia com Fax 1 919 772 8259 www ati ia com ISO 9001 Registered Company DL1...

Page 49: ...ssor 1 AP1 The Tool Present circuit is used to ensure that the spring contact pins are touching when power is turned on Refer to the product manual for additional information The 9121 DL12 M module requires the use of a two channel PL e rated 8 contactless Safety Sensor specifically CES I AP M C04 USB 117324 reference Figure 1 The Safety Sensor is not included with the DL12 but is available from A...

Page 50: ...CALE DRAWING ALL DIMENSIONS ARE IN MILLIMETERS DRAWN BY CHECKED BY W Berrocal 8 4 16 A Takla 8 5 16 TITLE SCALE SIZE DRAWING NUMBER PROJECT SHEET OF 9630 20 DL12 160426 1 06 PROPERTY OF ATI INDUSTRIAL AUTOMATION INC NOT TO BE REPRODUCED IN ANY MANNER EXCEPT ON ORDER OR WITH PRIOR WRITTEN AUTHORIZATION OF ATI 1031 Goodworth Drive Apex NC 27539 USA Tel 1 919 772 0115 Email info ati ia com Fax 1 919 ...

Reviews: