background image

KN9008 / KN9016 User Manual

88

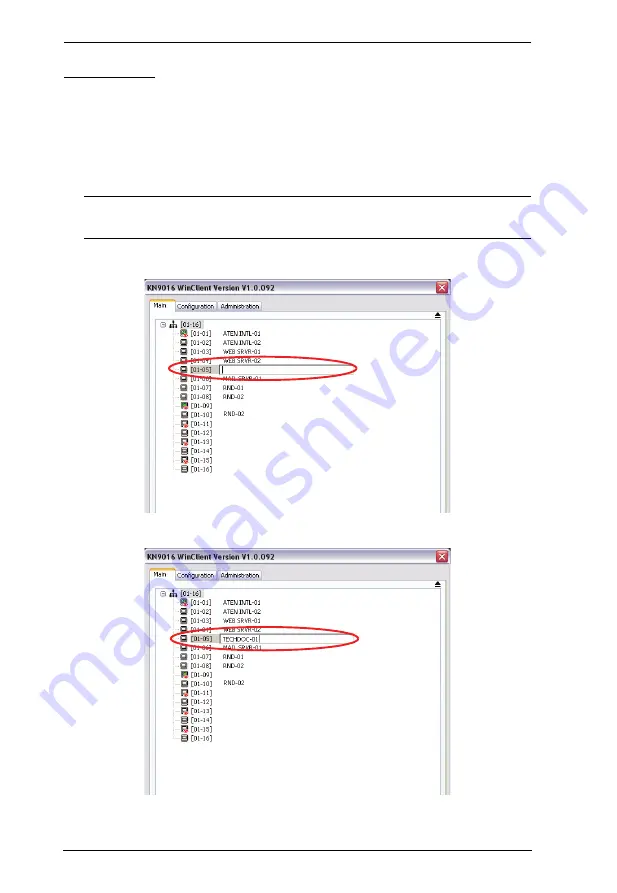
Port Names

To help remember which computer is attached to a particular port, every port 
can be given a name. This field allows the Administrator to create, modify, or 
delete port names. To configure a port name:

1. Click once on the port you want to edit, then either press [F2], or click 

again on the highlight bar.

Note:

This is not a double click. It involves two separate clicks. A double 
click will switch you to the device attached to the port.

After a second or two, the bar changes to a text input box:

2. Key in the new Port Name, or modify/delete the old one.

Summary of Contents for Altusen KN9008

Page 1: ...KVM Over the NET KN9008 KN9016 User Manual www aten com ...

Page 2: ...nable protection against harmful interference when the equipment is operated in a commercial environment This equipment generates uses and can radiate radio frequency energy and if not installed and used in accordance with the instruction manual may cause harmful interference to radio communications Operation of this equipment in a residential area is likely to cause harmful interference in which ...

Page 3: ...hase the buyer and not the manufacturer its distributor or its dealer assumes the entire cost of all necessary servicing repair and any incidental or consequential damages resulting from any defect in the software The manufacturer of this system is not responsible for any radio and or TV interference caused by unauthorized modifications to this device It is the responsibility of the user to correc...

Page 4: ...ad this manual thoroughly and follow the installation and operation procedures carefully to prevent any damage to the switch or to any other devices on the KN9008 KN9016 installation Features may have been added to the KN9008 KN9016 since this manual was printed Please visit our website to download the most up to date version of the manual Copyright 2010 2011 ATEN International Co Ltd Manual Part ...

Page 5: ...mation xiii Chapter 1 Introduction Overview 1 Features 3 Requirements 5 General 5 Console 5 Computers 5 Cables 6 Operating Systems 6 Browsers 7 Components 8 Front Panel 8 KN9008 8 KN9016 8 Rear Panel 10 KN9008 10 KN9016 10 Chapter 2 Hardware Setup Overview 13 Before You Begin 13 Stacking and Rack Mounting 14 Stacking 14 Rack Mounting Front 15 Rack Mounting Rear 17 Single Station Installation 19 Ca...

Page 6: ... Navigation 29 OSD Main Screen Headings 29 OSD Functions 30 F1 GOTO 30 F2 LIST 31 F3 SET 32 F4 ADM 34 F5 SKP 37 F6 BRC 38 F7 SCAN 38 F8 LOUT 39 Hotkey Operation 40 Overview 40 Invoking Hotkey Mode 41 Hotkey Port Control 42 Selecting the Active Port 42 Auto Scan Mode 43 Skip Mode 44 Hotkey Configuration Operations 45 Keyboard Mouse Reset 45 Hotkey Beeper Control 45 Toggling the Hotkey Invocation Ke...

Page 7: ...ler 57 Finishing Up 57 Security 58 Adding Filters 59 IP Filter MAC Filter Conflict 60 Modifying Filters 60 Deleting Filters 60 Login String 60 ANMS 61 RADIUS Settings 61 RADIUS Examples 63 CC Management Settings 63 LDAP Settings 63 Log Server 65 User Management 66 Customization 68 Timeout 68 Login Failure 68 Working Mode 69 Mouse Sync Mode 69 Automatic 69 Manual 70 Reset 70 Maintenance 71 Firmware...

Page 8: ...ing Languages 84 The Main Page 85 The List Function 86 Port Names 88 Port Operation 90 The Port Toolbar 90 Recalling the GUI 90 Hotkey Summary Table 91 Toolbar Icons 91 Auto Scan Mode 92 Panel Array Mode 93 The Configuration Page 95 The Administration Page 97 General Information 97 User Management 98 Port Access 99 Network 101 ANMS 102 Security 103 Customization 104 The I O Panel 105 Chapter 8 The...

Page 9: ...Client 121 Installation 121 Starting Up 122 Connecting 124 Operation 125 Ending the Session 125 The Java Client 126 Starting Up 126 Operation 127 Chapter 12 The Firmware Upgrade Utility Introduction 129 Downloading the Firmware Upgrade Package 129 Preparation 130 Starting the Upgrade 131 Upgrade Succeeded 133 Upgrade Failed 133 Firmware Upgrade Recovery 134 Safety Instructions 135 General 135 Rack...

Page 10: ...Determination 145 IP Installer 145 Browser 146 AP Windows Client 146 Additional Mouse Synchronization Procedures 147 Trusted Certificates 149 Overview 149 Installing the Certificate 150 Certificate Trusted 151 Specifications 152 Connection Tables 154 KN9008 154 KN9016 154 Supported KVM Switches 155 Restoring Factory Default Settings 156 OSD Factory Default Settings 157 About SPHD Connectors 157 Li...

Page 11: ... and procedures used to operate the KN9008 KN9016 from a locally connected KVM console Chapter 5 Browser Login explains how to log into the KN9008 KN9016 with your browser and explains the functions of the icons and buttons on the KN9008 KN9016 web page Chapter 6 Administration describes how to administer the KN9008 KN9016 after logging in from a browser Chapter 7 The Windows Client Viewer explain...

Page 12: ...m as someone who logs into the switch over the net from a location that is remote from the switch Local Console The keyboard mouse and monitor connected directly to the switch Servers The servers attached to the switch via KVM Adapter Cables User s Point of View Local client users We refer to a user as a Local client user when we think of him as sitting at his computer performing operations on the...

Page 13: ...ld key in Indicates keys you should press For example Enter means to press the Enter key If keys need to be chorded they appear together in the same bracket with a plus sign between them Ctrl Alt 1 Numbered lists represent procedures with sequential steps Bullet lists provide information but do not involve sequential steps Indicates selecting the option on a menu or dialog box for example that com...

Page 14: ...KN9008 KN9016 User Manual xiv This Page Intentionally Left Blank ...

Page 15: ...r Once they successfully log in operators can take control using either the Windows Client or Java Client utility Inclusion of a Java based client allows the switches work with Java enabled operating systems The client software allows operators to exchange keyboard video and mouse signals with the computers attached to the KN9008 KN9016 just as if they were present locally and working on the equip...

Page 16: ...nes or to be concerned with incompatibility problems A custom ASIC patent pending provides an auto sensing function that recognizes the position of each station on the chain eliminating the need to manually set the position with DIP switches A seven segment front panel LED displays each station s position for easy identification By allowing a single console to manage all the attached computers a K...

Page 17: ...ansmission via RC4 128bit encryption 128bit SSL browser access Two level password security up to 64 user accounts with separate profiles for each Up to 32 concurrent logins External Remote authentication support RADIUS LDAP LDAPS MS Active Directory Supports ALTUSEN CC Central Control Management Multilanguage web UI support featuring a tree structured local and remote OSD On screen keyboard with m...

Page 18: ...rate panel users can easily select the number of panels to view Message board allows logged in users to communicate with each other and allows a user to take exclusive control of the KVM functions Adjustable video quality for flexible adaptation to diverse network environments Auto Scan feature for monitoring user selected computers Broadcast mode operations simultaneously performed on all selecte...

Page 19: ...the Log Server you must have the Microsoft Jet OLEDB 4 0 or higher driver installed Console The following hardware components are required for the KVM console A monitor capable of displaying the highest resolution provided by any computer in the installation A keyboard and mouse USB or PS 2 Computers The following hardware components are required for each computer A video graphics card with an HDB...

Page 20: ...t Number KVM switch to KVM switch daisy chaining 0 6 m 1 8 m 2L 1700 2L 1701 KVM switch to computer PS 2 1 2 m 1 8 m 3 0 m 6 0 m 1 8 m 2L 5201P 2L 5202P 2L 5203P 2L 5206P 2L 5702P USB 1 2 m 1 8 m 3 0 m 5 0 m 2L 5201U 2L 5202U 2L 5203U 2L 5205U OS Version Windows 2000 and higher Linux RedHat 7 1 and higher Fedora Core 5 and higher SuSE 9 0 and higher Mandriva Mandrake 9 0 and higher UNIX AIX 4 3 an...

Page 21: ...s Supported browsers for users that log into the KVM Over the NETTM include the following Browser Version IE 6 and higher Firefox 1 5 and higher Mozilla 1 7 and higher Safari 4 0 and higher Opera 9 0 and higher Netscape 8 1 and higher ...

Page 22: ...KN9008 KN9016 User Manual 8 Components Front Panel KN9008 KN9016 1 2 3 4 5 6 7 8 1 2 3 4 5 6 7 8 ...

Page 23: ... is recessed and must be pushed with a small object such as the end of a paper clip or a ballpoint pen 4 USB Port USB peripherals flash drive CD ROM etc plug into this port Peripherals can be shared among the connected computers 5 Firmware Upgrade Recovery Switch During normal operation and while performing a firmware upgrade this switch should be in the NORMAL position If a firmware upgrade opera...

Page 24: ...KN9008 KN9016 User Manual 10 Rear Panel KN9008 KN9016 1 2 3 4 5 6 7 1 2 6 7 3 4 5 ...

Page 25: ...ables to link these ports to the computers 3 Grounding Terminal The grounding wire used to ground the KN9008 KN9016 attaches here 4 Power Socket The power cable plugs in here 5 Power Switch This standard rocker switch powers the unit on and off 6 LAN Port The cable that connects the KN9008 KN9016 to the Internet LAN or WAN plugs in here The LED on the left side of the port indicates data transmiss...

Page 26: ...KN9008 KN9016 User Manual 12 This Page Intentionally Left Blank ...

Page 27: ...separate custom KVM cable is required for each computer connection The custom KVM cables are listed under Cables on page 6 Consult your dealer to find out which custom KVM cables best fit your needs Before You Begin 1 Important safety information regarding the placement of this device is provided on page 135 Please review it before proceeding 2 Make sure that power to all the devices you will be c...

Page 28: ...ge nuts If you need additional screws or cage nuts contact your rack dealer Stacking The KN9008 KN9016 can be placed on any level surface that can safely support its weight and the weight of the attached cables Make sure that the surface is clean and free of any materials that can block the exhaust vents or otherwise interfere with normal operation of the switch To place the KN9008 KN9016 or to st...

Page 29: ...s from the left and right sides of the switch 2 screws total near the front of the switch 2 Use the M3 x 8 Phillips hex head screws supplied with the rack mounting kit to screw the rack mounting brackets into the sides near the front of the unit Continues on next page ...

Page 30: ...r Manual 16 Continued from previous page 3 Place the KVM switch in the rack Position it so that the holes in the mounting brackets line up with the holes in the rack Secure the mounting brackets to the front of the rack ...

Page 31: ...ach from the left and right sides of the switch 2 screws total near the rear of the unit 2 Use the M3 x 8 Phillips hex head screws supplied with the rack mounting kit to screw the rack mounting brackets into the sides near the rear of the unit Continues on next page ...

Page 32: ...r Manual 18 Continued from previous page 3 Place the KVM switch in the rack Position it so that the holes in the mounting brackets line up with the holes in the rack Secure the mounting brackets to the rear of the rack ...

Page 33: ... switch connect a USB or PS 2 keyboard mouse and monitor to the KN9008 KN9016 console port See Console Cable Installation Diagram on the following page 3 Use KVM cable sets as described in the Cables section on page 6 to connect any available KVM port to the keyboard video and mouse ports of the computer you are installing See KVM Cable Installation Diagrams on the following page 4 Plug the power ...

Page 34: ...KN9008 KN9016 User Manual 20 Cable Connection Diagrams Console Cable Installation Diagram KVM Cable Installation Diagrams 2 USB PS 2 USB KVM Cable Connection PS 2 KVM Cable Connection ...

Page 35: ...rt of the first chained unit 3 To add additional switches to the chain use daisy chain cable sets to connect the Chain Out port of the parent switch to the Chain In port of the child switch 4 Connect the chained switches to their computers using appropriate KVM cable sets described in the Cables section page 6 according to the information given for single station installations Powering Up After al...

Page 36: ...KN9008 KN9016 User Manual 22 Daisy Chain Installation Diagram Note The CS1716A is used in this illustration as an example See page 157 for a full list of supported KVM switches ...

Page 37: ...port selection procedure A text based OSD On Screen Display when you log in from a local console and a GUI Graphical User Interface when you log in remotely over the internet Local console OSD operation is discussed in the next chapter GUI operations are discussed in Chapter 7 for Windows logins and Chapter 8 for Java logins Keyboard Hotkeys Hotkeys allow you to conveniently provide KVM focus to a...

Page 38: ...s to correspond to the change you must manually reconfigure the OSD information for the new Port information See F3 SET page 32 and the Port Setting selections under the F4 ADM function page 34 for details Note If the computer s Operating System doesn t support hot plugging this function may not work properly Console Ports The keyboard monitor and mouse can all be hot plugged When hot plugging the...

Page 39: ...Port 6 of a station that was 12th in the daisy chain sequence would have a Station Number of 12 and a Port Number of 06 Its Port ID would be 12 06 Powering Off and Restarting If it becomes necessary to power off a KN9008 KN9016 do the following before restarting it 1 Shut down all the computers that are attached to the KN9008 KN9016 Note Unplug the power cords of any computers that have the Keyboa...

Page 40: ...l on a one at a time basis Note Peripheral devices are only available to computers directly connected to a KN9008 KN9016 on the same level They are not available to computers connected to daisy chained switches USB peripherals are automatically detected on target computers when you switch ports For example when you switch from to port 1 to port 2 the peripheral automatically disconnects from the c...

Page 41: ...croll Lock is the default OSD hotkey You can optionally change the Hotkey to the Ctrl key see OSD HOTKEY page 32 The login screen appears Enter a valid Username and password to continue Note 1 The default username is administrator the default password is password The first time you log in you must use these defaults For security purposes we strongly recommend that you change the default password t...

Page 42: ...me position it was in the last time it was closed Only the ports that have been set accessible by the administrator for the current logged in user are visible see Port Access page 99 for details The OSD uses a tree view If a switch s port list is collapsed a plus symbol displays in front of its Station Number To see the ports click on the switch s Station Number or move the highlight bar to it the...

Page 43: ...ere is room for on the Main Screen the screen will scroll To bring the KVM focus to a port Double Click it or move the Highlight Bar to it then press Enter After executing any action you automatically go back to the menu one level above OSD Main Screen Headings SN PN This column lists the Port ID numbers Station Number Port Number for all the KVM Ports on the installation The simplest method to ac...

Page 44: ...d pressing Enter 3 Press Esc to return to the previous menu level F1 GOTO GOTO allows you to switch directly to a port either by keying in the port s Name or its Port ID To use the name method key in 1 key in the port s Name then press Enter To use the Port ID method key in 2 key in the Port ID then press Enter Note 1 You can key in a partial Name or Port ID In that case the screen will show all t...

Page 45: ...An icon appears before the choice to indicate that it is the currently selected one Choice Meaning ALL Lists all of the ports on the installation that have been set accessible by the administrator for the current logged in user QUICK VIEW Lists only the ports that have been selected as Quick View Ports see SET QUICK VIEW PORTS page 35 POWERED ON Lists only the ports that have their attached comput...

Page 46: ...mbination PORT ID DISPLAY POSITION Allows each user to customize the position where the Port ID appears on the screen The default is the upper left corner but users can choose to have it appear anywhere on the screen Use the mouse or the arrow keys plus Pg Up Pg Dn Home End and 5 on the numeric keypad with Num Lock off to position the Port ID display then double click or press Enter to lock the po...

Page 47: ...uick view choices only show up on the administrator s screen since only he has Quick View setting rights see SET QUICK VIEW PORTS page 35 for details SCREEN BLANKER If there is no input from the console for the amount of time set with this function the screen is blanked Key in a value from 0 30 minutes then press Enter A setting of 0 disables this function The default is 0 disabled HOTKEY COMMAND ...

Page 48: ... LOGOUT TIMEOUT If there is no input from the console for the amount of time set with this function the Operator is automatically logged out A login is necessary before the console can be used again This enables other Operators to gain access to the computers when the original Operator is no longer accessing them but has forgotten to log out To set the timeout value key in a number from 0 180 minu...

Page 49: ...or the LIST view see F2 LIST page 31 only a port that has been selected here will display on the list If one of the quick view options is chosen for Auto Scanning see SCAN SKIP MODE page 33 only a port that has been selected here will be Auto Scanned The default has no ports selected for Quick View RESET STATION IDS If you change the position of one of the Stations in the daisy chain the OSD setti...

Page 50: ...ble Firmware Upgrade mode or N to leave this menu without enabling it KEYBOARD LANGUAGE Sets the keyboard mapping for the computer keyboard attached to the KVM port To select a keyboard language double click it or use the navigation keys to move the highlight bar to it then press Enter Choices are AUTO default ENGLISH US ENGLISH UK GERMAN GER GERMAN SWISS FRENCH HUNGARIAN ITALIAN JAPANESE KOREAN R...

Page 51: ...to the previous or next available computer that is in the Scan Skip Mode selection If a Port has been selected for Scan Skip Mode when the focus switches to that port a Left Right Triangle symbol appears before its Port ID Display to indicate so While Skip Mode is in effect the console will not function normally You must exit Skip Mode in order to regain control of the console To exit Skip Mode pr...

Page 52: ... each port displays for is set with the Scan Duration setting under the F3 SET function see SCAN DURATION page 32 When you want to stop at a particular location press Space to stop scanning and exit Auto Scan Mode If the scanning stops on an empty port or one where the computer is attached but is powered Off the monitor screen will be blank and the mouse and keyboard will have no effect Simply wai...

Page 53: ...to regain access to the OSD whereas with Esc all you have to do to reenter the OSD is tap the OSD hotkey Note 1 When you reenter the OSD after logging out the screen stays blank except for the OSD login screen You must input your username and password before you can continue 2 If you reenter the OSD after logging out and immediately use Esc to deactivate the OSD without having selected a port from...

Page 54: ...DE page 33 for details Hotkey port control allows you to provide KVM focus to a particular computer directly from the keyboard The KN9008 KN9016 provides the following Hotkey Port Control features Selecting the Active Port Auto Scanning Skip Mode Switching The following hotkey configuration operations can also be performed Keyboard and Mouse Resets Setting the Beeper Toggling the Hotkey Invocation...

Page 55: ...ey must be released within one half second otherwise Hotkey invocation is automatically cancelled When Hotkey Mode is active The Caps Lock and Scroll Lock LEDs flash in succession to indicate Hotkey Mode is active They stop flashing and revert to normal status when you exit Hotkey Mode A Command Line appears on the monitor screen The command line prompt is the word Hotkey in white text on a blue b...

Page 56: ...s you key them in If you make a mistake use Backspace to erase the wrong number Note 1 Just key in the numbers do not key in the dash 2 If the port you want to switch to is on the current station you can just key in the port number you do not need to key in the station number 3 Press Enter After you press Enter the KVM focus switches to the designated computer and you automatically exit Hotkey Mod...

Page 57: ...ouse During the time that auto scanning is paused the command line displays Auto Scan Paused Pausing when you want to keep the focus on a particular computer is more convenient than exiting Auto Scan Mode because when you resume scanning you start from where you left off If on the other hand you exited and restarted scanning would start over from the very first computer on the installation To resu...

Page 58: ... follows See SCAN SKIP MODE page 33 for information regarding the list of accessible ports Once you are in Skip Mode you can keep on skipping by pressing the Arrow keys You don t have to use the hotkey invocation keys again While Skip Mode is in effect ordinary keyboard and mouse functions are suspended only Skip Mode compliant keystrokes can be input You must exit Skip Mode in order to regain nor...

Page 59: ...ole keyboard and mouse reset For more information see Port Selection Switches page 9 Hotkey Beeper Control The Beeper see ACTIVATE BEEPER page 35 can be hotkey toggled On and Off When the beeper is set to On the KN9008 KN9016 beeps when it switches ports To toggle the Beeper do the following 1 Invoke Hotkey Mode see page 41 2 Press B After you press B the Beeper toggles On or Off The Command Line ...

Page 60: ...t a port s operating system attribute do the following 1 Invoke Hotkey Mode see page 41 2 Press a Function key according to the information shown in the following table After pressing a function key you automatically exit Hotkey mode Restore Default Values This administrator only hotkey restores the KN9008 KN9016 default values see RESTORE DEFAULT VALUES page 35 To restore the default values do th...

Page 61: ... Performs a keyboard mouse reset on the target computer H Toggles the Hotkey invocation keys Port ID Enter Switches access to the computer that corresponds to that Port ID R Enter Administrator only hotkey It returns the switch s settings to their default values T Toggles the OSD Hotkey between Ctrl Ctrl and Scroll Lock Scroll Lock Invokes Skip Mode and skips from the current port to the first acc...

Page 62: ...KN9008 KN9016 User Manual 48 This Page Intentionally Left Blank ...

Page 63: ...g In To log in from an Internet browser do the following 1 Open your browser and specify the IP address of the KN9008 KN9016 you want to access in the browser s URL location bar Note 1 For security purposes a login string may have been set by the administrator If so you must include a forward slash and the login string along with the IP address when you log in For example 192 168 0 100 KN9016 If y...

Page 64: ...ssword password For security purposes we strongly recommend you remove these and give yourself a unique Username and Password see User Management page 66 2 If you supply an invalid login the authentication routine will this message Invalid Username or Password Please try again If you see this message log in again being careful with the Username and Password 3 If the number of invalid login attempt...

Page 65: ... see User Management page 66 Not all of the screen elements appear for all users For example the screenshot shown above depicts the type of page that an Administrator or User with administrator permissions would see A typical User would not see the administration icons that appear across the top of the page or the Log icon at the left of the page and the large central area would be blank ...

Page 66: ...h Note The Windows Client Viewer is only available when you log in using the Microsoft Internet Explorer IE browser Open Java Applet Opens the Java Applet Viewer to access the computers connected to the switch This Viewer makes the KN9008 KN9016 accessible to all platforms that have the Java Runtime Environment JRE installed Log All the events that take place on the KN9008 KN9016 are recorded in a...

Page 67: ...As you make your configuration changes in each dialog box click Apply to save them 2 Some configuration changes only take effect after a KN9008 KN9016 reset For those changes a check is automatically put in the Reset on Exit box see Customization page 68 To have the changes take effect log out and then log back in again 3 If you don t have Configuration privileges see User Management page 66 the A...

Page 68: ...sing here 16 characters max then click Apply MAC Address The KN9008 KN9016 s MAC Address displays here Firmware Version Indicates the KN9008 KN9016 s current firmware version level New versions of the KN9008 KN9016 s firmware can be downloaded from our website as they become available see Firmware Upgrade page 71 You can reference this number to see if there are newer versions available on the web...

Page 69: ...used the Administrator can specify the port numbers that the firewall will allow and set the firewall accordingly If a port other than the default is set users must specify the port number as part of the IP address when they log in If not an invalid port number or no port number is specified the KN9008 KN9016 will not be found Continues on next page ...

Page 70: ...n To specify a fixed IP address select the Set IP address manually radio button and fill in the IP address Subnet Mask and Default Gateway fields with settings appropriate for your network Note If the KN9008 KN9016 is on a network that uses DHCP to assign network addresses and you need to ascertain its IP address see IP Address Determination page 145 for information Field Explanation HTTP The port...

Page 71: ...y for assigning IP addresses to the KN9008 KN9016 Click one of the radio buttons to select Enable View Only or Disable for the IP Installer utility See p 145 for IP Installer details Note 1 If you select View Only you will be able to see the KN9008 KN9016 in the IP Installer s Device List but you will not be able to change the IP address 2 For security we strongly recommend that you set this to Vi...

Page 72: ...resses of the computers attempting to connect A maximum of 100 IP filters and 100 MAC filters are allowed To enable IP and or MAC filtering Click to put a check mark in the IP Filter Enable and or MAC Filter Enable checkbox If the Include button is checked all the addresses within the filter range are allowed access all other addresses are denied access If the Exclude button is checked all the add...

Page 73: ...ress key in the same address as the start IP To filter a continuous range of addresses key in the end number of the range for example 192 168 0 225 4 After filling in the address click OK Repeat these steps for any additional IP addresses you want to filter To add a MAC filter do the following 1 Click Add A dialog box similar to the one below appears 2 Specify the MAC address in the dialog box for...

Page 74: ... to the Add dialog box When it comes up simply delete the old address es and replace it with the new one s Deleting Filters To delete a filter select it in the IP Filter or MAC Filter list box and click Delete Login String The Login String lets the Administrator specify a login string that users must include in addition to the IP address when they access the KN9008 KN9016 with a browser For exampl...

Page 75: ...ns that follow RADIUS Settings To allow authentication and authorization for the KN9008 KN9016 through a RADIUS server do the following 1 Check Enable 2 Fill in the IP addresses and port numbers for the Preferred and Alternate RADIUS servers 3 In the Timeout field set the time in seconds that the KN9008 KN9016 waits for a RADIUS server reply before it times out 4 In the Retries field set the numbe...

Page 76: ... are comma delimited Character Meaning C Grants the user administrator privileges allowing the user to configure the system W Allows the user to access the system via the Windows Client program J Allows the user to access the system via the Java applet L Allows the user to access log information via the user s browser V Limits the user s access to only viewing the video display PN SN Denies the us...

Page 77: ...the person logging in authorization refers to assigning permission to use the device s various functions In order to configure the LDAP server you will have to complete the following procedures 1 Install the Windows Server Support Tools 2 Install the Active Directory Schema Snap in and 3 Extend and Update the Active Directory Schema To allow authentication and authorization for the KN9008 KN9016 v...

Page 78: ...ver For LDAP the default port number is 389 for LDAPS the default port number is 636 Timeout Set the time in seconds that the KN9008 KN9016 waits for an LDAP or LDAPS server reply before it times out LDAP Administrator DN Consult the LDAP LDAPS administrator to ascertain the appropriate entry for this field For example the entry might look like this cn LDAPAdmin ou kn9016 dc aten dc com LDAP Admin...

Page 79: ...hat the Log Server runs on in the MAC address field Specify the port used by the computer that the Log Server runs on to listen for log details in the Port field The valid port range is 1 65535 The default port number is 9001 Note The port number must different than the one used for the Program port see Program page 56 See Chapter 10 The Log Server for details on setting up the log server The Log ...

Page 80: ...fy a user profile first select it from the list in the left panel change the information that appears in the right panel then click Update Note The user s password is not displayed the Password and Confirm password fields are blank If you do not want to change the user s password simply leave the two fields as is If you do want to change the user s password key the new password in the Password and...

Page 81: ...t again The two entries must match Description Additional information about the user that you may wish to include Permissions Click to place remove a check mark next to an item to grant withhold access to that aspect of the KN9008 KN9016 s operation Win Client Checking Win Client allows a user to access the KN9008 KN9016 via the Windows Client software Java Client Checking Java Client allows a use...

Page 82: ... terminated To reaccess the server on KN9008 KN9016 the user needs to open the Windows Java client again The default is 0 which means that the Timeout function is disabled Login Failure Allowed sets the number of consecutive failed login attempts that are permitted from a remote computer The default is 5 times Timeout sets the amount of time a remote computer must wait before attempting to login a...

Page 83: ...d The default is Enabled Enable Device List If this parameter is enabled the device will show up in the list of local KN9008 KN9016 units on the AP Windows Client Connection screen see To connect to the KN9008 KN9016 click the WinClient exe program icon on your desktop to bring up the Windows Client Connection Screen page 122 If it is not enabled it will not show up The default is Enabled Force Al...

Page 84: ... and implement all the new settings when you log out Following the reset wait approximately 30 to 60 seconds before logging back in For network IP address settings changes the check box is automatically selected and the switch will reset when you log out Clearing the check mark before logging out will cause the new IP settings to be ignored and the original IP address settings will remain in effec...

Page 85: ...test information and packages Note 1 The firmware upgrade described in this section refers to the KN9008 KN9016 s icard firmware 2 Each time you perform this upgrade you may also upgrade the mainboard firmware see Chapter 12 The Firmware Upgrade Utility To upgrade the icard firmware do the following 1 Download the new firmware file to your computer 2 Open your browser log in to the KN9008 KN9016 a...

Page 86: ...rm a backup do the following 1 In the Password field key in a password for the file Note Make a note of the password since you will need it to be able to perform restore operations with the file 2 Select whether to backup only the configuration information only the user account information or both 3 Click Save 4 When the browser asks what you want to do with the file select Save to disk then save ...

Page 87: ...d with the information that you restore To restore a previous backup do the following 1 In the Password field key in the same password that you used to save the backup file 2 Click Browse navigate to the file and select it Note If you renamed the file you can leave the new name There is no need to return it to its original name 3 Click Restore After the file is restored a message appears to inform...

Page 88: ...KN9008 KN9016 User Manual 74 This Page Intentionally Left Blank ...

Page 89: ...tarting Up The Windows Client Viewer is only available when you log in using the Microsoft Internet Explorer IE browser After you log in see Logging In page 49 click the Open Windows Client icon at the left of the page Continues on next page ...

Page 90: ...ou use to switch ports and access the servers connected to them Note 1 If another user is using the GUI it does not appear A message informing you that it is in use by another user appears instead you must wait until the other user finishes with it before it becomes available to you 2 The Administration tab is not available for users who don t have administration permission 3 The display of the se...

Page 91: ...e location at the left and the number of currently logged in users in the center Note To place the control panel anywhere on the screen move the mouse pointer over the text bar area and drag the panel to the new position The functions that the icons perform are described in the table below Icon Function Click to bring up the Hotkey Setup dialog box see Hotkey Setup page 79 for details Click to bri...

Page 92: ...emote view These icons show the Num Lock Caps Lock and Scroll Lock status of the remote computer When the lock state is On the LED is bright green and the lock hasp is closed When the lock state is Off the LED is dull green and the lock hasp is open Click on the icon to toggle the status Note When you first connect the LED display may not be accurate To be sure click on the LEDs to set them Click ...

Page 93: ...Video Settings page 81 Toggle OSD Toggles the Control Panel Off and On Toggle pointer display If you find the display of the two mouse pointers local and remote to be confusing or annoying you can use this function to hide the non functioning pointer Since this function is a toggle use the hotkeys again to bring the pointer display back to its original configuration Adjust mouse This utility synch...

Page 94: ...em 4 Click Set 5 Click Close Substitute Alt key Although all other keyboard input is captured and sent to the remote system Alt Tab and Ctrl Alt Del work on your local computer In order to implement their effects on the remote system another key may be substituted for the Alt key If you substitute the F12 key for example you would use F12 Tab and Ctrl F12 Del Exit remote location Breaks the connec...

Page 95: ...d horizontal offset values of the remote screen detected and automatically synchronized with the local screen Note 1 If the local and remote mouse pointers are out of sync in most cases performing this function will bring them back into sync 2 This function works best with a bright screen 3 If you are not satisfied with the results use the Screen Position arrows to position the remote display manu...

Page 96: ...hen more than one user is logged in this button allows a user to occupy the KVM When a user occupies the KVM other users cannot see the video and cannot input keyboard or mouse data The button is shadowed when the KVM is occupied The icon displays next to the user s name in the User List panel when the user has occupied the KVM Occupy Release Keyboard Mouse When more than one user is logged in thi...

Page 97: ...ost the message to the board User List Panel The names of all the logged in users are listed in this panel By default messages are posted to all users To post a message to one individual user select the user s name before sending your message If a user s name is selected and you want to post a message to all users select All Users before sending your message If a user has disabled Chat its icon di...

Page 98: ...d local systems aren t the same you don t have to change the configuration settings for either system The user just has to bring up the on screen keyboard select the language used by the computer on the port he is accessing and use the on screen keyboard to communicate with it Note You must use your mouse to click on the keys You cannot use your actual keyboard Changing Languages To change languag...

Page 99: ...s a tree view To see the ports for a particular station click the plus sign in front of the Station Number To dismiss the list click the minus sign in front of the Station Number A port icon in the shape of a monitor displays in front of the port number Ports that have devices connected to them that are up and running have the port icon lit in green Ports that have been selected as Quick View port...

Page 100: ...on lets you broaden or narrow the scope of which ports the GUI displays lists in the Main Screen To invoke the List Function click the arrow at the upper right corner of the panel or press F3 The screen changes to allow you to choose the ports that will be listed ...

Page 101: ...string and either click the binoculars to the right of the box or press Enter To dismiss the List function click the arrow or press F3 Choice Meaning All Lists all of the ports on the installation Powered On Lists only the ports that have their attached devices powered on Quick View Lists only the ports that have been selected as Quick View ports see SET QUICK VIEW PORTS page 35 and The I O Panel ...

Page 102: ... or delete port names To configure a port name 1 Click once on the port you want to edit then either press F2 or click again on the highlight bar Note This is not a double click It involves two separate clicks A double click will switch you to the device attached to the port After a second or two the bar changes to a text input box 2 Key in the new Port Name or modify delete the old one ...

Page 103: ...Chapter 7 The Windows Client Viewer 89 3 When you have finished editing the port name click anywhere outside of the input box to complete the operation ...

Page 104: ...pending on the settings that were selected under ID Display see The Configuration Page page 95 the Port Number and or the Port Name display at the right of the toolbar When the toolbar displays mouse input is confined to the toolbar area Keyboard input has no effect on the computer connected to the port To carry out operations on the computer connected to the port close the toolbar by clicking the...

Page 105: ...he next station Click to skip directly to the first accessible port on the entire installation Click to skip directly to the first accessible port previous to the current one Click to begin Auto Scan Mode The KN9008 KN9016 automatically switches among the ports that were selected for Auto Scanning under the Configuration Scan Select function see Scan Select page 96 This allows you to monitor their...

Page 106: ...o regain normal control of the keyboard Under Auto Scan Mode the normal toolbar is replaced by one that looks similar to the one below The meanings of the toolbar icons are explained in the table below Icon Meaning The indicates the port is being accessed under Auto Scan Mode Click to pause temporarily stop auto scanning When auto scan is paused the icon changes to an arrowhead Click the arrowhead...

Page 107: ... icon invokes Panel Array Mode Under this mode the screen is divided into a grid of panels Each panel represents one of the KN9008 KN9016 s ports The port s ID displays in the top center of the panel When the Array is invoked it scans through each of the powered on ports at 4 second intervals ...

Page 108: ... explained in the table below Icon Meaning Move back four panels Move to the previous panel Pause panel scanning leaving the focus on the panel that currently has it Move to the next panel Move ahead four panels Show More Ports Increase the number of panels in the array Show Fewer Ports Decrease the number of panels in the array Toggle between 4 3 and current aspect ratio Exit Panel Array mode ...

Page 109: ...ers to set up their own individual working environments The KN9008 KN9016 stores a separate configuration record for each user profile and sets up the working configuration according to the Username that is used to log in The Configuration page settings are explained in the table on the following page ...

Page 110: ...Quick View Ports see SET QUICK VIEW PORTS page 35 and The I O Panel page 105 QUICK VIEW POWERED ON Only those Ports which have been set Accessible and have been selected as Quick View Ports and are Powered On The default is ALL Scan Duration Determines how long the focus dwells on each port as it cycles through the selected ports in Auto Scan Mode see Auto Scan Mode page 92 Key in a value from 0 2...

Page 111: ... left of the browser main page The meaning of these items is described in the table below Item Meaning Device Name This field lets you give the switch a unique name This can be convenient when you need to differentiate among several devices in multi station installations Click in the field to key in the name MAC Address This item displays the KN9008 KN9016 s MAC address Firmware Ver This item disp...

Page 112: ... profiles Up to 64 user profiles can be established Up to 32 users can log in concurrently To delete a user profile select it in the list box and click Delete To modify a user profile select it and click Modify To add a user click Add If you choose Modify or Add a dialog box similar to the one below appears ...

Page 113: ...e the selected User s access to the computers on a Port by Port basis Note If the list is collapsed click the in front of the Station to expand the list and show the ports The access rights choices are explained in the table below Choice Explanation Full The user can view the remote server s screen and can perform keyboard and mouse operations on the remote server View Only The user can only view ...

Page 114: ...ight bar to a port and press to cycle backward through the choices Shift Click on any port to have all the ports on the Station cycle through the choices in unison Hold down Shift and tap to have all the ports on the Station cycle forward through the choices in unison Hold down Shift and tap to have all the ports on the Station cycle backward through the choices in unison When you have finished ma...

Page 115: ...1 Network The Network dialog is used to specify the KN9008 KN9016 s access ports and network environment The information called for is the same as the information discussed under Network in the Administration chapter see page 55 for details ...

Page 116: ...ork Management Settings page allows you to set up login authentication and authorization management from external sources The information called for is the same as the information discussed under ANMS in the Administration chapter see page 61 for details ...

Page 117: ... Security The Network dialog is used to specify the KN9008 KN9016 s access ports and network environment The information called for is the same as the information discussed under Security in the Administration chapter see page 58 for details ...

Page 118: ...r Maintenance in the Administration chapter see page 71 for details The information called for in the Login Failures Working Mode and Mouse Sync Mode panels is the same as the information discussed under Customization in the Administration chapter see page 68 for details The meanings of the Reset on exit Restore Default Values and Clear Port Names parameters are the same as the ones discussed unde...

Page 119: ... of the port numbers specifies the operating platform that the computer on the connected port is using Choices are PC Mac1 Sun and Mac2 The default is PC The next column sets the port s Quick View status see SET QUICK VIEW PORTS page 35 The default is Disable QV To change an attribute Click on it to cycle through the choices Navigate to it with the Arrow Keys and press or to cycle through the choi...

Page 120: ...KN9008 KN9016 User Manual 106 This Page Intentionally Left Blank ...

Page 121: ...ed See Requirements page 5 for the required JRE version The JRE is available for free download from the Java web site http java com To run the Java Client Viewer after you log in see Logging In page 49 Click the Open Java Applet link Note The Windows Client Viewer icon is only available when you log in using the Microsoft Internet Explorer IE browser Continues on next page ...

Page 122: ...u use to switch ports and access the servers connected to them Note 1 If another user is using the GUI it does not appear A message informing you that it is in use by another user appears instead you must wait until the other user finishes with it before it becomes available to you 2 The Administration tab is not available for users who don t have administration permission 3 The display of the ser...

Page 123: ...l system You can maximize the window drag the borders to resize the window or use the scrollbars to move around the screen You can switch between your local and remote programs with Alt Tab Operation The features and functions of Java Client Viewer operation are the same as those of the Windows Client Viewer Refer to Chapter 7 The Windows Client Viewer for details ...

Page 124: ...KN9008 KN9016 User Manual 110 This Page Intentionally Left Blank ...
Page 125: ...he one below appears A maximum of 512 events are kept in the log file As new events are recorded they are placed at the bottom of the list When a new event is recorded after there are 512 events in the log file the earliest event in the list is discarded Note To maintain and view a record of all the events that take place not just the most recent 512 set up the Log Server AP program see The Log Se...

Page 126: ...KN9008 KN9016 User Manual 112 This Page Intentionally Left Blank ...

Page 127: ...tall and configure the Log Server Installation 1 With Windows running put the KN9008 KN9016 software CD that came with this product into the CD DVD drive 2 Navigate to the Log Server AP Installer folder on the CD 3 Click the Log Server icon to execute LogServerSetup exe and start the installation 4 Click Next Then follow the on screen instructions to complete the installation and have the Log Serv...

Page 128: ... in the ANMS settings see Log Server page 65 for details 2 The Log Server requires the Microsoft Jet OLEDB 4 0 driver see The Log Server program does not run page 142 if the program doesn t start The screen is divided into three components A Menu Bar at the top A panel that will contain a list of KN9008 KN9016 units in the middle see The Log Server Main Screen page 119 for details A panel that wil...

Page 129: ...ntains three items Add Edit and Delete They are used to add new KN9008 KN9016 units to the KN9008 KN9016 List edit the information for units already on the list or delete KN9008 KN9016 units from the list To add a KN9008 KN9016 to the KN9008 KN9016 List click Add To edit or delete a listed KN9008 KN9016 first select the one you want in the KN9008 KN9016 List window then open this menu and click Ed...

Page 130: ... This can either be the IP address of the KN9008 KN9016 or its DNS name if the network administrator has assigned it a DNS name Key in the value specified for the KN9008 KN9016 in the Network settings see Network page 55 Port Key in the port number that was specified for the KN9008 KN9016 in the ANMS settings see ANMS page 61 Description This field is provided so that you can put in a descriptive ...

Page 131: ...o their IP address Select the unit that you want to perform the search on from this list You can select more than one unit for the search If no units are selected the search is performed on all of them Priority List Sets the level for how detailed the search results display should be 1 is the most general 3 is the most specific Start Date Select the date that you want the search to start from The ...

Page 132: ...onnect if the previous attempt to connect failed When you click this item a dialog box similar to the one below appears Key in the number of seconds then click OK to finish Help From the Help Menu click Contents to access the online Windows Help file The help file contains instructions about how to setup operation and troubleshoot the Log Server ...

Page 133: ...ls The upper List panel lists the KN9008 KN9016 units that have been selected for the Log Server to track see Configure page 115 The lower Event panel displays the log events for the currently selected KN9008 KN9016 the highlighted one if there are more than one To select a KN9008 KN9016 unit in the list simply click on it ...

Page 134: ... box is checked the Log Server will still record its log events Address This is the IP Address or DNS name that was given to the KN9008 KN9016 when it was added to the Log Server see Configure page 115 Port This is the port number that was assigned to the KN9008 KN9016 when it was added to the Log Server see Configure page 115 Connection If the Log Server is connected to the KN9008 KN9016 this fie...

Page 135: ... have been downloaded by the Users the Administrator can disable browser access see Working Mode page 69 The Windows Client Installation To install the Windows Client on your computer do the following 1 Run the program WinClient exe on the software CD that came with your KN9008 KN9016 package 2 Follow along with the installation dialog boxes 3 When the installation completes an icon KN9008iClient ...

Page 136: ...the serial number 5 characters per box then click OK to bring up the KN9008 KN9016 Connection Screen Note 1 Letters in the serial number must be entered in capitals 2 This dialog box only appears the first time you run the program In the future you go directly to the Windows Client Connection screen To connect to the KN9008 KN9016 click the WinClient exe program icon on your desktop to bring up th...

Page 137: ...istrator When the IP address and Port number for the unit you wish to connect to have been specified click Login When you have finished with your session Click Logout Remote View Once contact with a KN9008 KN9016 has been established this button becomes active Click it to switch and take over console control of the unit that is attached to the KN9008 KN9016 The screen output of the unit appears on...

Page 138: ...IP address and port number in the Server IP and Port input boxes and then Click Login The Login dialog box appears 2 Key in a valid Username and Password and then click OK 3 Once contact with the KN9008 KN9016 has been established the Remote View button becomes active Click it to connect to the KN9008 KN9016 and take over console control of the unit that is connected to it ...

Page 139: ...nitor At the same time your local keystroke and mouse input is captured and sent to the remote system The look and feel of the AP Windows client operation is the same as for the The Windows Client Viewer Refer back to Chapter 7 for details Ending the Session After you log out of the KN9008 KN9016 you return to the Connection dialog box Click Logout to end the session ...

Page 140: ...e to bring up the Java Client Connection screen If this is the first time that you are running the program a dialog box appears requesting you to input your serial number The serial number can be found on the KN9008 KN9016 s CD case Key in the serial number 5 characters per box then click OK to bring up the KN9008 KN9016 Connection Screen Note 1 Letters in the serial number must be entered in capi...

Page 141: ...nnection a Login dialog box appears 4 Provide a valid Username and Password and then click OK Once the authentication procedure completes successfully the KN9008 KN9016 main page displays on your monitor Operation The look and feel of the Java Client AP operation is the same as for the Java Client Viewer Refer back to Chapter 8 for details ...

Page 142: ...KN9008 KN9016 User Manual 128 This Page Intentionally Left Blank ...

Page 143: ...ation and packages Note 1 The firmware upgrade described in this chapter refers to the KN9008 KN9016 s mainboard firmware 2 Each time you perform this upgrade you may also do a browser based upgrade to upgrade the icard firmware see Maintenance page 71 for details Downloading the Firmware Upgrade Package To download the firmware upgrade package 1 From a computer that is not part of your KVM instal...

Page 144: ...your switch Note On a daisy chained installation the chained stations will automatically receive the upgrade via the daisy chain cables 2 Shut down all the computers but not the stations on the KVM installation 3 From your KVM switch console login to the OSD as the administrator see page 27 and select the F4 ADM function 4 Scroll down to FIRMWARE UPGRADE Press Enter then press Y to invoke Firmware...

Page 145: ...opening a command line and entering the full path to it The Firmware Upgrade Utility welcome screen appears Note The screens shown in this section are for reference only The wording and layout of the actual screens put up by the Firmware Upgrade Utility may vary slightly from these examples 2 Read and Agree to the License Agreement enable the I Agree radio button Continues on next page ...

Page 146: ...evice s firmware level with that of the upgrade files If it finds that the device s version is higher than the upgrade version it brings up a dialog box informing you of the situation and gives you the option to continue or cancel If you didn t enable Check Firmware Version the Utility installs the upgrade files without checking whether they are a higher level or not As the upgrade proceeds status...

Page 147: ...creen appears to inform you that the procedure was successful Click Finish to close the Firmware Upgrade Utility Upgrade Failed If the Upgrade Succeeded screen doesn t appear it means that the upgrade failed to complete successfully See the next section Firmware Upgrade Recovery for how to proceed ...

Page 148: ...Power off the switch If it is part of a daisy chain disconnect it from the chain 2 Connect the Firmware Upgrade Cable to its Firmware Upgrade Port 3 Slide the Firmware Upgrade Recovery Switch to the Recover position 4 Power the switch back on and repeat the upgrade procedure 5 After the switch has been successfully upgraded power it off and slide the Firmware Upgrade Recovery Switch back to the No...

Page 149: ...Never spill liquid of any kind on the device Unplug the device from the wall outlet before cleaning Do not use liquid or aerosol cleaners Use a damp cloth for cleaning The device should be operated from the type of power source indicated on the marking label If you are not sure of the type of power available consult your dealer or local power company The device is designed for IT power distributio...

Page 150: ...lting in a risk of fire or electrical shock Do not attempt to service the device yourself Refer all servicing to qualified service personnel If the following conditions occur unplug the device from the wall outlet and bring it to qualified service personnel for repair The power cord or plug has become damaged or frayed Liquid has been spilled into the device The device has been exposed to rain or ...

Page 151: ...and stable before extending a device from the rack Do not overload the AC supply branch circuit that provides power to the rack The total rack load should not exceed 80 percent of the branch circuit rating Make sure that all equipment used on the rack including power strips and other electrical connectors is properly grounded Ensure that proper airflow is provided to devices in the rack Ensure tha...

Page 152: ...y beforehand Product model number serial number and date of purchase Your computer configuration including operating system revision level expansion cards and software Any error messages displayed at the time the error occurred The sequence of operations that led up to the error Any other information you feel may be of help Email Support support aten usa com Online Technical Support Troubleshootin...

Page 153: ...m Resolution Erratic operation Check that the power adapter that was supplied with the unit is plugged in and functioning properly Press and hold the Reset Switch see page 9 for longer than three seconds Mouse and or keyboard not responding due to improper mouse and or keyboard reset Unplug the cable s from the console port s then plug it them back in again All Station IDs display as 01 Station 1 ...

Page 154: ...ointer Dis play function see page 79 Part of remote window is off my monitor Use the AutoSync feature see Video Settings page 81 to synchronize the local and remote monitors Problem Resolution Java Client won t connect to the KN9008 KN9016 1 Java JRE 6 or higher must be installed on your computer 2 Make sure to include the correct login string when you specify the KN9008 KN9016 s IP address see Lo...

Page 155: ...d issue the following com mands setenv output device screen r1024x768x60 reset all Under XWindow 1 Open a console and issue the following command m64config res 1024x768x60 2 Log out 3 Log in Video display problems with 13W3 interface systems e g Sun Ultra servers The display resolution should be set to 1024 x 768 Under Text Mode 1 Go to OK mode and issue the following com mands setenv output devic...

Page 156: ...om data download htm to retrieve the driver file MDAC 2 7 RTM Refresh 2 70 9001 0 Since this driver is used in Windows Office Suite an alternate method of obtaining it is to install Windows Office Suite Once the driver file or Suite has been installed the Log Server will run Problem Resolution Low resolution video in Panel Array Mode Increase the number of panels that are displayed Some users only...

Page 157: ...The emulation mappings are listed in the table below Note When using key combinations press and release the first key Ctrl then press and release the activation key PC Keyboard Mac Keyboard Shift Shift Ctrl Ctrl Ctrl 1 Ctrl 2 Ctrl 3 Ctrl 4 Alt Alt Print Screen F13 Scroll Lock F14 Enter Return Backspace Delete Insert Help Ctrl F15 ...

Page 158: ...ther keys The corresponding functions are shown in the table below Note When using key combinations press and release the first key Ctrl then press and release the activation key PC Keyboard Sun Keyboard Ctrl T Stop Ctrl F2 Again Ctrl F3 Props Ctrl F4 Undo Ctrl F5 Front Ctrl F6 Copy Ctrl F7 Open Ctrl F8 Paste Ctrl F9 Find Ctrl F10 Cut Ctrl 1 Ctrl 2 Ctrl 3 Ctrl 4 Ctrl H Help Compose ...

Page 159: ...omputers running Windows an IP address can be assigned with the IP Installer utility 1 Unzip the contents of IPInstaller zip found on the Software CD that came with your KN9008 KN9016 package to a directory on your hard drive 2 Go to the directory that you unzipped the IPInstaller program to and run IPInstaller exe A dialog box similar to the one below appears 3 Select the KN9008 KN9016 in the Dev...

Page 160: ...fault IP address 192 168 0 60 in your browser and you will be able to connect 3 Assign a fixed IP address for the KN9008 KN9016 that is suitable for the network segment that it resides on 4 After you log out reset your computer s IP address to its original value AP Windows Client For computers running Windows the KN9008 KN9016 s IP address can be determined with the Windows AP program see The Wind...

Page 161: ...tion icon The address is displayed at the bottom of the General Information page see page 54 Once you have determined what the IPv6 address is you can use it when logging in from a browser or the Win and Java Client AP programs For example If you are logging in from a browser you would key in http fe80 210 74ff fe61 1ef for the URL bar If you are logging in with the AP program you would key fe80 2...

Page 162: ...6 address For example 2001 74ff fe6e 59 As above the address is displayed at the bottom of the Device Information page Once you have determined what the IPv6 address is you can use it when logging in from a browser or the Win and Java Client AP programs For example If you are logging in from a browser you would key in http 2001 74ff fe6e 59 for the URL bar If you are logging in with the AP program...

Page 163: ...9016 2 In order for the local and remote mice to synchronize you must use the generic mouse driver supplied with the Windows operating system If you have a third party driver installed such as one supplied by the mouse manufacturer you must remove it 1 Windows 2000 Set the mouse speed to the middle position set the mouse acceleration to None Control Panel Mouse Mouse Properties Motion 2 Windows XP...

Page 164: ...e speed to the middle position disable mouse acceleration click Advanced to get the dialog box for this 4 Windows NT Windows 98 Set the mouse speed to the slowest position 5 Sun Linux Open a terminal session and issue the following command Sun xset m 1 Linux xset m 0 ...

Page 165: ...ficate s name is not found on Microsoft list of Trusted Authorities You have two options 1 you can ignore the warning and click Yes to go on or 2 you can install the certificate and have it be recognized as trusted If you are working on a computer at another location accept the certificate for just this session by clicking Yes If you are working at your own computer install the certificate on your...

Page 166: ...e Certificate Information dialog box appears Note There is a red and white X logo over the certificate to indicate that it is not trusted 2 Click Install Certificate 3 Follow the Installation Wizard to complete the installation Unless you have a specific reason to choose otherwise accept the default options 4 When the Wizard presents a caution screen Click Yes ...

Page 167: ...e installation then click OK to close the dialog box Certificate Trusted The certificate is now trusted When you click View Certificate you can see that the red and white X logo is no longer present further indication that the certificate is trusted ...

Page 168: ...d pushbutton Power 1 x Rocker Switch Port Selection 8 x Pushbutton 16 x Pushbutton FW Upgr Rec 1 x Slide LEDs On Line 8 Green 16 Green Selected 8 Orange 16 Orange Station ID 1 x 2 digit 7 segment Orange Power 1 Blue 10 100 Mbps 1 Orange Green at LAN port Link 1 Green at LAN port Emulation Keyboard Mouse PS 2 USB Video Local Console 2048 x 1536 DDC2B Remote 1600 x 1200 60Hz 24bit color depth Scan I...

Page 169: ...Appendix 155 Physical Properties Housing Metal Weight 3 34 kg 3 48 kg L x W x H 43 72 x 21 92 x 4 40 cm Function KN9008 KN9016 ...

Page 170: ...control KN9008 KN9016 No Computers No Computers 1 1 8 9 65 72 2 9 16 10 73 80 3 17 24 11 81 88 4 25 32 12 89 96 5 33 40 13 97 104 6 41 48 14 105 112 7 49 56 15 113 120 8 57 64 16 121 128 No Computers No Computers 1 1 16 9 129 144 2 17 32 10 145 160 3 33 48 11 161 176 4 49 64 12 177 192 5 65 80 13 193 208 6 81 96 14 209 224 7 97 112 15 225 240 8 113 128 16 241 256 ...

Page 171: ... KN9008 KN9016 and the last switch in the daisy chain cannot exceed 100 meters regardless of the number of switches in the daisy chain The maximum distance between two KVM switches in the daisy chain cannot exceed 15 meters Expansion Type Brand Model Name Daisy Chain ATEN ACS1208A 8 Port PS 2 KVM Switch ACS1216A 16 Port PS 2 KVM Switch CS1708 8 Port USB KVM Switch CS1716 16 Port USB KVM Switch CS1...

Page 172: ...defaults see page 27 1 Unplug the KN9008 KN9016 power adapter 2 Remove the cover of the KN9008 KN9016 3 Place a jumper cap over pins 1 2 of the J17 jumper on the mainboard 4 Plug in the KN9008 KN9016 power adapter The following directions appear on the KVM console screen USERNAME AND PASSWORD INFORMATION AND PORT USER INFORMATION HAS BEEN CLEARED PLEASE POWER OFF THE SWITCH REMOVE THE JUMPER CLOSE...

Page 173: ...only KVM cables that we have designed to work with this product can be connected Limited Warranty IN NO EVENT SHALL THE DIRECT VENDOR S LIABILITY EXCEED THE PRICE PAID FOR THE PRODUCT FROM DIRECT INDIRECT SPECIAL INCIDENTAL OR CONSEQUENTIAL DAMAGES RESULTING FROM THE USE OF THE PRODUCT DISK OR ITS DOCUMENTATION The direct vendor makes no warranty or representation expressed implied or statutory wi...

Page 174: ...KN9008 KN9016 User Manual 160 This Page Intentionally Left Blank ...

Page 175: ...ivate 35 Hotkey Control 45 BRC 37 Broadcast Mode 37 Browser Logging In 49 C CC Management 63 Clear Port Names 70 Clear the Name List 35 Components front panel 8 rear panel 10 Computer connection tables 154 Configuration backup 72 restore 73 Configuration Page Windows Client 95 Console cable installation 20 Control Panel 77 Customization 68 104 D Daisy chaining 21 Default username and password 27 D...

Page 176: ...ey Setup 79 Hotkey setup 79 Hotkey Summary Table 91 I Installation daisy chaining 21 single station 19 Invalid login 50 Invoking Hotkey Mode 41 IP Address determination 145 IP Address 34 56 J Java Applet Viewer 107 Java Client 126 AP Login 127 AP Operation 127 Troubleshooting 140 K Keyboard On Screen 84 Keyboard Emulation Mac 143 Sun 144 Keyboard Language 36 Keyboard Port Operation 42 KVM adapter ...

Page 177: ...7 32 Local Console 27 Logout 39 Main Page 85 Main Screen 28 Main Screen Headings 29 Navigation 29 Toolbar 90 OSD Hotkey toggling 46 P Panel Array Mode Windows Client 93 Password 27 Pause 38 Port Selection 23 Port Access 99 Port control hotkeys 40 Port ID Display Duration 32 Display Mode 32 96 Display Position 32 Numbering 25 Port Names 34 88 Port names clearing 70 Port Operating System setting 46 ...

Page 178: ...tation installation 19 SJ T 11364 2006 ii Skip Mode 36 44 Specifications 152 Stacking 14 Station IDs Reset 35 T Technical Support 138 Telephone support iii Tick Panel 120 Time out control 68 Toolbar OSD 90 Panel Array Mode Windows 93 Troubleshooting 139 General operation 139 Java Client 140 Log Server 142 Panel Array Mode 142 Sun Systems 141 Windows Client 140 Trusted Certificates 149 U User Accou...

Reviews: