background image

Getting started

17

Installation options

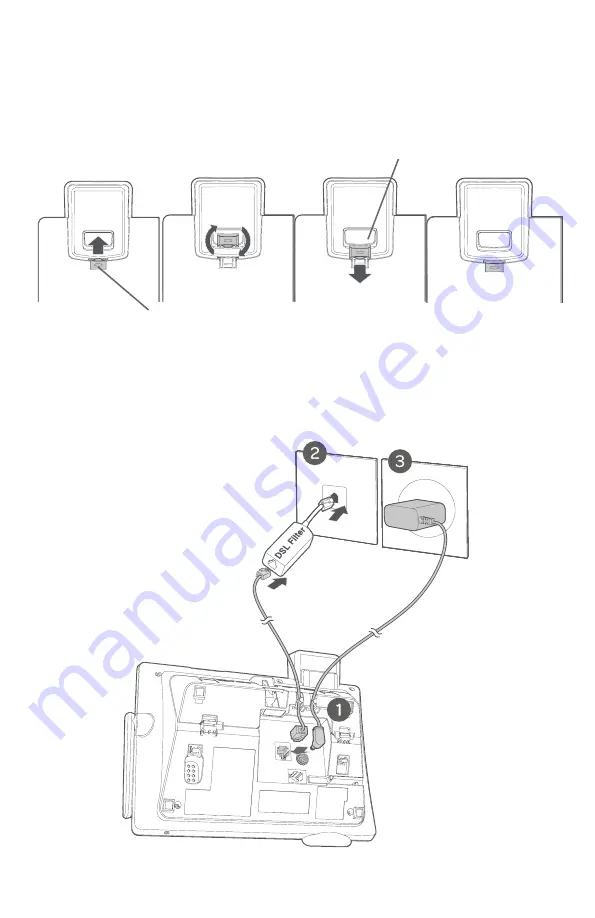
5.  Make sure the telephone line cord and power adapter cord are securely 

plugged into their jacks on the back of the telephone base. Plug the power 

adapter and telephone line into the wall outlets.

4.  Slide the handset tab upward. Rotate the handset tab by 180 degrees.

Handset tab

Switch hook

Summary of Contents for CL84107

Page 1: ...Complete user s manual CL84107 CL84207 CL84257 CL84307 CL84327 CL84347 CL84357 CL84367 DECT 6 0 corded cordless telephone answering system with caller ID call waiting ...

Page 2: ...hone answering system with caller ID call waiting Serial number ________________________________________________________ Purchase date _______________________________________________________ Placeofpurchase ____________________________________________________________ Both the model and serial numbers of your AT T product can be found on the bottom of the telephone base Save your sales receipt and ...

Page 3: ...07 CL84257 3 for CL84307 CL84327 CL84347 CL84357 CL84367 Charger for cordless handset with power adapter installed 1 for CL84107 2 for CL84207 CL84257 3 for CL84307 CL84327 CL84347 CL84357 CL84367 Battery for cordless handset 1 for CL84107 2 for CL84207 CL84257 3 for CL84307 CL84327 CL84347 CL84357 CL84367 THIS SIDE UP CE CÔTÉ VERS LE HAUT Battery Pack Bloc piles BT183342 BT283342 2 4V 400mAh Ni M...

Page 4: ...age 21 Caller ID announce 22 Set speed dial voicemail number 23 Voicemail visual message waiting indicator 23 Clear voicemail indicator 24 Rename handset 25 Key tone 25 Use caller ID to automatically set date and time 26 Home area code 26 Dial mode 27 Web address 27 QUIET mode 28 Telephone base settings 29 Ringer volume 30 Ringer tone 30 Set date time 31 LCD language 32 Caller ID announce 33 Set s...

Page 5: ...n a speed dial number 65 Reassign a speed dial number 66 Assign your speed dial voicemail number 66 Delete a speed dial number 67 Make a call using speed dial 67 Check your voicemail using speed dial 67 Caller ID About caller ID 68 Information about caller ID with call waiting 68 Caller ID log 69 How the caller ID log works 69 Missed new call indicator 69 Caller ID operation 70 Memory match 70 Rev...

Page 6: ...ng memos 121 Record a memo 121 Play back a memo 121 Base message counter displays 122 Message counter displays 122 Remote access 123 Appendix Adding and registering handsets headsets speakerphones 125 Register a handset to the telephone base 125 Deregistering handsets 126 Deregister all handsets from the telephone base 126 Alert tones and lights 127 Handset screen icons 127 Telephone base screen i...

Page 7: ...5 f f Press and hold to broadcast to a group of system devices page 55 qCID VOLUME f f Press qCID to show caller ID log when the handset is not in use page 71 f f Press to scroll down while in menus and lists f f While entering names or numbers press to move the cursor to the left f f Press to decrease the listening volume when on a call page 43 or to decrease the message playback volume page 119 ...

Page 8: ... f f Press to make or answer a call using the speakerphone page 39 f f Press to switch between the speakerphone and the handset page 41 MUTE DELETE f f During a call press to mute the microphone page 44 f f When the handset is ringing press to mute the ringer temporarily page 40 f f While reviewing the caller ID log directory redial memory block list allow list or star name list press to delete an...

Page 9: ...e 19 f f Set date time page 20 f f Settings page 18 f f Web address page 27 Using menus f f Press MENU SELECT to show the menu f f Press qCID or pDIR to scroll through menu items f f Press MENU SELECT to confirm or save changes to a highlighted menu item f f Press OFF CANCEL to cancel an operation back up to the previous menu or exit the menu display The symbol highlights a menu item Main menu Pla...

Page 10: ...s or numbers press to move the cursor to the right qCID f f Press qCID to show caller ID log when the telephone is not in use page 71 f f Press toscrolldownwhileinmenusand lists f f While entering names or numbers press to move the cursor to the left MENU SELECT f f When the telephone is not in use press to show the menu f f While in the menu press to select an item or save an entry or setting FIN...

Page 11: ...f f During playback press to repeat the playing message page 119 f f During playback press twice to play the previous message page 119 MUTE DELETE f f During a call press to mute the microphone page 44 f f When the telephone is ringing press to mute the ringer temporarily page 40 f f While reviewing the caller ID log directory redial memory block list allow list or star name list press to delete a...

Page 12: ...atedly to display other dialing options when reviewing a caller ID log entry page 72 f f Press and hold to enter the QUIET mode setting screen or to deactivate QUIET mode page 28 TONE a A f f Press to switch to tone dialing temporarily during a call if you have pulse service page 45 f f While entering names press to change the next letter to upper or lower case ...

Page 13: ...f Settings page 32 f f Web address page 38 The symbol highlights a menu item Play messages Answering sys p q Main menu Using menus f f Press MENU SELECT to show the menu f f Press qCID or pDIR to scroll through menu items f f Press MENU SELECT to confirm or save changes to a highlighted menu item f f Press CANCEL to cancel an operation back up to the previous menu or exit the menu display Quick re...

Page 14: ...r ID problems caused by DSL interference Please contact your DSL service provider for more information about DSL filters Your product may be shipped with protective stickers covering the handset and telephone base displays remove them before use For customer service or product information visit our website at www telephones att com or call 1 800 222 3111 In Canada dial 1 866 288 4268 Avoid placing...

Page 15: ...er the table or cabinet outlet Telephone base installation Charger installation Plug the large end of the telephone base power adapter into a power outlet not controlled by a wall switch Plug one end of the telephone line cord into a telephone jack or a DSL filter If you have DSL high speed Internet service a DSL filter not included is required Route the telephone line cord through this slot Plug ...

Page 16: ...hows Place in charger and flashing Battery has no or very little charge The handset cannot be used Charge without interruption at least 30 minutes The screen shows Low battery and flashing Battery has enough charge to be used for a short time Charge without interruption at least 30 minutes The screen shows HANDSET X Battery is charged To keep the battery charged place the handset in the charger wh...

Page 17: ... forward in the charger The CHARGE light on the top of the handset is on during charging Step 2 Align the cover flat against the battery compartment then slide it upwards until it clicks into place Ô TÉ V ER S LE H A U T 2 4V 40 0m Ah Ni M H M EN T UR E BA TT ER IE S CE R LE S PI LE S in e CR 13 49 ...

Page 18: ...set Smart call blk Voice guide to set up Ans sys Note Voice guides to set Smart call blocker and answering system are only available on the telephone base After you install your telephone or power returns following a power outage the handset and base will prompt you to set the date and time For instructions on setting the date and time using a cordless handset or the telephone base see Set date ti...

Page 19: ...r outage the telephone base or cordless handset will prompt you to set the date and time For instructions see Set date time on page 20 and page 31 for details To skip setting the date and time press OFF CANCEL on a cordless handset or CANCEL on the telephone base To make a call during a power failure 1 Lift the corded handset and wait for a dial tone The screen displays Base Check AC power 2 Slowl...

Page 20: ...sional to install the mounting plate Tabletop to wall mount installation To install the telephone base in the wall mount position make sure that you first unplug the telephone line cord and power adapter from the telephone wall jack and power outlet 1 Pull the integrated wall mount bracket and release it from the tabletop orientation as shown below Rotate it down into wall mount position and then ...

Page 21: ...cure them with twist ties Plug the power adapter and telephone line into the wall outlets 4 Align the mounting studs on the mounting plate with the mounting holes on the bracket and press the telephone base down until it clicks securely into place 2 Slide the handset tab upward Rotate the handset tab by 180 degrees The protruding edge of the handset tab holds the corded handset in place when the t...

Page 22: ...e from the wall 2 If necessary untie the bundled telephone cord and power adapter cord Make sure that you unplug the power adapter and telephone line cord from the wall outlets before you begin 3 Push as indicated by arrows in the illustration until the bracket is released and then rotate it upward until it clicks into the tabletop position Tabletop Wall mount Side view Rear view ...

Page 23: ...ne line cord and power adapter cord are securely plugged into their jacks on the back of the telephone base Plug the power adapter and telephone line into the wall outlets 4 Slide the handset tab upward Rotate the handset tab by 180 degrees Handset tab Switch hook ...

Page 24: ...ote Press OFF CANCEL to cancel an operation back up to the previous menu or exit the menu display Press and hold OFF CANCEL to return to idle mode Go to Answering system settings starting on page 105 for instructions on how to use a system handset to modify the answering system settings as shown below Setting Page Announcement play record and delete 105 107 Answer on off 108 Call screening 116 Num...

Page 25: ... If the ringer volume is set to off that handset is silenced for all incoming calls f f If the ringer volume is set to off the caller ID will not be announced and the screen will briefly display Caller ID won t be announced Ringer tone You can choose one of ten ringer tones 1 Press MENU SELECT in idle mode to enter the main menu 2 Press qCID or pDIR to scroll to Ringers then press MENU SELECT 3 Pr...

Page 26: ...s qCID or pDIR to scroll to Set date time and then press MENU SELECT 3 Press qCID or pDIR to select the month then press MENU SELECT or enter the number using the dialing keys 4 Press qCID or pDIR to select the day then press MENU SELECT or enter the number using the dialing keys 5 Press qCID or pDIR to select the year or enter the number using the dialing keys then press MENU SELECT to move on to...

Page 27: ...h Français or Español then press MENU SELECT The screen prompts Set English Français Español as LCD language 5 Press MENU SELECT to confirm There is a confirmation tone and the screen returns to the previous menu Note If you accidentally change the LCD language to French or Spanish you can reset it back to English without going through the French or Spanish menus When in idle mode press MENU SELEC...

Page 28: ...e screen shows CID Annc ON OFF on all HS BS The caller ID announce feature has been turned on or off on all handsets and on the telephone base Notes f f To use the caller ID announce feature you must subscribe to caller ID service from your telephone service provider f f If you have paired an AT T TL80133 DECT 6 0 cordless speakerphone to the telephone base the caller ID announce setting for all d...

Page 29: ...ss and hold MUTE DELETE to erase all digits f f Press REDIAL PAUSE to enter a three second dialing pause a p appears 5 Press MENU SELECT to save There is a confirmation tone The screen displays Voicemail saved and then returns to the previous menu Voicemail visual message waiting indicator If you subscribe to a voicemail service offered by your telephone service provider this feature provides a vi...

Page 30: ...ss MENU SELECT when in idle mode to enter the main menu 2 Press qCID or pDIR to scroll to Settings then press MENU SELECT 3 Press qCID or pDIR to scroll to Clr voicemail then press MENU SELECT The screen shows Reset Voicemail Indicator 4 Press MENU SELECT again to turn the voicemail indicator off There is a confirmation tone and the screen returns to the previous menu Notes f f Your telephone serv...

Page 31: ... delete a character f f Press and hold MUTE DELETE to delete all characters 5 Press MENU SELECT to save the setting and return to the previous menu There is a confirmation tone Key tone The handset is set to beep with each key press You can adjust the key tone volume or turn it off If you turn off the key tone there are no beeps when you press keys 1 Press MENU SELECT in idle mode to enter the mai...

Page 32: ...local phone call do not use this home area code feature If you do you cannot place local calls from your caller ID log as they will have only seven digits To set the home area code 1 Press MENU SELECT in idle mode to enter the main menu 2 Press qCID or pDIR to scroll to Settings then press MENU SELECT 3 Press qCID or pDIR to scroll to Home area code then press MENU SELECT The screen briefly shows ...

Page 33: ...s qCID or pDIR to scroll to Dial mode then press MENU SELECT 4 Press qCID or pDIR to select Touch tone or Pulse then press MENU SELECT The screen shows DIAL MODE is touch tone or DIAL MODE is pulse There is a confirmation tone and the screen returns to the previous menu Web address Use this feature to view the AT T website address 1 Press MENU SELECT in idle mode to enter the main menu 2 Press qCI...

Page 34: ...then press MENU SELECT Your screen briefly shows Answering sys is ON and then Quiet mode on To turn QUIET mode off f f While QUIET mode is on press and hold QUIET The screen then shows Quiet mode is off and you hear a confirmation tone Notes f f If you change the base ringer handset ringer ringer volume key tone or caller ID announce features when QUIET mode is on the sample plays but the feature ...

Page 35: ... main menu 2 Press qCID or pDIR to scroll to the feature to be changed When scrolling through the menu the symbol indicates the selected menu item 3 Press MENU SELECT to select the highlighted item Note Press CANCEL to cancel an operation back up to the previous menu or exit the menu display Press and hold CANCEL to return to idle mode Play messages Answering sys p q ...

Page 36: ...e ringer volume is set to off the telephone base is silenced for all incoming calls f f If the ringer volume is set to off the caller ID will not be announced and the screen will briefly display Caller ID won t be announced Ringer tone You can choose one of ten ringer tones 1 Press MENU SELECT in idle mode to enter the main menu 2 Press qCID or pDIR to scroll to Ringers then press MENU SELECT 3 Pr...

Page 37: ...DIR to scroll to Set date time and then press MENU SELECT 3 Press qCID or pDIR to choose the month then press MENU SELECT or enter the number using the dialing keys 4 Press qCID or pDIR to choose the day then press MENU SELECT or enter the number using the dialing keys 5 Press qCID or pDIR to choose the year or enter the number using the dialing keys then press MENU SELECT to move on to set the ti...

Page 38: ...t English Français or Español then press MENU SELECT The screen prompts Set English Français Español as LCD language 5 Press MENU SELECT to confirm There is a confirmation tone and the screen returns to the previous menu Note If you accidentally change the LCD language to French or Spanish you can reset it back to English without going through the French or Spanish menus Press MENU SELECT on the t...

Page 39: ...eturns to the previous menu If you change the setting for Set all On Off the screen shows CID Annc ON OFF on all HS BS The caller ID announce feature has been turned on or off on all handsets and on the telephone base Notes f f To use the caller ID announce feature you must subscribe to caller ID service from your telephone service provider f f If you have paired an AT T TL80133 DECT 6 0 cordless ...

Page 40: ...ts f f Press REDIAL PAUSE to enter a three second dialing pause a p appears 5 Press MENU SELECT to save There is a confirmation tone The screen displays Voicemail saved and then returns to the previous menu Voicemail visual message waiting indicator If you subscribe to a voicemail service offered by your telephone service provider this feature provides a visual indication when you have new voicema...

Page 41: ... service provider voicemail may alert you to new messages with a stutter broken dial tone Contact your telephone service provider for more details f f For information about using your voicemail service contact your telephone service provider Rename base You can create a new name for the telephone base 1 When the telephone is idle press MENU SELECT 2 Press qCID or pDIR to scroll to Settings then pr...

Page 42: ... and the screen returns to the previous menu Use caller ID to automatically set date and time If you subscribe to caller ID service the day month and time are set automatically with each incoming call Follow the steps below to turn the CID time sync feature on or off The default setting is On 1 When the telephone base is in idle mode press MENU SELECT to enter the main menu 2 Press qCID or pDIR to...

Page 43: ...ENU SELECT 3 Press qCID or pDIR to scroll to Home area code then press MENU SELECT The screen briefly shows Only for 7digit dial from CID 4 Use the dialing keys to enter a three digit home area code f f Press MUTE DELETE to delete a digit f f Press and hold MUTE DELETE to delete all digits 5 Press MENU SELECT to save There is a confirmation tone and the screen shows Area code will not show in CID ...

Page 44: ...CID or pDIR to scroll to Dial mode then press MENU SELECT 4 Press qCID or pDIR to select Touch tone or Pulse then press MENU SELECT The screen shows DIAL MODE is touch tone or DIAL MODE is pulse There is a confirmation tone and the screen returns to the previous menu Web address Use this feature to view the AT T website address 1 Press MENU SELECT in idle mode to enter the main menu 2 Press qCID o...

Page 45: ...t the elapsed time On hook dialing predialing Using a cordless handset 1 Enter the telephone number Press MUTE DELETE to make corrections when entering the phone number 2 Press PHONE FLASH or SPEAKER Using the telephone base 1 Enter the telephone number Press MUTE DELETE to make corrections when entering the phone number 2 Press SPEAKER or lift the corded handset Answering a call Using a cordless ...

Page 46: ...e telephone is ringing to silence the ringer temporarily on that handset only This turns off the ringer without disconnecting the call The next incoming call rings normally at the preset volume Using the telephone base Press CANCEL or MUTE DELETE while the telephone is ringing to silence the ringer temporarily on the telephone base only This turns off the ringer without disconnecting the call The ...

Page 47: ...Follow the battery charging instructions in the Battery installation and charging section on pages 10 11 Last number redial Each handset and the telephone base stores the last 10 telephone numbers dialed up to 30 digits each To view the 10 most recently dialed numbers Using a cordless handset f f To display the most recently called number press REDIAL PAUSE f f To view up to 10 recently called num...

Page 48: ...entry Using a cordless handset or the telephone base f f While the screen displays the desired number press MUTE DELETE to delete the number from the redial memory Equalizer The handset and base equalizers enable you to change the quality of the audio to best suit your hearing Using a cordless handset or the telephone base 1 While on an outside call or intercom call press MENU SELECT 2 Press MENU ...

Page 49: ...e handset or FLASH PTT on the telephone base to put your current call on hold and take the new call f f Press PHONE FLASH on your handset or FLASH PTT on the telephone base at any time to switch back and forth between calls Note f f If the Smart call blocker feature is on and in screening mode and you receive a call waiting call If you have already picked up a screened call the telephone checks wh...

Page 50: ...her numbers such as bank account numbers or access codes from the directory caller ID log or redial list Using a cordless handset To access the directory while on a call 1 Press MENU SELECT 2 Press qCID or pDIR to scroll to Directory and then press MENU SELECT 3 Press qCID or pDIR to scroll to the desired number 4 Press MENU SELECT to dial the number shown To access the caller ID log while on a ca...

Page 51: ...dial the number shown Notes f f You cannot edit a directory entry while on a call For more details about the directory see the Directory section starting on page 58 f f You cannot copy a caller ID entry into the directory while on a call For more details about the caller ID log see page 69 f f If you press REDIAL PAUSE while on a call you can only view the 10 most recently dialed numbers and you c...

Page 52: ... TRANSFER TO Use the dialing keys to enter a specific device number 0 for the telephone base 1 9 for handsets 1 9 TONE followed by 0 2 for handsets 10 12 or TONE followed by for all devices or press qCID or pDIR to scroll to the desired device and press MENU SELECT The outside call is put on hold and your handset screen shows Transferring call or Transferring call to all The other device rings and...

Page 53: ... desired handset and press MENU SELECT The outside call is put on hold and the telephone base shows Transferring call or Transferring call to all The other handset s rings and shows Transfer from BASE 0 BASE represents the base name 3 To answer the call on the destination handset press PHONE FLASH or SPEAKER The telephone base shows Call transferred and goes to idle mode Notes f f To cancel the tr...

Page 54: ...s FIND HS MUTE DELETE or CANCEL on the telephone base Join a call in progress When a handset or the telephone base is already on a call and you would like to join the call press PHONE FLASH or SPEAKER on your handset or SPEAKER on your telephone base or lift the corded handset To end the call using a cordless handset press OFF CANCEL or place the handset in the charger To end the call using the te...

Page 55: ... by for all devices or press qCID or pDIR to scroll to the desired device and press MENU SELECT Your handset screen shows Calling HANDSET X Calling BASE 0 Calling headset or Calling all devices The destination device s rings and shows HANDSET is calling HANDSET X is calling or HANDSET X is calling all HANDSET represents the handset name X represents the handset number 2 To answer the intercom call...

Page 56: ...ng device shows No answer Try again f f To temporarily silence the intercom ringer press OFF CANCEL or MUTE DELETE on the handset or press CANCEL or MUTE DELETE on the telephone base f f You can only use one pair of devices at a time to make intercom calls f f For cordless headsets and speakerphones refer to the corresponding user s manual on how to answer and end an intercom call f f If a total o...

Page 57: ...to highlight Share call then press MENU SELECT f f You can end the intercom call and continue the outside call with your handset Press PHONE FLASH on your handset the ended intercom call party hears four beeps Using the telephone base 1 During the call press MENU SELECT Press qCID or pDIR to scroll to Intercom then press MENU SELECT 2 Choose the handset s you would like to transfer the call to usi...

Page 58: ...n you attempt to place a PTT call to another device which is accessing the answering system or on an intercom call or outside call your device screen shows Not available at this time Turn PTT on or off Using a cordless handset 1 Press PUSH TO TALK when the handset is not in use The PUSH TO TALK menu displays 2 Press qCID or pDIR to highlight PTT On Off then press MENU SELECT 3 Press qCID or pDIR t...

Page 59: ...o BASE 0 BASE represents the base name for a few seconds When the connection is made both your and the destination device screens display Press and hold PTT to talk 2 Press and hold PUSH TO TALK A chirp indicates your microphone is on Speak towards the device Your voice is broadcast to the destination device While you are speaking your handset shows PTT To handset X or PTT To base 3 Release PUSH T...

Page 60: ...or a few seconds When the connection is made both the telephone base and destination handset display Press and hold PTT to talk 2 Press and hold FLASH PTT A chirp indicates your microphone is on Speak towards the telephone base Your voice is broadcast to the destination handset While you are speaking the telephone base shows PTT To handset X 3 Release FLASH PTT after speaking Both devices beep onc...

Page 61: ...H TO TALK when you want to speak Speak towards the handset Your voice is broadcast to all eligible devices 3 Release PUSH TO TALK after speaking 4 Any device can reply see Answer a PTT call on page 56 To call multiple devices using the telephone base 1 You have three ways to call multiple handsets When the telephone base is not in use f f Press and hold FLASH PTT until the screen shows Connecting ...

Page 62: ... chirp Speak towards the device f f While you are speaking your device shows PTT To Base PTT To Handset X X represents the handset numbers of one or more destination handsets a maximum of five handset numbers appear or PTT To Base Handset X X represents the handset numbers of one or more destination handsets a maximum of four handset numbers appear f f Your voice is broadcast to all destination de...

Page 63: ...ASH on the initiating handset or SPEAKER on the initiating telephone base The PTT call ends automatically and you get a dial tone f f During a one to group PTT call press PHONE FLASH on any one of the destination handsets or press SPEAKER on the destination telephone base That device gets a dial tone The PTT call continues for the rest of the PTT participants End or leave a PTT call The initiating...

Page 64: ...page82 f f When Smart call blocker is on calls with numbers saved in the directory will get through and ring on your telephone If a number saved in the directory is also saved in the block list calls with this number will be blocked Capacity The directory can store up to 50 entries with a maximum of 15 alphanumeric characters including spaces for names and 30 digits for telephone numbers A conveni...

Page 65: ...IAL PAUSE then qCID pDIR or pressing REDIAL PAUSE repeatedly to locate the number Press MENU SELECT to copy the number 5 Press MENU SELECT to move on to the name f f The display shows Number already saved if the number is already in the directory You cannot save the same number twice 6 Use the dialing keys to enter a name up to 15 characters when prompted Each time you press a key the character on...

Page 66: ...er the telephone number when in idle mode 2 Follow the steps in Edit a directory entry on page 64 Create directory entries Note The first letter of every word is a capital letter The remaining letters in a word start as lower case letters as shown in the chart below Dialing keys Characters by number of key presses 1 2 3 4 5 6 7 8 9 10 11 1 1 2 A B C a b c 2 3 D E F d e f 3 4 G H I g h i 4 5 J K L ...

Page 67: ... or pDIR to scroll to Directory Press MENU SELECT twice 2 Press qCID or pDIR to browse through the directory Entries appear alphabetically by the first letter in the name Notes f f If the telephone number in the directory exceeds 15 digits appears in front of the telephone number Press TONE to move towards the end of the telephone number or press pound key to move towards the beginning of the tele...

Page 68: ...ppear in alphabetical order For example if you have the names Jennifer Jessie Kevin and Linda in your directory f f If you press 5 JKL once you see Jennifer Press qCID and you see Jessie f f If you press 5 JKL twice you see Kevin f f If you press 5 JKL three times you see Linda f f If you press 5 JKL four times you see 5 and then the directory entry beginning with 5 or the next closest entry after...

Page 69: ... directory Press PHONE FLASH or SPEAKER on the handset OR On the telephone base lift the corded handset or press SPEAKER Delete a directory entry Using a cordless handset or the telephone base To delete the displayed directory entry press MUTE DELETE The screen displays Delete contact Press MENU SELECT to confirm There is a confirmation tone and the screen displays Contact deleted You cannot retri...

Page 70: ...r the telephone base to erase all digits f f Press and hold REDIAL PAUSE to add a three second dialing pause a p appears 3 Press MENU SELECT to move on to the name The screen shows EDIT NAME along with the name to be edited 4 To edit the name f f Press the dialing keys to add characters page 60 f f Press qCID or pDIR to move the cursor to the left or right f f Press MUTE DELETE on the handset or t...

Page 71: ...l Press MENU SELECT 4 Press qCID or pDIR to choose your desired speed dial location 2 9 0 then press MENU SELECT The screen briefly shows Copy from Directory and then displays the directory list 5 Press qCID or pDIR to scroll to the phone number you wish to assign to the selected speed dial location 6 Press MENU SELECT to save the setting There is a confirmation tone and the screen returns to the ...

Page 72: ... SELECT again 6 Press MENU SELECT to select Change SD The screen briefly shows Copy from Directory and then displays the directory list 7 Press qCID or pDIR to scroll to the phone number you wish to reassign to the selected speed dial location 8 Press MENU SELECT to save the setting and return to the speed dial list There is a confirmation tone Assign your speed dial voicemail number See the Set s...

Page 73: ...empty before returning to the speed dial list Make a call using speed dial Using a cordless handset or the telephone base When in idle mode press and hold the dialing key 2 9 0 corresponding to the assigned location you wish to call OR 1 Press MENU SELECT when in idle mode 2 Press qCID or pDIR to scroll to Directory then press MENU SELECT 3 Press qCID or pDIR to scroll to Speed dial then press MEN...

Page 74: ...vices There are fees for caller ID services In addition services may not be available in all areas This product can provide information only if both you and the caller are in areas offering caller ID service and if both telephone service providers use compatible equipment The time and date along with the call information are from the telephone service provider Caller ID information may not be avai...

Page 75: ...ws XX Missed calls All new and missed entries are counted as missed calls Each time you review a new caller ID log entry indicated by NEW on the screen the missed calls message goes away When there is a new unanswered call the missed calls message displays again The number of missed calls includes all new and missed entries that have not been reviewed If you do not want to review the missed calls ...

Page 76: ...ris if this is how you entered it into your directory Note The number shown in the caller ID log will be in the format sent by the telephone service provider The telephone service provider usually delivers ten digit phone numbers area code plus telephone number If the telephone number of the caller does not match a number in your directory the name will appear as it is delivered by the telephone s...

Page 77: ...r pDIR to scroll through the list 3 Press OFF CANCEL on the handset or CANCEL on the telephone base to exit the caller ID log You hear a double beep when the list reaches the beginning or end of the caller ID log Note Only one handset or the telephone base can review the caller ID log at a time If another device tries to enter the directory or caller ID log it shows Not available at this time 10 0...

Page 78: ...set on the telephone base To save the number to the directory allow list block list or star name list see page 73 86 83 and 89 respectively Dial a caller ID log entry Using a cordless handset or the telephone base 1 When in the caller ID log press qCID or pDIR to browse 2 Press PHONE FLASH or SPEAKER on the cordless handset or press SPEAKER or lift the corded handset on the telephone base to dial ...

Page 79: ...s pound key to move the last word to the front For example Johnson Charlie becomes Charlie Johnson when you press pound key f f Press TONE to change the next letter to upper or lower case 6 Press MENU SELECT when done The screen shows Saved to directory Notes f f You may need to change how a caller ID number is dialed if the entry does not appear in the correct format Caller ID numbers may appear ...

Page 80: ...UTE DELETE to erase all characters f f Press pound key to move the last word to the front For example Johnson Charlie becomes Charlie Johnson when you press pound key f f Press TONE to change the next letter to upper or lower case 7 Press MENU SELECT when done The screen shows Saved to allow list Save a caller ID log entry to the block list Using a cordless handset or the telephone base 1 When in ...

Page 81: ... lower case 7 Press MENU SELECT when done The screen shows Saved to block list Save a caller ID log entry to the star name list Using a cordless handset or the telephone base 1 When in the caller ID log press qCID or pDIR to browse 2 When the desired entry displays press MENU SELECT 3 Press qCID or pDIR to choose Star name list then press MENU SELECT 4 When the screen displays Star this name and t...

Page 82: ... NAME The caller prefers not to show the name PRIVATE CALLER The caller prefers not to show the phone number and name UNKNOWN NUMBER Your telephone service provider cannot determine the caller s number UNKNOWN NAME Your telephone service provider cannot determine the caller s name UNKNOWN CALLER Your telephone service provider cannot determine the caller s name and telephone number Calls from othe...

Page 83: ...ou can forward the call to the answering system If the caller does not respond or record his her name the call is blocked from ringing through When you add your welcome callers to your allow list they will bypass all screening and ring directly to your handsets Notes f f Smart call blocker is on once you install your telephone It allows all incoming calls to get through and ring by default You can...

Page 84: ... out of area or with numbers set to Private Uncategorized calls Uncategorized calls include calls with absent caller ID number calls with numbers that are not in your directory allow list or block list or calls with caller ID names that are not in your star name list Note The allow list stores up to 200 entries the block list stores up to 1 000 entries and the star name list stores up to 10 names ...

Page 85: ...s on your telephone You will then hear the caller s name announced if you have turned on the caller ID announce feature Then you can decide whether to accept or reject the call or to forward the call to the answering system Screening without caller name If you have selected this option the telephone plays the screening announcement and then ask the caller to press the pound key before the call rin...

Page 86: ...before you decide whether to answer or reject these calls Moreover you can forward these calls to the answering system To change the setting Using a cordless handset or the telephone base 1 Press CALL BLOCK when the telephone is not in use OR Press MENU SELECT to enter the main menu when the telephone is not in use Press qCID or pDIR to scroll to Smart call blk then press MENU SELECT 2 Press qCID ...

Page 87: ...ng a cordless handset or the telephone base 1 Press CALL BLOCK when the telephone is not in use OR Press MENU SELECT to enter the main menu when the telephone is not in use Press qCID or pDIR to scroll to Smart call blk then press MENU SELECT 2 Press qCID or pDIR to scroll to Uncategorized then press MENU SELECT 3 Press qCID or pDIR to choose one of the following options then press MENU SELECT f f...

Page 88: ...list and then press MENU SELECT 3 Press qCID or pDIR to scroll to Add new entry then press MENU SELECT 4 When the screen displays ENTER NUMBER use the dialing keys to enter a number up to 30 digits f f Press qCID or pDIR to move the cursor to the left or right f f Press MUTE DELETE to erase a digit f f Press and hold MUTE DELETE to erase all digits f f Press and hold REDIAL PAUSE to enter a three ...

Page 89: ...entry see Review the caller ID log on page 71 2 When the desired entry displays press MENU SELECT 3 Press qCID or pDIR to scroll to Block list then press MENU SELECT 4 The screen displays EDIT NUMBER Use the dialing keys to edit the number when necessary f f Press qCID or pDIR to move the cursor to the left or right f f Press MUTE DELETE to backspace and erase a digit f f Press and hold MUTE DELET...

Page 90: ...4 Press MENU SELECT to move on to the name The screen displays EDIT NAME along with the name to be edited 5 To edit the name f f Use the dialing keys to enter characters f f Press qCID or pDIR to move the cursor to the left or right f f Press 0 to add a space f f Press MUTE DELETE to erase a character f f Press and hold MUTE DELETE to erase all characters 6 Press MENU SELECT to save the entry The ...

Page 91: ... when the telephone is not in use OR Press MENU SELECT to enter the main menu when the telephone is not in use Press qCID or pDIR to scroll to Smart call blk then press MENU SELECT 2 Press qCID or pDIR to scroll to Allow list and then press MENU SELECT 3 Press qCID or pDIR to scroll to Add new entry then press MENU SELECT 4 When the screen displays ENTER NUMBER use the dialing keys to enter a numb...

Page 92: ...ess MENU SELECT to enter the main menu when the telephone is not in use Press qCID or pDIR to scroll to Smart call blk then press MENU SELECT 2 Press qCID or pDIR to scroll to Allow list and then press MENU SELECT 3 Press MENU SELECT to choose Review 4 Press qCID or pDIR to browse through the allow entries Note Allow list is empty appears if there are no allow entries Save a caller ID log entry to...

Page 93: ...ss MENU SELECT The screen displays EDIT NUMBER along with the phone number to be edited If you only want to edit the name skip to Step 4 3 To edit the number f f Use the dialing keys to enter digits f f Press qCID or pDIR to move the cursor to the left or right f f Press MUTE DELETE to erase a digit f f Press and hold MUTE DELETE to erase all digits f f Press and hold REDIAL PAUSE to enter a three...

Page 94: ...ess MENU SELECT again to confirm The screen displays Deleted There is a confirmation tone Star name list There are many organizations like schools medical offices and pharmacies that use robocalls to communicate important information to you Robocall uses an autodialer to deliver pre recorded messages By entering the name of the organizations into the star name list it ensures these calls will ring...

Page 95: ...en the telephone is not in use OR Press MENU SELECT to enter the main menu when the telehpone is not in use Press qCID or pDIR to scroll to Smart call blk then press MENU SELECT 2 Press qCID or pDIR to scroll to Star name list and then press MENU SELECT 3 Press MENU SELECT to choose Review 4 Press qCID or pDIR to browse through the star name entries Note Star name list is empty appears if there ar...

Page 96: ...elephone base 1 Search for the desired entry in the star name list see Review star name list on page 89 2 When the desired entry displays press MUTE DELETE The screen shows Delete entry 3 Press MENU SELECT to confirm The screen show Entry deleted and the next entry displays You cannot retrieve a deleted entry Delete all star name entries Using a cordless handset or the telephone base 1 Press CALL ...

Page 97: ... caller name Hello Calls to this number are being screened by Smart call blocker If you re a family member friend or invited caller please press pound to be connected If you re a solicitor please hang up now You can use these announcements or record your own name to replace this number in both announcements Please refer to Record your name for all screening announcements on page 92 Play your curre...

Page 98: ...ess MENU SELECT Record your name for all screening announcements Using a cordless handset or the telephone base 1 Press CALL BLOCK when the telephone is not in use OR Press MENU SELECT to enter the main menu when the telephone is not in use Press qCID or pDIR to scroll to Smart call blk then press MENU SELECT 2 Press qCID or pDIR to scroll to Screening annc then press MENU SELECT 3 Press MENU SELE...

Page 99: ...menu OR 1 Press CALL BLOCK when the telephone is not in use OR Press MENU SELECT to enter the main menu when the telephone is not in use Press qCID or pDIR to scroll to Smart call blk then press MENU SELECT 2 Press qCID or pDIR to scroll to Screening annc then press MENU SELECT 3 Press qCID or pDIR to scroll to Play annc then press MENU SELECT 4 Press qCID or pDIR to scroll to w Caller name or w o...

Page 100: ...U SELECT 3 You hear a voice prompt Hello This voice guide will assist you with the basic setup of Smart call blocker 4 Set up your Smart call blocker feature by inputting the designated numbers as instructed in the voice guide f f Press 1 if you want to screen calls with telephone numbers that are not saved in your directory allow list or star name list f f Press 2 if you only want to screen calls...

Page 101: ...s the following type of incoming calls will ring on your telephone system f f Calls with numbers that are not in your directory allow list or block list or with absent caller ID number f f Calls with caller ID names that are not in your star name list Note If you have set to allow all uncategorized calls the caller s numbers will not be saved to the allow list If you want to save the caller s numb...

Page 102: ...g type of incoming calls will not ring and the calls will be terminated f f Calls with numbers that are not in your directory allow list or block list or with absent caller ID number f f Calls with caller ID names that are not in your star name list The telephone plays the block announcement Calls to this number are being screened by Smart call blocker The number you are calling is not accepting y...

Page 103: ...all to the answering system Note If Caller ID announce is turned off the telephone will not announce the caller s name Screen calls without numbers and ask caller to press the pound key When screening a call the telephone announces to the caller Hello Calls to this number are being screened by Smart call blocker If you re a family member friend or invited caller please press pound to be connected ...

Page 104: ...nt to allow some robocalls to get through save their names in the star name list See page 88 f f The telephone can respond to remote access code while it is playing the screening announcement This allows you to access your answering system from an unknown number remotely See Remote access on page 123 Answer call once Using a cordless handset or the telephone base 1 When the telephone starts ringin...

Page 105: ...ss OFF CANCEL to mute the ringer temporarily f f The caller is sent to the answering system and can leave a message even if the answering system is off End call Using a cordless handset or the telephone base 1 When the telephone starts ringing and the screen displays Screened call press or SPEAKER to pick up the call If you have turned on the caller ID announce feature the telephone announces You ...

Page 106: ...e request the telephone announces to the caller Please wait a moment while your call is connected The telephone starts ringing and announces the caller s name The telephone screen displays Screened call and you can pick up the call The telephone will then ask whether you want to answer or reject the call or to forward the call to the answering system Note If Caller ID announce is turned off the te...

Page 107: ...lready picked up a screened call the telephone checks whether the call waiting call s number can be found in the directory block list or allow list It also checks whether the caller name is in the star name list After that the telephone displays the caller ID information or Blocked call accordingly You can press or SPEAKER to take the new call If the telephone is screening a call the call waiting ...

Page 108: ...elephone base 1 When the telephone starts ringing and the screen displays Screened call press or SPEAKER to pick up the call If you have turned on the caller ID announce feature the telephone announces You have a call from and the caller s name After you pick up the call the telephone announces To answer the call press 1 To answer and always allow this number press 2 To block this number press 3 T...

Page 109: ... the call the telephone announces To answer the call press 1 To answer and always allow this number press 2 To block this number press 3 To send this call to the answering system press 4 To repeat these options press 2 Press 4 to forward the call to the answering system Note The call is forwarded to the answering system and the caller can leave a message even if the answering system is off To scre...

Page 110: ...en displays Block and end and the caller s number if available Press MENU SELECT to end the call Notes f f The caller s number if available will be saved to the block list The screen displays Added to block list after pressing CALL BLOCK then press MENU SELECT If caller s number is not available the screen displays No number available to block f f You can press CALL BLOCK to end the call even if S...

Page 111: ...lays when calls are answered by the answering system The telephone has a default outgoing announcement Hello Please leave a message after the tone You can use this announcement or record your own You can record an announcement up to 90 seconds The system does not record any announcement shorter than two seconds To play your current outgoing announcement Using a cordless handset or the telephone ba...

Page 112: ...ess MENU SELECT again to select Announcement 4 Press MENU SELECT to select Record annc The system announces Record after the tone Press 5 when you are done 5 Speak towards the handset or the telephone base to record your announcement Press 5 to end recording Your recorded announcement plays To listen to the recorded announcement again scroll to Play annc and press MENU SELECT Record annc Play annc...

Page 113: ... the announcement The system announces Announcement deleted and the screen shows Annc Deleted OR 1 When the telephone is in idle mode press MENU SELECT 2 Press qCID or pDIR to scroll to Answering sys then press MENU SELECT 3 Press MENU SELECT again to select Announcement 4 Press qCID or pDIR to scroll to Reset annc then press MENU SELECT The screen shows Reset to default annc 5 Press MENU SELECT a...

Page 114: ...on the handset shows ANS ON Using the telephone base f f Press ANS ON OFF to turn the answering system on or off If the answering system is turned on it announces Calls will be answered If the answering system is turned off it announces Calls will not be answered OR 1 When the telephone base is in idle mode press MENU SELECT to enter the main menu 2 Press qCID or pDIR to scroll to Answering sys th...

Page 115: ...basic setup of your answering system 4 Setup your answering system by inputting designated numbers as instructed in the voice guide Notes f f You can press CANCEL to quit the voice guide at any time f f If the system does not receive any input it will play an alert message If there is still no input it will announce Sorry I still have not received any input If you want to restart the voice guide p...

Page 116: ...et or the telephone base 1 When the telephone is in idle mode press MENU SELECT to enter the main menu 2 Press qCID or pDIR to scroll to Answering sys then press MENU SELECT 3 Press qCID or pDIR to scroll to Ans sys setup then press MENU SELECT 4 Press MENU SELECT to select Call screening 5 Press qCID or pDIR to choose On or Off 6 Press MENU SELECT to save the setting You hear a confirmation tone ...

Page 117: ...mode press MENU SELECT to enter the main menu 2 Press qCID or pDIR to scroll to Answering sys then press MENU SELECT 3 Press qCID or pDIR to scroll to Ans sys setup then press MENU SELECT 4 Press qCID or pDIR to scroll to of rings then press MENU SELECT 5 Press qCID or pDIR to choose among 2 3 4 5 6 or Toll saver 6 Press MENU SELECT to save the setting You hear a confirmation tone Notes f f If you...

Page 118: ... SELECT to enter the main menu 2 Press qCID or pDIR to scroll to Answering sys then press MENU SELECT 3 Press qCID or pDIR to scroll to Ans sys setup then press MENU SELECT 4 Press qCID or pDIR to scroll to Remote code then press MENU SELECT 5 Use the dialing keys to enter a two digit number Press MUTE DELETE to backspace and delete a digit 6 Press MENU SELECT to save the setting You hear a confir...

Page 119: ... or pDIR to scroll to Answering sys then press MENU SELECT 3 Press qCID or pDIR to scroll to Ans sys setup then press MENU SELECT 4 Press qCID or pDIR to scroll to Msg alert tone then press MENU SELECT 5 Press qCID or pDIR to choose On or Off 6 Press MENU SELECT to save the setting You hear a confirmation tone Notes f f The message alert tone beeps only if all the following conditions are met Answ...

Page 120: ...SELECT to enter the main menu 2 Press qCID or pDIR to scroll to Answering sys then press MENU SELECT 3 Press qCID or pDIR to scroll to Ans sys setup then press MENU SELECT 4 Press qCID or pDIR to scroll to Recording time then press MENU SELECT 5 Press qCID or pDIR to choose 3 minutes 2 minutes or 1 minute then press MENU SELECT to save the setting You hear a confirmation tone Recording time Msg al...

Page 121: ...k what services you have and how to access them contact your telephone service provider To use your voicemail service rather than the answering system turn off the answering system To use the answering system rather than your voicemail service contact your telephone service provider to deactivate your voicemail service Note After reviewing all new messages the number of old messages appears on the...

Page 122: ...essage playback The device screen displays Rec mem full in idle mode Once the memory is full you cannot turn the answering system back on if it has been turned off nor can you record new messages until old ones have been deleted Memory full displays if you want to turn on the answering system on the handset but there is no memory Voice prompts The system provides voice prompts to guide you through...

Page 123: ...ng SPEAKER on the telephone base or lifting the corded handset Base ringer Press qVOLor pVOL on the telephone base to adjust the ringer volume when the telephone is not in use You hear a sample of the ringer while adjusting the volume The telephone base shows Ringer off and when you set the volume to 0 Temporarily turning off the message alert tone If the message alert tone is turned on the teleph...

Page 124: ...s MENU SELECT or PLAY STOP f f If there are only new or only old messages they are played automatically The system announces the number of messages then begins playback The message sequence is shown on the telephone base If there are no recorded messages the telephone base shows No message and you hear You have no message To listen to messages on a cordless handset 1 When the handset is in idle mo...

Page 125: ...then press SPEAKER or MENU SELECT to call back the caller If you do not call back within 10 seconds message playback resumes automatically When messages are playing on the handset f f Press qCID VOLUME or pDIR VOLUME to adjust the message playback volume f f Press 6 to skip to the next message f f Press 4 to repeat the message Press twice to hear the previous message f f Press MUTE DELETE to delet...

Page 126: ...Press MENU SELECT 3 Press qCID or pDIR to highlight Delete all old then press MENU SELECT The screen shows Delete all old messages 4 Press MENU SELECT again to confirm The screen displays Deleting and then All old msgs deleted There is a confirmation tone To delete all old messages on the handset 1 Press MENU SELECT when in idle mode to enter the main menu 2 Press qCID or pDIR to scroll to Answeri...

Page 127: ...set to record a memo 5 Press 5 to stop recording The system announces Recorded The system does not save memos shorter than two seconds Using the telephone base 1 When the telephone base is in idle mode press MENU SELECT to enter the main menu 2 Press qCID or pDIR to scroll to Answering sys then press MENU SELECT 3 Press qCID or pDIR to highlight Record memo then press MENU SELECT The system announ...

Page 128: ...The base message counter shows the total number of answering system messages See the following table for other message counter displays Message counter displays 0 No messages 1 99 Total number of messages and memos The remote access system is being used ...

Page 129: ...m 3 You can also enter the following remote commands Remote commands 1 Press to listen to all messages 2 Press to listen to new messages only 3 Press to delete the current message during playback 3 3 Press twice to delete all old messages 4 Press to repeat the current message during playback 4 4 Press twice to listen to the previous message 5 Press to stop any operation including recording 5 Press...

Page 130: ...e call ends automatically f f If the memory is full the answering system answers after 10 rings and announces Memory is full Enter the remote access code Enter your remote access code to access the messages and announcements f f The telephone can respond to remote access code while it is playing the screening announcement or block announcement This allows you to access your answering system from a...

Page 131: ...dset shows To register HS see manual 2 On the telephone base press MENU SELECT in idle mode 3 On the telephone base use qCID or pDIR to scroll to Settings then press MENU SELECT 4 On the telephone base use qCID or pDIR to scroll to Registration then press MENU SELECT 5 Press pound key on the handset Both the handset and the telephone base show Registering Please wait and the IN USE light on the te...

Page 132: ... holding FIND HS until the screen shows Deregister all devices and the IN USE light begins to flash Release FIND HS 3 Immediately press FIND HS or MENU SELECT while the IN USE light is still flashing If the light stops flashing start again with Step 1 4 It takes up to 10 seconds to complete the deregistration process Before registering the handset again wait for the cordless handset screen to disp...

Page 133: ...tem on the answering system is turned on to answer calls Message new message in the built in answering system NEW New caller ID log new and missed calls MUTE MUTE the handset microphone is off Message counter number of message playing total number of messages Telephone base screen icons Ringer off the telephone base ringer is off New voicemail you have new voicemail from your telephone service pro...

Page 134: ...the base during a call Four short beeps Low battery warning Telephone base alert tones One short beep Tone of each key press if key tone is turned on One long beep Indication to begin recording a message memo or announcement Indicates the start of message recording during call screening or the end of a message playback session Two short beeps You are pressing pVOLor qVOLon the telephone base when ...

Page 135: ... when handsets are being deregistered Flashes when another telephone is in use on the same line CHARGE On when the handset is charging in the charger SPEAKER On when the speakerphone is on Lighted display Lighted key pad ANS ON OFF On when the answering system is on PLAY STOP On when a message is being played Flashes when there are new messages MUTE DELETE On when the microphone is muted SPEAKER O...

Page 136: ...he caller ID log Calling BASE 0 The handset is calling the telephone base for intercom calls Calling HANDSET X The handset or telephone base is calling another handset for intercom calls The telephone base is transferring an outside call to a handset Call answered The answering system has answered an incoming call Contact deleted A directory entry is deleted Directory empty There are no directory ...

Page 137: ...TT The incoming PTT function is turned off The handset will not receive PTT calls Out of range OR No pwr at base The telephone base has lost power or the handset is out of range Paging The cordless handset is paged by the telephone base Paging all handsets The telephone base is paging all cordless handsets Phone The handset or telephone base is on a call Place in charger The battery is very low Th...

Page 138: ...one is in use TRANSFER TO You have started transferring a call and need to enter the desired device number or choose all devices To register HS see manual Screen display before handset registration To screen call press SELECT Press MENU SELECT to activate call screening on the handset Unable to call Line in use Failed phone call the telephone line is in use Unable to call Try again Youtrytojoinaca...

Page 139: ...r the cordless handset and telephone base to reset f f You may need to purchase a new battery Please refer to Battery installation and charging in this user s manual on pages 10 11 The display shows No line I cannot get a dial tone f f Try all the suggestions as mentioned above f f If the previous suggestions do not work disconnect the telephone line cord from your telephone and connect the teleph...

Page 140: ...nic devices Out of range OR No pwr at base appears on my cordless handset f f Ensure you plug the telephone base in properly and the power is on f f Place the cordless handset closer to the telephone base for synchronization f f Move the cordless handset closer to the telephone base You may have moved out of range f f Reset the telephone base Unplug the electrical power Wait for 15 seconds then pl...

Page 141: ...ting f f If you plug your phone in with a modem or a surge protector plug the phone or modem surge protector into a different location If this does not solve the problem relocate your phone or modem farther apart from one another or use a different surge protector f f Move your phone to a higher location The phone may have better reception in a high area f f If other phones in your home are having...

Page 142: ...all the battery again and place the cordless handset in the charger Wait for the cordless handset to reestablish its connection with the telephone base Allow up to one minute for this to take place f f Your line cord may be defective Try installing a new line cord My calls cut in and out while I m using my cordless handset f f Other electronic products such as HAM radios and other DECT phones can ...

Page 143: ...rough your telephone line you must install a DSL filter between the telephone line cord and the telephone wall jack page 9 The filter prevents noise and caller ID problems resulting from DSL interference Please contact your DSL service provider for more information about DSL filters System does not receive caller ID when on a call f f Make sure you subscribe to caller ID with call waiting features...

Page 144: ...d Control uncategorized calls on page 81 Blocking all unknown calls f f If you want to block all unknown calls with numbers that are not in your directory or allow list change the settings to block calls without numbers and uncategorized calls See Control calls without numbers on page 80 and Control uncategorized calls on page 81 Forwarding all unknown calls to the answering system f f If you want...

Page 145: ... of rings so that your answering system answers before your voicemail page 111 To determine how many rings activate your voicemail contact your telephone service provider f f If there is a fax machine connected to the same telephone line try disconnecting the fax machine If that solves the problem consult your fax machine documentation for information on compatibility with answering systems System...

Page 146: ...ine inches from the handset or the telephone base f f Make sure there is no background noise TV music etc while recording New voicemail and show on the screens and I don t know why f f Your telephone has both a built in answering system and voicemail indicator If New voicemail and appear on the screens then your telephone has received a signal from your telephone service provider that you have a v...

Page 147: ...nough power Try using a USB hub with its own external power supply f f If you are using a firewall it may prevent access to your nontraditional telephone service provider Contact your service provider for more information Common cure for electronic equipment If the telephone does not seem to be responding normally try putting the cordless handset in the charger If it does not fix the problem do th...

Page 148: ... storms f f Electrical storms can sometimes cause power surges harmful to electronic equipment For your own safety take caution when using electric appliances during storms Cleaning your telephone f f Your telephone has a durable plastic casing that should retain its luster for many years Clean it only with a soft cloth slightly dampened with water or mild soap f f Do not use excess water or clean...

Page 149: ...ontact with any liquid unplug any line or power cord immediately Do not plug the product back in until it has dried thoroughly f f Install this product in a protected location where no one can trip over any line or power cords Protect cords from damage or abrasion f f If this product does not operate normally see the Troubleshooting section on pages 133 141 of this user s manual If you cannot solv...

Page 150: ...hey could release caustic material which could cause injury The RBRC Seal means that the manufacturer is voluntarily participating in an industry program to collect and recycle nickel metal hydride rechargeable batteries when taken out of service within the United States These batteries may be taken to a participating local retailer of replacement batteries or recycling center You may call 1 800 8...

Page 151: ...tlined under the Limited warranty If this equipment is causing harm to the telephone network the telephone service provider may temporarily discontinue your telephone service The telephone service provider is required to notify you before interrupting service If advance notice is not practical you will be notified as soon as possible You will be given the opportunity to correct the problem and the...

Page 152: ... a circuit different from that to which the receiver is connected f f Consult the dealer or an experienced radio TV technician for help WARNING Changes or modifications to this equipment not expressly approved by the party responsible for compliance could void the user s authority to operate the equipment This device complies with Part 15 of the FCC Rules Operation is subject to the following two ...

Page 153: ... HS 2 After about 10 seconds when the IN USE light starts flashing and the screen displays Deregister all devices release FIND HS and then press it again or press MENU SELECT within two seconds The process takes up to one minute to complete When the phone successfully enters the CEC battery charging testing mode all handsets display To register HS see manual When the phone fails to enter this mode...

Page 154: ... You should expect the repair or replacement to take approximately 30 days 3 How long is the limited warranty period The limited warranty period for the PRODUCT extends for ONE 1 YEAR from the date of purchase If the manufacturer repairs or replaces a materially defective PRODUCT under the terms of this limited warranty this limited warranty also applies to repaired or replacement PRODUCT for a pe...

Page 155: ...l and the date of purchase or receipt and f f Provide your name complete and correct mailing address and telephone number 7 Other limitations This warranty is the complete and exclusive agreement between you and the manufacturer of this AT T branded PRODUCT It supersedes all other written or oral communications related to this PRODUCT The manufacturer provides no other warranties for this PRODUCT ...

Page 156: ...r a certain distance which can vary with the locations of the telephone base and handset the weather and the construction of your home or office Redefining long range coverage and clarity This telephone base comes with an antenna which gives much better clarity and covers a longer range than before HD audio HD audio improves sound quality by expanding and rebuilding frequencies that are lost with ...

Page 157: ...t 20 telephone base 31 Delete a caller ID log entry 72 a directory entry 63 a speed dial number 67 Deregistering handsets 126 Dialing from a record in the caller ID history 72 from the directory 63 Directory dial a number 63 edit entries 64 name search 62 new entries 59 Display dial 63 DSL 9 E Elapsed time 39 Ending a call 40 H Handset handset locator 48 quick reference guide 1 3 ringer tone 19 ri...

Page 158: ...ll blocker 77 104 Allow calls 95 Block calls 96 Calls without numbers 97 Screen uncategorized calls 100 Set Smart call blocker on off 80 Uncategorized calls 79 Speakerphone 41 Speed dial delete a number 67 edit a number 66 enter a number 65 set voicemail number 23 34 Star name list 88 T Technical specifications 150 Telephone base quick reference guide 4 7 ringer tone 30 screen icons 127 voicemail ...

Page 159: ... 5 Help menu 5 Skip current message 6 Record announcement 7 End remote access call 8 or hang up Turn system off or on 0 Call your phone number then enter your two digit access code preset to 19 Models CL84107 CL84207 CL84257 CL84307 CL84327 CL84347 CL84357 CL84367 Type DECT 6 0 corded cordless telephone answering system with caller ID call waiting 2017 2019 Advanced American Telephones All Rights ...

Page 160: ... AT T Intellectual Property licensed to Advanced American Telephones San Antonio TX 78219 QaltelTM is a trademark of Truecall Group Limited RBRC and 1 800 8 BATTERY are registered trademarks of the Rechargeable Battery Recycling Corporation Printed in China Issue 6 0 AT T 08 19 www telephones att com ...

Reviews: