background image

All Surface Loader 

16. Maintenance  

16-3


Fuel Filter Change Procedures 


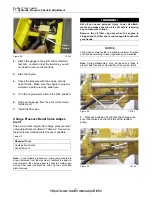
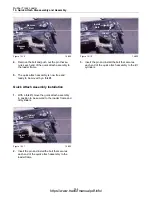
Figure 16-5 

16-004 

1.  Clean the outside of the filter thoroughly. 

2.  Remove the spin-on filter and dispose of prop-

erly. 

3.  Pour diesel fuel into the new filter until it is full. 

4.  Spin the new filter into place and tighten. 

Fuel Specifications 

In North America, diesel fuel distilled from crude oil 
and identified as NO. 1-D or No. 2-D in “ASTM 
D975” generally meets the proper specifications. 

Air Cleaner 

The air cleaner is one of the most important mainte-
nance items on the machine. A poorly maintained air 
cleaner can seriously shorten the life of the engine. 

Air Filter Change Procedures 

NOTICE 

When working in dusty conditions, the air cleaner ele-
ments should be checked and changed more frequently 
than when working under normal conditions. 

NOTICE 

Do not clean the primary air cleaner element by bumping 
and tapping. This could damage the seals. Do not use 
elements with damaged pleat gaskets or seals. 

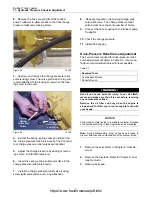
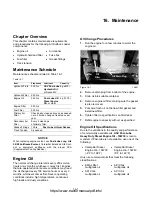
1.  Open the hood, release the latches on either 

side of the air cleaner, and then remove the 
cover. 


Figure 16-6 

16-010 

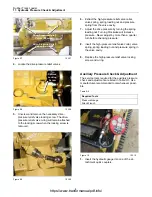
2.  Remove the primary element. The primary ele-

ment can be cleaned and reused up to five 
times, but it should be changed at least once a 
year. 


Figure 16-7 

16-011 

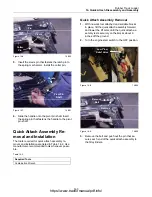
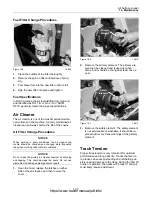
3.  Remove the safety element. The safety element 

is not serviceable or washable. It should be re-
placed with every three cleanings of the primary 
element. 


Track Tension 

Proper track tension is very important for optimum 
performance and long track life. Tracks that are run 
too loose can cause misfeeding and ratcheting pos-
sibly causing damage to the track. During the first 50 
hours of operation, the tracks will “break in” and will 
most likely require adjustment. 

Primary  

Element 

Safety  

Element 

https://www.tractormanualpdf.info/

Summary of Contents for RC30

Page 1: ...ish All Language Geographic Region Serial Number Range This manual is complements of TrackLoaderParts com The world s best source for ASV parts Track Loader Parts 6543 Chupp Road Atlanta Georgia 30058 USA 800 616 8156 https www tractormanualpdf info ...

Page 2: ... and Installation 5 4 Console Gauge Removal 5 4 Console Gauge Installation 5 4 Lap Bar Gas Assist Spring Removal and Installation 5 5 Lap Bar Gas Assist Spring Removal 5 5 Lap Bar Gas Assist Spring Installation 5 5 6 Chassis Disassembly and Assembly Chapter Overview 6 1 Personal Safety 6 1 Machine Preparation 6 1 Preliminary Checkout 6 1 Chassis Disassembly and Assembly Procedures 6 1 Seat Removal...

Page 3: ...p Drive Coupler Removal and Installation 10 6 Pump Drive Coupler Removal 10 6 Pump Drive Coupler Installation 10 7 11 Engine Components Disassembly and As sembly Chapter Overview 11 1 Personal Safety 11 1 Machine Preparation 11 1 Preliminary Checkout 11 1 Engine Components Disassembly and Assembly Procedures 11 1 Primary Air Filter Removal and Installation 11 1 Safety Air Filter Removal and Instal...

Page 4: ...view 15 1 Personal Safety 15 1 Machine Preparation 15 1 Preliminary Checkout 15 1 Visual Inspection 15 1 Operational Checks 15 1 Troubleshooting 15 2 16 Maintenance Chapter Overview 16 1 Maintenance Schedule 16 1 Engine Oil 16 1 Oil Change Procedures 16 1 Engine Oil Specifications 16 1 Hydraulic Fluid and Filter 16 2 Hydraulic Fluid and Filter Change Procedures 16 2 Fuel Filter 16 3 Fuel Filter Ch...

Page 5: ...https www tractormanualpdf info ...

Page 6: ...el is used to provide important additional information comments explanations or amplification of the accompanying subject matter The person servicing the Rubber Track Loader may be unfamiliar with many of the systems on the ma chine This makes it important to use caution when performing service work Knowledge of the system and or components is important before the removal or disassembly of any com...

Page 7: ...el Never disconnect any charging unit circuit or battery circuit cable from the battery when the charging unit is operating A spark can cause an explosion from the flammable vapor mixture of hy drogen and oxygen that is released from the electro lyte through the battery outlets Do not let electrolyte solution make contact with skin or eyes Electrolyte solution is an acid In case of contact immedia...

Page 8: ...gine 9 Be careful when removing cover plates Gradu ally back off the last two bolts or nuts located at opposite ends of the cover or device Then pry the cover loose to relieve any spring or other pressure before removing the last two nuts or bolts completely 10 Repairs requiring welding should be performed only with the benefit of the appropriate reference information and by personnel adequately t...

Page 9: ...t method to clean up asbestos debris A vacuum that is equipped with the high efficiency particulate air filter HEPA filter can also be used 2 Use exhaust ventilation on permanent machin ing jobs 3 Wear an approved respirator if there is no other way to control the dust 4 Comply with applicable rules and regulations for the work place In the USA use Occupational Safety and Health Administration req...

Page 10: ...Rubber Track Loader 1 Product Safety 1 5 Machine Label and Decal Examples Examples of the labels and decals placed on the machine are shown on this page https www tractormanualpdf info ...

Page 11: ...https www tractormanualpdf info ...

Page 12: ...ifices allow 1 gpm per side idle with 130 F 54 4 C oil Control Handles Model CAT 4TH6 Auxiliary Pump Model Rexroth Displacement 0 87 in3 rev 114 3 cc rev Flow 10 gpm 37 8 lpm 2800 rpm high idle Relief pressure 3000 psi 20 684 kPa Cooling filtering Auxiliary oil is filtered and cooled at all times In Auxiliary mode the oil is filtered after the attachment to protect the ma chine if the attachment m...

Page 13: ...https www tractormanualpdf info ...

Page 14: ...d cooling system Figure 3 1 con tains the following major components Hydraulic reservoir Radiator oil cooler Loader valve Auxiliary gear pump Pilot control manifold Figure 3 1 Filtering and Cooling System 3 001 50 Micron Suction Screen 10 Micron Return Filter Hot Oil Temp Sending Unit 100 PSI Cooler Relief Radiator Oil Cooler Loader Valve Hydraulic Reservoir Auxiliary Gear Pump Pilot Control Manif...

Page 15: ...r valve Pilot control manifold Auxiliary gear pump Loader control joystick Figure 3 2 Auxiliary Circuit System 3 002 To Cooler Then to Tank Loader Loader Control Joystick Quick Couplers Loader Valve Relief Valve Tranny Aux Gear Pump Reservoir Pilot Control Manifold Operator Pressure Solenoid Aux Flow Solenoids Reservoir https www tractormanualpdf info ...

Page 16: ...ump Drive motors Pilot control manifold Brake cylinders Drive control joystick Figure 3 3 Drive Loop System 3 003 To Implement Valve To Tank Brake Cylinder Drive Motor Pilot Control Manifold Charge Pressure Test Port Drive Control Joystick To Tank Tandem Pump With Drive Charge Pressure Relief Valves Drive Motor https www tractormanualpdf info ...

Page 17: ...https www tractormanualpdf info ...

Page 18: ...gure 4 1 4 001 Drive Control The drive control allows the operator to change di rections and speed using a simple pilot operated joystick Throttle The throttle controls engine rpm Use lower rpm when performing work that requires precise control of the machine Use higher rpm when faster travel speed or maximum horsepower is required Engine rpm also directly controls the speed of the hydraulic power...

Page 19: ...e during normal machine operation shut the machine down immediately Diagnose the problem and make needed repairs before continuing to operate NOTICE If the battery low voltage light illuminates drive the ma chine to a suitable location and shut the engine off Diag nose the problem and make needed repairs before continuing to operate It is normal for the low voltage light to illuminate after starti...

Page 20: ...nform personnel that the machine is being worked on Before starting any disassembly or assembly proce dures refer to Chapter 2 Product Safety Repair for machine preparation information Preliminary Checkout If troubleshooting is required prior to disassembly or assembly refer to Chapter 15 Troubleshooting Operator Enclosure Disassembly and Assembly Procedures Disassembly and assembly procedures are...

Page 21: ...ition the light bar without pinching the wiring harness against the cab frame Figure 5 6 5 006 2 Secure the light bar to the cab frame with the two capscrews Ignition Switch Removal and Installation The tools required for ignition switch removal and installation are listed in Table 5 2 Use manufac turer recommended tools whenever possible Table 5 2 Required Tools Combination Wrench Ignition Switch...

Page 22: ...out from the rear of the dash panel Figure 5 9 5 009 4 Unplug the ignition switch connector Ignition Switch Installation Figure 5 10 5 010 1 Insert the ignition switch from the rear of the dash panel Figure 5 11 5 011 2 Install the nut that secures the ignition switch to the dash panel Figure 5 12 5 012 3 Plug in the ignition switch connector Remove Nut Install Nut https www tractormanualpdf info ...

Page 23: ...moval 1 Lower the light bar Refer to Chapter 5 Light Bar Removal procedure Remove Connectors Figure 5 13 5 013 2 Remove the connectors from the console gauge Remove Nuts Retaining Clip Figure 5 14 5 014 3 Remove the two nuts that secure the console gauge to the retaining clip Figure 5 15 5 015 4 Pull the console gauge out from the front of the dash panel Console Gauge Installation Figure 5 16 5 01...

Page 24: ...t Spring Removal Raise Lap Bar Shown in Down Position Gas Assist Spring Figure 5 19 5 019 1 Put the lap bar in the UP position to relieve ten sion on the lap bar gas assist spring Remove Retaining Clip Figure 5 20 5 020 2 Using a small screwdriver remove the retaining clip from each end of the gas assist spring Figure 5 21 5 021 3 Remove the gas assist spring by pulling both ends out from the ball...

Page 25: ...bly 5 6 Install Endson Ball Joints Figure 5 23 5 023 2 Install the ends of the lap bar gas assist spring onto the ball joints Insert RetainingClip Figure 5 24 5 024 3 Slide the retaining clip on to each end of the gas assist spring https www tractormanualpdf info ...

Page 26: ...inform personnel that the machine is being worked on Before starting any disassembly or assembly proce dures refer to Chapter 2 Product Safety Repair for machine preparation information Preliminary Checkout If troubleshooting is required prior to disassembly or assembly refer to Chapter 15 Troubleshooting Chassis Disassembly and Assembly Procedures Disassembly and assembly procedures are provided ...

Page 27: ...onnector Figure 6 5 6 002 2 Tilt the seat forward and reach behind the seat to plug in the seat switch connector Note The machine will not operate unless the seat switch connector is plugged in insert Seat Bolts Figure 6 6 6 001 3 Position the seat so the holes in the seat mounts are aligned with the holes in the frame Insert the four seat mount bolts and washers Fuel Sending Unit Removal and Inst...

Page 28: ... the tank Mark the wires and hoses Note If the fuel sending unit wires are crossed the fuel gauge will not work If the hoses are crossed the engine will not run Figure 6 8 6 005 4 Remove the fuel sending unit Be careful not to damage the float mechanism when pulling it through the opening in the fuel tank Figure 6 9 6 006 5 The fuel pickup line will also come out with the fuel sending unit Fuel Se...

Page 29: ...If the fuel sending unit wires are crossed the fuel gauge will not work If the hoses are crossed the engine will not run 4 Install the seat Refer to Chapter 6 Seat Instal lation procedure Fuel Tank Removal and Installation The tools required for fuel tank removal and installa tion are listed in Table 6 3 Use manufacturer recommended tools whenever possible Table 6 3 Required Tools Screwdriver Comb...

Page 30: ...pan Fuel Sending Unit Figure 6 16 6 004 6 Remove the hoses and wires from the fuel send ing unit Remove Filler Piece Figure 6 17 6 009 7 Remove the steel filler piece behind the fuel tank Remove Bolt Figure 6 18 6 010 8 Remove the bolt that fastens the fuel tank to the frame Disconnect Vent Hose Figure 6 19 6 011 9 Disconnect the rubber vent hose from the fuel tank https www tractormanualpdf info ...

Page 31: ...e Fuel Tank Installation Figure 6 22 6 013 1 Place the fuel tank in the machine in approxi mately its normal position Attach Filler Hose Figure 6 23 6 012 2 Attach the filler hose to the rear of the tank Connect Vent Hose Figure 6 24 6 011 3 Connect the vent hose to the fuel tank Insert Bolt and Washer Figure 6 25 6 010 4 Insert the bolt and washer that connect the fuel tank to the frame https www...

Page 32: ...fuel tank Fuel Sending Unit Figure 6 27 6 004 6 Attach the hoses and wiring to the fuel sending unit Figure 6 28 6 008 7 Replace the floor pan Install Floor Pan Bolts and Washers Figure 6 29 6 007 8 Install the four floor pan bolts and washers 9 Install the seat Refer to Chapter 6 Seat Instal lation procedure https www tractormanualpdf info ...
Page 33: ...https www tractormanualpdf info ...
Page 34: ...ve the key Place a Do Not Operate tag prominently on the ma chine to inform personnel that the machine is being worked on Before starting any disassembly or assembly proce dures refer to Chapter 2 Product Safety Repair for machine preparation information Preliminary Checkout If troubleshooting is required prior to disassembly or assembly refer to Chapter 15 Troubleshooting Radiator Oil Cooler Disa...

Page 35: ... Shroud Removal and Installation The tools required for fan and fan shroud removal and installation are listed in Table 7 2 Use manufac turer recommended tools whenever possible Table 7 2 Required Tools Combination Wrench Socket Wrench Fan and Fan Shroud Removal WARNING Hot oil can cause personal injury Make sure the oil is cool before removing any components or lines Figure 7 3 7 002 1 Remove the...

Page 36: ...ween the radiator cooler and the fan and remove the four bolts that secure the fan to the engine Figure 7 6 7 005 5 Remove the fan from the engine compartment Figure 7 7 7 006 6 Remove the shroud from the engine compart ment Fan and Fan Shroud Installation Figure 7 8 7 007 1 Place the fan shroud in the engine compartment Figure 7 9 7 005 2 Place the fan in the engine compartment Remove Bolts Remov...

Page 37: ...efore removing any components or lines Remove the oil filler cap only when the engine is stopped and the filler cap is cool enough to touch with your bare hand WARNING Personal injury can result from hot coolant steam and alkali At operating temperature engine coolant is hot and under pressure The radiator and all lines to the heat ers and the engine contain hot coolant and steam Contact can cause...

Page 38: ...bottom of the radiator Figure 7 15 7 010 5 Remove the lower hose from the oil cooler sec tion Cap the hose and fitting Figure 7 16 7 002 6 Remove the upper hose from the oil cooler sec tion Cap the hose and fitting Figure 7 17 7 011 7 Remove the upper hose from the radiator sec tion Cap the hose and fitting Figure 7 18 7 012 8 Remove the lower hose from the radiator sec tion Cap the hose and fitti...

Page 39: ...gure 7 21 7 013 1 Position the radiator cooler in the engine com partment Figure 7 22 7 003 2 With the radiator cooler in position install the three mounting bolts on each side of the radia tor cooler Figure 7 23 7 012 3 Remove the hose and fitting caps and install the lower hose on the radiator section Figure 7 24 7 011 4 Remove the hose and fitting caps and install the upper hose on the radiator...

Page 40: ...ydraulic reservoir with oil Radiator Oil Cooler Adjustment Procedures Adjustment procedures are provided for the follow ing radiator oil cooler components Fan Shroud Fan Guard Fan Shroud Adjustment The tools required for fan shroud adjustment are listed in Table 7 4 Use manufacturer recommended tools whenever possible Table 7 4 Tool Name Combination Wrench Figure 7 28 7 003 1 The fan shroud can ad...

Page 41: ...in Table 7 5 Use manufacturer recommended tools whenever possible Table 7 5 Tool Name Combination Wrench Figure 7 29 7 002 1 The fan guard can adjusted forward or rearward To adjust loosen the capscrews that fasten the fan guard to the fan guard mounts Tighten the capscrews when finished Loosen Capscrews to Adjust https www tractormanualpdf info ...

Page 42: ...ng worked on Before starting any disassembly or assembly proce dures refer to Chapter 2 Product Safety Repair for machine preparation information Preliminary Checkout If troubleshooting is required prior to disassembly or assembly refer to Chapter 15 Troubleshooting Hydraulic Reservoir Disassembly and Assembly Procedures Disassembly and assembly procedures are provided for the following hydraulic ...

Page 43: ...hoses and fittings to prevent fluid loss and contamination of the system fluids Figure 8 1 8 001 1 Remove the hose from the left side of the filter assembly Cap hose and fitting Figure 8 2 8 002 2 Remove the hose from the front of the filter as sembly Cap hose and fitting Figure 8 3 8 003 3 Remove the hose from the right side of the filter assembly Cap hose and fitting Figure 8 4 8 004 4 Remove th...

Page 44: ...n position on top of the reservoir Replace if damaged Figure 8 8 8 005 2 Position the filter assembly on the gasket with the mounting holes aligned Figure 8 9 8 004 3 Install the two bolts that secure the filter assem bly to the reservoir Figure 8 10 8 003 4 Install the hose on the right side of the filter as sembly Figure 8 11 8 002 5 Install the hose on the front side of the filter as sembly htt...

Page 45: ...2 Required Tools Screwdriver Filler Cap Assembly Removal WARNING Hot oil can cause personal injury Make sure the oil is cool before removing any components or lines Remove the oil filler cap only when the engine is stopped and the filler cap is cool enough to touch with your bare hand Figure 8 13 8 007 1 Pull the filler cap off and remove the six screws from around the base of the filler cap flang...

Page 46: ...n the reservoir Figure 8 19 8 008 3 Place the filler cap flange on the gasket with the mounting holes aligned Figure 8 20 8 007 4 Insert the six screws in the base of the filler cap flange and replace the cap Put thread sealant on the six screws before installing Access Cover Removal and Installation The tools required for access cover removal and installation are listed in Table 8 3 Use manufac t...

Page 47: ...rate the upper cap from the oval shaped clamping disk on the underside of the assembly This will allow the assembly to be removed Do not re move the bolt entirely or the oval shaped clamp will fall into the reservoir Clamping Disk Figure 8 22 8 013 2 Remove the access cover assembly from the reservoir Access Cover Assembly Installation Clamping Disk Figure 8 23 8 013 1 Insert the access cover asse...

Page 48: ...uitable container Dispose of all liquids according to local regulations and mandates Note During disassembly cap all hoses and fittings to prevent fluid loss and contamination of the system fluids 1 Drain the hydraulic fluid Refer to Chapter 16 Hydraulic Fluid and Filter Change 2 Remove the filter assembly Refer to Chapter 8 Filter Assembly Removal Figure 8 25 8 016 3 View of hydraulic reservoir w...

Page 49: ...se personal injury Make sure the oil is cool before removing any components or lines Remove the oil filler cap only when the engine is stopped and the filler cap is cool enough to touch with your bare hand NOTICE Collect and contain liquids in a suitable container Dispose of all liquids according to local regulations and mandates Note It is normally not necessary to replace the suction screen unle...

Page 50: ...red for hydraulic reservoir cleaning are listed in Table 8 6 Use manufacturer recommended tools whenever possible Table 8 6 Tool Name Combination Wrench WARNING Hot oil can cause personal injury Make sure the oil is cool before removing any components or lines Remove the oil filler cap only when the engine is stopped and the filler cap is cool enough to touch with your bare hand NOTICE Collect and...

Page 51: ...https www tractormanualpdf info ...

Page 52: ...inary Checkout If troubleshooting is required prior to disassembly or assembly refer to Chapter 15 Troubleshooting Loader Transmission Controls Disassembly and Assembly Procedures Disassembly and assembly procedures are provided for the following loader transmission control compo nents Drive Control Joystick Loader Control Joystick Loader Float Magnet Loader Valve Note Procedures are provided for ...

Page 53: ...ls Screwdriver Open End Wrench Loader Control Joystick Drive Control Joystick Removal Note Since the procedures for removing both joystick controls are identical only the loader control joystick pro cedure is described below Note During disassembly cap all hoses and fittings to prevent fluid loss and contamination of the system fluids WARNING Lower all attachments and make sure the oil is cool bef...

Page 54: ... 9 The hoses and the control are labeled at the factory Make sure the labels are still legible 10 Remove the hoses Loader Control Joystick Drive Control Joystick Installation Note Since the procedures for installing both joystick con trols are identical only the loader control joystick proce dure is described below Hose and Control Labels Figure 9 7 9 006 1 Match the factory labels on the hoses an...

Page 55: ...r Figure 9 11 9 002 6 Place the side cover in position on the console Install Screws Figure 9 12 9 001 7 Install the four retaining screws in the side cover Loader Float Magnet Removal and Installation The tools required for loader float magnet removal and installation are listed in Table 9 2 Use manufac turer recommended tools whenever possible Table 9 2 Required Tools Screwdriver Open End Wrench...

Page 56: ... 16 9 007 4 Remove the rubber boot from the base of the joystick and pull the boot up Loader Float Magnet Figure 9 17 9 008 5 Remove the control from the console and locate the loader float magnet at the front of the con trol Remove Screw Figure 9 18 9 009 6 The loader float magnet is held in place by an allen screw at the bottom of the magnet Re move this screw Remove Magnet Figure 9 19 9 010 7 R...

Page 57: ... bottom of the magnet Install this screw Loader Float Magnet Figure 9 22 9 008 3 With the loader float magnet installed the con trol is ready to mount in the console Pull the Boot Down Figure 9 23 9 007 4 Position the control on the console and pull the rubber boot down over the base of the joystick Install Screws Figure 9 24 9 003 5 Install the four retaining screws in the top cover Position the ...

Page 58: ...ne is stopped and the filler cap is cool enough to touch with your hands NOTICE Collect and contain liquids in a suitable container Dispose of all liquids according to local regulations and mandates Note During disassembly cap all hoses and fittings to prevent fluid loss and contamination of the system fluids 1 Lower the lift arms to the ground 2 Turn the engine start switch to the OFF position 3 ...

Page 59: ...ttom of the loader valve Cap the tubes and fittings Figure 9 31 9 015 9 Remove the hoses from the end and side of the loader valve Cap the hoses and fittings Figure 9 32 9 016 10 Remove the nuts from the four bolts that secure the loader valve to the hydraulic reservoir Figure 9 33 9 017 11 Remove the loader valve from the engine com partment Remove Tubes Remove Tubes Remove Hoses Remove Nuts http...

Page 60: ...alve to the hydraulic reservoir Figure 9 36 9 015 3 Install the hoses on the end and side of the loader valve Figure 9 37 9 014 4 Install the tubes on the bottom of the loader valve Figure 9 38 9 013 5 Install the tubes on the side of the loader valve Figure 9 39 9 012 6 Install the tubes on the top of the loader valve 7 Add manufacturer approved hydraulic fluid Install Nuts Install Hoses Install ...

Page 61: ...https www tractormanualpdf info ...

Page 62: ...assembly proce dures refer to Chapter 2 Product Safety Repair for machine preparation information Preliminary Checkout If troubleshooting is required prior to disassembly or assembly refer to Chapter 15 Troubleshooting Transmission and Drive Disassembly and Assembly Procedures Disassembly and assembly procedures are provided for the following transmission and drive components Brake Cylinders Drive...

Page 63: ...to local regulations and mandates Note During disassembly cap all hoses and fittings to prevent fluid loss and contamination of the system fluids 1 Lower the lift arms to the ground 2 Turn the engine start switch to the OFF position 3 Relieve hydraulic pressure from the auxiliary circuit 4 Drain the hydraulic fluid Refer to Chapter 16 Hydraulic Fluid and Filter Change 5 Remove the seat Refer to Ch...

Page 64: ...m the gear pump this can be done after the pump is removed if necessary Auxiliary Gear Pump Installation Figure 10 7 10 006 1 With the lower manifold tube attached to the auxiliary gear pump align the mounting bolt holes in the auxiliary gear pump with the holes in the tandem pump It will be necessary to slide the manifold tube into the transmission hose to properly position the auxiliary gear pum...

Page 65: ...jury Lower all attach ments and make sure the oil is cool before removing any components or lines Remove the oil filler cap only when the engine is stopped and the filler cap is cool enough to touch with your hands NOTICE Collect and contain liquids in a suitable container Dispose of all liquids according to local regulations and mandates Note During disassembly cap all hoses and fittings to preve...

Page 66: ...at washer from the left hand side of the tandem pump Figure 10 14 10 010 11 Remove the tandem pump with pump drive coupler attached from the pump mounting plate Tandem Pump Installation Figure 10 15 10 010 1 With the pump drive coupler attached to the tan dem pump position the tandem pump against the pump mounting plate Make sure the teeth on the pump drive coupler mesh properly with the flywheel ...

Page 67: ...pump drive coupler removal and installation are listed in Table 10 3 Use manu facturer recommended tools whenever possible Table 10 3 Required Tools Screwdriver Combination Wrench Socket Wrench Pump Drive Coupler Removal WARNING Hot oil can cause personal injury Lower all attach ments and make sure the oil is cool before removing any components or lines Remove the oil filler cap only when the engi...

Page 68: ...tandem pump drive shaft Pump Drive Coupler Installation Figure 10 21 10 012 1 Slide the pump drive coupler all the way onto the tandem pump drive shaft Figure 10 22 10 011 2 Tighten the locking screw that secures the pump drive coupler to the tandem pump drive shaft 3 Install the tandem pump Refer to Chapter 10 Tandem Pump Installation 4 Install the auxiliary gear pump Refer to Chapter 10 Auxiliar...

Page 69: ...https www tractormanualpdf info ...

Page 70: ... assembly proce dures refer to Chapter 2 Product Safety Repair for machine preparation information Preliminary Checkout If troubleshooting is required prior to disassembly or assembly refer to Chapter 15 Troubleshooting Engine Components Disassembly and Assembly Procedures Disassembly and assembly procedures are provided for the following engine components Muffler Battery Exhaust Pipe Bleeding the...

Page 71: ...de the flex pipe off the muffler NOTICE Do not kink or twist the exhaust pipe One end of the ex haust pipe is attached to the muffler which is fixed to the frame The other end is attached to the engine which vi brates during operation Kinks or twists in the exhaust pipe could cause premature failure Figure 11 3 11 003 3 From underneath the machine remove the four bolts that fasten the muffler to t...

Page 72: ...ation Kinks or twists in the exhaust pipe could cause premature failure Figure 11 7 11 001 4 Tighten the bolts on the muffler clamp Exhaust Flex Pipe Removal and Installation The tools required for exhaust flex pipe removal and installation are listed in Table 11 2 Use manufac turer recommended tools whenever possible Table 11 2 Required Tools Socket Wrench Combination Wrench Channel Lock Pliers E...

Page 73: ...tion Kinks or twists in the exhaust pipe could cause premature failure Figure 11 11 11 005 4 Remove the exhaust flex pipe gasket from the exhaust manifold Note The gasket may come off with the exhaust pipe Exhaust Pipe Installation Figure 11 12 11 002 1 Carefully slide the exhaust pipe over the muffler extension Do not tighten the clamp yet NOTICE Do not kink or twist the exhaust pipe One end of t...

Page 74: ...ten the bolts on the muffler clamp Battery Removal and Installa tion The tools required for battery removal and installa tion are listed in Table 11 3 Use manufacturer recommended tools whenever possible Table 11 3 Required Tools Combination Wrench Socket Wrench Battery Removal Figure 11 16 11 006 1 Identify the positive and negative battery termi nals Figure 11 17 11 007 2 Disconnect the battery ...

Page 75: ...ry 90 degrees counter clockwise Tilt up the front of the battery and remove the battery from the machine Battery Installation Figure 11 21 11 011 1 Place the battery in position in the engine com partment Figure 11 22 11 009 2 Position the battery holdown bracket and install the two capscrews and nuts Figure 11 23 11 008 3 Connect the battery cable to the positive battery terminal Disconnect Posit...

Page 76: ... your machine For serial numbers 001 through 1357 Figure 11 25 11 006 1 Locate the bleed screw directly above the fuel injectors 2 Loosen the bleed screw two full turns 3 Turn over the engine from the operators com partment until fuel is flowing from the bleed screw without any air bubbles 4 Tighten the bleed screw 5 Engine should now start within 10 seconds For serial numbers 1358 and higher Figu...

Page 77: ...https www tractormanualpdf info ...
Page 78: ...a Do Not Operate tag prominently on the ma chine to inform personnel that the machine is being worked on Before starting any disassembly or assembly proce dures refer to Chapter 2 Product Safety Repair for machine preparation information Preliminary Checkout If troubleshooting is required prior to disassembly or assembly refer to Chapter 15 Troubleshooting Undercarriage Disassembly and Assembly Pr...

Page 79: ... remove the snap ring that secures the wheel cap Figure 12 3 12 006 3 Using a large channel lock pliers remove the wheel cap O Ring Figure 12 4 12 007 4 Remove the o ring from inside the wheel Figure 12 5 12 008 5 Using a socket remove the nut that fastens the wheel to the shaft Remove the wheel with a wheel extractor Inside Wheel Figure 12 6 12 009 6 To remove an inside wheel the machine must be ...

Page 80: ...aring but remove excess grease in the area of the o ring Install the wheel cap and snap ring Make sure the snap ring is fully seated in its grove Sprocket Roller Removal and Installation The tools required for sprocket roller removal and installation are listed in Table 12 2 Use manufac turer recommended tools whenever possible Table 12 2 Required Tools Socket Wrench Combination Wrench Note The ro...

Page 81: ...tely away and the steel pin is worn from engaging the track Sprocket Roller Installation Figure 12 14 12 059 1 With the drive sprocket rotated to the desired position position the composite roller and steel roller in the drive sprocket Figure 12 15 12 060 2 Insert the sprocket roller bolt with the nut facing out and tighten Brake Removal and Installation The tools required for brake removal and in...

Page 82: ...igure 12 18 12 021 3 Remove the two bolts that fasten the brake cyl inder to the rail Figure 12 19 12 022 4 Move the brake cylinder out from the sprocket If replacing the brake cylinder clean and discon nect the hoses going to the cylinder Cap the hoses until the new brake is ready to install Brake Installation Figure 12 20 12 046 1 Using a drift pin or punch line up the holes in the brake cylinde...

Page 83: ...aight Edge Crowbar Tape Measure Track Removal WARNING To remove the tracks the machine must be jacked up and placed on jack stands sturdy enough to support the weight of the machine The manufacturer supplied jack stands are recommended Figure 12 22 12 004 1 Locate the wheels marked A and B If the track is to be removed these wheels and the wheel to the inside of B must also be removed Figure 12 23...

Page 84: ...2 014 6 Using a crowbar pry up the drive sprocket as sembly until the track tensioner bolt is loose Remove the bolt Figure 12 28 12 015 7 Pry the drive sprocket assembly away from the tensioner and pivot the tensioner out of the way Lower the drive sprocket assembly until it is rest ing on the rail Figure 12 29 12 056 8 With the wheels removed and the drive sprocket lowered the track is ready for ...

Page 85: ...h the sprocket Apply Soap Figure 12 32 12 048 2 Using soap lubricate the front inside wheel Pull the track past the outside wheel shaft and onto the front inside wheel The soap will help the track slide onto the wheel Figure 12 33 12 049 3 Install the front wheel Refer to Chapter 12 Wheel Installation Align Holes Figure 12 34 12 052 4 Pry the sprocket up until the holes in the track tensioner and ...

Page 86: ...et Bearing Plate Removal and Installation The tools required for sprocket bearing plate re moval and installation are listed in Table 12 5 Use manufacturer recommended tools whenever possi ble Table 12 5 Required Tools Socket Wrench Allen Wrench Combination Wrench Torque Wrench Steel Punch Sprocket Bearing Plate Removal 1 Remove the track Refer to Chapter 12 Track Removal 2 Move the brake away fro...

Page 87: ...ate DO NOT chisel against the allen bolt or use the allen bolt hole to rotate the collar Remove the lock collar Figure 12 41 12 026 6 Pry the bearing plate off the shaft Be careful not to bend or damage the bearing plate or bearing flange Figure 12 42 12 027 7 Remove the bearing plate from the sprocket shaft Figure 12 43 12 028 8 Remove the bearing flange bolts from the bear ing plate Figure 12 44...

Page 88: ... the two bolts that fasten the bearing plate to the drive table Figure 12 48 12 041 4 Slide the lock collar all the way unto the shaft until it stops Rotate the lock collar in the direc tion opposite to which it was loosened Using a punch in the punch hole tighten the collar Tighten the allen bolt Sprocket Removal and Installation The tools required for sprocket removal and installa tion are liste...

Page 89: ...tening before freeing the sprocket hit the end of the puller a few times with a hammer Then retighten with the impact driver Once the sprocket breaks free remove the puller Adding some heat to the shaft can aid removal Figure 12 52 12 033 4 Remove the sprocket Be careful not to lose the key that fits into the drive motor shaft Sprocket Installation Figure 12 53 12 042 1 After inspecting and cleani...

Page 90: ...ket is tightened Figure 12 55b 12 034b Using a torque wrench tighten the sprocket bolt to 85 lb ft 4 Reinstall the bearing plate Drive Motor Removal and Installation Use manufacturer recommended tools whenever possible Required Tools Socket Wrench Crows Foot Attachment Drive Motor Removal Figure 12 56 12 035 1 Using a pressure washer or compressed air clean all hydraulic fittings on the drive moto...

Page 91: ...that fastens the drive motor to the drive table Figure 12 59 12 038 5 Remove the drive motor by rotating or indexing it until it fits through the opening Once out cap all hydraulic fittings on the drive motor Drive Motor Installation 1 Position the drive motor so the hydraulic fittings exit in the correct location Install the drive motor bolts Clean and inspect the drive motor shaft 2 Reinstall al...

Page 92: ...shooting is required prior to disassembly or assembly refer to Chapter 15 Troubleshooting Loader Disassembly and Assembly Procedures Disassembly and assembly procedures are provided for the following loader components Lift Cylinders Tilt Cylinders Pressure Release Valve Note Procedures are provided for only those loader com ponents listed above However information for removal and installation of o...

Page 93: ...ngine start switch to the OFF position Figure 13 1 13 001 3 Remove the bolt on the pin assembly on the loader tower Figure 13 2 13 002 4 Remove the pin assembly Figure 13 3 13 003 5 Remove and cap the hose on the ram end of the cylinder Figure 13 4 13 004 6 Remove and cap the hose on the loader end of the cylinder Figure 13 5 13 005 7 Remove the forward pin assembly bolt Remove Hose Remove Pin Rem...

Page 94: ...n The tools required for low flow relief valve removal and installation are listed in Table 13 2 Use manu facturer recommended tools whenever possible Table 13 2 Required Tools Combination Wrench Socket Wrench Pressure Release Valve Removal WARNING Hot oil can cause personal injury Lower all attach ments and make sure the oil is cool before removing any components or lines NOTICE Collect and conta...

Page 95: ... 13 10 13 009 5 Remove the four bolts that secure the low flow relief valve to the loader frame and remove the valve Quick Coupler Block Pressure Release Valve Installation Figure 13 11 13 009 1 Install the four bolts that secure the low flow re lief valve to the loader frame Figure 13 12 13 009 2 Install all hoses Remove Hoses Remove Bolts Install Bolts Install Hoses https www tractormanualpdf in...

Page 96: ...disassembly or assembly proce dures refer to Chapter 2 Product Safety Repair for machine preparation information Preliminary Checkout If troubleshooting is required prior to disassembly or assembly refer to Chapter 15 Troubleshooting Quick Attach Disassembly and Assembly Procedures Disassembly and assembly procedures are provided for the following quick attach components Latch Pin Assembly Quick A...

Page 97: ...ing housing Remove the latch pin from the quick attach bracket Latch Pin Assembly Installation Spring Mechanism Handle Latch Pin Clevis Pin Cotter Pin Figure 14 4 14 004 1 The quick attach parts are individually replace able 2 With no work tool attached and suitable blocks in place tilt the quick attach assembly forward and lower the lift arms until the quick attach as sembly rests securely on the...

Page 98: ...moval and installation are listed in Table 14 2 Use manufacturer recommended tools whenever possi ble Table 14 2 Required Tools Combination Wrench Quick Attach Assembly Removal 1 With no work tool attached and suitable blocks in place tilt the quick attach assembly forward and lower the lift arms until the quick attach as sembly rests securely on the blocks about 6 inches off the ground 2 Turn the...

Page 99: ...lift Quick Attach Assembly Installation 1 With a forklift move the quick attach assembly in position to be secured to the loader frame and tilt cylinders Install Bolt Insert Pin Figure 14 11 14 002 2 Insert the pin and install the bolt that secures each end of the quick attach assembly to the loader frame Install Bolt Insert Pin Figure 14 12 14 002 3 Insert the pin and install the bolt that secure...

Page 100: ...o personnel working on the machine To avoid accidental machine starting disconnect the battery cables from the battery and tape the battery clamps and remove the key Place a Do Not Operate tag prominently on the ma chine to inform personnel that the machine is being worked on Before starting any troubleshooting procedures re fer to Chapter 2 Product Safety Repair for ma chine preparation informati...

Page 101: ...om left rear side of hydraulic reservoir 5 Safety relay is not activating 6 Faulty safety solenoid or safety solenoid spool 7 Poor wire connections on fuse relay or safety sole noid 8 Low charge pressure Problem 4 Loader operates but tracks will not move Probable cause 1 Leak in feed line to pilot control 2 Pilot control malfunctioning Problem 5 Tracks operate but loader will not operate Probable ...

Page 102: ... hour meter should draw only 0 01 amps in off position 5 Bad battery 6 Bad alternator Problem 12 Loader control will not lock in float position Probable cause 1 Float magnet fuse blown 2 Poor wire connections at fuse float detent magnet or pin connector P18 3 Faulty float detent magnet Problem 13 Loader will not float labors engine and has down pressure when detented into float Probable cause 1 En...

Page 103: ...https www tractormanualpdf info ...

Page 104: ...0 service hours or six months whichever comes first Engines that are operated under severe conditions may need the oil changed every 100 service hours or every 3 months whichever comes first Severe operating conditions include high temperatures continuous high loads and dusty conditions Oil Change Procedures 1 Run the engine for a few minutes to warm the engine oil Figure 16 1 16 001 2 Remove drai...

Page 105: ... hydrostatic system NOTICE Collect and contain liquids in a suitable container Dispose of all liquids according to local regulations and mandates Figure 16 2 16 002 1 Locate and remove the hydraulic fluid drain plug and drain the fluid into a suitable container Figure 16 3 16 015 2 Clean the area around the filter assembly which is located on the top of the hydraulic reservoir Figure 16 4 16 003 3...

Page 106: ...ng under normal conditions NOTICE Do not clean the primary air cleaner element by bumping and tapping This could damage the seals Do not use elements with damaged pleat gaskets or seals 1 Open the hood release the latches on either side of the air cleaner and then remove the cover Figure 16 6 16 010 2 Remove the primary element The primary ele ment can be cleaned and reused up to five times but it...

Page 107: ...Once proper tension is achieved retighten the jam nut Checking for Proper Track Adjustment 1 Drive the machine forward five feet Figure 16 11 16 008 2 Lay a straightedge along the top of the track be tween the sprocket and the front idler wheel 3 Using a rope or wire put 50 pounds of down force on the track at the midpoint of the straight edge Figure 16 12 16 009 4 Using a ruler measure the distan...

Page 108: ...ved Grease Fittings Figure 16 14 16 013 The locations of the grease fittings for the left side of the machine are shown above An identical set of fittings is located on the right side of the machine These fitting should be lubricated at least after every 10 hours of operation using Posi Lube Multi Pur pose EP Lithium Grease or other high quality low temperature grease https www tractormanualpdf in...

Page 109: ...https www tractormanualpdf info ...

Page 110: ...ne To avoid accidental machine starting disconnect the battery cables from the battery and tape the battery clamps and remove the key Place a Do Not Operate tag prominently on the ma chine to inform personnel that the machine is being worked on Before starting any disassembly or assembly proce dures refer to Chapter 2 Product Safety Repair for machine preparation information Hydraulic Pressure Adj...

Page 111: ...cket Wrench Note In the following procedure some components are shown detached from the machine to facilitate the descrip tion However the charge pressure check is normally per formed from under the machine with only the center skid plate removed WARNING Hot oil can cause personal injury Lower all attach ments and make sure the oil is cool before removing any components or lines Remove the oil fil...

Page 112: ... have the same number of shims 9 Connect the hose coupling on the tandem pump T adapter 10 Check the charge pressure 11 Install the belly pan Drive Pressure Relief Valve Adjustment The service tools required for drive pressure relief valve adjustment are listed in Table 0 3 Use manu facturer recommended tools whenever possible Table 0 3 Required Tools Combination Wrench Socket Wrench WARNING Hot o...

Page 113: ... Clockwise will increase pressure Never adjust by more than a quarter turn before checking pressure 8 Insert the high pressure relief valve collar valve spring spring loading nut and pressure spring in the valve cavity 9 Replace the high pressure relief valve locking screw and o ring Auxiliary Pressure Check Adjustment The service tools required for the auxiliary pressure check and adjustment are ...

Page 114: ...continuous flow switch next to the loader control joystick Make sure it is in the di rection that sends flow to the gage Jam Nut Adjustment Screw Figure 13 10 113 4 Loosen the jam nut and turn the adjustment screw in with an allen wrench to increase pres sure and turn screw out to decrease pressure Tighten jam nut when after adjustment has been made https www tractormanualpdf info ...

Page 115: ...https www tractormanualpdf info ...
Page 116: ...allation 5 5 Latch Pin Assembly Removal and Installation 14 1 Lift Cylinder Removal and Installation 13 1 Light Bar Removal and Installation 5 1 Loader Control Joystick Removal and Installation 9 1 Loader Control 4 1 Loader Disassembly and Assembly Procedures 13 1 Loader Float Magnet Removal and Installation 9 4 Loader Valve Removal and Installation 9 7 Loader Transmission Controls Disassembly and...

Page 117: ...Terex Construction Americas 8800 Rostin Road Southaven MS 38671 888 201 6008 662 393 1800 www terex com https www tractormanualpdf info ...

Reviews:

Related manuals for RC30