5
5
5
5
5
Q u i c k i n s t a l l a t i o n g u i d e
Q u i c k i n s t a l l a t i o n g u i d e
Q u i c k i n s t a l l a t i o n g u i d e
Q u i c k i n s t a l l a t i o n g u i d e
Q u i c k i n s t a l l a t i o n g u i d e
English
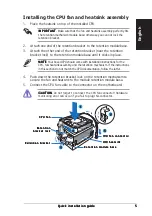
Installing the CPU fan and heatsink assembly
1.
Place the heatsink on top of the installed CPU.
I M P O R T A N T
I M P O R T A N T
I M P O R T A N T
I M P O R T A N T
I M P O R T A N T. Make sure that the fan and heatsink assembly perfectly fits
the retention mechanism module base; otherwise you can not lock the
retention bracket.
2.
Attach one end of the retention bracket to the retention module base.
3.
Attach the other end of the retention bracket (near the retention
bracket lock) to the retention module base until it clicks in place.
N O T E
N O T E
N O T E
N O T E
N O T E. Your boxed CPU should come with installation instructions for the
CPU, fan/heatsink assembly, and the retention mechanism. If the instructions
in this section do not match the CPU documentation, follow the latter.
4.
Push down the retention bracket lock on the retention mechanism to
secure the fan and heatsink to the module retention module base.
5.
Connect the CPU fan cable to the connector on the motherboard.
C A U T I O N
C A U T I O N
C A U T I O N
C A U T I O N
C A U T I O N. Do not forget to connect the CPU fan connector! Hardware
monitoring error can occur if you fail to plug this connector.
R e t e n t i o n m o d u l e b a s e
R e t e n t i o n m o d u l e b a s e
R e t e n t i o n m o d u l e b a s e
R e t e n t i o n m o d u l e b a s e
R e t e n t i o n m o d u l e b a s e
C P U h e a t s i n k
C P U h e a t s i n k
C P U h e a t s i n k
C P U h e a t s i n k
C P U h e a t s i n k
C P U f a n
C P U f a n
C P U f a n
C P U f a n
C P U f a n
R e t e n t i o n
R e t e n t i o n
R e t e n t i o n
R e t e n t i o n
R e t e n t i o n
b r a c k e t l o c k
b r a c k e t l o c k
b r a c k e t l o c k
b r a c k e t l o c k
b r a c k e t l o c k
R e t e n t i o n b r a c k e t
R e t e n t i o n b r a c k e t
R e t e n t i o n b r a c k e t
R e t e n t i o n b r a c k e t
R e t e n t i o n b r a c k e t
C P U f a n c o n n e c t o r
C P U f a n c o n n e c t o r
C P U f a n c o n n e c t o r
C P U f a n c o n n e c t o r
C P U f a n c o n n e c t o r
1
1
1
1
1
2
2
2
2
2
3
3
3
3
3
4
4
4
4
4
5
5
5
5
5
Summary of Contents for Vintage2-AE1
Page 1: ...English Vintage2 AE1 Barebone System Quick Installation Guide ...
Page 9: ...Français Vintage2 AE1 Système barebone Guide de démarrage rapide ...
Page 17: ...Deutsch Vintage2 AE1 Barebone System Schnellinstallationsanleitung ...
Page 25: ...Italiano Vintage2 AE1 Sistema Barebone Guida all installazione veloce ...
Page 33: ...Español Vintage2 AE1 Sistema barebone Guía de instalación rápida ...
Page 49: ...Português Vintage2 AE1 Sistemas barebone Guia de instalação rápida ...
Page 57: ...Česky Vintage2 AE1 Systém Barebone Stručný průvodce instalací ...
Page 65: ...Polski Vintage2 AE1 System typu Barebone Instrukcja szybkiej instalacji ...
Page 73: ...Magyar Vintage2 AE1 Számítógépház Gyors üzembe helyezési útmutató ...


