background image

ASUS TS100-E7/PI4

4-7

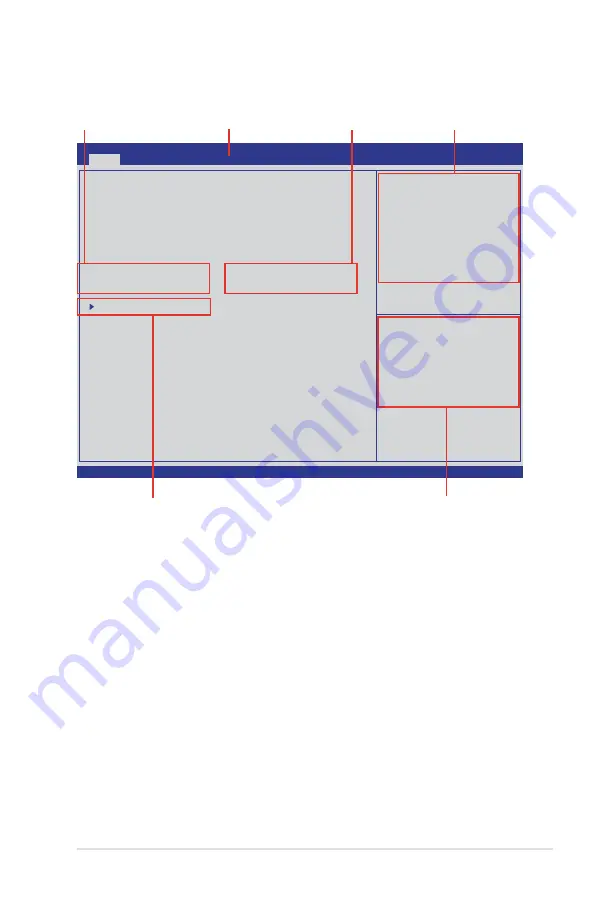
4.2.2 

Menu bar

The menu bar on top of the screen has the following main items:

Main


For changing the basic system configuration

Event Logs


For changing the event log settings

Advanced


For changing the advanced system settings

Monitor


 For displaying the system temperature, power status, and 

changing the fan settings

Boot


For changing the system boot configuration

Tool


For configuring options for special functions

Exit


For selecting the exit options

To select an item on the menu bar, press the right or left arrow key on the keyboard 

until the desired item is highlighted.

4.2.1 

BIOS menu screen

Version 2.01.1204. Copyright (C) 2010 American Megatrends, Inc.

Aptio Setup Utility - Copyright (C) 2010 American Megatrends, Inc.


Main 

 Event Logs  Advanced  Monitor  Boot  Tool  Exit

Set the Date, Use Tab to


switch between Data elements.

→←:

 Select Screen


↑↓:

  Select Item


Enter: Select Item


+/-: Change Opt.


F1: General Help


F2: Previous Values

F5: Optimized Defaults


F10: Save & Exit


ESC: Exit

BIOS Information

BIOS Version 

0602 x64

Build Date 

02/17/2011

CPU Information

Intel(R) Xeon(R) CPU E31230 @ 3.20GHz

Memory Information

Total Memory 

1024 MB

System Date 

[Tue 03/08/2011]

System Time 

[15:07:28]

Access Level 

Administrator

 Security

Navigation keys


General help

Menu bar

Submenu item

Configuration fields

Menu items

Summary of Contents for TS100-E7/PI4

Page 1: ...Pedestal Server TS100 E7 PI4 User Guide ...

Page 2: ...ion of business and the like even if ASUS has been advised of the possibility of such damages arising from any defect or error in this manual or product Specifications and information contained in this manual ae furnished for informational use only and are subject to change at any time without notice and should not be construed as a commitment by ASUS ASUS assumes no responsibility or liability fo...

Page 3: ...e setup 2 1 Chassis cover 2 2 2 1 1 Removing the side cover 2 2 2 1 2 Reinstalling the side cover 2 3 2 2 Central Processing Unit CPU 2 4 2 2 1 Installing the CPU 2 4 2 2 2 Installing the CPU heatsink and fan 2 7 2 2 3 Uninstalling the CPU heatsink and fan 2 8 2 3 System memory 2 9 2 3 1 Overview 2 9 2 3 2 Memory Configurations 2 9 2 3 3 Installing a DIMM 2 10 2 3 4 Removing a DIMM 2 10 2 4 Front ...

Page 4: ... Flash Utility 4 3 4 1 3 BUPDATER utility 4 4 4 2 BIOS setup program 4 6 4 2 1 BIOS menu screen 4 7 4 2 2 Menu bar 4 7 4 2 3 Menu items 4 8 4 2 4 Submenu items 4 8 4 2 5 Navigation keys 4 8 4 2 6 General help 4 8 4 2 7 Configuration fields 4 8 4 2 8 Pop up window 4 8 4 2 9 Scroll bar 4 8 4 3 Main menu 4 9 4 3 1 System Date Day xx xx xxxx 4 9 4 3 2 System Time xx xx xx 4 9 4 3 3 Security 4 9 4 4 Ev...

Page 5: ...SI Software RAID Configuration Utility 5 4 5 2 1 Creating a RAID set 5 5 5 2 2 Adding or viewing a RAID configuration 5 11 5 2 3 Initializing the virtual drives 5 12 5 2 4 Rebuilding failed drives 5 16 5 2 5 Checking the drives for data consistency 5 18 5 2 6 Deleting a RAID configuration 5 21 5 2 7 Selecting the boot drive from a RAID set 5 22 5 2 8 Enabling WriteCache 5 23 5 3 Intel Rapid Storag...

Page 6: ...6 2 6 1 2 Installing the RAID controller driver 6 5 6 2 Intel chipset device software installation 6 8 6 3 LAN driver installation 6 10 6 4 VGA driver installation 6 13 6 5 Management applications and utilities installation 6 15 6 5 1 Running the support DVD 6 15 6 5 2 Drivers menu 6 15 6 5 3 Utilities menu 6 16 6 5 4 Make disk menu 6 16 6 5 5 Contact information 6 16 ...

Page 7: ... harmful interference to radio or television reception which can be determined by turning the equipment off and on the user is encouraged to try to correct the interference by one or more of the following measures Reorient or relocate the receiving antenna Increase the separation between the equipment and receiver Connect the equipment to an outlet on a circuit different from that to which the rec...

Page 8: ...efore operating the server carefully read all the manuals included with the server package Before using the server make sure all cables are correctly connected and the power cables are not damaged If any damage is detected contact your dealer as soon as possible To avoid short circuits keep paper clips screws and staples away from connectors slots sockets and circuitry Avoid dust humidity and temp...

Page 9: ...y should not be placed in municipal waste REACH Complying with the REACH Registration Evaluation Authorization and Restriction of Chemicals regulatory framework we published the chemical substances in our products at ASUS website at http csr asus com english REACH htm ASUS Recycling Takeback Services ASUS recycling and takeback programs come from our commitment to the highest standards for protect...

Page 10: ...uct Introduction This chapter describes the general features of the server including sections on front panel and rear panel specifications 2 Chapter 2 Hardware setup This chapter lists the hardware setup procedures that you have to perform when installing or removing system components 3 Chapter 3 Motherboard information This chapter includes the motherboard layout and brief descriptions of the jum...

Page 11: ...t information Typography Bold text Indicates a menu or an item to select Italics Used to emphasize a word or a phrase Key Keys enclosed in the less than and greater than sign means that you must press the enclosed key Example Enter means that you must press the Enter or Return key Key1 Key2 Key3 If you must press two or more keys simultaneously the key names are linked with a plus sign Example Ctr...

Page 12: ...xii ...

Page 13: ...ASUS TS100 E7 PI4 This chapter describes the general features of the server including sections on front panel and rear panel specifications Chapter 1 Product introduction ...

Page 14: ...the figure below With the correct serial number of the product ASUS Technical Support team members can then offer a quicker and satisfying solution to your problems Model Name TS100 E7 PI4 Chassis ASUS T11 Pedestal Chassis Motherboard ASUS P8B X MR Server Board Component 1 x 300W Single Power Supply 1 x 120mm x 25mm System Fan 4 x SATA Cables 4 x Internal HDD bays 1 x Front I O Board FPB R9 Access...

Page 15: ... 1066 1333 ECC UDIMM Memory Size 1 GB 2GB 4GB 8GB Expansion Slots Total PCI PCI X PCI E Slots 6 Slot Type 1x PCI E G2 x16 slot x16 link 1x PCI E G2 x 8 slot x4 link 2x PCI E G2 x1 slot x1 link 2 x PCI 32 33 5V Storage Intel C202 6 SATA 3Gb s ports Intel Rapid Storage for Windows only Support software RAID 0 1 10 5 LSI MegaRAID for Linux Windows Support software RAID 0 1 10 HDD Bays I internal A or...

Page 16: ...se Server 10 SP3 11 32 64 bit Subject to change without any notice Anti virus Software Optional Anti Virus CD Pack Management Solution Software ASUS ASWM Enterprise Dimension HH x WW x DD 436 8mm 200mm 478 8mm Net Weight Kg CPU DRAM HDD not inclu ded 15 Kg Power Supply 300W 80PLUS Single Power Supply Power Rating 100 240Vac 8 4A 50 60Hz Class I Environment Operation temperature 10 C 35 C Non opera...

Page 17: ...two USB ports are located on the front panel The drive bays power and reset buttons LED indicators CD DVD ROM drive and USB 2 0 ports are located on the front panel For future installation of 5 25 inch devices two drive bays are available Refer to section 1 7 1 Front panel LEDs for the LED descriptions Reset button HDD access LED Power LED USB 2 0 ports Optical drive Empty 5 25 inch bays Power but...

Page 18: ...rboard rear I O ports expansion slots a chassis lock a vent for the system fan and power supply module 300W Single power supply Power connector Expansion slots PS 2 keyboard port USB 2 0 ports Serial port VGA port Gigabit LAN port 1 Chassis lock 120mm x 25mm system fan PS 2 mouse port Gigabit LAN port 2 ...

Page 19: ...s on the front or rear panel if you need to use a floppy disk or a optical disc WARNING HAZARDOUS MOVING PARTS KEEP FINGERS AND OTHER BODY PARTS AWAY Turn off the system power and detach the power supply before removing or replacing any system component 1 Power supply unit 2 120mm x 25mm system fan 3 ASUS P8B X MR Server Board 4 Expansion card locks 5 Optical drive 6 2 x 5 25 inch drive bays 7 Fro...

Page 20: ...HDD Access LED OFF Blinking No activity Read write data into the HDD HDD Access LED Power LED 1 7 2 Rear panel LEDs SPEED LED ACT LINK LED SPEED LED ACT LINK LED ACT LINK LED SPEED LED Status Description Status Description OFF No link OFF 10 Mbps connection GREEN Linked ORANGE 100 Mbps connection BLINKING Data activity GREEN 1 Gbps connection ...

Page 21: ...ASUS TS100 E7 PI4 This chapter lists the hardware setup procedures that you have to perform when installing or removing system components Chapter 2 Hardware setup ...

Page 22: ...hat can cause injury such as the CPU fan rear fan and other sharp edged parts The images of the barebone server shown in this section are for reference purposes only and may not exactly match the model you purchase 2 Slide the side cover for about half an inch toward the rear until it is disengaged from the chassis 3 Carefully lift the side cover and set it aside 1 1 2 To remove the side cover 1 R...

Page 23: ... 1 Match and insert the lower sliding edge of the side cover to the corresponding chassis edge 2 Position the side cover to the chassis 4 Drive in the two screws you removed earlier to secure the side cover 3 Slide the side cover toward the front panel until it snaps in place 4 4 3 1 ...

Page 24: ... if you see any damage to the PnP cap socket contacts motherboard components ASUS will shoulder the cost of repair only if the damage is shipment transit related Keep the cap after installing the motherboard ASUS will process Return Merchandise Authorization RMA requests only if the motherboard comes with the cap on the LGA1155 socket The product warranty does not cover damage to the socket contac...

Page 25: ... the socket to prevent bending the connectors on the socket and damaging the CPU Load plate Gold triangle mark Alignment keys CPU notches 5 Position the CPU over the socket ensuring that the gold triangle is on the bottom left corner of the socket and then fit the socket alignment keys into the CPU notches 4 Remove the PnP cap from the CPU socket by lifting the tab only PnP cap Cap tab ...

Page 26: ...hermal paste If so skip this step The Thermal Interface Material is toxic and inedible DO NOT eat it If it gets into your eyes or touches your skin wash it off immediately and seek professional medical help 8 Insert the load lever under the retention tab 6 Apply some Thermal Interface Material to the exposed area of the CPU that the heatsink will be in contact with ensuring that it is spread in an...

Page 27: ...ocket is incompatible with the LGA775 and LGA1366 sockets in size and dimension Orient the heatsink and fan assembly such that the CPU fan cable is closest to the CPU fan connector To install the CPU heatsink and fan 1 Place the heatsink on top of the installed CPU making sure that the four fasteners match the holes on the motherboard 2 Push down two fasteners at a time in a diagonal sequence to s...

Page 28: ...g this connector 2 2 3 Uninstalling the CPU heatsink and fan To uninstall the CPU heatsink and fan 1 Disconnect the CPU fan cable from the connector on the motherboard 2 Rotate each fastener counterclockwise 3 Pull up two fasteners at a time in a diagonal sequence to disengage the heatsink and fan assembly from the motherboard A A B B A A B B 4 Carefully remove the heatsink and fan assembly from t...

Page 29: ...MM sockets 2 3 2 Memory Configurations You may install 1 GB 2 GB 4 GB 8GB Unbuffered with ECC DDR3 DIMMs into the DIMM sockets using the memory configurations in this section UDIMM DIMM Slot Per Channel DIMM Populated per Channel DIMM Type Speed Rank per DIMM 2 1 Unbuffered DDR3 ECC 1066 1333 Single Rank Dual Rank 2 2 Unbuffered DDR3 ECC 1066 1333 Single Rank Dual Rank Always install DIMMs with th...

Page 30: ...IMMs or other system components Failure to do so may cause severe damage to both the motherboard and the components A DIMM is keyed with a notch so that it fits in only one direction DO NOT force a DIMM into a socket to avoid damaging the DIMM Unlocked retaining clip 1 DIMM notch 1 Unlock a DIMM socket by pressing the retaining clips outward 2 Align a DIMM on the socket such that the notch on the ...

Page 31: ... panel cover To remove the front panel cover 1 Locate the three hooked tabs on the chassis side rail 2 Release the hooked tabs and take off the front panel cover 2 4 2 Reinstalling the front panel cover To reinstall the front panel cover 1 Hook the other side of the front panel cover to the chassis 2 Swing the front panel cover and snap it back into place ...

Page 32: ...ew driver to bend and remove the metal cover to avoid physical injury Ensure to unplug the power cable before installing or removing any system components Failure to do so may cause damage to the motherboard and other system components The system comes with three 5 25 inch drive bays located on the upper front part of the chassis An optical drive that comes standard optional with the system packag...

Page 33: ...f the drive 7 Connect a power plug from the power supply to the power connector on the back of the drive 8 Follow the instructions on the previous section to reinstall the front panel cover 4 Insert the drive into the bay 5 Slide the bay lock to the right until it clicks in place 7 6 ...

Page 34: ...all a Serial ATA hard disk drive 1 Secure the supplied HDD trays to the HDD with four screws 2 Carefully insert the trays with the HDD installed and push them all the way to the depth of the bay 3 Connect the SATA cable to the SATA connector on the back of the drive 4 Connect a power plug from the power supply to the power connector on the back of the drive 4 3 ...

Page 35: ...the motherboard and other system components 2 7 1 Installing an expansion card To install an expansion card 1 Before installing the expansion card read the documentation that came with it and make the necessary hardware settings for the card 5 Remove the metal slot cover opposite the slot where you wish to install an expansion card 4 Lift up the expansion card lock as shown 2 Lay the system on its...

Page 36: ...ts original position A light click indicates that the card is locked in place Ensure that the total power consumption of your system does not exceed 300W 6 Align the card golden fingers with the slot and then press firmly until the card is completely seated on the slot ...

Page 37: ...vers for the expansion card These IRQs are usually available for ISA or PCI devices Standard Interrupt assignments IRQ Priority Standard function 0 1 System Timer 1 2 Keyboard Controller 2 Programmable Interrupt 3 11 Communications Port COM2 4 12 Communications Port COM1 5 13 6 14 Floppy Disk Controller 7 15 8 3 System CMOS Real Time Clock 9 4 ACPI Mode when used 10 5 IRQ Holder for PCI Steering 1...

Page 38: ...he system fan 1 Unplug the system fan cable from the REAR_FAN1 connector on the motherboard 3 Remove the system fan and then set it aside 2 Locate and remove four system fan screws at the rear panel Keep the screws for late use Hold the system fan with one hand while removing the system fan screws Follow the previous instructions in reverse if you want to reinstall the system fan ...

Page 39: ...tailed information on the connectors Standard cables connected to the motherboard 1 24 pin ATX power connector from power supply to motherboard 2 8 pin ATX 12V power connector from power supply to motherboard 3 System fan connector from system fan to motherboard 4 SATA conectors system default from motherboard to SATA devices 5 USB connector from motherboard to front I O board 6 System panel conne...

Page 40: ...Chapter 2 Hardware setup 2 20 ...

Page 41: ...ASUS TS100 E7 PI4 This chapter includes the motherboard layout and brief descriptions of the jumpers and internal connectors Chapter 3 Motherboard Info ...

Page 42: ...Chapter 3 Motherboard information 3 2 3 1 Motherboard layout ...

Page 43: ...3 SATA4 SATA5 SATA6 3 8 2 Hard disk activity LED connector 4 pin HDLED1 3 9 3 USB connector 10 1 pin USB34 USB56 A Type USB7 3 10 4 Thermal sensor cable connectors 3 pin TR1 3 10 5 CPU front and rear fan connectors 4 pin CPU_FAN1 FRNT_FAN1 FRNT_FAN2 FRNT_FAN3 REAR_FAN1 3 11 6 Serial General Purpose Input Output connector 6 1 pin SGPIO1 3 12 7 Serial port connectors 10 1 pin COM2 3 12 8 TPM connect...

Page 44: ...e computer and unplug the power cord 2 Move the jumper cap from pins 1 2 default to pins 2 3 Keep the cap on pins 2 3 for about 5 10 seconds then move the cap back to pins 1 2 3 Plug the power cord and turn ON the computer 4 Hold down the Del key during the boot process and enter BIOS setup to re enter data Except when clearing the RTC RAM never remove the cap on CLRTC jumper default position Remo...

Page 45: ...llow you to switch for fan pin selection The CPUFAN_SEL1 jumper is for the CPU fan control and the CHAFAN_SEL1 jumper is for the front fans and rear fans control Set to pins 1 2 when using 4 pin fans or pins 2 3 when using 3 pin fans If you use a 4 pin fan but set the jumper to pin 2 3 the fan you installed may not work If you use a 3 pin fan but set the jumper for a 4 pin fan the fan control will...

Page 46: ... activate the Gigabit LAN feature 5 Intel C202 SATA port S W RAID setting 3 pin RAID_SEL1 This jumper allows you to select the Serial ATA RAID configuration utility to use when you create disk arrays Place the jumper caps on pins 1 2 if you want to use the LSI Logic Embedded SATA RAID Setup Utility default otherwise place the jumper caps on pins 2 3 to use the Intel Rapid Storage Techonology IRST ...

Page 47: ...202 chipset these connectors are for the Serial ATA signal cables for Serial ATA hard disk drives that allows up to 3Gb s of data transfer rate If you installed Serial ATA hard disk drives you can create a RAID 0 RAID 1 RAID 10 or RAID 5 configuration The actual data transfer rate depends on the speed of Serial ATA hard disks installed ...

Page 48: ...tivity LED connector 4 pin HDLED1 This LED connector is for the storage add on card cable connected to the SATA or SAS add on card The read or write activities of any device connected to the SATA or SAS add on card causes the front panel LED to light up ...

Page 49: ...l the modules to a slot opening at the back of the system chassis These USB connectors comply with USB 2 0 specification that supports up to 480 Mbps connection speed 4 Thermal sensor cable connectors 3 pin TR1 This connector is for temperature monitoring Connect the thermal sensor cable to this connector and place the other end to the device which you want to monitor temperature ...

Page 50: ... A 53 28 W max at 12V Connect the fan cables to the fan connectors on the motherboard ensuring that the black wire of each cable matches the ground pin of the connector DO NOT forget to connect the fan cables to the fan connectors Insufficient air flow inside the system may damage the motherboard components These are not jumpers DO NOT place jumper caps on the fan connectors All fans feature the A...

Page 51: ... used for the SGPIO peripherals for the Intel Rapid Storage Technology RAID SATA LED 7 Serial port connectors 10 1 pin COM2 This connector is for the serial COM port Connect the serial port module cable to one of these connectors then install the module to a slot opening at the back of the system chassis ...

Page 52: ...or 20 1 pin TPM This connector supports a Trusted Platform Module TPM system which can securely store keys digital certificates passwords and data A TPM system also helps enhance network security protects digital identities and ensures platform integrity ...

Page 53: ...l the connectors completely fit DO NOT forget to connect the 24 8 pin power plugs otherwise the system will not boot up Use of a PSU with a higher power output is recommended when configuring a system with more power consuming devices The system may become unstable or may not boot up if the power is inadequate This motherboard supports ATX2 0 PSU or later version Ensure that your power supply unit...

Page 54: ...in SPEAKER This 4 pin connector is for the chassis mounted system warning speaker The speaker allows you to hear system beeps and warnings 4 Hard disk drive activity LED 2 pin HDDLED This 2 pin connector is for the HDD Activity LED Connect the HDD Activity LED cable to this connector The IDE LED lights up or flashes when data is read from or written to the HDD 5 Power button soft off button 2 pin ...

Page 55: ...ion feature for chassis with intrusion sensor or microswitch When you remove any chassis component the sensor triggers and sends a high level signal to these leads to record a chassis intrusion event The default setting is short CASEOPEN and GND pin by jumper cap to disable the function 4 Locator LED 2 pin LOCATORLED1 and 2 pin LOCATORLED2 These leads are for the locator LED1 and LED2 on the front...

Page 56: ...Chapter 3 Motherboard information 3 16 ...

Page 57: ...ASUS TS100 E7 PI4 This chapter tells how to change the system settings through the BIOS Setup menus Detailed descriptions of the BIOS parameters are also provided Chapter 4 BIOS setup ...

Page 58: ... ASUS CrashFree BIOS 3 utility The ASUS CrashFree BIOS 3 is an auto recovery tool that allows you to restore the BIOS file when it fails or gets corrupted during the updating process You can update a corrupted BIOS file using a USB flash drive that contains the updated BIOS file Prepare a USB flash drive containing the updated motherboard BIOS before using this utility Recovering the BIOS from a U...

Page 59: ...he BIOS without having to use a DOS based utility Before you start using this utility download the latest BIOS from the ASUS website at www asus com To update the BIOS using EZ Flash Utility 1 Insert the USB flash disk that contains the latest BIOS file to the USB port 2 Enter the BIOS setup program Go to the Tool menu to select ASUS EZ Flash Utility and press Enter to enable it Flash Info MODEL P...

Page 60: ...isk drive 2 Copy the BUPDATER utility BUPDATER exe from the ASUS support website at support asus com to the bootable USB flash disk drive you created earlier 3 Boot the system in DOS mode then at the prompt type BUPDATER i filename ROM where filename is the latest or the original BIOS file on the bootable USB flash disk drive then press Enter A BUPDATER i file name ROM This function can support de...

Page 61: ...e for DOS V1 06 09 08 04 Current ROM Update ROM Note Writing BIOS FLASH TYPE MXIC 25L1605A PATH BOARD P8B X VER 0201 DATE 12 01 2010 BOARD P8B X VER 0202 DATE 12 09 2010 5 The utility returns to the DOS prompt after the BIOS update process is completed Reboot the system from the hard disk drive The BIOS update is finished Please restart your system C WARNING Do not turn off power during flash BIOS...

Page 62: ...un this program Press Del during the Power On Self Test POST to enter the Setup utility otherwise POST continues with its test routines If you wish to enter Setup after POST restart the system by pressing Ctrl Alt Delete or by pressing the reset button on the system chassis You can also restart by turning the system off and then back on Do this last option only if the first two failed The Setup pr...

Page 63: ...e keyboard until the desired item is highlighted 4 2 1 BIOS menu screen Version 2 01 1204 Copyright C 2010 American Megatrends Inc Aptio Setup Utility Copyright C 2010 American Megatrends Inc Main Event Logs Advanced Monitor Boot Tool Exit Set the Date Use Tab to switch between Data elements Select Screen Select Item Enter Select Item Change Opt F1 General Help F2 Previous Values F5 Optimized Defa...

Page 64: ...ngs 4 2 6 General help At the top right corner of the menu screen is a brief description of the selected item 4 2 7 Configuration fields These fields show the values for the menu items If an item is user configurable you can change the value of the field opposite the item You cannot select an item that is not user configurable A configurable field is enclosed in brackets and is highlighted when se...

Page 65: ...ser s password is set then this is a power on password and must be entered to boot or enter Setup In Setup the User will have Administrator rights Administrator Password Not Installed User Password Not Installed Administrator Password User Password If you have forgotten your BIOS password erase the CMOS Real Time Clock RTC RAM to clear the BIOS password See section 2 6 Jumpers for information on h...

Page 66: ...er when prompted to create confirm the password After you clear the password the Administrator Password item on top of the screen shows Not Installed User Password If you have set a user password you must enter the user password for accessing the system The User Password item on top of the screen shows the default Not Installed After you set a password this item shows Installed To set a user passw...

Page 67: ...MECI Multiple Event Count Increment which is the number of occurrences of a duplicate event that must pass before the multiple event counter associated with log entry is updated Use the and keys to adjust the value The values range from 1 to 255 METW xx Allows you to adjust value for the METW Multiple Event Time Window which is the number of minutes that must pass between duplicate log entries whi...

Page 68: ... of EFI status codes as OEM codes Configuration option Disabled Enabled Convert OEM Codes Disabled Allows you to enable or disable the converting of EFI status codes to standard Smbios types Configuration option Disabled Enabled View Smbios Event Log Press Enter to view the Smbios event logs ...

Page 69: ...tion North Bridge South Bridge SATA Configuration Intel TXT LT Configuration USB Configuration Onboard Devices Configuration APM Serial Port Console Redirection 4 5 1 ACPI Settings Aptio Setup Utility Copyright C 2010 American Megatrends Inc Advanced Enables or Disables BIOS ACPI Auto Configuration Enable ACPI Auto Configuration Disabled ACPI Sleep State S3 Suspend to RAM Enable ACPI Auto Configur...

Page 70: ...M Status Information NO TPM Hardware TPM SUPPORT Disabled Allows you to enable or disable the TPM support Configuration options Disabled Enabled 4 5 3 WHEA Configuration Aptio Setup Utility Copyright C 2010 American Megatrends Inc Advanced Enable or disable Windows Hardware Error Architecture WHEA Support Enabled WHEA Support Enabled Allows you to enable or disable the Windows Hardware Error Archi...

Page 71: ...to boot even without support for CPUs with extended CPUID functions Configuration options Disabled Enabled Version 2 01 1204 Copyright C 2010 American Megatrends Inc Aptio Setup Utility Copyright C 2010 American Megatrends Inc Advanced Includes TM1 TM2 and EMTTM Select Screen Select Item Enter Select Item Change Opt F1 General Help F2 Previous Values F5 Optimized Defaults F10 Save Exit ESC Exit CP...

Page 72: ...lows you to enable or disable the Enhanced Intel SpeedStep Technology EIST Configuration options Disabled Enabled Turbo Mode Enabled This item appears only when you set the Enhanced Intel SpeedStep Technology item to Enabled and allows you to enable or disable the Intel Turbo Mode Technology Configuration options Disabled Enabled CPU C1E Enabled Enabled Enables the C1E support function This item s...

Page 73: ...4M DMI Gen2 Enabled Allows you to enable or disable the DMI Gen2 Configuration options Disabled Enabled VT d Disabled Allows you to enable or disable the VT d Configuration options Disabled Enabled Initiate Graphic Adapter PEG PCI Allows you to decide which graphics controller to use as the primary boot device Configuration options PCI PEG PEG PCI 4 5 6 South Bridge Aptio Setup Utility Copyright C...

Page 74: ...e Advanced Host Controller Interface AHCI set this item to AHCI Mode The AHCI allows the onboard storage driver to enable advanced Serial ATA features that increases storage performance on random workloads by allowing the drive to internally optimize the order of commands If you want to create RAID sets with LSI MegaRAID utility or Intel Rapid Storage Technology from the Serial ATA hard disk drive...

Page 75: ...cy mode is enabled If no USB device is detected the legacy USB support is disabled Configuration options Disabled Enabled Auto EHCI Hand off Disabled Enables or disables the BIOS EHCI hand off support Configuration options Disabled Enabled 4 5 8 Intel TXT LT Configuration Aptio Setup Utility Copyright C 2010 American Megatrends Inc Advanced Enables Legacy USB support AUTO option disables legacy su...

Page 76: ...econd interval 4 5 10 Onboard Devices Configuration The Onboard Devices Configuration menu items allow you to change the advanced settings for onboard devices Aptio Setup Utility Copyright C 2010 American Megatrends Inc Advanced Launch Intel PXE OpROM Azalia HD Audio Enabled INTEL W82574L OpROM1 PXE INTEL W82574L OpROM2 PXE Serial Port 1 Configuration Serial Port 2 Configuration Parallel Port Conf...

Page 77: ... items in this menu allow you to set the parallel port configuration Parallel Port Enabled Allows you to enable or disable the parallel port LPT LPTE Configuration options Enabled Disabled Change Settings Auto Allows you to select an optimal setting for the super IO device Configuration options Auto IO 378h IRQ 5 IO 378h IRQ 5 6 7 9 10 11 12 IO 278h IRQ 5 6 7 9 10 11 12 IO 3BCh IRQ 5 6 7 9 10 11 1...

Page 78: ...On Last State EuP Ready Disabled When set to Enabled all other PME options will be switched off Configuration options Disabled Enabled This item is available on selected models Power On By PCI Disabled Disabled Disables the PME to wake up from S5 by PCI devices Enabled Allows you to turn on the system through a PCI LAN or modem card This feature requires an ATX power supply that provides at least ...

Page 79: ...encoding to map Unicode chars onto 1 or more bytes ANSI Extended ASCII char set Bits per second 57600 Selects serial port transmission speed The speed must be matched on the other side Long or noisy lines may require lower speeds Configuration options 9600 19200 38400 57600 115200 Data Bits 8 Configuration options 7 8 Parity None A parity bit can be sent with the data bits to detect some transmiss...

Page 80: ...ignal can be sent to re start the flow Hardware flow control uses two wires to send start stop signals Configuration options None Hardware RTS CTS Recorder Mode Disabled With this mode enabled only text will be sent This is to capture Terminal data Configuration options Disabled Enabled Legacy OS Redirction Resolution 80x24 Configures the number of rows and columns supported on legacy OS Configura...

Page 81: ...therboard component temperatures Select Ignore if you do not wish to display the detected temperatures CPU FAN1 Speed FRNT FAN1 3 Speed REAR FAN1 Speed xxxx RPM or Ignore N A The onboard hardware monitor automatically detects and displays the speed of CPU fans front fans and rear fan in rotations per minute RPM If the fan is not connected to the motherboard the field shows N A Fan Speed Control Ge...

Page 82: ...Priorities CD DVD ROM Drive BBS Priorities Hard Drive BBS Priorities Setup Prompt Timeout xx Use the and keys to adjust the number of seconds to wait for setup activation key Bootup NumLock State On Allows you to select the power on state for the NumLock Configuration options Off On Full Screen Logo Disabled Allows you to enable or disable the full screen logo display feature Configuration options...

Page 83: ...ng Press F5 when ASUS Logo appears Press F8 after POST Boot Override These items displays the available devices The number of device items that appears on the screen depends on the number of devices installed in the system Click an item to start booting from the selected device Network Device BBS Priorities Set the booting order of network devices Boot Option 1 2 IBA GE Slot 0200 v1324 Configurati...

Page 84: ... Save Changes Reset Once you are finished making your selections choose this option from the Exit menu to ensure the values you selected are saved When you select this option or if you press F10 a confirmation window appears Select Yes to save changes and exit Discard Changes Exit This option allows you to exit the Setup program without saving your changes When you select this option or if you pre...

Page 85: ...ASUS TS100 E7 PI4 This chapter provides instructions for setting up creating and configuring RAID sets using the available utilities Chapter 5 RAID configuration ...

Page 86: ...ment software directs all applications to the surviving drive as it contains a complete copy of the data in the other drive This RAID configuration provides data protection and increases fault tolerance to the entire system Use two new drives or use an existing drive and a new drive for this setup The new drive must be of the same size or larger than the existing drive RAID 10 is data striping and...

Page 87: ...isk drives for SATA hard disk drive installation 5 1 3 Setting the RAID item in BIOS You must enable the RAID function in the BIOS Setup before creating RAID set s using SATA HDDs To do this 1 Enter the BIOS Setup during POST 2 Go to the Main menu Storage Configuration and then press Enter 3 Set the Configure SATA as item to RAID 4 Save your changes and then exit the BIOS Setup Refer to Chapter 4 ...

Page 88: ...ing RAID set s Press Ctrl M to enter the utility The LSI MegaRAID software RAID configuration utility automatically configures to RAID 1 when the SATA to RAID Mode is enabled The RAID setup screens shown in this section are for reference only and may not exactly match the items on your screen due to the controller version difference When you create RAID sets with the LSI MegaRAID software RAID con...

Page 89: ...command This menu also allows you to view add or clear RAID configurations or select the boot drive Initialize Allows you to initialize the virtual drives of a created RAID set Objects Allows you to initialize virtual drives or change the virtual drive parameters Rebuild Allows you to rebuild failed drives Check Consistency Allows you to check the data consistency of the virtual drives of a create...

Page 90: ...en creating a RAID 1 set You need at least four identical hard disk drives when creating a RAID 10 set Management Menu Configure Initialize Objects Rebuild Check Consistency PORT DNLIN A00 00 DNLIN A00 01 0 1 Easy Configuration ARRAY SELECTION MENU Select Configurable Array s A 0 SPAN 1 LSI Software RAID Configuration Utility Ver A 62 Apr 29 2009 BIOS Version A 09 07211059R Cursor Keys SPACE De Se...

Page 91: ...NO Choose RAID Level For This VD Cursor Keys SPACE De Select F2 ChIdInfo F3 SlotInfo F10 Configure Esc Quit 6 Select RAID from the Virtual Drive sub menu and then press Enter 7 Select the RAID level from the menu and then press Enter Management Menu Configure Initialize Objects Rebuild Check Consistency PORT DNLIN A00 00 DNLIN A00 01 0 1 LSI Software RAID Configuration Utility Ver A 62 Apr 29 2009...

Page 92: ...62 Apr 29 2009 BIOS Version A 09 07211059R Virtual Drive s Configured LD RAID Size Stripes StripSz Status 0 1 77247MB 2 64 KB ONLINE Virtual Drive 0 RAID 1 Size 77247MB DWC Off RA On Accept SPAN NO Disk Write Cache Setting Of VD Change DWC Off On Cursor Keys SPACE De Select F2 ChIdInfo F3 SlotInfo F10 Configure Esc Quit Management Menu Configure Initialize Objects Rebuild Check Consistency PORT LS...

Page 93: ...s And Press Enter To Select An Option Using New Configuration When a RAID set already exists using the New Configuration command erases the existing RAID configuration data If you do not want to delete the existing RAID set use the View Add Configuration command to view or create another RAID configuration To create a RAID set using the New Configuration option 1 From the Management Menu select Co...

Page 94: ...AID set Management Menu Configure Initialize Objects Rebuild Check Consistency PORT LSI Software RAID Configuration Utility Ver A 62 Apr 29 2009 BIOS Version A 09 07211059R DNLIN A00 00 DNLIN A00 01 0 1 Easy Configuration ARRAY SELECTION MENU Virtual Drive s Configured LD RAID Size Stripes StripSz Status 0 1 77247MB 2 64 KB ONLINE Virtual Drive 0 RAID 1 Size 77247MB DWC Off RA On Accept SPAN NO En...

Page 95: ...he screen 3 Follow step 3 to 12 of section 6 2 1 Creating a RAID set Using Easy Configuration to add a new RAID set Management Menu Configure Initialize Objects Rebuild Check Consistency View Add to The Existing Configuration Configuration Menu Easy Configuration New Configuration View Add Configuration Clear Configuration Select Boot Drive LSI Software RAID Configuration Utility Ver A 62 Apr 29 2...

Page 96: ...e to initialize Use the arrow keys to select the virtual drive from the Virtual Drive selection and then press Space Management Menu Configure Initialize Objects Rebuild Check Consistency Initialize Virtual Drive s LSI Software RAID Configuration Utility Ver A 62 Apr 29 2009 BIOS Version A 09 07211059R Use Cursor Keys To Navigate Between Items And Press Enter To Select An Option Management Menu Co...

Page 97: ...ipSz Status 0 10 154494MB 4 64 KB ONLINE Virtual Drives Virtual Drive 0 Initialize Yes No Init Will Destroy Data On Selected VD s LSI Software RAID Configuration Utility Ver A 62 Apr 29 2009 BIOS Version A 09 07211059R SPACE De Select F10 Initialize Management Menu Configure Initialize Objects Rebuild Check Consistency Virtual Drive s Configured LD RAID Size Stripes StripSz Status 0 10 154494MB 4 ...

Page 98: ...are RAID Configuration Utility Ver A 62 Apr 29 2009 BIOS Version A 09 07211059R Use Cursor Keys To Navigate Between Items And Press Enter To Select An Option 2 Select the virtual drive to initialize from the Virtual Drives sub menu and then press Enter Management Menu Configure Initialize Objects Rebuild Check Consistency Select VD Objects Adapter Virtual Drive Physical Drive Vitual Drive 1 Virtua...

Page 99: ...To Select An Option 4 When prompted press the Space to select Yes from the Initialize dialog box and then press Enter Management Menu Configure Initialize Objects Rebuild Check Consistency Initilize Will Destroy Data On Selected VD s Objects Adapter Virtual Drive Physical Drive Vitual Drive 1 Virtual Drive 0 Initialze Check Consistency View Update Parameters Vitual Drive 0 Initialize Yes No LSI So...

Page 100: ...pace Management Menu Configure Initialize Objects Rebuild Check Consistency Rebuild PD s LSI Software RAID Configuration Utility Ver A 62 Apr 29 2009 BIOS Version A 09 07211059R Use Cursor Keys To Navigate Between Items And Press Enter To Select An Option Management Menu Configure Initialize Objects Rebuild Check Consistency Port 1 DISK 77247MB HDS728080PLA380 PF20A60A REBUILD PHYSICAL DRIVES SELE...

Page 101: ...itialize Objects Rebuild Check Consistency Port 1 DISK 77247MB HDS728080PLA380 PF20A60A REBUILD PHYSICAL DRIVES SELECTION MENU PORT ONLIN A00 00 RBLD A00 01 0 1 Rebuilding Of Drive Will Take A Few Minutes Start Rebuilding Drive Y N LSI Software RAID Configuration Utility Ver A 62 Apr 29 2009 BIOS Version A 09 07211059R SPACE De Select F10 Start Rebuild F2 Drive Information F3 View Virtual Drives ...

Page 102: ...hen press Enter 2 The screen displays the available RAID set s and prompts you to select the virtual drive to check Press Space to select the virtual drive from the Virtual Drive sub menu and then press F10 Management Menu Configure Initialize Objects Rebuild Check Consistency CC Of VD s LSI Software RAID Configuration Utility Ver A 62 Apr 29 2009 BIOS Version A 09 07211059R Use Cursor Keys To Nav...

Page 103: ...to continue Management Menu Configure Initialize Objects Rebuild Check Consistency Virtual Drive s Configured LD RAID Size Stripes StripSz Status 0 10 154494MB 4 64 KB ONLINE Virtual Drives Virtual Drive 0 Consistency Check Yes No Select VD LSI Software RAID Configuration Utility Ver A 62 Apr 29 2009 BIOS Version A 09 07211059R SPACE De Select F10 Check Consistency Management Menu Configure Initia...

Page 104: ...ects and then select Virtual Drive from the sub menu 2 Use the arrow keys to select the virtual drive you want to check and then press Enter 3 Select Check Consistency from the pop up menu and then press Enter 4 When prompted use the arrow keys to select Yes from the dialog box to check the drive 5 When checking is complete press any key to continue ...

Page 105: ... Easy Configuration New Configuration View Add Configuration Clear Configuration Select Boot Drive LSI Software RAID Configuration Utility Ver A 62 Apr 29 2009 BIOS Version A 09 07211059R Use Cursor Keys To Navigate Between Items And Press Enter To Select An Option Management Menu Configure Initialize Objects Rebuild Check Consistency Clear Existing Configuration Configuration Menu Easy Configurat...

Page 106: ...onfigure Initialize Objects Rebuild Check Consistency Select A Boot VD Configuration Menu Easy Configuration New Configuration View Add Configuration Clear Configuration Select Boot Drive LSI Software RAID Configuration Utility Ver A 62 Apr 29 2009 BIOS Version A 09 07211059R Use Cursor Keys To Navigate Between Items And Press Enter To Select An Option Management Menu Configure Initialize Objects ...

Page 107: ...0 Rebuild Rate 30 Chk Const Rate 30 FGI Rate 30 BGI Rate 30 Disk WC Off Read Ahead On Bios State Enable Stop On Error No Fast Init Enable Auto Rebuild On Auto Resume Enable Disk Coercion 1GB Factory Default LSI Software RAID Configuration Utility Ver A 62 Apr 29 2009 BIOS Version A 09 07211059R Use Cursor Keys To Navigate Between Items And Press Enter To Select An Option 3 From the Management Menu...

Page 108: ... allow you to move through the menus and select the menu options The RAID BIOS setup screens shown in this section are for reference only and may not exactly match the items on your screen Intel R Rapid Storage Technology Option ROM 10 1 0 1008 Copyright C 2003 10 Intel Corporation All Rights Reserved MAIN MENU 1 Create RAID Volume 3 Reset Disks to Non RAID 2 Delete RAID Volume 4 Recovery Volume O...

Page 109: ...iangle marks the selected drive Press Enter after completing your selection Intel R Rapid Storage Technology Option ROM 10 1 0 1008 Copyright C 2003 10 Intel Corporation All Rights Reserved CREATE VOLUME MENU HELP Enter a unique volume name that has no special characters and is 16 characters or less Change TAB Next ESC Previous Menu ENTER Select Name Volume0 RAID Level RAID0 Stripe Disks Select Di...

Page 110: ...me item is selected press Enter The following warning message appears WARNING ALL DATA ON SELECTED DISKS WILL BE LOST Are you sure you want to create this volume Y N 9 Press Y to create the RAID volume and return to the main menu or N to go back to the CREATE VOLUME menu 5 3 2 Creating a Recovery set To create a recovery set 1 From the utility main menu select 1 Create RAID Volume and press Enter ...

Page 111: ...ys to select a sync option that you want and press Enter 7 When the Create Volume item is selected press Enter The following warning message appears SELECT DISKS Port Drive Model Serial Size Status 0 ST3160812AS 9LS0HJA4 149 0GB Non RAID Disk 1 ST3160812AS 9LS0F4HL 149 0GB Non RAID Disk 2 ST3160812AS 3LS0JYL8 149 0GB Non RAID Disk 3 ST3160812AS 9LS0BJ5H 149 0GB Non RAID Disk Select 1 Master and 1 ...

Page 112: ...the RAID set and return to the utility main menu or press N to return to the DELETE VOLUME menu ALL DATA IN THE VOLUME WILL BE LOST This does not apply to Recovery volumes Are you sure you want to delete volume Volume0 Y N DELETE VOLUME VERIFICATION Intel R Rapid Storage Technology Option ROM 10 1 0 1008 Copyright C 2003 10 Intel Corporation All Rights Reserved DELETE VOLUME MENU HELP Deleting a v...

Page 113: ...s you want to reset and then press Space to select 3 Press Enter to reset the RAID set drive s A confirmation message appears 4 Press Y to reset the drive s or press N to return to the utility main menu Resetting RAID disk will remove its RAID structures and revert it to a non RAID disk WARNING Resetting a disk causes all data on the disk to be lost This does not apply to Recovery volumes Port Dri...

Page 114: ...t C 2003 10 Intel Corporation All Rights Reserved RECOVERY VOLUME OPTIONS HELP Enable Only Recovery Disk enables recovery disk if available and disables master disk Enable Only Master Disk enables master disk if available and disables recovery disk Actions will result in change from Continuous Update mode to On Request Select ESC Previous Menu ENTER Select 1 Enable Only Recovery Disk 2 Enable Only...

Page 115: ... RAID 1 array failed the system displays the status of the RAID volume as Degraded during POST You can rebuild the RAID array with other installed non RAID disks To rebuild the RAID with other non RAID disk 1 At the prompt press Ctrl I to enter the Intel Rapid Storage Technology option ROM utility 2 If there is a non RAID SATA Hard Disk available the utility will prompt to rebuild the RAID Press E...

Page 116: ...ology and reboot the system 5 Under Microsoft Windows OS select Start Programs Intel Rapid Storage Intel Rapid Storage Console or click the Intel Rapid Storage Technology tray icon to load the Intel Rapid Storage Manager utility 6 From the View menu select Advanced Mode to display the details of the Intel Rapid Storage Console 7 From the Volumes view option select RAID volume to view the rebuildin...

Page 117: ... BIOS Set at least one of the arrays bootable to boot from the hard disk 1 Reboot the system and press Del to enter the BIOS setup utility during POST 2 Go to the Boot menu and select the boot option priority 3 Use up down arrow keys to select the boot priority and press Enter See section 4 7 Boot menu for details 4 From the Exit menu select Save Changes Exit then press Enter 5 When the confirmati...

Page 118: ...5 34 Chapter 5 RAID configuration ...

Page 119: ...ASUS TS100 E7 PI4 This chapter provides instructions for installing the necessary drivers for different system components Chapter 6 Driver installation ...

Page 120: ...to be manually adjusted Otherwise the system will not boot from the connected SATA ODD A floppy disk with the RAID driver is required when installing Windows or Red Hat Enterprise operating system on a hard disk drive that is included in a RAID set You can create a RAID driver disk in DOS using the Makedisk application in the support DVD To create a RAID driver disk in DOS environment 1 Place the ...

Page 121: ...D Driver Windows 32 bit also support AHCI Windows 64 bit also support AHCI Back Exit PXH LSI RAID Driver Windows XP 32 bit Windows XP 64 bit Windows Server 2003 32 bit Windows Server 2003 64 bit Windows Vista 32 bit Windows Vista 64 bit Windows Server 2008 32 bit Windows Server 2008 64 bit Windows 7 32 bit Windows 7 64 bit Windows Server 2008 R2 64 bit RHEL AS4 UP7 32 64 bit RHEL AS4 UP8 32 64 bit...

Page 122: ... drive 5 Follow succeeding screen instructions to complete the process Write protect the floppy disk to avoid computer virus infection To create a RAID driver disk in Red Hat Enterprise Linux server environment 1 Insert a blank formatted high density floppy disk to the floppy disk drive 2 Type dd if XXX img of dev fd0 to decompress the file into the floppy disk from the following path in the suppo...

Page 123: ...ird party SCSI or RAID driver Windows Setup S Specify Additional Device ENTER Continue F3 Exit Windows Setup Setup could not determine the type of one or more mass storage devices installed in your system or you have chosen to manually specify an adapter Currently Setup will load support for the following mass storage devices s none To specify additional SCSI adapters DVD ROM drives or special dis...

Page 124: ...lick Cancel 3 Right click the My Computer icon on the Windows desktop and then select Properties from the menu 4 Click the Hardware tab and then click the Device Manager button to display the list of devices installed in the system 5 Right click the RAID controller item then select Properties 6 Click the Driver tab and then click the Update Driver button 7 The Upgrade Device Driver Wizard window a...

Page 125: ...ce Manager button 3 Click the sign before the item SCSI and RAID controllers and then the Intel R ICH8R ICH9R ICH10R DO PCH SATA RAID Controller item should appear The screen differs based on the controller 4 Right click the RAID controller driver item and then select Properties from the menu 5 Click the Driver tab and then click the Driver Details button to display the RAID controller drivers 6 C...

Page 126: ...puter and then log on with Administrator privileges 2 Insert the motherboard system support DVD to the optical drive The support DVD automatically displays the Drivers menu if Autorun is enabled in your computer If Autorun is NOT enabled in your computer browse the contents of the support DVD to locate the file ASSETUP EXE from the BIN folder Double click the ASSETUP EXE to run the support DVD 3 C...

Page 127: ... Yes to accept the terms of the License Agreement and continue the process 6 Read the Readme File Information and press Next to continue the installation 7 After completing the installation click Finish to complete the setup process ...

Page 128: ...rator privileges 2 Insert the motherboard system support DVD to the optical drive The support DVD automatically displays the Drivers menu if Autorun is enabled in your computer Windows automatically detects the LAN controllers and displays a New Hardware Found window Click Cancel to close this window If Autorun is NOT enabled in your computer browse the contents of the support DVD to locate the fi...

Page 129: ...Intel R Network Connections InstallShield Wizard window appears 5 Toggle I accept the terms in the license agreement and click Next to continue 6 Click the Intel R PROSet for Windows Device Manager box and then click Next to start the installation ...

Page 130: ...6 12 Chapter 6 Driver installation 7 Follow the screen instructions to complete installation 8 When finished press Finish to continue ...

Page 131: ...th Administrator privileges 2 Insert the motherboard system support DVD to the optical drive The support DVD automatically displays the Drivers menu if Autorun is enabled in your computer If Autorun is NOT enabled in your computer browse the contents of the support DVD to locate the file ASSETUP EXE from the BIN folder Double click the ASSETUP EXE to run the support DVD 3 Click on the ASPEED AST11...

Page 132: ...windows and click Next when finished a Accept the terms in the license agreement b Fill in User Name and Organization optional c Select a setup type 6 Click Install to begin the installation 7 When the installation completes click Finish and select Yes to restart your computer for the configuration changes to take effect ...

Page 133: ...1 Running the support DVD Place the support DVD to the optical drive The DVD automatically displays the Drivers menu if Autorun is enabled in your computer If Autorun is NOT enabled in your computer browse the contents of the support DVD to locate the file ASSETUP EXE from the BIN folder Double click the ASSETUP EXE to run the DVD 6 5 2 Drivers menu The Drivers menu shows the available device driv...

Page 134: ...hat the motherboard supports Click an item to install 6 5 4 Make disk menu The Make disk menu contains items to create the Intel and LSI MegaRAID driver disks 6 5 5 Contact information Click the Contact tab to display the ASUS contact information You can also find this information on the inside front cover of this user guide ...

Page 135: ...15 Li Te Road Peitou Taipei Taiwan 11259 Telephone 886 2 2894 3447 Fax 886 2 2890 7798 E mail info asus com tw Web site http www asus com tw Technical Support Telephone 886 2 2894 3447 0800 093 456 Online Support http support asus com techserv techserv aspx ASUSTeK COMPUTER INC China Address No 508 Chundong Road Xinzhuang Industrial Zone Minhang District Shanghai China Telephone 86 21 5442 1616 Fa...

Page 136: ...0883 General support 1 812 282 2787 Online support http support asus com techserv techserv aspx ASUS COMPUTER GmbH Germany and Austria Address Harkort Str 21 23 40880 Ratingen Germany Fax 49 2102 959911 Web site http www asus de Online contact http www asus de sales Technical Support Telephone 49 1805 010923 Support Fax 49 2102 959911 Online support http support asus com techserv techserv aspx ...

Reviews: