


ASUS P9D WS
3-55
Chapter 3
3. When the Make Disk menu appears, select the FreeDOS command prompt item by
pressing the item number.
4.
At the FreeDOS prompt, type d: and press <Enter> to switch the disk from Drive C
(optical drive) to Drive D (USB flash drive).
Updating the BIOS file
To update the BIOS file using BIOS Updater:
1.
At the FreeDOS prompt, type bupdater /pc /g and press <Enter>.
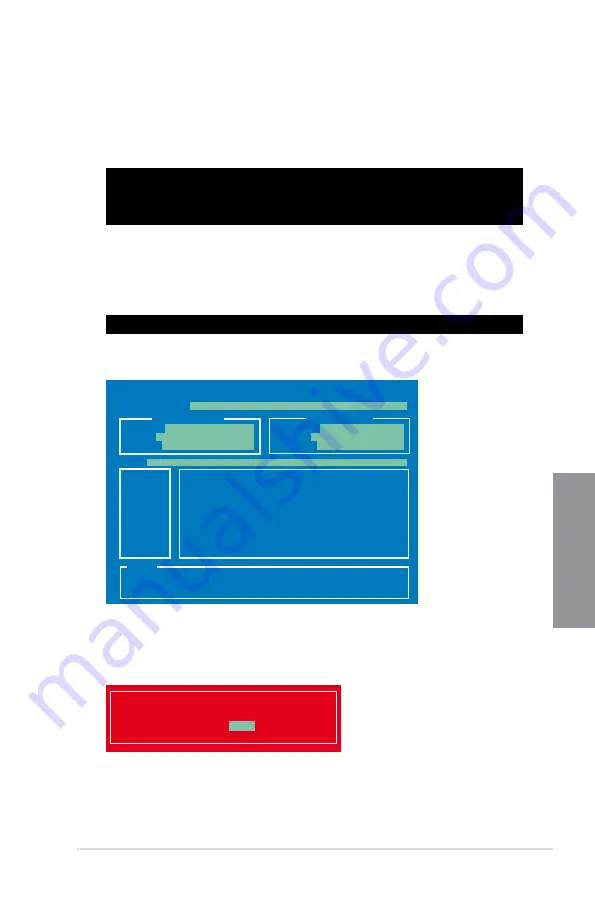
2.
The BIOS Updater screen appears as below.
3.
Press <Tab> to switch between screen fields and use the <Up/Down/Home/End> keys
to select the BIOS file and press <Enter>. BIOS Updater checks the selected BIOS file
and prompts you to confirm BIOS update.
Welcome to FreeDOS (http://www.freedos.org)!
C:\>d:
D:\>
D:\>bupdater /pc /g
ASUSTek BIOS Updater for DOS V1.30 [2013/02/22]
Current ROM
Update ROM
A:
Note
[Enter] Select or Load [Tab] Switch [V] Drive Info
[Up/Down/Home/End] Move [B] Backup [Esc] Exit
P9DWS.CAP 2097152 2013-02-22 17:30:48
PATH:
BOARD:
VER:
DATE:
FLASH TYPE:
WINDBOND 25Q64
BOARD:
VER:
DATE:
A:\
P9D-WS
0204
04/04/2013
UNKNOWN
UNKNOWN
UNKNOWN
Are you sure to update BIOS?
Yes
No
Summary of Contents for P9D WS
Page 1: ...Motherboard P9D WS ...
Page 53: ...ASUS P9D WS 2 35 Chapter 2 A B 1 2 3 2 3 2 CPU installation ...
Page 54: ...2 36 Chapter 2 Hardware information Chapter 2 C B A 5 6 4 ...
Page 57: ...ASUS P9D WS 2 39 Chapter 2 1 2 3 To remove a DIMM 2 3 4 DIMM installation B A ...
Page 60: ...2 42 Chapter 2 Hardware information Chapter 2 2 3 6 ATX Power connection 1 OR 2 ...
Page 61: ...ASUS P9D WS 2 43 Chapter 2 2 3 7 SATA device connection OR 2 OR 1 ...
Page 70: ...2 52 Chapter 2 Hardware information Chapter 2 ...