3-2
Chapter 3: BIOS setup
3.2.1
EZ Mode
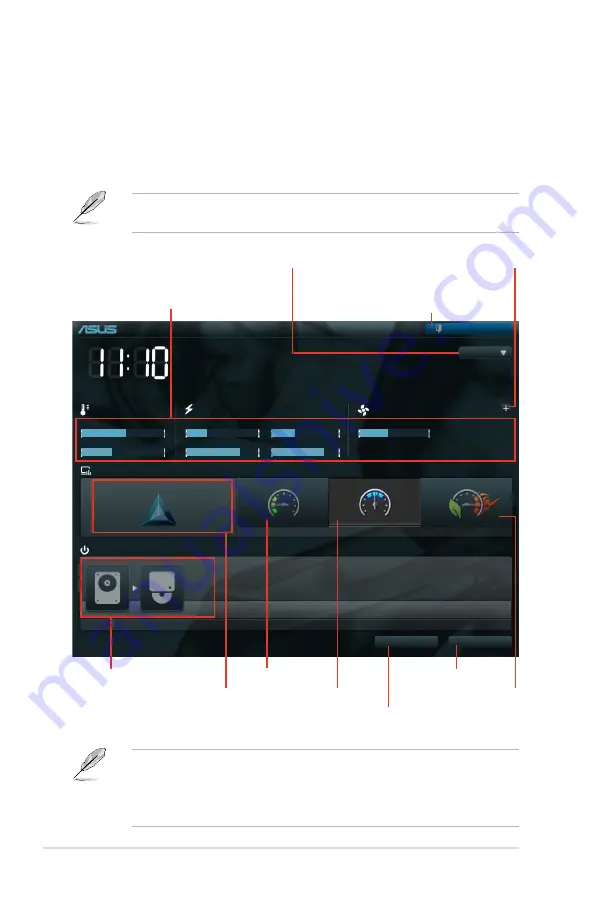
By default, the EZ Mode screen appears when you enter the BIOS setup program.
The EZ Mode provides you an overview of the basic system information, and
allows you to select the display language, system performance mode and boot
device priority. To access the Advanced Mode, click
Exit/Advanced Mode
, then
select
Advanced Mode
.
The default screen for entering the BIOS setup program can be changed. Refer
to the
Setup Mode
item in section
section
3.7 Boot memu
for details.
P8P67 WS REVOLUTION
BIOS Version : 0602
Build Date : 11/04/2010
CPU Type : Intel(R) Core(TM) i5-2300 CPU 0 @ 2.80GHz Speed : 2800 MHz
Total Memory : 1024 MB (DDR3 1066MHz)
Exit/Advanced Mode
Temperature
Voltage
Fan Speed
CPU
+113.0ºF/+45.0ºC
CPU
1.248V
5V
5.160V
CPU_FAN
3325RPM
PWR_FAN1
N/A
MB
+75.2ºF/+40.0ºC
3.3V
3.344V
12V
12.248V
CHA_FAN1
N/A
CHA_FAN2
N/A
English
EFI BIOS Utility - EZ Mode
Monday [11/08/2010]
Normal
Quiet
Performance
Energy Saving
System Performance
Boot Menu(F8)
Default(F5)
Use the mouse to drag or keyboard to navigate to decide the boot priority.
Boot Priority
Exits the BIOS setup program without saving
the changes, saves the changes and resets
the system, or enters the Advanced Mode
Selects the display language
of the BIOS setup program
Displays the CPU/motherboard
temperature, CPU/5V/3.3V/12V voltage
output, CPU/chassis/power fan speed
Power Saving mode
Normal mode
ASUS Optimal
mode
Loads optimized default
Selects the boot device priority
Selects the boot
device priority
•
The boot device options vary depending on the devices you installed to the
system.
•
The
Boot Menu(F8)
button is available only when the boot device is
installed to the system.
Displays the system properties of
the selected mode on the right hand
side
Clicks to display all fan
speeds if available
Summary of Contents for P8P67 WS Revolution
Page 1: ...Motherboard P8P67 WS Revolution ...
Page 14: ...xiv ...
Page 24: ...1 8 Chapter 1 Product Introduction ...
Page 55: ...A B 1 2 3 2 3 2 CPU installation ASUS P8P67 WS Revolution 2 29 ...
Page 56: ...C B A 5 6 4 2 30 Chapter 2 Hardware information ...
Page 59: ...1 2 3 To remove a DIMM 2 3 4 DIMM installation B A ASUS P8P67 WS Revolution 2 33 ...
Page 62: ...2 3 6 ATX Power connection 1 2 OR OR 2 36 Chapter 2 Hardware information ...
Page 63: ...2 3 7 SATA device connection 2 OR 1 ASUS P8P67 WS Revolution 2 37 ...
Page 69: ...Connect to 5 1 channel Speakers Connect to 7 1 channel Speakers ASUS P8P67 WS Revolution 2 43 ...
Page 72: ...2 46 Chapter 2 Hardware information ...
Page 116: ...3 42 Chapter 3 BIOS setup ...


