background image

LED projector E-Manual

13

120

o

AV-IN

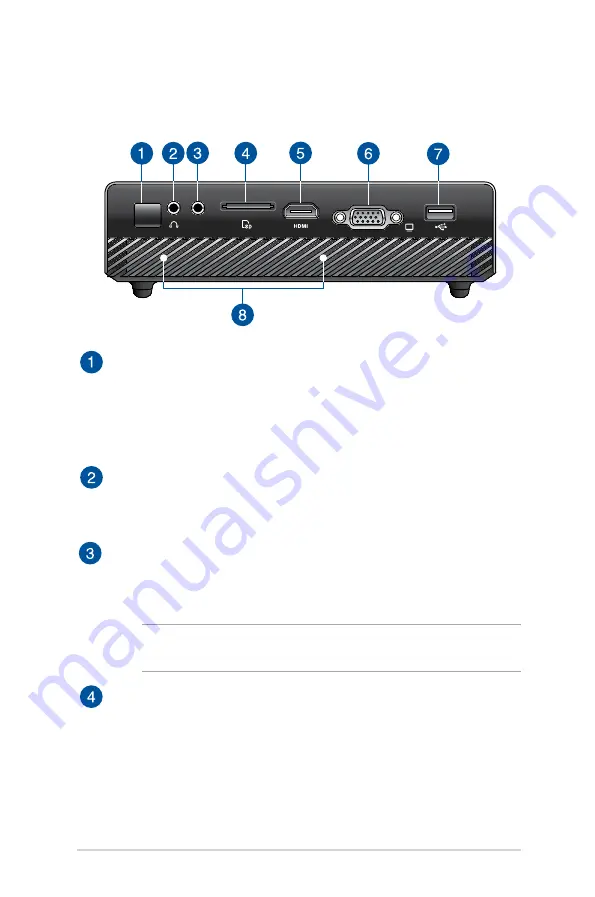
Infrared (IR) sensor

The IR sensor detects signal from your LED projector’s remote 

control, allowing you to access the LED projector’s control 

panel from a distance of up to 7 meters and a receiving angle of 

15


degrees.

Audio output jack port

The audio output jack port allows you to connect your LED 

projector to amplified speakers or headphones.

Audio/Video input jack port

Insert a 3.5mm composite AV cable into this port to connect 

your audio/video equipment to the LED projector. 

NOTE: 

To know which cable to connect to this port, refer to the 

table on page 25.

Memory card reader

This LED projector has a single built-in memory card reader slot 

that supports SD card formats.

Rear view

Summary of Contents for B1M

Page 1: ...LED projector E Manual B1M B1MR ...

Page 2: ...HIS MANUAL ARE FURNISHED FOR INFORMATIONAL USE ONLY AND ARE SUBJECT TO CHANGE AT ANY TIME WITHOUT NOTICE AND SHOULD NOT BE CONSTRUED AS A COMMITMENT BY ASUS ASUS ASSUMES NO RESPONSIBILITY OR LIABILITY FOR ANY ERRORS OR INACCURACIES THAT MAY APPEAR IN THIS MANUAL INCLUDING THE PRODUCTS AND SOFTWARE DESCRIBED IN IT Copyright 2015 ASUSTeK COMPUTER INC All Rights Reserved LIMITATION OF LIABILITY Circu...

Page 3: ...Proper disposal 8 Chapter 1 Knowing your LED projector Features 10 Top view 10 Front view 12 Rear view 13 Right side 15 Left side 16 Bottom view 17 LED projector remote control 18 Replacing the battery 19 Chapter 2 Setting up Operating your LED projector 22 1 Connect the LED projector to the power adapter 22 2 Connect the LED projector to your device 24 3 Adjust the height of the LED projector 30 ...

Page 4: ...eating and playing your own demo video 50 Using the Media Center 51 Launching the Media Center 51 Opening files from the SD Card or USB Drive 52 Ezlink 58 WiFi 60 Multi language versions 65 Appendices Federal Communications Commission Statement 68 Regional notice for California 68 Canadian Department of Communications Statement 69 Global Environmental Regulation Compliance and Declaration 69 ASUS ...

Page 5: ...e parts of your LED projector and its accompanying remote control Chapter 2 Setting up This chapter shows you how to set up your LED projector and use its parts for input device connection Chapter 3 Using the onscreen display menu This chapter talks about the features of your LED projector s onscreen display menu and how to navigate it using the control panel Appendices This section includes safet...

Page 6: ...ation and tips that can help complete tasks WARNING This message contains important information that must be followed to keep you safe while performing tasks and prevent damage to your LED projector s data and components Typography Bold This indicates a menu or an item that must be selected Italic This indicates sections that you can refer to in this manual Multi language versions Download other l...

Page 7: ...mance Keep the LED projector s plastic packages out of the reach of children Do not block or place anything near the LED projector s ventilation holes Doing so may cause internal heat build up that can degrade picture quality and damage the projector Ensure that the operating voltage of your LED projector matches the voltage of your power source Servicing and replacement of parts Do not disassembl...

Page 8: ...cold location When the LED projector is exposed to a drastic change in temperature moisture may condense on the lens and its other internal parts To prevent this use the unit two 2 hours after an extreme or sudden change in temperature occurs Proper disposal Do not throw your LED projector in municipal waste This product has been designed to enable proper reuse of parts and recycling The symbol of...

Page 9: ...LED projector E Manual 9 Chapter 1 Knowing your LED projector Chapter 1 Knowing your LED projector ...

Page 10: ...10 LED projector E Manual Features Top view Focus ring The focus ring allows you to adjust the image focus of your LED projector ...

Page 11: ...rrespond to a specific LED projector setting as indicated below Media Center Input Power Image Position Brightness Image Quality Keystone Main menu OK Volume Splendid Contrast Setup NOTE For more information on using the control panel buttons to access your LED projector s settings refer to the Accessing your LED projector s settings section in this manual ...

Page 12: ...ables or other objects do not block any of the air vents or else overheating may occur Lens The lens projects video or image files onscreen from your input device WARNING Do not touch the lens using your hands or any sharp object Lens cover The lens cover protects the lens from scratches and possible dirt build up IMPORTANT Remove the lens cover before using your LED projector ...

Page 13: ...output jack port The audio output jack port allows you to connect your LED projector to amplified speakers or headphones Audio Video input jack port Insert a 3 5mm composite AV cable into this port to connect your audio video equipment to the LED projector NOTE To know which cable to connect to this port refer to the table on page 25 Memory card reader This LED projector has a single built in memo...

Page 14: ...d content playback VGA port This port allows you to connect your LED projector to other VGA compatible devices USB 2 0 port The USB 2 0 Universal Serial Bus 2 0 port is compatible with USB 2 0 or USB 1 1 devices Audio speakers This LED projector uses SonicMaster technology to provide hi fi sound quality with richer bass sounds straight from the built in audio speakers ...

Page 15: ... LED projector using Kensington compatible LED projector security products Air vents The air vents allow cool air to enter and warm air to exit the LED projector WARNING Ensure that paper books clothing cables or other objects do not block any of the air vents or else overheating may occur Right side 120o ...

Page 16: ...jector WARNING The adapter may become warm to hot while in use Do not cover the adapter and keep it away from your body while it is connected to a power source Air vents The air vents allow cool air to enter and warm air to exit your LED projector WARNING Ensure that paper books clothing cables or other objects do not block any of the air vents or else overheating may occur ...

Page 17: ...ttom view Built in stand This LED projector comes with a built in stand that allows you to adjust the height of the projector by either 5 degrees or 9 5 degrees Tripod socket Connect the LED projector to a tripod using this socket ...

Page 18: ...ecific LED projector setting NOTE For more details on using the control panel buttons refer to the Using the onscreen display menu section in this manual Battery compartment The battery compartment allows you to use a CR2025 lithium coin battery to power your LED projector s remote control NOTE For more details on using the battery compartment refer to the Replacing the battery section in this man...

Page 19: ...jector E Manual 19 Replacing the battery A Move the battery compartment s latch to the right to unlock the battery holder B Pull down the battery holder and remove it completely out of the battery compartment ...

Page 20: ...e new CR2025 lithium coin battery into the battery holder with the positive side facing up D Slide the battery holder back into the battery compartment Push it all the way in until you hear a soft click indicating that the battery compartment is locked back in place ...

Page 21: ...LED projector E Manual 21 Chapter 2 Setting up Chapter 2 Setting up AV IN ...

Page 22: ...ector is also compatible with ASUS power adapters within the 65W to 95W range Operating your LED projector This portable LED projector allows you to plug and play your devices so you can easily open multimedia files hear audio straight from its built in SonicMaster speakers and experience using Wi Fi to project onscreen For your safety and to maintain the quality of this unit refer to the followin...

Page 23: ... dealer if the AC power cord bundled with your LED projector does not match your local power source NOTE We highly recommend that you use a video source device that also uses a grounding type plug to prevent signal interference due to voltage fluctuations for Australia and Mainland China for U S A Canada and Taiwan for Continental Europe for U K ...

Page 24: ...24 LED projector E Manual 2 Connect the LED projector to your device A Audio output jack AV IN AV IN AV IN ...

Page 25: ...ctor E Manual 25 NOTE Refer to the table below to know which pin to connect into the AV IN port PIN Signal 1 Ground 2 White Left Audio 3 Red Right Audio 4 Yellow Video B Audio video input jack AV IN AV IN AV IN ...

Page 26: ...26 LED projector E Manual C SD SDHC AV IN NOTE For details on how to launch files from a memory card refer to the Launching the Media Center section in this manual AV IN ...

Page 27: ...LED projector E Manual 27 D HDMI AV IN AV IN NOTE Some mobile phone models may require a specific adapter for use with HDMI ports ...

Page 28: ...28 LED projector E Manual AV IN E VGA ...

Page 29: ...29 F USB 2 0 AV IN NOTE For details on using the USB 2 0 port to launch supported file formats refer to the Launching the Media Center section in this manual Compatible USB 2 0 input devices USB cable Flash drive Wi Fi dongle ...

Page 30: ...screen WARNING Ensure that the built in stand is fully retracted before placing the LED projector inside the projector bag NOTES Place the LED projector on a stable flat surface Keep a space of 30 cm or more between the sides of the LED projector Consult your dealer for special installation procedures like suspending the LED projector from the ceiling ...

Page 31: ... LED projector s distance from the screen using the table below projection distance LED projector screen size Screen size 16 10 Projection distance inches millimeters meters 30 762 0 58 40 1016 0 78 60 1524 1 16 80 2032 1 55 100 2540 1 94 120 3048 2 33 140 3556 2 71 160 4064 3 10 ...

Page 32: ...32 LED projector E Manual 4 Press the power button AV IN ...

Page 33: ...LED projector E Manual 33 5 Adjust the image focus Move the focus ring to the left or to the right to adjust the image focus NOTE Use a still image when adjusting the onscreen display AV IN AV IN ...

Page 34: ...34 LED projector E Manual ...

Page 35: ...LED projector E Manual 35 Chapter 3 Using the onscreen display menu Chapter 3 Using the onscreen display menu ...

Page 36: ...e LED projector You can navigate inside the onscreen display menu using the control panel buttons on your LED projector or its accompanying remote control To launch options or programs shown on the onscreen display menu refer to the control panel grid shown as below control panel grid NOTE The following screenshots are for reference only and may be updated without prior notice ...

Page 37: ...guides you through the process of using the control panel buttons to launch active options inside your onscreen display menu The control panel grid represents the 8 buttons surrounding the button on the control panel AV IN control panel grid sample control panel buttons ...

Page 38: ...t the language you want to use in your LED projector 3 In the Demo Mode control panel grid select either of the following options On This option launches the demo video of your LED projector If you choose this proceed to step 4 IMPORTANT This option automatically launches the Demo Mode control panel grid whenever you turn on your LED projector When this option is enabled your LED projector automat...

Page 39: ...eactivates the Demo Mode control panel grid and instead launches the Input control panel grid whenever you turn on your LED projector NOTE To know more about the functions of Demo Mode refer to the Using Demo Mode section in this manual 4 After watching the demo video or while watching the demo video you can press to proceed to scanning for connected input devices ...

Page 40: ...functions in the Media Center Power Press this button to turn the LED projector on or off Brightness Press this button to adjust the brightness of your projection onscreen Keystone Press this button to correct distorted images resulting from an angled projection Main Menu OK Press this button to launch the main menu of your LED projector settings to activate a selected item or exit the current con...

Page 41: ...rence between lighten or darken your projection onscreen Media Center Press this button to launch the Media Center NOTE For more details refer to the Using the Media Center section in this manual Input Press this button to scan the connected devices to your LED projector ...

Page 42: ...42 LED projector E Manual Splendid Press this button to activate either of the following display modes Standard Black Board White Board Dynamic sRGB Theater Scenery ...

Page 43: ... to the following options Low Medium High Color Adjustment This option allows you to adjust the color of your screen according to the following settings Auto RGB YUV Color Enhance This option allows you to enhance the colors of your projected image Sharpness This option allows you to sharpen or soften the appearance of the projected image Saturation This option allows you to adjust the hue of the ...

Page 44: ...his option allows you to adjust the position of the projected image based from the location of your LED projector Vertical Positioning This option allows you to vertically shift the image position Aspect Ratio This option allows you to change the projection of your display according to the following aspect ratios AUTO 4 3 16 9 and 16 10 Digital Zoom This option allows you to zoom in or zoom out yo...

Page 45: ...nual 45 Phase This option allows you to adjust the number of lines emitted by the LED projector relative to the computer Clock This option allows you to adjust the frequency of the LED projector relative to the computer ...

Page 46: ...option allows you to reset all the settings you have currently set up for your LED projector Menu Timeout This option allows you to set the timeout rate according to seconds before the onscreen display menu disappears from your projection screen PC 3D This option allows you to use 3D glasses with your LED projector Language This option allows you to select the language to use on your LED projector...

Page 47: ...s you to set the number of minutes before your LED projector automatically shuts down when not in use Demo Mode This option turns the demo video features of your LED projector on or off NOTE For more details refer to the Using Demo Mode section in this manual ...

Page 48: ...details on viewing 3D files refer to the user guide that comes with your 3D glasses To view 3D files 1 Download a compatible 3D player software on your computer IMPORTANT Ensure that the software version supports 3D format conversion to frame sequential output via an HDMI VGA port 2 Turn on your 3D glasses 3 Ensure your PC monitor is set to 1024 x 768 display resolution settings 4 Connect your PC ...

Page 49: ...ng Off disables this feature In this case you can enable this feature using the following steps Enabling Demo Mode 1 Launch the Setup control panel grid 2 Choose Demo Mode On IMPORTANT This option automatically launches the Demo Mode control panel grid whenever you turn on your LED projector When this option is enabled your LED projector automatically launches the demo video from its internal memo...

Page 50: ...SUS in your SD Card or USB drive 2 Select the photos you want to include in your demo video and one music file optional IMPORTANT You may only choose one music file as your demo video s background music NOTE Refer to the Specifications section in this manual to see the list of compatible photo and music file formats 3 Copy the selected files inside the ASUS folder you created 4 Connect the SD card...

Page 51: ...utomatically launches after the LED projector detects an SD card external drive or Wi Fi dongle connection You can also manually launch the Media Center by pressing from the control panel SD Card Select this item to open files inside your memory card USB Drive Select this item to open files inside your external drive Ezlink Select this item to project from USB connected input devices WiFi Select t...

Page 52: ...he LED projector 2 Turn on the LED projector to launch the Media Center s onscreen display menu 3 Select the input device you wish to access 4 Select Photo 5 Refer to the control panel grid to help you browse and select the file from your input device 6 Press to open the selected folder or file 7 After opening the file press on the control panel to launch the control panel grid ...

Page 53: ...20 Mbps 30 fps AC3 AAC MPEG 1 2 3 DTS LPCM H 264 support less than 4 reference frames DAT VOB MPG MPEG MPEG 1 MPEG 2 1080P 20 Mbps 30 fps MPEG 1 2 3 AC3 DTS LPCM MOV MP4 3GP MPEG 4 H 264 H 263 1080P 20 Mbps 30 fps AAC AMR PCM ADPCM H 264 support less than 4 reference frames RM RMVB RV3 RV4 720P 5 Mbps 30 fps Cook RA6 AAC RA9 RACP RA10 WMV WMV3 1080P 20 Mbps 30 fps WMA2 WMA3 No Support VC 1 AP NOTE...

Page 54: ...unch the Media Center s onscreen display menu 3 Select the input device you wish to access 4 Select Video 5 Refer to the control panel grid to help you browse and select the file from your input device 6 Press to open the selected folder or file 7 After opening the file press on the control panel to launch the control panel grid ...

Page 55: ...t device you wish to access 4 Select Music 5 Refer to the control panel grid to help you browse and select the file from your input device 6 Press to open the selected folder or file 7 After opening the file press on the control panel to launch the control panel grid File Type Sample Rate KHz Bit Rate Kbps MP1 MP2 MP3 8 48 8 320 WMA 22 48 5 320 OGG 8 48 64 320 ADPCM WAV 8 48 32 384 PCM WAV 8 48 12...

Page 56: ...e Excel Microsoft Office Excel 1995 Microsoft Office Excel 1997 Microsoft Office Excel 2000 Microsoft Office Excel 2002 Microsoft Office Excel 2003 Microsoft Office Excel 2007 xlsx Microsoft Office Excel 2010 xlsx Microsoft Office Excel XP Row Limit up to 595 Column Limit up to 256 Sheet up to 100 Note These 3 listed limitations do not appear altogether in just one file Up to 15 MB Does not suppor...

Page 57: ... to launch the Media Center s onscreen display menu 3 Select the input device you wish to access 4 Select Document 5 Refer to the control panel grid to help you browse and select the file from your input device Press 6 Press to open the selected folder or file 7 After opening the file press on the control panel to launch the control panel grid ...

Page 58: ...and desktop computers using a USB cable To project files using Ezlink you need to install EZ Display in your input device s operating system For Windows 1 Connect your LED projector to your device using a USB cable 2 Turn on your input device and go to My Computer 3 Select EZ Display EZ_USB_installer exe ...

Page 59: ... on the LED projector If the Media Center does not automatically launch press on the control panel 3 Select EzLink Wait for the USB icon to appear onscreen to verify that the LED projector was successfully connected to your input device 4 From your input device select the EZ USB Mirror only icon to start projecting from your input device to the LED projector ...

Page 60: ...he ASUS WiFi Projection software to project from your input device using WiFi Download this application using any of the following options If you are using an Android OS download ASUS WiFi Projection from Google Play Store If you are using an iOS download ASUS WiFi Projection from App Store If you are using a laptop tablet or desktop PC download the ASUS WiFi Projection software using the followin...

Page 61: ...LED projector E Manual 61 2 Type the password as shown on your LED projector 3 After connecting your device type in this IP address on your browser http 192 168 111 1 ...

Page 62: ...ftware from the IP address by clicking on either of the following icons NOTE The ASUS WiFI projection software is compatible with Windows 7 Windows XP Windows Vista and Mac OS X The list of compatible operating systems are subject to change without prior notice ...

Page 63: ...jector NOTE You may also refer to the steps presented onscreen 3 Type the password on your input device as shown on the LED projector to enable the AP mode connection 4 Open ASUS WiFi Projection on your input device 5 Select Projector 6 Tap the feature you would like to use NOTE The features are subject to change without prior notice due to sofware updates Using Display by Client mode Using this m...

Page 64: ...aunch the onscreen display menu s keyboard Refer to the control panel grid when navigating the keyboard to input the Wi Fi hotspot s password then press Enter NOTE The B1M B1MR LED projector supports WPA WPA2 enabled devices 5 Press OK to start the Wi Fi connection between the Wi Fi hotspot and your LED projector 6 Repeat the same steps under Using Display by AP mode to connect input devices to th...

Page 65: ...word settings when using Display by AP mode Using WiFi Client setting This scans the available WiFi hotspots that you can connect to your LED projector to enable the Display by Client mode Multi language versions Download other language versions of this E Manual via this website http support asus com ...

Page 66: ...66 LED projector E Manual ...

Page 67: ...LED projector E Manual 67 Appendices Appendices Appendices ...

Page 68: ...e to radio or television reception which can be determined by turning the equipment off and on the user is encouraged to try to correct the interference by one or more of the following measures Reorient or relocate the receiving antenna Increase the distance between the equipment and receiver Connect the equipment to an outlet on a different circuit than that which the receiver is connected to Con...

Page 69: ...is in line with global environmental regulations In addition ASUS disclose the relevant information based on regulation requirements Please refer to http csr asus com english Compliance htm for information disclosure based on regulation requirements ASUS is complied with Japan JIS C 0950 Material Declarations EU REACH SVHC Korea RoHS ASUS Recycling Takeback Services ASUS recycling and takeback pro...

Page 70: ... Screen Size 31 2 153 inches Projection Offset 105 5 Zoom Ratio Fixed Video Features Picture Modes 7 Modes Standard Mode Black board White board Dynamic Mode sRGB Scenary Mode Theater Mode Keystone adjustment Digital Up to 40 degree Auto Keystone Yes Aspect Ratio 16 10 16 9 4 3 Projector Placement Front Table Rear Table Front Ceiling Rear Ceiling Audio Features Built in speakers Yes 2W speaker 2 S...

Page 71: ...eo Input Composite Video Audio Out Earphone out Card Reader Yes 1 x SD card slot for multimedia playback USB 2 0 port Yes 1 x Type A for Service FW upgrade and Media features of USB WiFi dongle USB display USB thumb disk Multimedia Formats Supported Video MOV MP4 AVI MKV MPG MPEG WMV Audio MP3 MP1 MP2 WMA AAC ADPCM WAV PCM WAV Picture JPG JPEG BMP Document Viewer PDF DOC DOCX XLS PPT PPTX TXT cont...

Page 72: ...39 D x44 5 H mm Box Dimension 338 W x225 D x80 H mm Weight Net Weight Esti 0 9 Kg Gross Weight Esti 2 3 Kg Operating Temperature 0 40o C Operating Humidity 20 90 Accessories carrying bag power adapter power cord D Sub cable Quick Start Guide remote control WiFi dongle in specific countries warranty card Regulation Approvals FCC UL CE CB CCC C tick VCCI PSE Gost R Specifications are subject to chan...

Page 73: ...5 1152 x 864 1152 x 864_75 75 67 5 108 1280 x 720 1280 x 720_60 60 45 74 25 1280 x 768 1280 x 768_60 59 87 47 776 79 5 1280 x 800 WXGA_60 59 81 49 702 83 5 WXGA_75 74 934 62 795 106 5 WXGA_85 84 88 71 554 122 5 1280 x 1024 SXGA_60 60 02 63 981 108 SXGA_75 75 025 79 976 135 1280 x 960 1280 x 960_60 60 60 108 1440 x 900 WXGA _60 59 887 55 935 106 5 1400X1050 SXGA _60 59 978 65 317 121 75 640x480 67H...

Page 74: ...GA_85 85 008 43 269 36 720 x 400 720x400_70 70 087 31 469 28 322 800 x 600 SVGA_60 60 317 37 879 40 SVGA_72 72 188 48 077 50 SVGA_75 75 46 875 49 5 SVGA_85 85 061 53 674 56 25 1024 x 768 XGA_60 60 004 48 363 65 XGA_70 70 069 56 476 75 XGA_75 75 029 60 023 78 75 XGA_85 84 997 68 667 94 5 1152 x 864 1152 x 864_75 75 67 5 108 1280x720 1280 x 720_60 60 45 74 25 1280 x 768 1280 x 768_60 59 87 47 776 79...

Reviews: