background image

Getting Started


07

User Guide

Connec-

tions

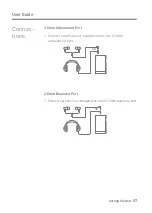
3.5mm Unbalanced Port

1. Connect earphones or headphones to the 3.5mm 
  unbalanced port.

2.5mm Balanced Port

1. Connect earphones or headphones to the 2.5mm balanced port.

OR

OR

Summary of Contents for Dreamus SE200

Page 1: ...INSTRUCTION BOOK SE200 User Guide...

Page 2: ...02 Basic Operations Home Screen Notification Bar Using Open APP Service AK CONNECT Listening to Music Playlist Management USB DAC Installation How to Use USB Audio CD Ripping AK CD Player Car Mode Set...

Page 3: ...talled in the product by default USB Type C Cable For charging and data transfer Quick Start Guide Basic overview of device functionality Warranty Card Provides warranty details for your device Mainta...

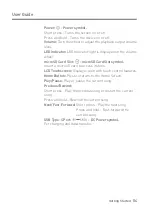
Page 4: ...phones that utilize a 2 5mm jack Getting Started 03 User Guide The appearance of the product as well as the printed and engraved information may vary depending on the model Product Overview Power Prev...

Page 5: ...SD Card Slot symbol Insert a microSD card to access its files LCD Touchscreen Display screen with touch control features Home Button Press to return to the Home Screen Play Pause Play or pause the cur...

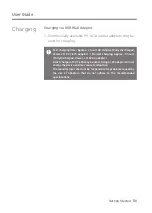
Page 6: ...r 7 seconds to force a shutdown The device can then be restarted after the shutdown is complete Turning the Screen On Off 1 While the screen is on press the Power button to turn off the screen 2 Press...

Page 7: ...5V 2A adapter A fast charger of 9V 1 67A may be used Using a 12V adapter will not charge the device and may cause malfunction The manufacturer shall not be responsible for problems caused by the use o...

Page 8: ...Started 07 User Guide Connec tions 3 5mm Unbalanced Port 1 Connect earphones or headphones to the 3 5mm unbalanced port 2 5mm Balanced Port 1 Connect earphones or headphones to the 2 5mm balanced por...

Page 9: ...tting Started 08 User Guide Connecting to a Balanced Audio Device 1 Connect to an external audio device by using the 3 5mm unbalanced port and 2 5mm balanced port Unbalanced Port Ground Balanced Port...

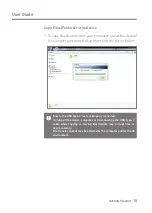
Page 10: ...c on a connected computer through the device See Page 37 Mac users need to download and install Android File Transfer from the Astell Kern website http www astellnkern com Support Download For an opti...

Page 11: ...iles folders and drag drop them into the device folder Ensure the USB Type C cable is properly connected Turning off the device computer or disconnecting the USB Type C cable while copying or moving f...

Page 12: ...n select Delete 2 Select Yes in the Confirm File Folder Deletion window to delete the selected files folders Disconnecting from the Computer 1 Disconnect the USB Type C cable after the transfer betwee...

Page 13: ...e Not following the proper procedure may corrupt data and cause serious damage to the both the card and device Do not remove the microSD card during use Doing so may cause malfunction delete data and...

Page 14: ...el of 20 is required Do not disconnect from the wireless network while downloading the update file Doing so may cause data corruption and or damage to the system If an error occurs or the notice in th...

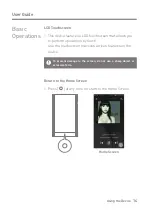
Page 15: ...LCD touchscreen that allows you to perform operations by touch Use the touchscreen to access various features on the device To prevent damage to the screen do not use a sharp object or excessive forc...

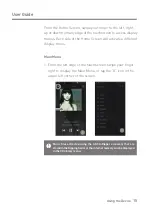
Page 16: ...rner of the screen From the Home Screen swipe your finger to the left right up or down from any edge of the touchscreen to access display menus Each side of the Home Screen will activate a different d...

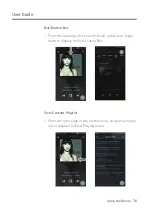
Page 17: ...Notification Bar 1 From the top edge of the touchscreen swipe your finger down to display the Notification Bar View Current Playlist 1 From the right edge of the touchscreen swipe your finger left to...

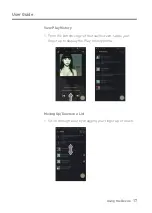
Page 18: ...ce 17 User Guide View Play History 1 From the bottom edge of the touchscreen swipe your finger up to display the Play History menu Moving Up Down on a List 1 Scroll through a list by dragging your fin...

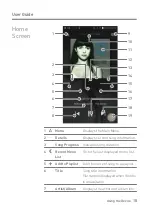
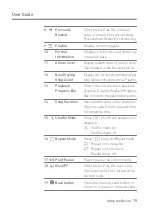
Page 19: ...to the last displayed menu list Add the current song to a playlist Song title information File name is displayed when the title is unavailable Displays the artist and album info Menu Details Song Pro...

Page 20: ...sired track time Indicates the song s total duration Press to switch from elapsed time to remaining time Press to set track sequence for playback Shuffle mode on Shuffle mode off Press to set the Repe...

Page 21: ...Using the Device 20 User Guide Notifi cation Bar 12 13 14 1 2 3 4 5 6 7 8 9 11 10...

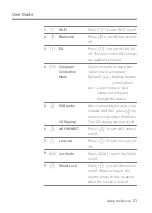
Page 22: ...onnected computer through the device After connecting the device to a portable USB DAC press to connect or disconnect the device Turn CD ripping function on off Press to turn AK Connect on off Press t...

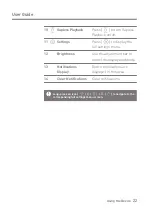
Page 23: ...Guide Press to turn Gapless Playback on off Press to display the full settings menu Use the adjustment bar to control the display brightness Device notifications are displayed in this area Clear notif...

Page 24: ...ource of the app you are trying to install is unknown Be aware that if the app is installed the device may be damaged and personal data compromised Depending on the APP some functions may not work If...

Page 25: ...Apple s App store or Google Play Store AK CONNECT Using AK Connect to Link Music Libraries Speakers 1 Turn on the music library device and or speaker and AK player 2 Connect all devices to the same Wi...

Page 26: ...Using the Device 25 User Guide For Wi Fi connections see Page 48 7 After selecting a library speaker select a category from the menu to display the corresponding music list...

Page 27: ...nd press to initiate the download A message on the Notification Bar will indicate when the download is complete Depending on network conditions song loading may be slow and streaming may stutter Perfo...

Page 28: ...Using the Device 27 User Guide AK Connect Usage Examples Case 1 LIBRARY SPEAKER AK T1 SE200 Case 2 AK500N LIBRARY REMOTE SPEAKER AK T1 SE200...

Page 29: ...Using the Device 28 User Guide Case 3 REMOTE LIBRARY SE200 SPEAKER AK500N Case 4 LIBRARY SPEAKER AK T1 SE200 AK500N REMOTE...

Page 30: ...Using the Device 29 User Guide Case 5 SPEAKER AK T1 LIBRARY SE200 or REMOTE AK Connect APP AK500N LIBRARY...

Page 31: ...es MQS MQA 44 1 384kHz 24bit MQS PCM 8 384kHz 24 32bit DSD DSD 2 8 5 6 11 2MHz Select the Folder category to check the internal external memory capacity and number of files folders and copy move music...

Page 32: ...ious next track Press and hold to rewind fast forward the track Drag the indicator on the Playback Progress Bar to a desired location of a track during playback Press the album art on the Home Screen...

Page 33: ...User Guide Playlist Screen 1 3 2 4 Return to the previous screen Display the current playlist Display the editing options for the music list Play all songs in the current list Previous Playlist Edit m...

Page 34: ...he upper right corner of the screen 3 Enter a name for the playlist and then press Add to create a new playlist Adding a Song to a Playlist 1 Press Playlists to display the list of playlists 2 Select...

Page 35: ...song from the selected playlist Playing a Playlist 1 Select the desired playlist for playback 2 Press at the top right of the screen to play the entire playlist 3 To playback part of the playlist or...

Page 36: ...the playlist to be deleted 3 Press at the top of the screen 4 Press DELETE to delete the selected playlist 1 Press Playlists to view the playlists then press 2 Select a playlist to be renamed 3 Press...

Page 37: ...am must be used to adjust the volume Install a dedicated driver to use the AK device as a USB DAC The driver file is located in SE200 Internal_Storage SE200_ Contents Driver Before installing the driv...

Page 38: ...PCM DSD audio is converted into PCM before being outputted through the USB audio out DoP DSD audio is converted into DoP before being outputted through the USB audio out MQA Optional activation of S...

Page 39: ...sing the proper cable 2 In the Notification Bar press to link the devices and activate the CD Ripping Menu 3 When ripping is complete before disconnecting press on the Notification Bar to unlink disco...

Page 40: ...abled during CD ripping The service will automatically restart when CD ripping is completed Music playback is disabled during ripping You can set the desired file format and ripping speed from the Men...

Page 41: ...ded with the device is to be used to connect to the computer or to charge the product Depending on the CD Ripper model the dedicated USB Type C OTG cable may not be provided in the product package Dep...

Page 42: ...Device 41 User Guide Exit car mode Play or pause music Display current playlist Switch the screen orientation to horizontal mode vertical mode Exit Play Pause Playlist Screen Rotation 1 2 3 4 Car Mod...

Page 43: ...ngs or select from the Notification Bar menu 2 Select the feature to view setting options Wi Fi Change wireless network settings and turn Wi Fi on off Bluetooth Connect a Bluetooth device to listen to...

Page 44: ...e same model User EQ of SE200 is not compatible with the SE100 If the User EQ file is modified or changed externally it will no longer be recognized User EQ dat will not display in the SE200 however i...

Page 45: ...ne Out feature enabled Doing so may cause permanent hearing loss CD Ripper Set the automatic CD ripping function as well as the file format and ripping speed LR Balance Adjust the left right balance f...

Page 46: ...song details LED Indicator on off individually USB Audio Select the type of DSD sound being outputted through USB Audio Out to a connected portable DAC Enable Disable MQA decoding software Car mode Tu...

Page 47: ...screen Move the Back Button to the desired position by dragging and dropping the icon with your finger Move the button to the center of the screen to deactivate it To reactivate the button turn it on...

Page 48: ...tion time may vary depending on the number of files stored on the device Settings Reset Resets all user settings back to the default settings Factory Data Reset Deletes all user data and resets all us...

Page 49: ...y be required depending on Wi Fi settings Connecting to a Wi Fi Network 1 Press and hold from the Notification Bar or select Menu Settings Wi Fi to display a list of available Wi Fi networks Networks...

Page 50: ...Refer to the Bluetooth device s instruction manual for details 1 Select from the Notification Bar menu or select On Off from Menu Settings Bluetooth Bluetooth Pairing 1 In the Settings Menu select th...

Page 51: ...may be heard while using Bluetooth For multipoint devices make the necessary connections prior to use Malfunction noise and other undesirable effects may occur due to the device s battery level and th...

Page 52: ...ice 51 User Guide 3 Enter a name for the custom EQ settings and select SAVE Equalizer Setup 1 Press and hold on the Notification Bar or turn on Menu Settings Equalizer 2 Press NORMAL EQ then select Eq...

Page 53: ...the frequencies up and down according to the user s preferences 5 The number values at the lower left corner of the screen can be adjusted for fine tuning 6 Press the Advanced tab on the top to displa...

Page 54: ...he equalizer 2 Press next to the EQ name to be deleted 3 Press OK to delete the selected EQ setting Renaming a Custom Equalizer Setting 1 Press NORMAL EQ in the upper left of the equalizer 2 Press nex...

Page 55: ...nside of a car during the summer Do not store or use in hot and humid places such as saunas Avoid places with excessive dust or smoke Do not use for extended periods on blankets electric blankets or c...

Page 56: ...ing the device Do not listen to music at excessive volumes for extended periods Do not use earphones headphones at excessive volumes Make sure that the headphone earphone does not get stuck in another...

Page 57: ...e a USB port on the back of the computer Check if the USB Type C cable is connected correctly For Mac check to ensure the MTP program is installed properly Check if the device connects properly on a d...

Page 58: ...manual may be duplicated or reproduced in any format or by any means without the prior approval of Dreamus Company Using or reproducing in whole or part the contents of this document is subject to pe...

Page 59: ...d to comply with the limits for a Class B digital device pursuant to part 15 of the FCC Rules These limits are designed to provide reasonable protection against harmful interference in a residential i...

Page 60: ...he typical user can easily understand the information to acquire the required body worn accessories to maintain compliance Instructions on how to place and orient a device in body worn accessories in...

Page 61: ...SE OF USED BATTERIES ACCORDING TO THE INSTRUCTIONS The device must be used a minimum of 5mm away from the body in normal use conditions The excessive sound pressure from earphones and headphones can c...

Page 62: ...9 132mm H x 0 61 15 7mm D 14 49oz 410 8g Firmware upgrade supported OTA 0 015dB Condition 20Hz 20kHz Unbalanced 0 010dB Condition 20Hz 20kHz Balanced 0 050dB Condition 20Hz 70kHz Unbalanced 0 030dB Co...

Page 63: ...c 19600 Fairchild Road Suite 125 Irvine CA 92612 Supplier s Declaration of Conformity 47 CFR 2 1077 Compliance Information Unique Identifier Responsible Party U S Contact Information Company Address C...

Reviews: