October 11, 2011
Page 14 of 22
66 3081 018-4
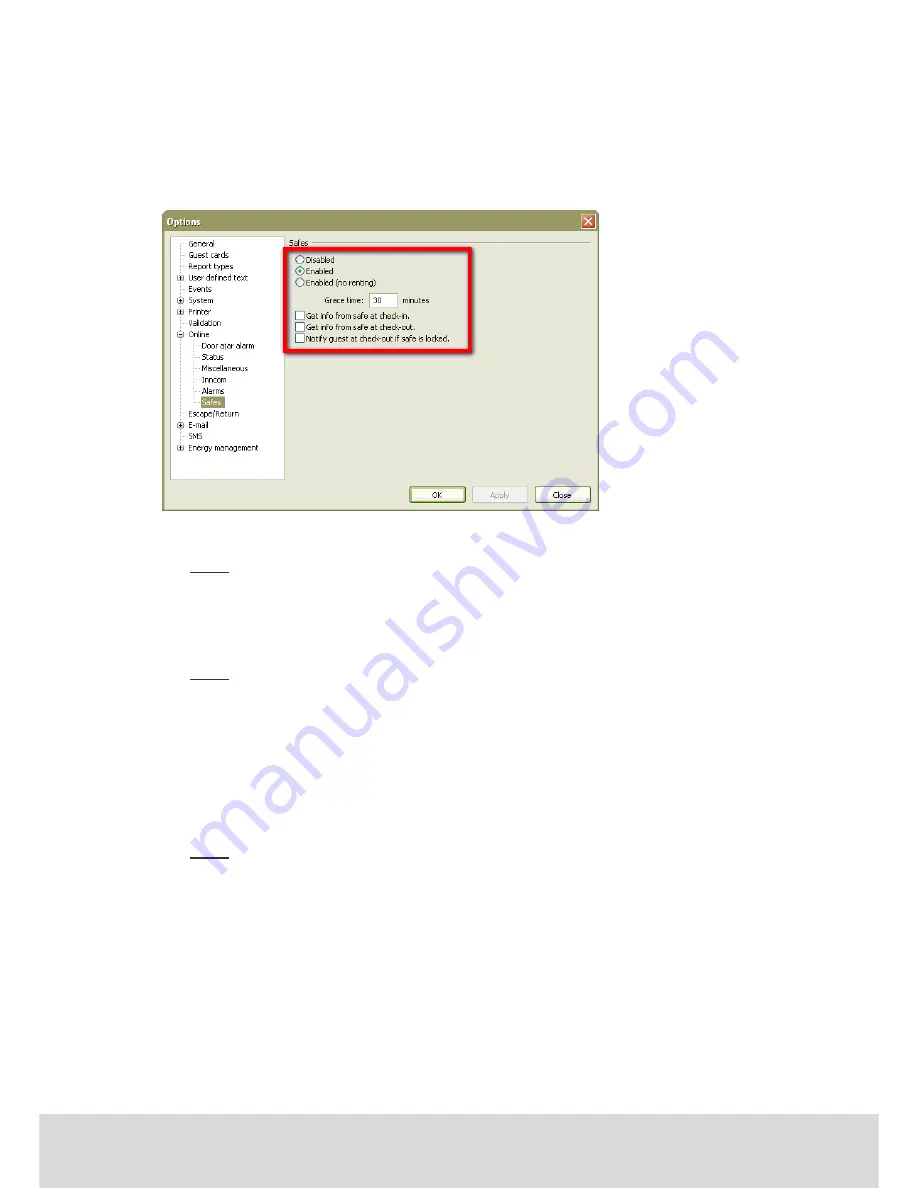
4.1.2 Settings at Tools/Options/Online/Safes
When the steps in section 4.1.1 have been performed, settings for the safes can be made in VISIONLINE.
1.
Launch the VISIONLINE software and log on with user name and password.
2.
Go to
Tools/Options/Online/Safes
.
3.
If there should be an extra cost for the guest if a safe is used, “Enabled” (default) should be
marked. If there is no extra cost, “Enabled (no renting)” should be marked.
Note:
If “Enabled” is chosen, the check box ‘Rent safe’ must be marked in the guest card
dialog before issuing the guest card; see section 4.7 Renting a safe for details. If cards are
encoded via PMS Plus and ‘Enabled’ is chosen, the RS field is used; see Specification for
PMS Plus Protocol (DP-060) for details.
4.
If ‘Get info from safe at check-in’ is marked, an event about the status of the safe
(locked/unlocked) will be sent at guest check-in.
Note:
The status of the safe is explicitly checked at check-in/check-out. If the check box
‘Get info from safe at check-in’ is not marked, the last known status is used. This may
cause unnecessary triggering of The safe is LFPG (locked from previos guest) alarms.
5.
If the check box ‘Get info from safe at check-out’ is marked, an event about the status of
the safe (locked/unlocked) will be sent at guest check-out. See note in step 4.
6.
If ‘Notify guest at check-out if safe is locked’ is marked, the guest will at check-out be
alerted by SMS or e-mail that the safe is still locked. The SMS/e-mail alert comes directly
at check-out, but the guest has some time (the Grace time entered in this dialog; default is
30 minutes, the valid range is 30-1440 minutes) to go back to the room and pick up the
belongings in the safe.
Note:
The function ‘Notify guest at check-out if safe is locked’ requires that information about
the guest’s cell phone number and/or e-mail address has been given from PMS at check-in.
7.
Click
OK
.


