background image

6

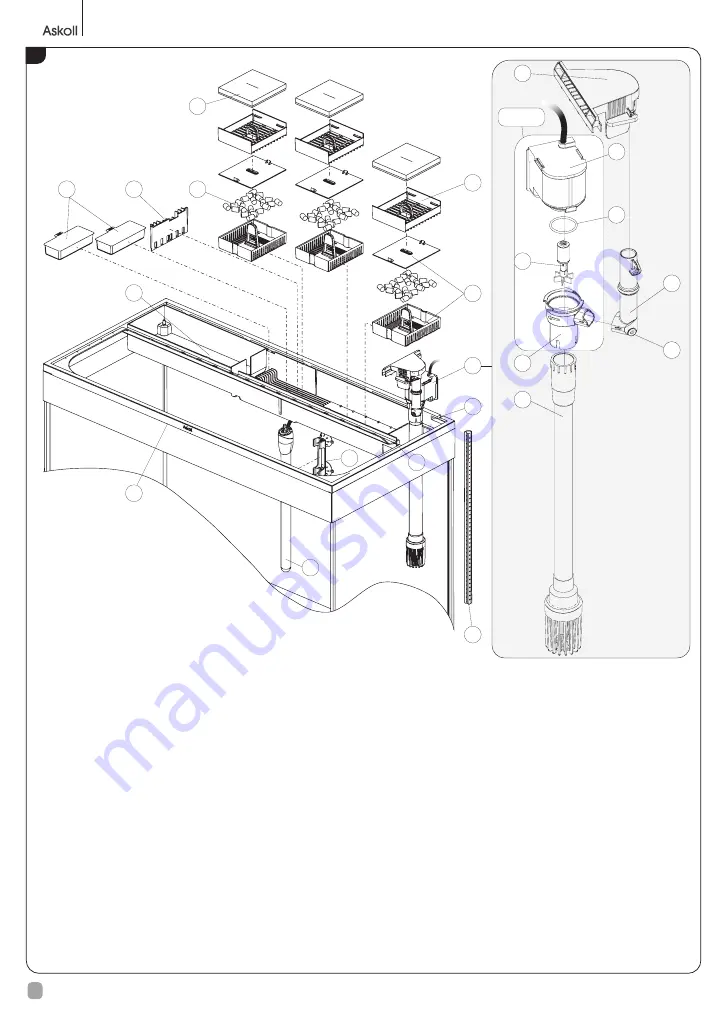
PURE Aquarium KIT

12) 

Frame

13) 

Thermal heater (with glass tube)

14) 

Heater bracket with suction cups

15) 

CO

2

 tube connection

16) 

Fairlead seat

17) 

Cable guide

18) 

Pump unit

19) 

Intake tube

20) 

Volute

21) 

Delivery for circulation in the tank

22) 

Delivery tube

23) 

Impeller

24) 

Pump gasket

25) 

Pump motor

26) 

Delivery (water outlet nozzle)

27) 

Accessories compartment

28) 

Chemical cartridges (in bag): 2 CARBON cartridg-
es and 2 ZEO cartridges

29) 

Ceramic cylinders (in bag)

30) 

Chemical filtration separator

31) 

Biological baskets with cover (for ceramic cylin-
ders)

32) 

Baskets for mechanical filtration sponges

33) 

Mechanical filtration sponges

12

27

14

13

17

29

31

30

28

18

2

16

15

32

33

26

22

25

19

20

23

24

21

Pump

Summary of Contents for PURE XL HC LED

Page 1: ...PUREXL HC LED MARINE AQUARIUM KIT Instruction manual Manuale di istruzioni Manuel d instructions Bedienungsanleitung Handleiding EASYAQUARIUM PURE MARINE...

Page 2: ...sensory or mental capabilities or lack of experience and knowledge if they have been given supervision or instruction concerning use of the appliance in a safe way and understand the hazards involved...

Page 3: ...ith a sensitivity 30 mA After maintenance operations if necessary dry the external parts of the product and the stand To protect the polished surfaces of the product from scratches and scrapes pay utm...

Page 4: ...the components shown in the following figures 9 10 8 11 PURE MARINE PURE MARINE 1 2 3 4 5 6 7 1 Glass tank 2 2 Edge seals glass sealant Edge seals glass sealant 3 Light cover door 4 Light cover 5 Filt...

Page 5: ...tube 23 Impeller 24 Pump gasket 25 Pump motor 26 Delivery water outlet nozzle 27 Accessories compartment 28 Chemical cartridges in bag 2 CARBON cartridg es and 2 ZEO cartridges 29 Ceramic cylinders in...

Page 6: ...from the tank fig 5 and place it on a flat clean surface without scratching it 8 Carefully remove the thermal heater and led driver from their packaging inside the tank along with the cable guide 9 Di...

Page 7: ...tallation Do not use the thermal heater and the pump dry After installation do not move the product If necessary move it only if the tank is completely empty CAUTION When choosing the suitable setup f...

Page 8: ...9 EN 6 7 3 0 1 9 2 2 24 2 7 8 9 10 11 12 13 14 15 16 17 18 max min PURE 19 20...

Page 9: ...programming operation is carried out the lighting system is pre set to switch the day light on at 10 00 a m and switch it off at 6 00 p m according to pre set ramps Therefore the blue light will swit...

Page 10: ...and limiting the build up of nitrates The regular replacement of the CARBON and ZEO cartridges par 6 2 allows keeping the main unwanted compounds under control thus maintaining the water clear and cr...

Page 11: ...s of parts affected by the salt condensate To remove the salt scaling that is most difficult to clean mere lemon juice can be used Then rinse thoroughly to remove any acid residues 6 1 Maintenance and...

Page 12: ...If the light cover or the lighting unit with the timer need re placing disassemble the two elements by unscrewing the three screws which keep them together using a suitable Phillips screwdriver fig 26...

Page 13: ...50102 UK AB350103 Lighting unit with timer 10 AB350104 Thermal heater THERM 13 14 EUR AA230004 UK AA230009 Heater bracket with suction cups 14 AB230001 Delivery and intake KIT 19 22 26 AB350101 Basket...

Page 14: ...E1642201 16M17 Askoll Due S r l Via Industria 32 34 36031 DUEVILLE VI ITALIA www askoll com PURE MARINE...

Reviews: