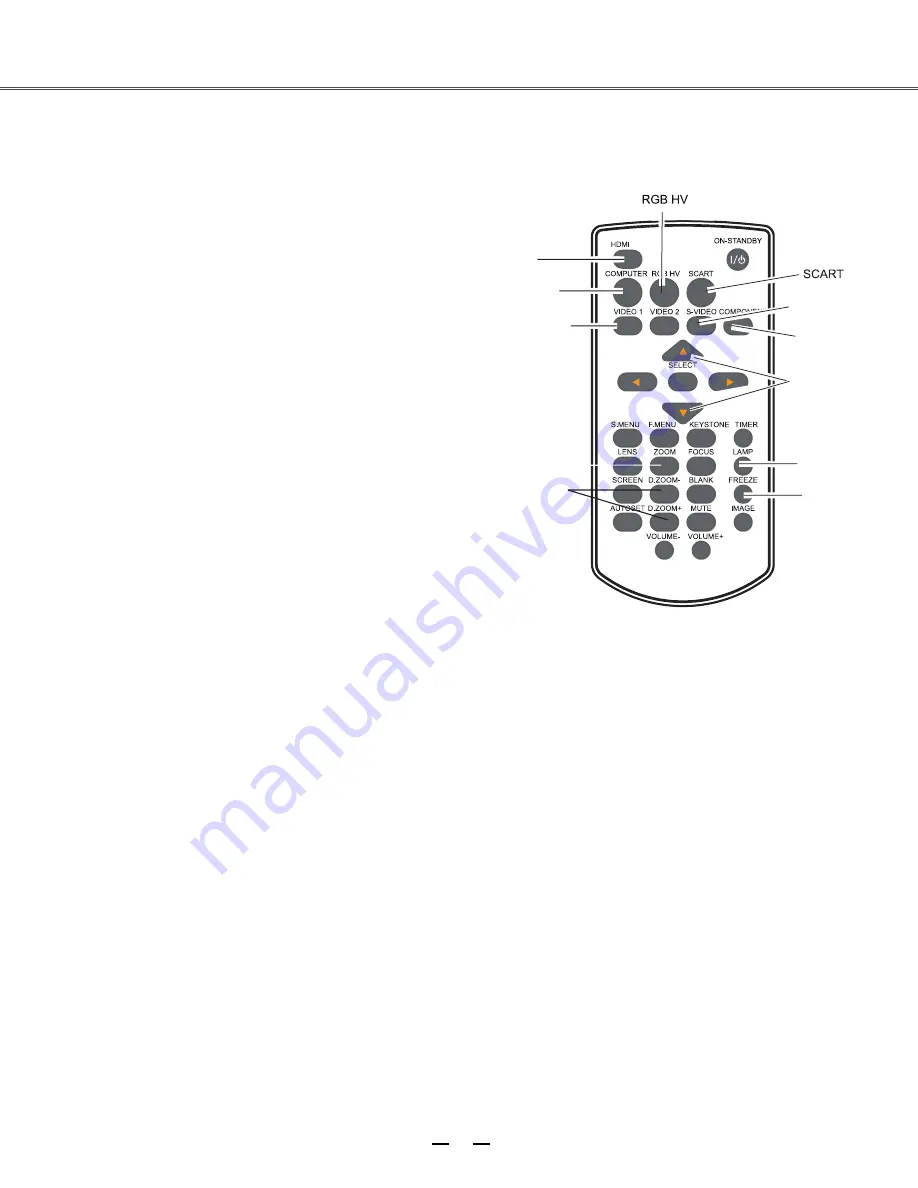
background image

25

Basic operation 

HDMI/DVI


Computer 

button 

Video button

Z

D. oom 

+/-

button 

S-Video 

button 

Component 

button 

Arrow buttons


▲▼

Lamp mode


button 

Freeze

 button 

Remote control operation 

Using the remote control for some frequently used operations is advisable. Just pressing one of the buttons enables 

you to make the desired operation quickly  without calling up the on-screen menu. 

Remote control 

Direct INPUT button 

Press the  Computer/video/HDMI/ DVI/S-Video/RGBHV/

SCART/component  button to select an input source. 

FREEZE button 

Press the FREEZE button to freeze the picture on the screen. To 

cancel the Freeze function, press the FREEZE button again or 

press any other button. 

D.ZOOM button 

Press the D.ZOOM button and use the 

▲▼

  buttons to access 

the digital zoom mode.   

LAMP button 

Press the LAMP button to select the lamp mode to change the brightness of 

the screen. 

Normal … Normal  brightness  
Auto  ……  Brightness  changes  according  with  the  input  signal,  providing  the 

contrast of images and thus more real images. 

Eco …… Lower brightness reduces the lamp power consumption and extends 

the lamp life. 

  Note: 

See the  next page for the


description of other buttons. 

/DVI

Summary of Contents for E1655U

Page 1: ...Owner s Manual P N 4100534500 Multimedia Projector MODEL E1655U ...

Page 2: ...right owner Shenzhen Digital Video Technology Co Ltd shall investigate the criminal responsibilities of the infringing party who have damaged the interests of the copyright owner Shenzhen Digital Video Technology Co Ltd reserves the right to modify or improve the product without prior notice Shenzhen Digital Video Technology Co Ltd reserves the right to modify the manual Please consult the company...

Page 3: ...etup Function Sound Adjustment 24 Remote Control Operation 25 Computer Input mputer Input 27 Input Source Selection Computer 1 2 27 Computer System Selection 29 Auto PC Adjustment 30 Manual Adjustment 31 Selecting Image Mode 32 Adjusting Image 33 Adjusting Screen Size 34 Video Input 35 Selecting Input Source 35 Selecting AV System 36 Selecting image mode 37 Adjusting Image 38 Adjusting Screen Size...

Page 4: ...dition Otherwise it will not only shorten the service life of the unit but also may cause malfunction a fire or other accidents If your projector cannot work properly please read this manual again check the operating methods and cable connection and try the solutions in the part of Troubleshooting If the problem still exists contact the dealer or the service center The lamp of the projector is a w...

Page 5: ...o this projector through cabinet slots as they may touch dangerous voltage points or short out parts that could result in a fire or electric shock Never spill liquid of any kind on the projector Do not install the projector near the ventilation duct of air conditioning equipment This projector should be operated only from the type of power source indicated on the marking label If you are not sure ...

Page 6: ...vent Air intake vent Caution on ceiling mounting For ceiling mounting you need the ceiling mount kit designed for this projector When not mounted properly the projector may fall causing hazards or injury For details consult your dealer The warranty on this projector does not cover any damage caused by use of any non recommended ceiling mount kit or installation of the ceiling mount kit in an impro...

Page 7: ... projector by courier or any other transport service in an unsuitable transport case This may cause damage to the projector For information about transporting the projector by courier or any other transport service consult your dealer Do not put the projector in a case before it is cooled enough Caution in handling the projector When lifting or moving the projector do not hold the lens or the dire...

Page 8: ... 8 Remote receiver Front top 9 Side control panel 10 Exhaust vent Caution Hot air is exhausted from the exhaust vent Do not put heat sensitive objects near this side 11 Remote receiver Back 12 Terminals and connectors 13 Air filter and air intake vent 14 Power cord connector 15 Safety lock 16 Adjustable feet Front Back Back Bottom ...

Page 9: ... output 6 BNC jacks C Cr onnect the component video output to Y Cb or composite video output from video equipment to VIDEO 2 terminal or connect the RGBHV format 5 line system signal to G B R Hs and Vs jacks 7 S VIDEO Used to connect the S video output of video equipment 8 Composite video input jacks Connect the composite signals to this terminal 9 AUDIO IN3 Connect the audio to these jacks When V...

Page 10: ...indicator It turns orange when the life of the projection lamp draws to an end 11 WARNING TEMP indicator It flashes red when the internal projector temperature is too high 12 SHIFT indicator It lights blue when the projector lens is moving It lights blue when the projector lens is moving to the end 13 1 FOCUS indicator It lights green when zooming in out To turn on off the projector Part names and...

Page 11: ...O 1 input source Select VIDEO 2 input source Open or close the full screen menu Open or close the shortcut menu button button button button button button button button button button button button button Select an item or adjust the value in the on screen menu Pan the image in Digital zoom mode button Select SCART input source Select the component input source Select the S Video input source Access...

Page 12: ... focus Select the lamp mode Temporarily close the on screen image Freeze the projected image Select the image mode Mute the sound Increase the volume level button button button button button button button button button button button button button button To ensure safe operation observe the following precautions Do not bend drop or expose the remote control to moisture or heat For cleaning use a so...

Page 13: ... remote control toward the projector when pressing any button The maximum operating range for the remote control is about 5 meters and 60 degrees Adjustable feet Projection angle can be adjusted up to 5 0 degree with the adjustable feet Rotate the adjustable feet to lift the projector to a certain height During lifting rotate the two feet clockwise To lower or retract the adjustable feet rotate th...

Page 14: ... The display position can be shifted downward up to 50 elevation of the display When the lens is shifted to top When the lens is shifted to bottom When the lens is shifted to leftmost When the lens is shifted to rightmost The display position can be shifted to the left up to 10 width of the display The display position can be shifted to the right up to 10 width of the display Adjusting range Shift...

Page 15: ...BNC cable HDMI cable Monitor output Serial output Monitor input Monitor output HDMI terminal BNC cable VGA cable VGA cable DVI cable HDMI cable Control terminal Analog output Analog input Unplug the power cords of both the projector and external equipment from the AC outlet before connecting the cables G B R H V Serial output Control port Serial crossover cable HDMI DVI ...

Page 16: ...bles are not supplied with the projector Video cable RCA 1 or RCA 3 BNC cable BNC 1 or BNC 3 S Video cable Scart VGA cable Composite video video output Composite video video output RGB Scart21 pin output cable cable cable Video Video Analog otput Analog input Scart VGA Y Pb Cb Pr Cr Component RCA S video S video S VIDEO DVI Refer to the analog outpu signal table as shown in the figure above ...

Page 17: ...ore connecting the cables Installation Connecting to audio equipment Cables used for connection Cables are not supplied with the projector Audio cable External audio equipment Audio cable Audio cable Stereo Audio output Audio input Stereo Audio cable Audio output Audio cable Stereo Audio cable Stereo Audio IN ...

Page 18: ...ower being supplied consult service station Connect the projector with all peripheral equipment before turning it on Connect the AC power cord supplied to the projector The AC outlet should be near this equipment and must be easily accessible Note Note on the power cord AC power cord must meet the requirements of the country where you use the projector Confirm the AC plug type with the chart below...

Page 19: ...ector Caution Do not drop the lens when handling Installing the lens Remove the lens decorator Align the red point on the lens with that on the projector to install the lens Rotate the lens clockwise slowly until it clicks Make sure that the lens is the projector Caution While installing the lens do not hold the release button Notes on lens installation Do not touch or remove any part except lens ...

Page 20: ...When the display function is set to be Off the logo and countdown will not be displayed on the screen During the countdown period all operations are invalid except shutdown Enter a PIN code Select a number by pressing the buttons and then press the button to fix the number and move the cursor The number changes to If you fixed an incorrect number move the cursor to the number you want to correct b...

Page 21: ...ector and let it stand for about an hour in every 24 hours Note When the On start function is On this projector is turned on automatically by connecting the AC power cord to an AC outlet p 44 The running speed of cooling fans is changed according to the temperature inside the projector Do not put the projector in a case before the projector is cooled enough If the WARNING indicator flashes or emit...

Page 22: ... menu button on the side control or the S MENU button on the remote control again to quit the shortcut menu Or press the SELECT button again to show the full menu Full menu Press the menu button on the side control to display the shortcut menu and then the SELECT button again to show the full menu Or you may directly press the F MENU button to show it Press the buttons to select an entry in the ma...

Page 23: ...ns are available Contrast Brightness Color temp Red Green Blue Sharpness and Gamma If video equipment is selected as a signal source the following image adjusting options are available Contrast Brightness Color T i n t Red Green Blue Sharpness Gamma Noise reduction and Progressive 5 Input menu Used to select input source HDMI DVI Computer 1 Computer 2 Component Video 1 Video 2 S Video RGBHV or SCA...

Page 24: ...tortion The maximum shift range is 50 vertically and 10 horizontally 3 Push SHIFT on the control panel or LENS of the remote control and hold on for at least 5 seconds to reset the lens to the center Note when the lens is in unshifted the arrows turn green when the lens is shifted the arrows turn yellow when the lens reaches its maximum shift range the arrows turn red Zoom adjustment 1 Push ZOOM o...

Page 25: ...UME buttons on the side control or on the remote control to adjust the volume Remote control Mute Press the MUTE button on the remote control and select ON to turn off the sound temporarily To restore the sound to its previous level press the MUTE button again or press the VOLUME buttons Mute function is also effective for AUDIO OUT jack Volume button Sound menu Full menu operation 1 Press the F M...

Page 26: ...t button to select an input source FREEZE button Press the FREEZE button to freeze the picture on the screen To cancel the Freeze function press the FREEZE button again or press any other button D ZOOM button Press the D ZOOM button and use the buttons to access the digital zoom mode LAMP button Press the LAMP button to select the lamp mode to change the brightness of the screen Normal Normal brig...

Page 27: ...the screen and the timer starts to count time 00 00 59 59 To stop the Timer press the TIMER button Press the TIMER button again and then the Timer display disappears Timer display IMAGE button Press the IMAGE button on the remote control to select your required image mode SCREEN button Press the SCREEN button on the remote control to select your required screen mode LENS button Press the LENS butt...

Page 28: ...and press the button or SELECT button Press the buttons to select Computer 1 or Computer 2 and then press the SELECT button COMPUTER button F MENU button Component S Video Video1 Video2 RGBHV Input source selection RGBHV Direct operation Press the INPUT button on the side control or the RGBHV button on the remote control to select RGBHV Remote control RGBHV button F MENU button HDMI Computer 1 Com...

Page 29: ...te control HDMI DVI button F MENU button HDMI Computer 1 Computer 2 DVI RGBHV SCART Component S Video Video1 Video2 DVI Input menu Full menu operation 1 Press the F MENU button to display the full screen menu Use the buttons to select the input source icon and press the button or SELECT button 2 Press the buttons to select DVI and then press the SELECT button HDMI DVI Computer 1 Video 2 RGBHV SCAR...

Page 30: ...nnot recognize the signal beyond the signal format table Auto is displayed on the PC System Menu icon and the Auto PC Adjustment function works to display proper images If images are not projected properly adjust manually There is no signal input from computer Check the connection between your computer and projector Selecting computer system manually The system can also be selected manually 1 Pres...

Page 31: ...ect AUTO PC Adjustment and then press the SELECT button To store the adjusted parameters The system parameters adjusted in the Auto PC Adjustment can be stored in the projector Note Total dots and horizontal vertical positions of some computers cannot be fully adjusted with this Auto PC Adjustment function When the image is not provided properly with this operation manual adjustments are required ...

Page 32: ... Vertical Press to adjust the vertical position of the image Clamp Press to adjust the clamp position When black strips appear on the image you can use this function Display area H Press to adjust the area of horizontal projection Display area V Press to adjust the area of vertical projection Reset To re set the adjusted data you should select the initial state and then press Select Click Yes when...

Page 33: ... image mode Multiple grey scales can be selected and it suits for watching movies This mode can be used to project the image on a green board to enhance the image quality It mainly functions on a green board not black board This mode is suitable for projecting the image onto the red blue yellow or green wallpaper This is the image mode pre set by in the image adjustment menu Remote control Key for...

Page 34: ...e High Mid and low Red Press to make the red color lighter and press to make it stronger Green Press to make the green color lighter and press to make it stronger Blue Press to make the blue color lighter and press to make it stronger Sharpness Press to soften the image and press to sharpen it Gamma Press to adjust the grey level to achieve better contrast and balance Note After white balance red ...

Page 35: ...ontal verticalposition of the screen Common Usethis item tosave input adjustedproportion When you press Select at this item a dialog box will pop up for confirmation To save theproportion press Select at Yes If you select self definition the system will use the saved proportion Reset This item allows you to re set the adjusted values In the initial state press Select and a dialog box will pop up f...

Page 36: ...ect Component Select Component if the input source is a video device connected to Y Cb Pb and Cr Pr through the component VGA cable Video Select Video when input video signal is connected to VIDEO terminal S video Select S video when input video signal is connected to the S video SCART Select SCART if the input source is a video device connected to SCART IN COMPUTER IN through the SCART VGA cable ...

Page 37: ...SECAM NTSC NTSC4 43 PAL M PAL N if can t reproduce the image you should select a specific signal format from PAL SECAM NTSC NTSC 4 43 PAL M and PAL N Component Auto can automatically detect the input video system and optimize its own state Component video signal format If can t reproduce the image you should select a specific component video signal format from 480i 575i 480p 575p 720p 1035i and 10...

Page 38: ...ge mode Improved half tone lifelike image mode Blackboard Green This mode can be used to project the image on a green board to enhance the image quality It mainly functions on a green board not black board Colorboard This mode is suitable for projecting the image onto the red blue yellow or green wallpaper This is the image mode pre set by in the image adjustment menu Remote control Key for select...

Page 39: ...lance Green Press to make the green color lighter and press to make it stronger White balance Blue Press to make the blue color lighter and press to make it stronger Sharpness Press to soften the image and press to sharpen it Gamma Press to adjust the grey level to achieve better contrast and balance Noise reduction Enable this item to reduce the snow interference and achieve more smooth and clear...

Page 40: ...l Zoom Wide Natural wide Custom Screen Exit Move Next Screen Menu AV Input Next Custom This item can help users manually adjust the proportion and position of the screen When this item is selected press The indication of self definition will appear on the screen You can press to select the items to be adjusted Scale H V To adjust the horizontal vertical proportion of the screen H V When this item ...

Page 41: ... the desired item and then press Select OSD language OSD languages include English Chinese French Spanish Portugal German Italian Japanese Korean Russian Finnish Dutch Thai Vientnamese Turkish Afrikaans Bahasa Indonesia Arabic OSD setting Press to select OSD setting then press Select or Menu position You can use this function to change the position of on screen menu To do that select menu position...

Page 42: ...ollo control Settings for those ws Keystone Correction This function is used to store or reset the keystone correction when the AC power cord is unplugged Use the Point buttons to switch between each option Store Keep the keystone correction even when the AC power cord is unplugged Reset Release the keystone correction when the AC power cord is unplugged To correct keystone distortion press the SE...

Page 43: ...Select Capture and press the SELECT button A confirmation box appears and select Yes to capture the projected image After capturing the projected image go to the Logo select function and set it to User Then the captured image will be displayed the next time you turn on the projector This function prevents an unauthorized person from changing the screen logo Off The screen logo can be changed freel...

Page 44: ...go PIN code can be changed to your desired three digit number Press the SELECT button to select Logo PIN code change Logo Pin code dialog box appears use the Point buttons to enter the correct code The New Logo PIN code input dialog box appears Set a new Logo PIN code confirmation box appears choose yes to set the new Logo Pin code Be sure to note the new Logo PIN code and keep it on hand If you l...

Page 45: ...he POWER indicator changes to green blinking In this condition the projection lamp will be turned on if the input signal is reconnected or any button on the top control or remote control is pressed Shut down When the lamp has been fully cooled down the power will be turned off Off Power management function is off Timer If the input signal is interrupted and no button is pressed for more than 30 se...

Page 46: ...to The system must be set on NTSC or Auto in Video System Selection P 36 The icon of Closed Caption is displayed in gray while it is not available The Closed caption is unavailable when On Screen menu and Timer are displayed This function allows you to change brightness of the screen Normal Normal brightness Eco Lower brightness reduces the lamp power consumption and extends the lamp life Lamp Con...

Page 47: ...mber you want to correct and then enter the correct number Repeat this step to complete entering a three digit number After entering the three digit number move the pointer to Set Press the SELECT button so that you can start to operate the projector If you entered an incorrect PIN code PIN code and the number will turn red for a moment Enter the correct PIN code all over again Use the Point butto...

Page 48: ...function in the Setting menu Choose the running speed of cooling fans from the following options according to the ground elevation where you use the projector Off Normal speed Set this function to Off when using the projector in non high altitude environment High land This function is used to set a frequency for the filter cleaning When the projector reached a specified time between cleanings a Fi...

Page 49: ...put signal is displayed in KHz or KHz when no signal The vertical frequency of the input signal is displayed in Hz or Hz when no signal Numbers of Hz doubles when during Interlace The cumulative lamp operating time is displayed Press menu on theTop Control and then press SELECT button to display on screen menu Press the Point buttons to select the Information The Information Menu is displayed See ...

Page 50: ... site where installed is well ventilated and whether the vent is blocked Whether installed near the vent of air conditioner Note it can not be installed at that place Whether the filter is clean You should clean it regularly Projector is in OFF state and Warning TEMP indicator is illuminated red When any abnormity is detected The projector will be automatically powered off to protect its internal ...

Page 51: ... steps below 1 Turn off the projector and unplug the AC power cord from the outlet 2 Remove the air filter from the projector 3 Brush the filter clean 4 Install the filter onto the projector again and make sure it is secured properly Note Do not operate the projector when the filter is removed Otherwise dust will be accumulated on lens and thus affect the image quality Never attempt to place any o...

Page 52: ... to clean the lens Avoid excessive use of cleaning agent Abrasive cleaning agent solvent or other coarse chemicals may scratch the lens Cleaning the projector s shell Unplug the AC power cord before cleaning Use a piece of clean cloth to gently wipe the surface of projector If the projector is quite polluted you can apply some neutral cleaning agent onto a piece of clean cloth and use it to wipe t...

Page 53: ...hould stand beside the lamp cover but not under it for the broken glass may falldown to hurt you To do that remove the lamp cover gently to avoid being hurt by the dropped glass If glass drops into your eyes or mouth you should see the doctor immediately Note Note As temperature inside the projector is high you should cool the projector for at least 45 minutes before you open the lamp cover For th...

Page 54: ...ghted may increase the risk of lamp explosion A Lamp may explode as a result of vibration shock or degradation as a result of hours of use as its lifetime draws to an end Risk of explosion may differ according to the environment or conditions in which the projector and lamp are being used IF A LAMP EXPLODES THE FOLLOWING SAFETY PRECAUTIONS SHOULD BE TAKEN If a lamp explodes disconnect the projecto...

Page 55: ...put signals are automatically switched can t be switched Adjust the search function of input source properly When input is pressed during startup a non Lamp icon appears This icon warns that the filter needs to be replaced An icon of non input mode or lamp mode appears This icon indicates the replacement of lamp or warns for the filter Ambiguous images Adjust the focus Set a more proper projection...

Page 56: ...tor will be disconnected Is there any image projected Only when the image appears on the screen can the sound be heard Abnormal color Check the input signal color system video system or PC system mode Make sure the green board is not selected in the item image quality Some information can t be seen in the operation Check the function of displaying Automatic adjustment through PC can t be effective...

Page 57: ...minated or flashes Check the state of the projector according to the indicator Excalmatory point appears on the screen Ineffectiveoperation You should operate the system correctly The side control panel doesn t work Unlock the keys on the side control panel through the item security in the setup menu PIN code lock for startup animation key lock and PIN code lock can t be unlocked Contact the local...

Page 58: ... too high can t be powered on When the projector is cool enough the temperature is restored to the normal value and the power indicator is illuminated red you can then power on the projector The indicator Warning Temp keeps on flashing When the projector is cool enough the temperature is restored to the normal value and the power indicator is illuminated red you can then power on the projector At ...

Page 59: ...5 1024x768 65 1280x800 85 1024x768 70 1280x800 120 1024x768 72 1080psf24 1920x1080 1920x1200 24 1024x768 75 1080psf25 1920x1080 25 1024x768 80 1080psf30 1920x1080 30 1024x768 85 480i 60 1024x768 120 575i 50 1152x864 70 480p 60 60 1035i 60 575p 50 1080i 60 720p 50 1080i 50 720p 60 SXGA VGA SVGA Appendix Compatible PCs Is compatible with all analog and digital signal formats under 160MHz of DCLK who...

Page 60: ...its 8 bits Parity None Stop bits 1 Flow control None RS232 cross cable is applied RS232 Commands SPEC 1 1 Port Setting 1 2 Wiring PC COM D Sub 9 Pin D Sub 9 Pin Projector Control Port 1 Connection 1 2 3 4 5 6 7 8 9 1 2 3 4 5 6 7 8 9 CD SG RXD TXD DTR DSR RTS CTS RING RXD TXD SG RTS CTS N C N C N C N C ...

Page 61: ...n projector is in standby mode OK ACK CR Return NG CR Command A01 CR Hex Ox41 0x30 0x31 0x0d Details Power OFF immediately OK ACK CR Return NG CR Command A02 CR Hex Ox41 0x30 0x32 0x0d Details Power off displays for the command resend the command to power off the projector OK ACK CR Return NG CR Command A05 CR Hex Ox41 0x30 0x35 0x0d Details Change the input to Computer1 OK ACK CR Return NG CR 2 1...

Page 62: ... Details Change the input to Component OK ACK CR Return NG CR Command A33 CR Hex Ox41 0x33 0x33 0x0d Details Change the input to Video OK ACK CR Return NG CR Command A34 CR Hex Ox41 0x33 0x34 0x0d Details Change the input to S Video OK ACK CR Return NG CR Command A36 CR Hex Ox41 0x33 0x36 0x0d Details Change the input to HDMI OK ACK CR Return NG CR NB ACK CR is the effective return for commands re...

Page 63: ... interface will flash continuously Operation procedures 1 Turn on the projector 2 Obtain network address DHCP set is displayed as on and obtain network address automatically If familiar with network you can set DHCP as close and obtain network address manually 3 Enter network settings menu 1 Press MENU button of the remote or press MENU button of the projector first and then SELECT The MENU will d...

Page 64: ... the IP address obtained by step 4 into the address bar figure 6 Format http IP address figure 3 LAN DHCP ON IP Address Subnet Gateway DNS set cancel Network Setting LAN DHCP ON IP Address Subnet Gateway DNS set cancel Network Setting 6 Set the corresponding items of the projector by the website Standby on off PCAdj PC adjustment Screen adjustment of screen size Image adjustment of image mode Imag...

Page 65: ...ineffective Factory default PIN code 111 Factory default PIN code 111 Locking startup animation PIN code Configuration of terminals OMPUTER IN 1 COMPUTER IN 2 MONITOR OUT analog Terminal Analog RGB D sub 15 pin CONTROL PORT terminal D SUB 9 Pin LAN terminal Red Input output Green Input output Grounding field synchronizing Blue Input output Grounding DDC data Grounding line synchronizing Horizontal...

Page 66: ...parts Optical parts PCB assembly Body Other parts Remote control Accessories Cable It means that contents of hazardous substancesin all homogeneous materials in this part don t exceed Required Limitations specified in SJ T11363 2006 It means that contents of hazardous substances inat least one homogeneous material in this part exceed Required Limitations specified in SJ T11363 2006 Unit mm Screw h...

Page 67: ...Only qualified sales personnel or repair engineers are permitted to install or replace the lens To avoid injury never attempt to install or replace the lens without permission When you need to lift or move do not grasp the lens for that purpose Otherwise the projector may be seriously damaged To sales personnel and repair engineers For information on installation and replacement of lens please ref...

Page 68: ......

Reviews: