


8.
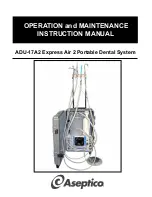
CAVITRON
CONNECTOR
Fig. 7 - Handpiece Controls - RH
B. Depress the Foot Pedal: The handpiece will
activate. The Syringe, HVE, and Saliva Ejector will
remain operational.
3. Depress the foot pedal to operate the handpiece. Set
the Handpiece High/Low switch to the desired position.
For the High speed, adjust the air pressure and water
coolant flow to the desired settings. (Turn the water
coolant control knob
clockwise to decrease flow
, or
counterclockwise to increase flow
.) For the Low speed,
adjust the air pressure to the desired setting. (See
Figs. 6 & 7)
4. Use the 3-Way Air/Water Syringe as necessary for
irrigation or drying.
5. Adjust the vacuum pressure by moving the valves on
both the HVE and saliva ejector vacuum heads.
6. Empty the Vacuum Waste Tank when it is 3/4 full.
STERILIZATION AND MAINTENANCE:
Because of its simple design, the Aseptico ADU-17A2 Express
Air 2 requires very little maintenance. Any maintenance that is
needed can be performed in minutes.
BLEEDING THE SYSTEM
If the unit will not be used for an extended period of time, or the
unit might be subjected to freezing conditions, you should bleed
the system. Simply empty the contents of the water supply tank
and install the tank back into the cap. Operate the air/water
syringe and handpiece with water coolant ‘ON’ until just air
comes through the water line. Pack unit and store as normal.
HANDPIECE FLUSH
Flush the handpiece for about 5 seconds after every patient, and
about 20 seconds at the beginning of each day.
GENERAL CLEANING
The external surfaces of the case should be cleaned using a
soft cloth moistened with a mild detergent solution. Any external
surfaces of the unit that are contacted during use should be
wiped down with a soft cloth moistened with a disinfectant at the
beginning of each day and between each patient use.
WATER LINES
Disinfect the water lines weekly. Prepare a 1:10 bleach solution
(1 part household bleach to 9 parts water). Remove water
reservoir and discard residual water. Replace empty water
supply tank and air purge all waterlines. Fill water supply tank
with bleach solution. Run bleach solution through all lines. Allow
bleach solution to stand in lines for 10 minutes. Remove water
supply tank and discard bleach.
Flush water supply tank and
all lines thoroughly with clean water
. Air purge and leave lines
dry until next clinical use.
VACUUM SYSTEM
The HVE and Saliva Ejector Valves are fully autoclavable.
Remove the valves from the hoses before autoclaving. The
vacuum hoses should not be autoclaved. Clean hoses with
a disinfectant solution.
CAUTION
: Use only NON-foaming
cleansers in the vaccum lines.
SYRINGE TIPS
The ADU-17A2 unit features a three-way air/water syringe with
quick-change autoclavable tips. To remove a tip, press on the
locking collar surrounding the tip socket and pull the used tip
straight out of the socket
(see Fig. 8). To insert a
new tip, press locking
collar and push tip into
socket as far as it will
go. Release collar and
gently tug on tip before
using to ensure that tip
is securely locked into
socket.
Syringe Tip Sterilization:
1. Remove contaminated syringe tip.
2. Remove all visible signs of contamination before
autoclaving.
3. Autoclave tip at 132° C (270° F) for ten minutes.
4. Sterilize between each patient use.
NOTE:
Since only the tips can be autoclaved, it is recommended
that the Air/Water Syringe be bagged with a disposable, single-
use plastic sleeve between each patient use.
This device requires periodic maintenance to remove dust in and
around the compressor every 12 months or if accumulations are
seen. The fan on the unit vents air from inside the device to the
outside. With the unit operating, use compressed air to spray
into the intake vents and blow dust out of the unit.
DEPRESS LOCKING
COLLAR
FIG. 8