Aruba Instant On AP22 Installation Manual Download Page 5

Aruba Instant On AP22 Access Point 

| Installation Guide

5

The following sections provide instructions on how to use this mount bracket.

Installing the Access Point to a Ceiling Tile Rail

1. Pull the necessary cables through a prepared hole in the ceiling tile near where the access point will be 

placed.

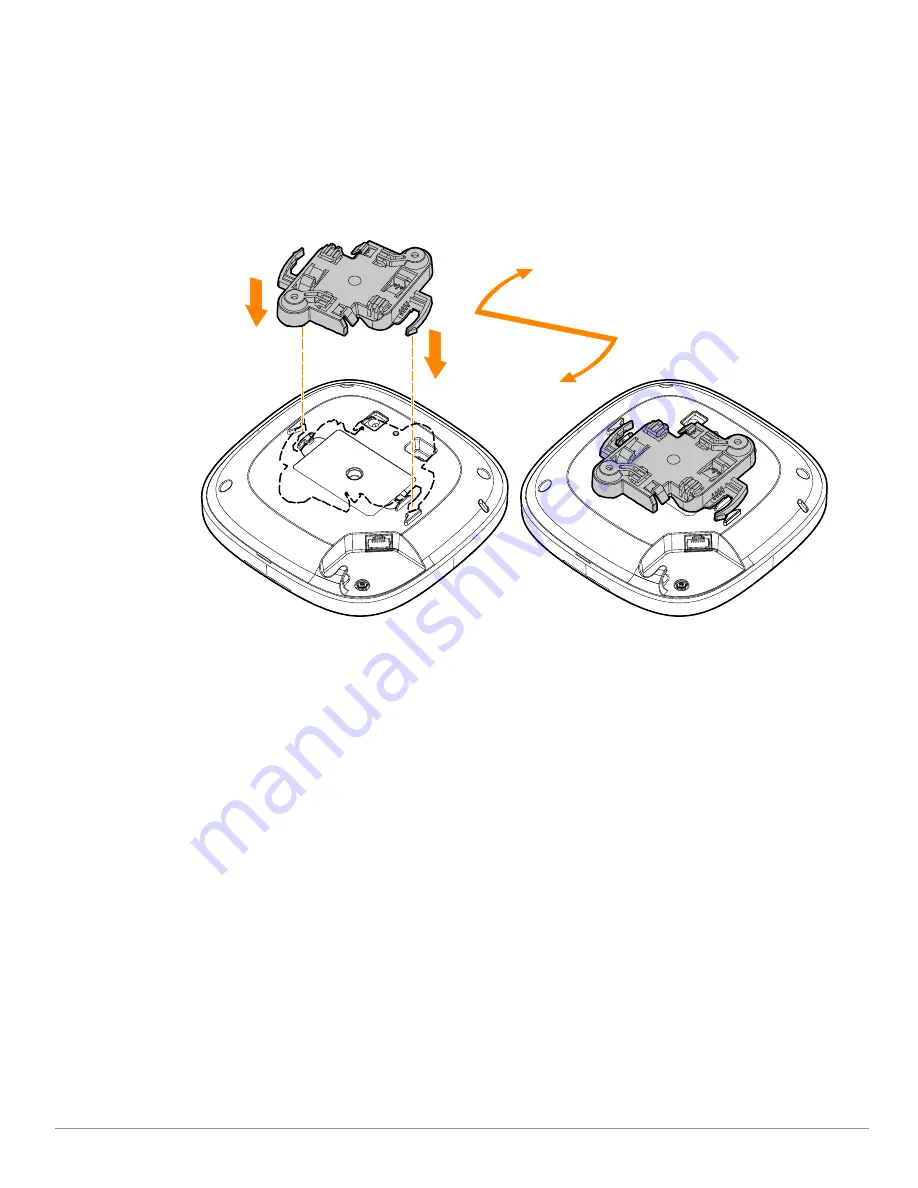
2. Place the mount bracket against the back of the access point with the mount bracket at an angle of 

approximately 30 degrees to the tabs (see 

Figure 4

).

3. Twist the mount bracket clockwise until it snaps into place in the tabs (see 

Figure 4

).

Figure 4  

Attaching the Mount Bracket to the AP

4. Hold the access point next to the ceiling tile rail with the mounting slots at approximately a 30-degree angle 

to the ceiling tile rail (see 

Figure 5

 and 

Figure 6

). Make sure that any cable slack is above the ceiling tile.

5. Pushing toward the ceiling tile, rotate the access point clockwise until the device clicks into place on the 

ceiling tile rail.

Summary of Contents for Instant On AP22

Page 1: ...s services Package Contents 1 x AP22 access point 1 x Mount bracket 1 x Ethernet cable Hardware Overview Figure 1 AP22 Front View If you have ordered AP22 bundle the package would also include a power...

Page 2: ...span injector or a network switch Kensington Lock Slot The AP22 access point is equipped with a Kensington lock slot for additional security Table 1 AP22 Access Point LEDs Status LED Color State Meani...

Page 3: ...hile the reset button is being held down 3 Release the reset button on the access point after 15 seconds Power If PoE is not available a proprietary Aruba power adapter can be used to power the AP22 a...

Page 4: ...ting ducts Make sure that access points are placed below ducts to avoid RF disturbances RF interference sources include Microwave ovens and other 2 4 or 5 GHz objects such as cordless phones Cordless...

Page 5: ...the mount bracket at an angle of approximately 30 degrees to the tabs see Figure 4 3 Twist the mount bracket clockwise until it snaps into place in the tabs see Figure 4 Figure 4 Attaching the Mount...

Page 6: ...g Rail Installing the Access Point to a Solid Surface 1 Attach the mount bracket to any solid surface such as a wall or hard ceiling as shown in Figure 7 a Install any necessary wall anchors Wall anch...

Page 7: ...tach the access point to the secured mount bracket as shown in Figure 8 a Align the access point with the mount bracket placing the access point so that it s mounting tabs are at an angle of approxima...

Page 8: ...rubaInstantOn com in the address bar to access the Aruba Instant On portal login screen In the login screen enter your Instant On account credentials to access your site Figure 9 Instant On Portal Log...

Page 9: ...ceiver Connect the equipment to an outlet on a circuit different from that to which the receiver is connected Consult the dealer or an experienced radio or TV technician for help Industry Canada This...

Page 10: ...tes 1 ce p riph rique ne doit pas provoquer d interf rences et 2 ce p riph rique doit accepter toute interf rence y compris les interf rences susceptibles de provoquer un dysfonctionnement En cas d ut...

Page 11: ...n no deseada Morocco This device is intended for indoor use in professional healthcare facilities This device has no IEC EN60601 1 2 essential performance Use of this equipment adjacent to or stacked...

Page 12: ...1 2 3 MPE 1 mW cm2 0 18mW cm2 Ukraine Hereby Hewlett Packard Enterprise Company declares that the radio equipment type APIN0505 is in compliance with Ukrainian Technical Regulation on Radio Equipment...

Page 13: ...ears following the date of the final distribution of this product version by Hewlett Packard Enterprise Company To obtain such source code send a check or money order in the amount of US 10 00 to Hewl...

Reviews: