background image

64

CUSTOMIZING SETTINGS

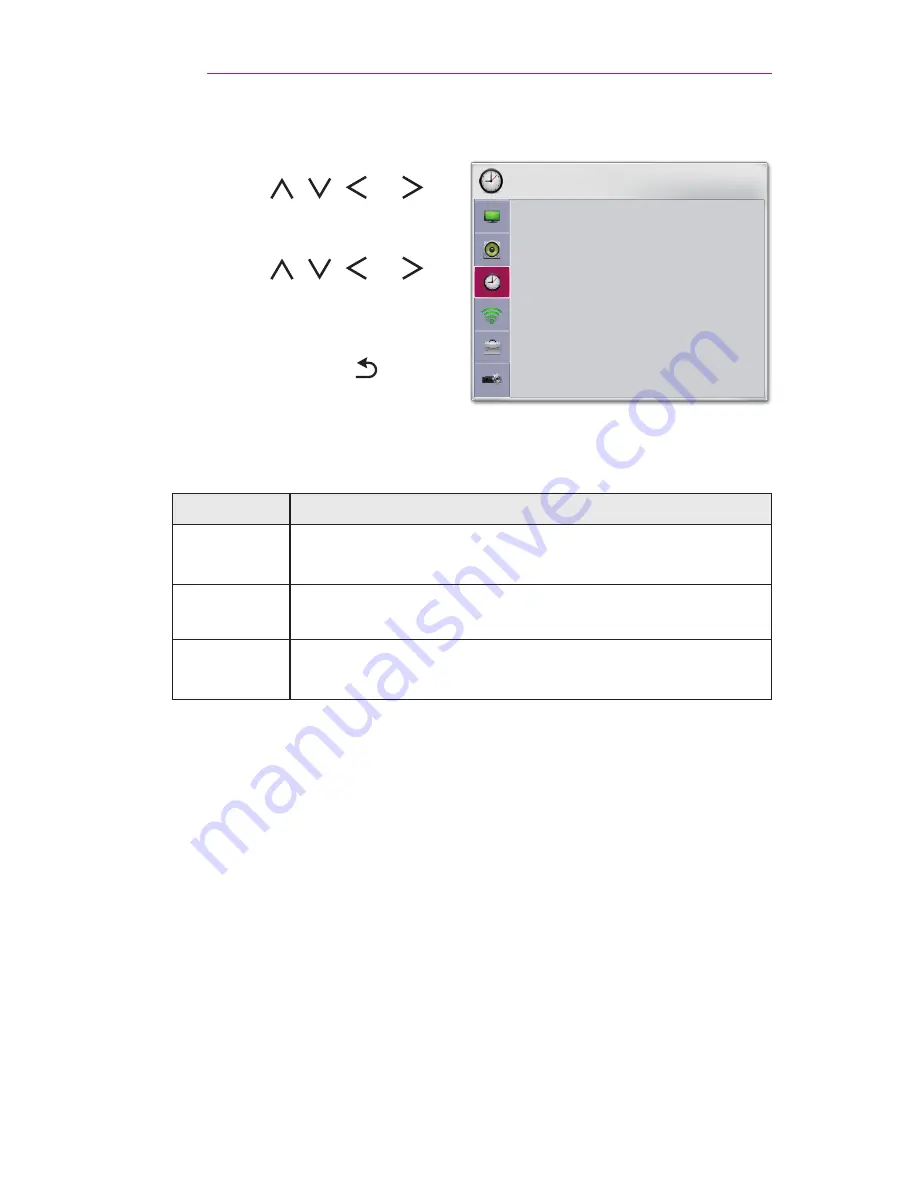
TIME Settings

1 

Press the 

SETTINGS

 button.

2 

Use the   ,   ,   , or   

button to select 

TIME

 and press 

the 

OK

 button.

3 

Use the   ,   ,   , or   

button to set up the desired item 

and press the 

OK

 button.


-

To return to the previous 

menu, press the   button.

4 

Press the 

EXIT 

button when 

completed.

TIME

 •

Sleep Timer   

: Off

 •

Auto Off 


: 60 min.

 •

Automatic Standby  : 4 hours

ꔂ Move      ꔉ OK


The available time settings are described as follows.

Menu

Description

Sleep 

Timer

Turns off the Projector after a preset number of minutes.
To cancel the 

Sleep Timer

, select 

Off

.

Auto Off

If there is no input signal or button press, the projector 

automatically turns off after the preset time has elapsed. 

Automatic 

Standby

Turns off the projector automatically after a set period of 

time if there is no button input on the projector.

Summary of Contents for Flare100

Page 1: ......

Page 2: ...nt DivX DivX Certified and associated logos are trademarks of DivX LLC and are used under license Covered by one or more of the following U S patents 7 295 673 7 460 668 7 515 710 7 519 274 The terms...

Page 3: ...t may be of sufficient magnitude to constitute a risk of electric shock to persons The exclamation point within an equilateral triangle is intended to alert the user to the presence of important opera...

Page 4: ...in fire or electric shock Do not allow a tablecloth or curtain to block the air vent This may result in fire due to the increase in the internal temperature Ensure good ventilation around the project...

Page 5: ...his may result in fire due to the power outlet overheating Keep the AC adapter power plug and the used power outlet clean from dust or foreign materials building up This may result in fire If there is...

Page 6: ...cord which is provided with the product Do not use other power cords This may result in fire or electric shock If any water or foreign materials have gone into the AC adapter power cord or the interi...

Page 7: ...k of electric shock Do not look directly into the lens when the projector is in use The bright light may damage your eyes When the lamp is on or has just been turned off avoid touching the air vent or...

Page 8: ...l length of the screen If you watch the screen at a close distance for a long time your eye sight may become worse Do not block the light beam emitted from the projector using a book or other object L...

Page 9: ...n electric shock Others WARNING When you go out place the projector out of reach of animals and remove the power plug from the wall outlet Using a damaged power cord may result in short circuit or fir...

Page 10: ...e product CAUTION Do not use or store the projector outdoors for long periods of time Be sure to unplug if the projector is not to be used for a long period Accumulated dust may result in fire or elec...

Page 11: ...er than 60 C or in high humidity This may result in explosion or fire Make sure that the battery is connected correctly This prevent explosion or fire Incorrect battery replacement may cause fire Make...

Page 12: ...1 Projection Distance per Screen Size 22 How to Install the Projector On a Tripod 23 Kensington Security System 24 REMOTE CONTROL 25 USING THE PROJECTOR 27 Using The Battery 27 Battery using time info...

Page 13: ...57 SETTINGS 57 PICTURE Settings 58 AUDIO Settings 63 TIME Settings 64 WIRELESS 65 OPTION 1 Settings 66 OPTION 2 Settings 67 CONNECTING DEVICES 69 Connecting HD Receiver DVD Player or VCR Player 70 HD...

Page 14: ...Owner s Manual Owner s Manual CD AC DC Adaptor Power cord When connecting an HDMI or USB cable or connecting a USB flash drive to the HDMI or USB port use a product that has a width of 18 mm or less...

Page 15: ...nal accessories visit an electronics store or online shopping site or contact the retail store where you purchased the product Optional accessories are subject to change without prior notice Projectio...

Page 16: ...blue or green that continuously appear on the projector screen This is a normal result of the manufacturing process and does not indicate a malfunction Main Unit Lens2 Vent1 Focus Ring Vent1 Speaker...

Page 17: ...17 PREPARATION Side 1 2 No Description 1 DC IN Port 2 Battery Charge Indicator Red Charging Green Charging complete...

Page 18: ...rt 2 Port 3 Switch OFF Turns the projector off completely ON Turns the projector on and the projector goes into Standby mode Place the switch to OFF when you move the projector or when you intend not...

Page 19: ...lease it However if the Menu button is on the screen pressing and holding the joystick button will let you exit the Menu Volume Control Place your finger over the joystick button and move it left or r...

Page 20: ...e desired menu item and then press the joystick button once to select it Close Projector off Turns the power off Input List Changes the input source Close Clears on screen displays and returns to proj...

Page 21: ...or more around the projector Do not install the projector in a hot or humid environment Only install the projector in a place of moderate temperature and low humidity Do not install the projector in a...

Page 22: ...Keystone function See page 32 4 Connect the power cords of the projector and the connected devices to the wall outlet Ratio of upward projection 100 X 2 X 2 Projection Distance D Screen Height X Scree...

Page 23: ...e maximum allowed size it may damage the projector Bottom of the Projector The projector is connected to this part Tripod Bolt used to attach the projector to the tripod If you are using a tripod be c...

Page 24: ...le as shown below For more information on installation and use of the Kensington Security System refer to the user s guide provided with the Kensington Security System The Kensington Security System i...

Page 25: ...tor on or off MUTE Mutes the sound of the projector INPUT Changes the input source VOLUME Adjusts the volume level PAGE Moves to the previous next page PICTURE Changes the picture mode BLANK Turns the...

Page 26: ...tons Sets detailed settings or gesture for each menu When using the remote control the optimal operation range is 3 meters or less left right and within a 30 degree arc of the remote control IR receiv...

Page 27: ...ery is low the projector will be turned off in a minute If the screen shows a low battery message be sure to charge the battery Battery using time information Status Time and Display Charging About 3...

Page 28: ...eriod of use and user preferences As the battery is consumable its lifetime gradually decreases When the battery s life is reduced by half replace it with a new battery from your dealer or Service Cen...

Page 29: ...the switch on the rear port area to ON and press the POWER button on the joystick or on the remote control If the switch is placed to OFF the projector will not turn on 3 On the Language Selection scr...

Page 30: ...ect the input signal you want 3 Control the projector using the following buttons while watching the screen Button Description VOLUME Adjusts the volume level MUTE Mutes the sound of the projector Q M...

Page 31: ...ure in the same aspect ratio as the original image 4 3 Displays the screen with a 4 3 aspect ratio Zoom Enlarges an image to fit the screen width The top and bottom of the image may be truncated Use t...

Page 32: ...K button 3 Use the buttons to select Keystone and press the OK button 4 Use the buttons to adjust Keystone 5 Keystone can be adjusted from 40 to 40 6 Press the OK button when finished Changing input d...

Page 33: ...tion This function may be effective when you need to draw attention during a meeting or training 1 Press the BLANK button and the screen is covered by the background color You can change the backgroun...

Page 34: ...button to select a menu and press OK button Menu Description Aspect Ratio Resizes the picture PJT Mode Turns the projected image upside down or flips it horizontally Picture Mode Changes the picture m...

Page 35: ...compatible with SCREEN SHARE However other versions of Windows and some other operating systems may not be compatible with SCREEN SHARE Ice Cream Sandwich Jellybean and KitKat versions of LG s Android...

Page 36: ...lash drive as shown below USB flash Drive Removing a USB Device 1 Press the Q MENU button 2 Use the or button to move to USB Device and press the OK button 3 Select a USB to remove Wait for confirmati...

Page 37: ...ge of less than 5 V and a rated current of less than 500 mA It is recommended to use a USB hub or hard disk drive with power supplied If the power supplied is not enough the USB storage device may not...

Page 38: ...s generated from DivX6 Video Supported Codec Maximum resolution 1920 x 1080 30p only Motion JPEG 640 x 480 30p Extension Codec asf wmv Video VC 1 Advanced Profile VC 1 Simple and Main Profiles Audio W...

Page 39: ...0 kbps Sampling Rate 32 kHz 44 1 kHz 48 kHz MPEG Bit rate 32 kbps to 448 kbps Sampling Rate 32 kHz to 48 kHz AAC HEAAC Bit rate 24 kbps to 3844 kbps Sampling Rate 8 kHz to 96 kHz CDDA Bit rate 1 44 Kb...

Page 40: ...tle files should be placed in the same folder For subtitles to display correctly the video and subtitle files must have the same name We do not support any stream that contains GMC Global Motion Compe...

Page 41: ...TORAGE DEVICE Page 1 1 Page 1 1 Drive1 Drive5 Drive3 Drive4 Drive2 PAGE Page Change Movie List Sheba_ 01 34 33 Go to root folder Go to upper folder Exit 1 2 4 5 6 7 8 9 3 No Description 1 Thumbnails A...

Page 42: ...playback Pauses the media player If no button is pressed on the remote control for 10 minutes after pausing the playback is restarted Displays in slow motion Whenever this button is pressed the playb...

Page 43: ...audio track Subtitle Language The subtitle can be turned on or off Language One of any of the available languages can be selected Code Page A character set used for a subtitle can be selected By defau...

Page 44: ...button to move to Registration and press the OK button You must register your device to play DivX R protected videos Registration Code XXXXXXXXXX Register at http vod divx com OK 3 Check the DivX Reg...

Page 45: ...utton 3 Select Yes No No Yes Yes Your device is already registered Are you sure you wish to deregister Deregistration code Deregister at http vod divx com Continue with registration What is DRM Digita...

Page 46: ...xel height Progressive 64 pixel width x 64 pixel height 1920 pixel width x 1440 pixel height Only JPEG files are supported Non supported files are displayed in the form of an icon An error message is...

Page 47: ...he OK button USB STORAGE DEVICE Page 1 1 Page 1 1 Drive1 Drive5 Drive3 Drive4 Drive2 PAGE Page Change Photo List Go to root folder Go to upper folder Exit 1 2 4 7 8 9 3 6 5 No Description 1 Thumbnails...

Page 48: ...d in the Option Set Photo View menu BGM You can listen to music while viewing photos in full size Set the BGM in Option Set Photo View menu Rotates photos Rotates a photo 90 180 270 360 clockwise Phot...

Page 49: ...button to set up each item Set Photo View Item Description Slide Speed Selects a slideshow speed BGM Selects a music folder for the background music You cannot change the music folder while the backg...

Page 50: ...yer3 16 kHz 22 05 kHz 24 kHz Browsing Music List 1 Connect a USB storage device 2 Press the USB button 3 Use the or button to select Music List and press the OK button 4 Use the or button to select th...

Page 51: ...nt page Total no of file pages 7 Moves to the top level folder 8 Moves to the upper level folder 9 Exits Music List 5 Control playback by using the following buttons USB STORAGE DEVICE Page 1 1 Drive1...

Page 52: ...K button to make the playback bar appear Exit Returns to the Music List screen Options for Music List 1 Press the Q MENU button 2 Use the or button to move to a desired option and press the OK button...

Page 53: ...ferent from what is displayed on a PC For documents that include images the resolution may look lower during the realigning process If the document is large or has many pages it may take longer to loa...

Page 54: ...DEVICE Page 1 1 Page 1 1 Drive1 Drive5 Drive3 Drive4 Drive2 PAGE Page Change File List DOC Butterfly_ 06 09 2014 Go to root folder Go to upper folder Exit 1 3 6 7 8 2 5 4 No Description 1 File List 2...

Page 55: ...ress the OK button and then use the Up Down Left Right buttons to move to Go Page or Zoom Q MENU Go Page Zoom Option Hide Exit Item Description Go Page Moves to the page you want Use the Up Down Left...

Page 56: ...to display them The initial loading time is long but you can navigate pages quickly after loading is complete If a file is too large it may fail to load all the pages Image Quality You can set the qua...

Page 57: ...ton 4 Press the EXIT button when completed Menu Description PICTURE Adjusts the image quality for optimal viewing AUDIO Adjusts the sound quality and volume level TIME Sets time related settings WIREL...

Page 58: ...urn to the previous menu press the button 4 Press the EXIT button when completed Energy Saving Minimum Picture Mode Standard Contrast 100 Brightness 50 Sharpness 20 Color 55 Tint 0 R G PICTURE Move OK...

Page 59: ...ames on fast moving screens Expert1 Expert2 Menu for adjusting picture quality that allows experts and amateurs to enjoy the best projector viewing Expert mode is for picture tuning professionals to c...

Page 60: ...the range of colours that can be expressed Standard Displays the original colors of an input signal regardless of the display features Wide Makes use of the display s rich colors Skin Color Skin colou...

Page 61: ...on and hue accurately Color Temperature In Expert mode you can customize the options of each mode Gamma Select 1 9 2 2 or 2 4 a Method 2 Points Pattern Inner Outer Points Low High Red Green Blue The a...

Page 62: ...ellow Cyan Magenta The adjustment range is 30 to 30 each Depending on input signal or other picture settings the range of detailed items for adjustment may differ Picture Option Menu Description Noise...

Page 63: ...on 4 Press the EXIT button when completed AUDIO Sound Mode Standard Clear Voice II Auto Volume Off Move OK The available audio settings are described as follows Menu Description Sound Mode Sets the so...

Page 64: ...ep Timer Off Auto Off 60 min Automatic Standby 4 hours Move OK The available time settings are described as follows Menu Description Sleep Timer Turns off the Projector after a preset number of minute...

Page 65: ...SHARE displays the screen of the connected device You can check the SCREEN SHARE s ID Mode Group This is the Group setting for each device supporting the SCREEN SHARE feature When the wireless connec...

Page 66: ...ress the OK button To return to the previous menu press the button 4 Press the EXIT button when completed OPTION 1 Language DivX R VOD Initial Setting Move OK The available option 1 settings are descr...

Page 67: ...trapezoidal Keystone adjusts the top and bottom width of the image if the projector is not set at a right angle to the screen Auto Keystone Auto Keystone provides a rectangular screen image by automat...

Page 68: ...Power Makes the projector turn on automatically when the adaptor plug is inserted Item On When the AC DC plug is connected to the projector it turns on automatically Off When the AC DC plug is connect...

Page 69: ...DEVICES You can connect various external devices to the projector Computer Notebook Digital Device Headphone DVD Mobile Phone Video USB Games Console HDMI Page 70 USB Device Page 36 Headphone Page 71...

Page 70: ...put port of the device to connect Both video and audio are output at the same time Press the INPUT button on the remote control and select HDMI Optional Extras The table below shows examples of switch...

Page 71: ...71 CONNECTING DEVICES Connecting Headphones You can listen to the audio through a headphone Not provided...

Page 72: ...limport adapter To find out whether your device is MHL Slimport certified please contact your device manufacturer Optional Extras When you connect a mobile phone to the port you can see the mobile pho...

Page 73: ...s use an air spray or apply a small amount of cleaning agent onto a swab or soft cloth to lightly rub the lens Please be aware that liquid may flow into the lens if the product is sprayed directly ont...

Page 74: ...rol 3 m Power AC 100 240 V 50 60 Hz AC DC Adaptor 19 V 1 3 A Audio Output 1 W Height mm 42 7 without foot 43 7 with foot Width mm 107 6 Depth mm 102 8 Weight g 270 USB Device 5 V 0 5 A max Operation e...

Page 75: ...768 48 363 60 00 1152 x 864 54 348 60 053 1280 x 1024 63 981 60 02 1400 x 1050 65 317 59 979 1440 x 900 55 935 59 888 1600 x 900 60 000 60 00 1680 x 1050 65 3 60 If an invalid signal is input into the...

Page 76: ...ormation To obtain the source code under GPL LGPL MPL and other open source licenses that is contained in this product please visit http opensource lge com In addition to the source code all referred...

Page 77: ...The model and serial numbers of the projector are located on the back or on the side of the projector Record them below should you ever need service MODEL SERIAL...

Reviews: