background image

5

11.3

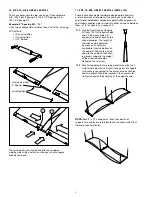
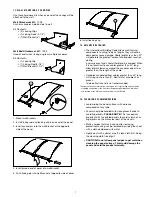
   Use two Single Hinge Linking Kits (item 7044) to link 

canopies end-to-end. Insert the Left Hinge into the 
extrusion on the end of one of the canopies. Insert the 
Right Hinge into the other canopy. Insert the Hinge Rod 
and lock components together by inserting the Circle Clip 
into the slot closest to the end of the extrusions.


Hinge Rod

Left Hinge

Circle Clip

Right Hinge

Extrusion

11.4

   Repeat at opposite side of end-linked canopies.  

This will be the same process for all hinge assemblies. 
The end of the Hinge Rod will always  
be flush with an extrusion.

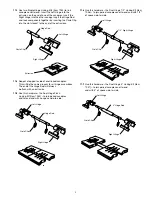
11.5

   Use this hardware – the Dual Hinge Flush  

Linking Kit (item 7045) – to join paired canopies  
end-to-end and with no space side-to-side.


Left Hinge

Hinge Rod

Right Hinge

Circle Clip


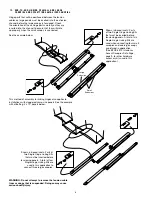
11.6

   Use this hardware – the Dual Hinge 1/2" Linking Kit (item 

7046) – to join paired canopies end-to-end and with 1/2" 
of space side-to-side. 


1/2" Right Hinge

Left Hinge

Circle Clip

Right Hinge

11.7

   Use this hardware – the Dual Hinge 3" Linking Kit (item 

7047) – to join paired canopies end-to-end  
and with 3" of space side-to-side.


3

n

 Hinge Rod

Left Hinge

Circle Clip

Right Hinge


Summary of Contents for INFUSIONS Accent Canopies Series

Page 1: ...after the tensioning cables have been installed Follow these guidelines for minimum distance from standard light sources Lamp Type Label Wattage Minimum Distance Halogen FL XL PAR 30 60 14 Incandescen...

Page 2: ...required for this operation with larger panels CAUTION Only use cables from Panel Kits for tensioning panels Cables from Kit 7004 7005 and 7010 shown in section 6 are only for hanging panels Hill and...

Page 3: ...Gripper Anchor Cap Bottom End Cable Adjuster Gripper Bottom End Assembly 4 Insert Top Cable into Bottom End Cable Adjuster and thread cable thru opening NOTE Gripper Structure Anchors have 1 4 20NC i...

Page 4: ...rmit attaching rows of end linked canopies side to side with either no space between them a 1 2 of space or a space of 3 11 1 Use the Dual Canopy Hanging Kit item 7041 at linked canopy ends A dual ass...

Page 5: ...e the same process for all hinge assemblies The end of the Hinge Rod will always be flush with an extrusion 11 5 Use this hardware the Dual Hinge Flush Linking Kit item 7045 to join paired canopies en...

Page 6: ...th offsetting 4 x 10 panels below WARNING Do not attempt to remove the tension cable from a canopy that is suspended Doing so may cause serious bodily injury Large Extrusion Small Extrusions Shown in...

Page 7: ...will generate the greatest amount of pendulum reaction during a seismic event and should therefore be avoided When it is not practical to use cables greater than 20 long allow lateral clearance aroun...

Page 8: ...ation and many other technical services call TechLine customer support at 1 877 276 7876 or FAX 1 800 572 TECH For the latest product selection and specification data visit armstrongceilings com infus...

Reviews: