Ariterm EKERUM Installation And Operating Instructions Manual Download Page 3

  PELLET STOVE KMP EKERUM / NEPTUNI

ARITERM SWEDEN AB


Installation Instructions - 

2011.08.19

 - 3

/24

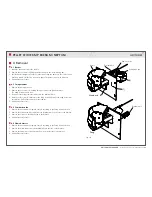
  Important points to note!

In order for the stove to function properly, the following rules must be followed.

•  The stove needs air in order to function, never close the supply air vent to the house. 


Note that there must be at least one air supply ventilator in the room where the stove is located.

•  The room temperature must exceed 5˚C for the thermostat to work. 
•  Your installer must adjust the stove in connection with commissioning and fill in the values in the 

warranty/proof of installation at the end of these user instructions. 

•  The store should be emptied periodically and the sawdust removed using a vacuum cleaner. 


Also test the safety switch by unlocking one of the filler hatches or the door during operation 


or start-up. The pellet feeder should then be stopped. 

•  We recommend removing the ash daily during the firing season, or each time pellets are filled. 

Remove ash through the door using the handle supplied. Lift out the burner from the burner 
housing and remove any ash from the ash box (unburned pellets must not be emptied into 


the ash box, there is a risk of them starting to smoulder).

•  After a period of operation the glass in the door becomes coated with ash dust and eventually 

becomes opaque. It should be wiped off from the inside using kitchen roll moistened with 


normal tap water, we recommend that this is done each time the pellets store is filled. 


(Wait until the glass has cooled). If the pane of glass becomes black and/or difficult to clean, see 

section 3.6.1.

•  Vacuum under the top panel’s soot hatch once between visits by the chimney sweep, the 


sweep normally comes twice a year. 

•  Sweep your stove once a week during the firing season. Sweeping is easily done by releasing and 

pulling the soot rakes backwards and forwards a few times. Slide them in and secure them again.

•  Vacuum the inside of the stove annually to keep the fans clean. See section 3.5. 
•  If you have installed KMP Draft, ash must be removed from it at least once every firing season. 

NOTE!

 When you start your stove for the first time there may be a slight smell of paint, this is 


because the paint on the stove body must cure fully before one can obtain odour free operation.

Summary of Contents for EKERUM

Page 1: ...INSTALLATION and OPERATING INSTRUCTIONS PELLET STOVE EKERUM NEPTUNI ...

Page 2: ......

Page 3: ...urner from the burner housing and remove any ash from the ash box unburned pellets must not be emptied into the ash box there is a risk of them starting to smoulder After a period of operation the glass in the door becomes coated with ash dust and eventually becomes opaque It should be wiped off from the inside using kitchen roll moistened with normal tap water we recommend that this is done each ...

Page 4: ...PELLET STOVE KMP EKERUM NEPTUNI ARITERM SWEDEN AB Installation Instructions 2011 08 19 4 24 ...

Page 5: ... level of efficiency in combination with automatic operation means that the stove replaces up to 80 of the heating in a normal family house with electricity as heating source The stove is designed for firing with wood pellets and requires an electrical power supply In the event of a power failure the stove requires power from another power source optional extra The integrated convection fan distri...

Page 6: ...1 is inset in the bottom of the hearth under the burner housing It can be removed when the door has been opened The combustion fan 12 is placed on the rear of the burner housing and provides the burner with air for combustion The control circuit board 14 is placed inside the stove and contains a transformer for 12V voltage to the electronics and control and supervision The hot air fan 15 is locate...

Page 7: ...ature Explanatory text scrolls through the display every 5 seconds The adjustment dial is used by pressing or turning Turn to scroll through the menu or change the value when adjusting Pushing once makes a selection in the menu Example Connect the stove to the wall socket Pressing once causes the panel to ask Start Pressing again means that you confirm the question and the stove starts If you turn...

Page 8: ...crews 2 Hook one corner of the panel onto the wall mounting 3 Press the other corner of the panel onto the wall mounting Removing the control panel 1 Slide the panel straight up 2 Lift the panel straight out from the wall 1 2 3 1 2 Connecting the control panel Connect the control panel in the modular connection on the side of the control circuit board image ...

Page 9: ...ntended for authorised installers Turn the dial to scroll through the menu To jump out of the menu hold the button in for 4 seconds The menu appears as follows Main menu Start Stop Confirm by pressing once to start stop Stop T Press to select and adjust desired stop temperature Usermenu Press for Usermenu Back Press for display Usermenu Settings SetCode 021 Settings Press for Settings Service Menu...

Page 10: ... to the set values HIGH OUTPUT After START HiPower scrolls through the display The feeder runs according to FeedHi Combustion fan Fan HI The time depends on the set fuel amount at high output Every 10 seconds Set temperature and room temperature are compared If the room temperature falls below the set temperature by less than 1 C the program switches to low output The flame sensor is checked If no...

Page 11: ... flammable material of sufficient durability and with sufficient resistance to temperature variations climate effects corrosive smoke gases and slag and use of sweeping tools etc It must be possible to clean the flue If fallen ash cannot be removed via the stove s cleaning hatch another cleaning hatch must be arranged The cleaning hatch must not be located in a room other than the one in which the...

Page 12: ...ection Warranty and Installation proof Manufacturing number Installation date Vacuum in chimney cold Vacuum in chimney hot Outdoor temperature Smoke gas temp at max operation Carbon dioxide content CO2 Distance to combustible material Trafo 230 VAC J3 J4 J1 J8 J5 J10 RS485 J6 J9 PE röd vit orange orange 1 2 6 7 9 1 0 4 5 230 VAC M brown grey Convector fan Feeder motor black blue white blue Safety ...

Page 13: ...h it must be restarted again 3 2 Ash removal The amount of ash that build up in the burner varies depending partially on how the stove is fired number of starts and stops division between full and half speed and partially on the quality of the pellets The ash content varies between different pellets but can also differ between different batches from the same factory This can only be established th...

Page 14: ...mes each starting from above To prevent ash falling onto the floor move the ash box before sweeping as follows Measurement hole Remove the soot rakes as follows 1 The silicon seal seals against the stove body 2 Slacken off the nut a couple of turns 3 Press the soot rake upwards or downwards 4 Pull the soot rakes in pairs straight out 5 The soot rakes are sealed in reverse order The chimney must be...

Page 15: ...fan Vacuum cleaning of the fans with a brush nozzle should be carried out a couple of times annually after removing the side hatch Do not forget to pull the plug out before the side hatch is removed The side hatch is secured using two panel screws that are visible when the hatches above the pellet magazine been lifted After the screws have been removed the upper section of the side hatch is pulled...

Page 16: ... temperature Increase Stop T above 30 C to start in On mode When the room temperature has exceeded 5 C adjust the desired stop temperature Condensation leaks from the stove s flue connection Flue smoke too cold for the chimney Increase the output by adjusting the amount of fuel and air Deactivate low output Insulate the chimney Install condensation trap Smoke odour Blocked smoke access Contaminate...

Page 17: ...ere are no foreign objects stuck in the feeder auger Check switches and wiring to the motor Replace motor Powfail Power failure Check the electrical connection Errign The firing element is not drawing any power Poor contact to firing element Defective firing element Check wiring and connections Replace firing element ErrSafe The flame sensor has not detected a flame when the safety coil has been b...

Page 18: ...rminal block 4 Slacken off the screw 3 that secures the firing element Remove the firing sleeve from the element Pull out the cables from the lead ins 5 Reinstall in reverse order 4 3 Combustion fan 1 Remove the burner and the ignition console according to the Firing element section 2 Remove the red and the blue cable from the terminal block on the side of the bracket 3 Remove the screws 2 holding...

Page 19: ...er 4 6 Control circuit board 1 Remove the plug from the wall socket 2 Remove one of the side hatches according to the Hot air fan section 3 Remove the edge connectors on the long sides of the control circuit board by pulling them straight out from the circuit board 4 Disconnect the cable for the control panel located in a connector on one edge of the control circuit board Press in the hook on the ...

Page 20: ...PELLET STOVE KMP EKERUM NEPTUNI ARITERM SWEDEN AB Installation Instructions 2011 08 19 20 24 Warranty For warranty issues Ariterm Sweden AB refers to our local Distributor ...

Page 21: ...PELLET STOVE KMP EKERUM NEPTUNI ARITERM SWEDEN AB Installation Instructions 2011 08 19 21 24 Declaration of conformity ...

Page 22: ......

Page 23: ......

Page 24: ...r www ariterm se If these instructions are not followed at installation operation and maintenance Ariterm Sweden AB s applicable warranties are not binding Ariterm reserves the right to make changes to components and specifications without prior notice ...

Reviews: