background image

ARISTEL NETWORKS

 PTY. LTD


Operating manual   Ver. 1.1  

Issued September 2006                  

 page 3 

Installation 

1.


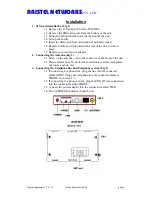
SIM card installation (Fig 1) 

1.1


Remove the 12V adaptor from the CTM3000 

1.2


Remove the SIM card cover from the bottom of the unit 

1.3


Slide the SIM card holder towards the front of the unit 

1.4


Lift up the holder 

1.5


Insert the SIM card (Note orientation of notched corner) 

1.6


Replace holder and slide towards the rear of the unit to lock in 
place 

1.7


Replace cover and power adaptor 

2.


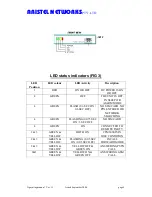
Connecting the Antenna (Fig 2) 

2.1


Screw on the antenna cord to the connector on the front of the unit 

2.2


Place antenna away from electrical/electronic systems (computers, 
microwave ovens, etc) 

3.


Connecting the Telephone line and Telephone system (Fig 2) 

3.1


If connecting to a phone line, plug the line into the connector 
marked LINE. Plug your telephone into the connector marked 
PHONE. Go to step 3.3 

3.2


If connecting to a phone system, plug the PBX CO line connection 
into the connector marked PHONE.  

3.3


Connect the power adaptor into the connector marked PWR 

3.4


The red POWER indicator should be on. 


Summary of Contents for CTM3000

Page 1: ...ARISTEL NETWORKSPTY LTD Operating manual Ver 1 1 Issued September 2006 page 1 CTM3000 GSM Call Forwarding Unit Programming Operating Manual ...

Page 2: ...and patch the call through the mobile network to any outside telephone number mobile or landline You can reprogram the system at any time should you 1 Change your mobile contract 2 Need more mobile phones 3 Change any of your mobile numbers No expensive Technician service visit is required You can do it yourself very simply Parts List DESCRIPTION QUANTITY REQUIRED STANDARD INCLUDED CTM3000 1 YES D...

Page 3: ...lace 1 7 Replace cover and power adaptor 2 Connecting the Antenna Fig 2 2 1 Screw on the antenna cord to the connector on the front of the unit 2 2 Place antenna away from electrical electronic systems computers microwave ovens etc 3 Connecting the Telephone line and Telephone system Fig 2 3 1 If connecting to a phone line plug the line into the connector marked LINE Plug your telephone into the c...

Page 4: ...EP OR ALARM MODE 4 GREEN FLASH 0 6 SEC ON 0 6 SEC OFF NO SIM CARD NO PIN ENTERED OR NETWORK SEARCHING 4 GREEN FLASHING 0 075 SEC ON 3 SEC OFF NO SIM CARD 4 GREEN ON CONNECTED TO REMOTE PARTY 2 3 GREEN YELLOW BOTH ON CTM3000 IS IN IDLE CONDITION 2 3 GREEN YELLOW FLASHING 0 05 SEC ON 0 05 SEC OFF IN CALL FORWARD MODE 2 3 GREEN YELLOW YELLOW OFF GREEN ON ANSWERING PSTN CALL 2 3 GREEN YELLOW YELLOW ON...

Page 5: ...he destination number and the password Call is forwarded to remote number Connected as an extension on a Telephone System Program the Telephone system to have the CTM3000 in the ring group Programme the CTM3000 with the remote number to be forwarded to Incoming call is answered by CTM3000 Answering tone burst is heard by caller Call is forwarded to remote number as programmed Or Program the Teleph...

Page 6: ... answered call enabled Delay time enable 993 Enables inter digit pause 1 Appointed mode 995 Enables the destination to be the programmed number enabled Bi Directional 992 Allows both PSTN to GSM and GSM to PSTN calls enabled PTG number PSTN to GSM 2 Program the destination GSM number 200000 GTP number GSM to PSTN 3 Program the destination PSTN number 311111 Delay before forwarding 4 Sets time befo...

Page 7: ...password is correct a programming tone tone C will be heard for 2 seconds You are now in programming mode b If the password is incorrect the call will be disconnected 6 You can now program any of the features as listed a If programming of a feature is successful a confirmation tone 1 burst of 05 sec on and 0 5 sec off will be heard You can continue to program b If the programming of a feature fail...

Page 8: ...cond increments Number of rings before answer Press 5xx to enter the number of rings before the CTM3000 answers an incoming call where xx can be from 01 to 99 Busy Tone learning Press 985 to set the busy tone frequency to default 480Hz and 620Hz Press 990 to enter Busy Tone Learning mode Hang up the telephone after approximately 30 seconds when you hear an acknowledgement tone The CO yellow LED wi...

Reviews: