background image

Chapter  3

Rack Mounting the Switch

Important:

The rack mounting procedure is identical for all switches covered by this guide. Illustrations in
this chapter depict the mounting of a DCS-7020SR-32C2 switch.

Les procédure de montage du bâti est identique pour tous les commutateurs visés
par ce guide. Illustrations dans ce chapitre montrent le montage d’un interrupteur de
DCS-7020SR-32C2.

Two-Post Rack Mount 

 provides instructions for mounting all switches in a two-post rack.

Four-Post Rack Mount 

 provides instructions for mounting all switches in a four-post rack.

After completing the instructions for your rack type, proceed to 

Cabling the Switch

.

3.1

 Two-Post Rack Mount

To mount the switch onto a two-post rack, attach the mounting ears to the chassis, then attach the ears
to the rack posts. Two-post accessory kit includes 2x mounting ears as two-post mounting parts.

Important:

Attachment pins must engage all three upper bracket holes.

Goupilles de fixation doivent être bloquer tous les trois trous de la bride supérieure.

3.1.1

 Attaching Mounting Brackets to the Chassis

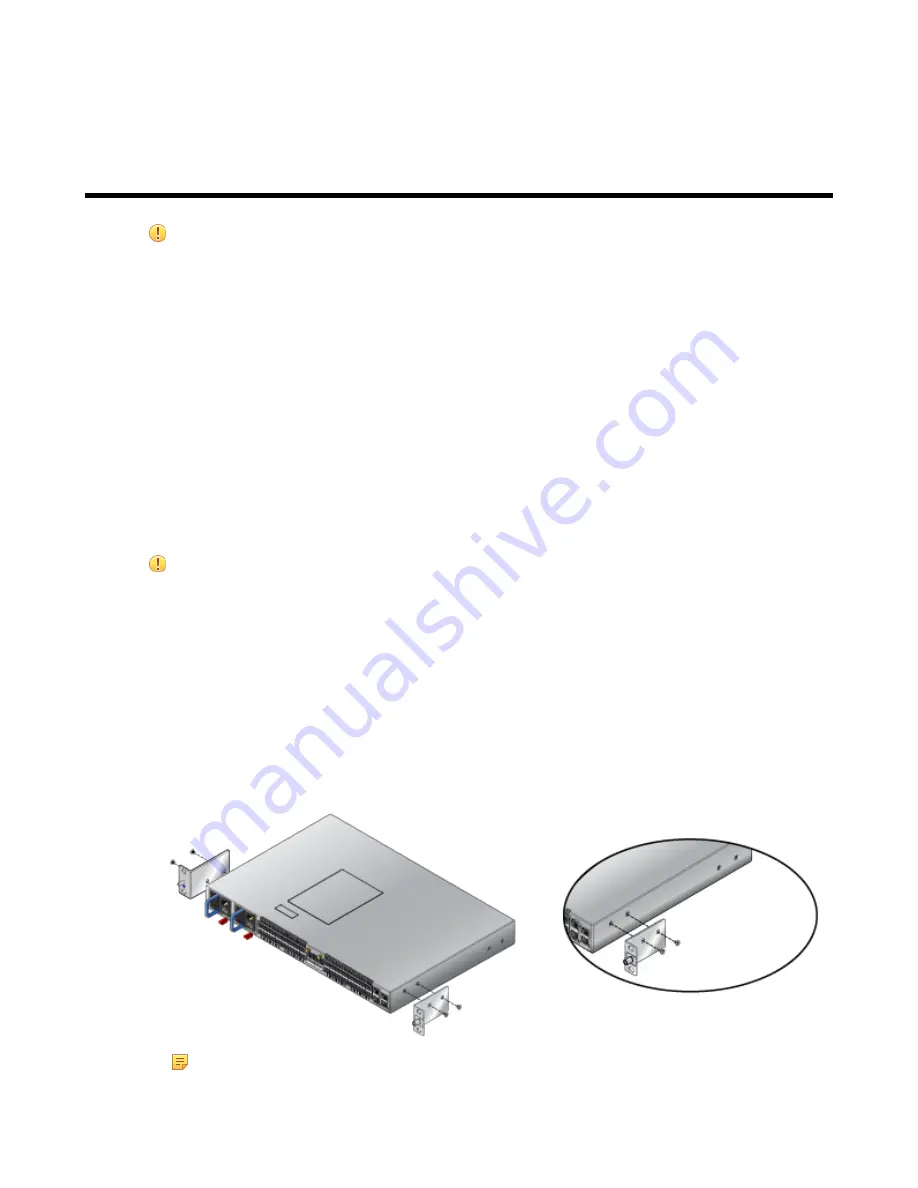
This procedure attaches mounting brackets to the switch chassis as depicted b

Figure 2: Attaching

Mounting Brackets to the Switch Chassis 

.

1. Align the mounting brackets with the sides of the chassis.
2. Use the screws to attach the brackets to the chassis.

Figure 2: Attaching Mounting Brackets to the Switch Chassis

Note:  DCS-7020SR-32C2 supports front mount only.

9

Summary of Contents for 7020SR-32C2 Series

Page 1: ...Quick Start Guide 7020SR 32C2 Series 1 RU Gen 3 Data Center Switches Arista Networks www arista com DOC 00152 02 ...

Page 2: ...tworks and the Arista logo are trademarks of Arista Networks Inc in the United States and other countries Other product or service names may be trademarks or service marks of others Headquarters 5453 Great America Parkway Santa Clara CA 95054 USA 1 408 547 5500 www arista com Support 1 408 547 5502 1 866 476 0000 support arista com Sales 1 408 547 5501 1 866 497 0000 sales arista com ...

Page 3: ...ttaching Mounting Brackets to the Chassis 10 3 2 2 Assembling the Rails onto the Equipment Rack 11 3 2 3 Attaching the Switch to the Rack 13 Chapter 4 Cabling the Switch 15 4 1 Grounding the Switch 15 4 2 Connecting Power Cables 15 4 2 1 AC Power Supplies 16 4 2 2 DC Power Supplies 17 4 3 Connecting Serial and Management Cables 19 Chapter 5 Configuring the Switch 21 Appendix A Status Indicator LED...

Page 4: ... Maintenance and Field Replacement 33 E 1 Considerations 33 E 2 Power Supplies 33 E 2 1 Removing a Power Supply 33 E 2 2 Installing a Power Supply 33 E 3 Fan Modules 34 E 3 1 Removing a Fan Module 34 E 3 2 Installing a Fan Module 34 Appendix F Regulatory Model Numbers 35 Appendix G Taiwan RoHS Information 37 iv ...

Page 5: ...y accessories that may be packaged in the same box as the main unit Inspect the packing list and confirm that you received all listed items Compare the packing list with your purchase order Parts List provides a list of components included with the switch 1 3 Installation Process The following tasks are required to install and use the switch 1 Select and prepare the installation site Site Selectio...

Page 6: ...eur avant l installation Seuls appareils laser de classe 1 certifiés pour une utilisation dans le pays d installation par l organisme compétent doivent être utilisées dans ce produit Important Ultimate disposal of this product should be handled in accordance with all national laws and regulations L élimination finale de ce produit doit être effectuée conformément à toutes les lois nationales etrèg...

Page 7: ...Table 3 Switch Specifications Power Input Power Source PSU Models Ratings Power Input AC Power PWR 400AC 100 240 VAC 4 5 A max 50 60 Hz Table 4 Switch Specifications Power Input Power Source PSU Models Ratings Power Input DC Power PWR 400 DC 24 VDC 16 A 48 VDC 11 A 60 VDC 9 A Note All PSU models are not supported by all switches Some switches described in this guide could use power supplies that m...

Page 8: ...4 ...

Page 9: ...Blue Handle Air Inlet module Red Handle Air Exit module Airflow Direction displays fan and power supply module locations on the device Base the switch orientation on the airflow direction of the modules to assure the air inlet is always oriented toward the cool aisle Air Exit modules orient the rear panel toward the hot aisle Air Inlet modules orient the rear panel toward the cool aisle If the air...

Page 10: ...y method of disconnecting power from the system La combinaison de la puissance prise d entrée doit être accessible en tout temps Il fournit le principal moyen de coupure d alimentation du système Other Requirements Select a site where liquids or objects cannot fall onto the equipment and foreign objects are not drawn into the ventilation holes Verify these guidelines are met Clearance areas to the...

Page 11: ...ws for attaching the switch to the equipment rack When installing the switch into an equipment rack with unthreaded post holes nuts are also required to secure the switch to the rack posts 2 3 Electrostatic Discharge ESD Precautions Observe these guidelines to avoid ESD damage when installing or servicing the switch Assemble or disassemble equipment only in a static free work area Use a conductive...

Page 12: ...8 ...

Page 13: ...proceed to Cabling the Switch 3 1 Two Post Rack Mount To mount the switch onto a two post rack attach the mounting ears to the chassis then attach the ears to the rack posts Two post accessory kit includes 2x mounting ears as two post mounting parts Important Attachment pins must engage all three upper bracket holes Goupilles de fixation doivent être bloquer tous les trois trous de la bride supéri...

Page 14: ...st Rack Mount Note For DCS 7020SR 32C2 four post rack kits are optional and sold separately The switch is mounted onto a four post rack by assembling two rails onto the rear posts sliding the switch onto the rails then securing the switch to the front posts The installation kit provides the following four post mounting parts 2x mounting brackets 2x rail rods 2x rail slides The rail rods and rail s...

Page 15: ... switch to the rail Each end of an assembled rail contains two rack plugs Figure 5 Attaching the Mounting Brackets to the Switch Chassis The rails are installed into a rack by inserting the plugs into rack slots When installing rails into posts with threaded or rounded holes remove all plugs located on both sides of the assembled rails then install the rails with bolts that fit the rack Figure 5 A...

Page 16: ... Attaching the Rails The slide assembly must be inside the right posts relative to the left rack posts Note If the rack plugs were previously removed use bolts to attach the rail to the rack 3 Attach the slide end of the rail to the front post by extending the rail end past the post then contracting the rail while guiding the rack plugs into the post Figure 7 Attaching the Rails 4 Repeat Step 1 th...

Page 17: ...Inserting the Switch onto the Rails Figure 8 Inserting the Switch onto the Rails 2 Slide the switch on the rails toward the rear posts until the mounting bracket flanges are flush with the rail flanges attached to the rack posts 3 Attach the bracket flanges to the rack post using the quick release thumb screws supplied with the brackets Figure 9 Attaching the Switch to the Rack Posts Figure 9 Atta...

Page 18: ...14 ...

Page 19: ...tallations in the U S À la terre et de mise à la terre fils cosses M4 x 0 7 ne sont pas fournis Calibre des fils doit satisfaire des exigences de l installation locale et nationale Disponible dans le commerce 6 fils AWG est recommandé pour les installations aux États Unis Figure 10 Earth Grounding Pad Sockets for DCS 7020SR 32C2 1 Ground lug 6 ESD 2 Blue handle indicates forward airflow 7 Console ...

Page 20: ...quipment must be grounded Never defeat the ground conductor Cet équipement doit être mis à la terre Ne jamais modifier le conducteur de terre Important This unit requires overcurrent protection Cet appareil requiert une protection contre les surintensités 4 2 1 AC Power Supplies The PWR 400AC power supply is supported Figure 11 AC Power Supply PWR 400AC displays an AC power supply It connects to a...

Page 21: ...llation Localiser les disjoncteurs ou des fusibles sur les lignes de courant continu desservant les circuits Coupez les circuits de lignes d alimentation ou retirer les fusibles Important Wire size must comply with local and national requirements and electrical codes Use only copper wire Le calibre du fil doit être conforme aux exigences locales et nationales et les codes électriques Utiliser du f...

Page 22: ...el of the lugs and the insulation on the wires Figure 13 Lug Preparation two hole lug shown Figure 13 Lug Preparation two hole lug shown 1 Insulated wire 3 Lug B 1 2 2 Heat shrink tubing A 1 4 C 5 8 7 Shrink the tubing with a heat gun 4 2 2 2 Connecting a DC Power Supply to Power Source To connect a DC power supply to power source 1 Prepare the stranded wiring Wire and Lug Preparation 2 Attach the...

Page 23: ...ng installation and remove last when removing power Appliquer le motif connexion tout d abord pendant l installation et supprimer dernière lors du retrait de puissance 4 Replace the terminal covers as required 4 3 Connecting Serial and Management Cables The accessory kit includes the following cables RJ 45 to DB 9 serial adapter cable RJ 45 Ethernet cable Table 7 RJ 45 to DB 9 Connections lists th...

Page 24: ...settings 9600 baud No flow control 1 stop bit No parity bits 8 data bits Ethernet Management Port Connect to 10 100 1000 management network with RJ 45 Ethernet cable USB Port The USB port may be used for software or configuration updates Note The DCS 7020SR 32C2 chassis has other ports labeled as Alarm Clk in Clk Out and ToD These ports are not supported Do not connect any cables to these ports CA...

Page 25: ...agement Cables As the switch boots without a startup config file it displays the following through the console The device is in Zero Touch Provisioning mode and is attempting to download the startup config from a remote system The device will not be fully functional until either a valid startup config is downloaded from a remote system or Zero Touch Provisioning is cancelled To cancel Zero Touch P...

Page 26: ...Save the configuration by typing write memory or copy running config startup config localhost copy running config startup config When the management port IP address is configured use this command to access the switch from a host using the address configured in Step 9 ssh admin 192 0 2 8 Refer to the Arista Networks User Manual for complete switch configuration information 22 ...

Page 27: ...1 1 System Status Indicator LED Figure 15 System Status and Fan Status Indicators display the system and the fan status LEDs Figure 15 System Status and Fan Status Indicators 1 System status LED 2 Fan status LED Table 8 System Status Indicator LED States LED Name LED State Device Status Blinking Green System is powering up Green Normal operations Due to power supply and fan redundancy this LED wil...

Page 28: ...ctioning The switch will automatically execute a graceful shutdown shortly Note Fan Module status LED is located on the fan module and displays the status of the corresponding fan module A 1 3 Port Status Indicator LEDs Port LEDs located in the vicinity of their corresponding ports provide link and operational status Figure A 2 displays a representative Port LED location on the DCS 7020SR 32C2 swi...

Page 29: ...e system level fan status LED Fan Status Indicator LED Figure 17 Fan Module Status LED 1 Release lever 2 Fan module LED Table 11 Fan Module Status LED States provides status conditions that correspond to fan module status LED states Table 11 Fan Module Status LED States LED State Status Off The fan module is not detected If it is inserted it may not be seated properly Green The fan is operating no...

Page 30: ...tates Table 12 AC Power Supply Status LED States Power Supply State PWR 400AC Input power present Normal operation Green Input power present Power Supply fault Yellow No Input power Supply installed in chassis Blinking Yellow Input power present Supply not installed in chassis Blinking Green Note You can narrow down the error condition by logging in to the switch to view the specific device state ...

Page 31: ... kit Note The accessory kit is included in a bag For DCS 7020SR 32C2 four post rack kit is optional and sold separately The following topics are covered in this section Rack Mount Parts Cables B 1 Rack Mount Parts The following topics are covered in this section Figure 19 Four Post Rack Mount Parts Two Post Rack Mount Parts B 1 1 Four Post Rack Mount Parts Figure 19 Four Post Rack Mount Parts 27 ...

Page 32: ... Post Rack Mount Parts for DCS 7020SR 32C2 B 2 Cables Quantity Description 2 Power cables IEC 320 C13 C14 13 A 250 V 1 RJ 45 Patch Panel Cable 1 RJ 45 to DB9 Adapter Cable Warning All provided power cables are for use only with Arista products 28 ...

Page 33: ...nding on the power supplies installed your switch may look different Figure 21 DCS 7020SR 32C2 1 Ground lug 6 ESD 2 Blue handle indicates forward airflow 7 Console serial port 3 Ethernet management port 8 USB port 4 System status LED 9 Power supply 2 status LED 5 Fan status LED 10 Power supply 1 status LED 29 ...

Page 34: ...30 ...

Page 35: ... Rear Panel All switches covered by this guide use the rear panel shown below Figure 22 DCS 7020SR 32C2 1 Fan module 1 handle 3 Ground 5 Fan module 1 status LED 2 Fan module 3 handle 4 Fan module 3 status LED 31 ...

Page 36: ...32 ...

Page 37: ...ear Panel panel illustrations of your device to locate the appropriate LED the release lever or handle and the handle for the power supply and fan modules E 2 Power Supplies The following steps are required when removing power supplies from a switch Removing a Power Supply Installing a Power Supply E 2 1 Removing a Power Supply 1 Ground yourself with an ESD wrist strap 2 Power down the power suppl...

Page 38: ...led in the switch E 3 1 Removing a Fan Module The following steps are required when removing or replacing fans from a switch 1 Ground yourself with an ESD wrist strap 2 Push the fan module release lever and slide the fan module out of the switch E 3 2 Installing a Fan Module You must make space for installing the fan module by removing an existing one Removing a Fan Module 1 Remove the replacement...

Page 39: ...x lists the Regulatory Model Numbers RMNs where applicable for the product models for the switches described in this document Table 13 Regulatory Model Numbers and Product Numbers Regulatory Model Number RMN Product Number s AN1723 DCS 7020SR 32C2 35 ...

Page 40: ...36 ...

Page 41: ...endix G Taiwan RoHS Information This appendix provides Taiwan RoHS information for switches covered by this guide For Taiwan BSMI RoHS Table go to https www arista com assets data pdf AristaBSMIRoHS pdf 37 ...

Page 42: ...38 ...

Reviews: