background image

R-Series Technical Manual   

          Rev. 1.02      November 24, 2008 


Argox Information Co., Ltd. 


42 

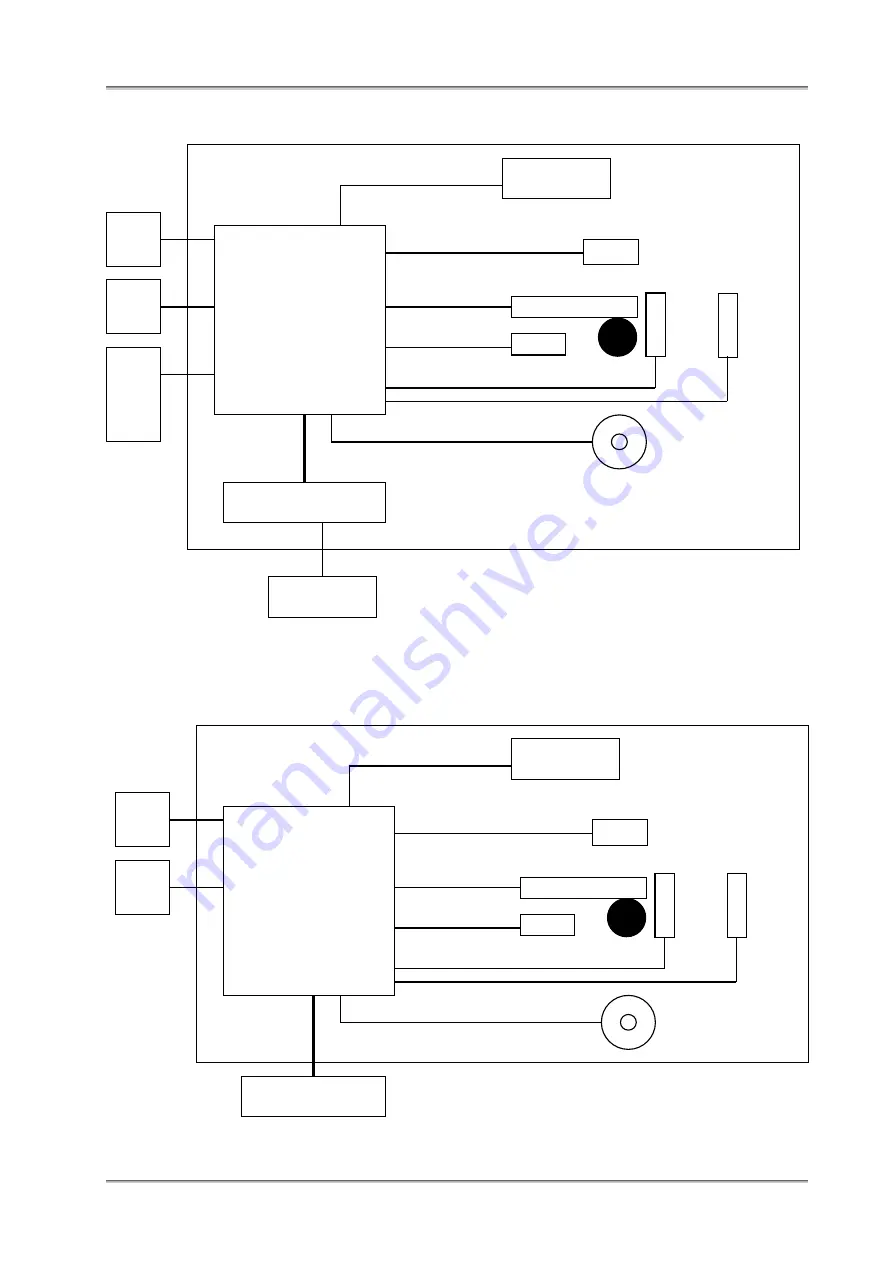
10.1.2 System block diagram of R-400plus/R-400Kplus 


Figure 10-2 R-400plus System Block Diagram 


10.1.3 System block diagram of R-200/R-200K 


Figure 10-3 R-200/R-200K System Block Diagram 

Parallel 

Port 

Serial 

Port 

Main Board 

Switching Power 

Panel Board 

Ribbon sensor 

TPH 

Paper sensor 

Roller 

Cutter  Peeler sensor 

90~250 V AC 

Motor 

USB 

2.0 Full 

Speed 

Parallel 

Port 

Serial 

Port 

Main Board 

Panel Board 

Ribbon sensor 

TPH 

Paper sensor 

Roller 

Cutter  Peeler sensor 

External AC Adaptor 

Motor 

Summary of Contents for R Series

Page 1: ...R Series Technical Manual Rev 1 02 November 24 2008 Argox Information Co Ltd R Series Technical Manual Rev 1 02 ...

Page 2: ...tion specifications 8 2 10 The difference between R Series and R xxxK Series 9 3 CONTROLS AND INDICATORS 10 3 1 Front Panel 10 3 2 Rear Panel 11 4 OPTIONS 13 4 1 Cutter mechanism 13 4 2 FONT module 14 4 3 Dispenser 14 4 4 RTC module 14 5 SETUPAND DIAGNOSTIC 15 5 1 Inlet power voltage and grounding 15 5 2 Performing the self test 15 5 3 Calibration 18 5 4 Printer reset 19 6 ADJUSTMENTS 20 6 1 Media...

Page 3: ...us Only 32 8 5 Verification 32 9 MAINTENANCE AND TROUBLE SHOOTING 33 9 1 Printer status indication 33 9 2 Trouble Shooting 34 9 3 Clearance 38 9 4 Replacement 39 10 OPERATIONAL THEROREM 41 10 1 System block diagram 41 10 2 Panel board block diagram and description 47 10 3 Sensor board diagram and description 47 10 4 Wiring diagram 48 11 RECOMMENDED SPARE PARTS 50 12 ASSEMBLY DRAWING 51 ...

Page 4: ...ons The printer is designed with the most efficient memory management technology True Speed prints up to 4 inches second for R 200 R 200Kand R 600 6 inches second for R 400 R 400K and R 400plus R 400Kplus When bundled with its smart printer driver the user can easily print a label by using any Windows applications e g Microsoft Word ArgoBar Codesoft Bar Tender Nicelabel under Windows XP 2000 98 95...

Page 5: ...ermal Resolution 203 dots inch 8 dots mm 300 dots 12 dots mm Max print width 4 25 108mm 4 16 104mm Max print length 43 1066mm 30 762mm Max print speed 6 152mm per second 4 102mm per second Memory 2M bytes DRAM Ribbon Inside coating ribbon Outside coating ribbon Inside coating ribbon Emulation PPLA PPLB and PPLZ PPLA and PPLB 2 2 Fonts Text fonts Printer Programming Language A R 400 R 400K R 400plu...

Page 6: ...IBC Telepen FIM MaxiCode PDF 417 Data matrix Printer Programming Language B Code39 Code93 Code128 subset A B and C Codabar Interleave 2 of 5 UPC A E 2 and 5 add on EAN 13 8 UCC EAN 128 Postnet Matrix 2 of 5 Code 128UCC PDF 417 and MaxiCode Printer Programming Language Z Code11 Interleave 2 of 5 Code39 Code93 EAN 13 8 UPCA E Code128 subset A B and C Industrial 2 of 5 Standard 2 of 5 Codabar UPC EAN...

Page 7: ...nd R 600 90V AC to 250V AC 50 60Hz 2 Amps 110V AC 1 Amps 220V AC Environment Operation 40 140 4 38 10 90 non condensing Storage 40 140 4 60 2 6 Physical dimension Weight 8 41bs 3 85kg 9 31lbs 4 2kg Size W12 4 x D9 1 x H8 6 W314 x H231 x L218mm 2 7 Agency list CE FCC class A CCC UL and CUL 2 8 Communication interface Serial interface RS 232 serial 1200 38400BPS 8 data bits 1 stop bit no parity Para...

Page 8: ... command to the printer Data bit number can be set as 7 8 data bits one no parity for both sending and receiving Figure 2 1 Pin No Direction Description 1 Shorted to Pin 6 2 IN RxD 3 OUT TxD 4 N C 5 GROUND 6 Shorted to Pin 1 7 OUT RTS 8 IN CTS 9 OUT 5V Table 2 1 Pin assignment and description of serial port For recommended connection details between host and printer please refer to the user s manu...

Page 9: ...PE Table 2 2 Pin assignment and description of parallel port 2 9 3 USB Interface specification This port complies with USB 2 0 Full Speed R 400plus R 400Kplus only Pin Signal Description 1 VBUS 3 3V 2 D Differential data signaling pair 3 D Differential data signaling pair 4 GND Table 2 3 Pin assignment and description of USB port 2 10 The difference between R Series and R xxxK Series R 200 R 400 a...

Page 10: ...st Out of ribbon out of media canceling a print job or printer fault MEDIA indicator The MEDIA indicator will remain ON under normal operation It will start blinking to indicate The printer is out of media or fails to detect the gap of media The printer is at PAUSE state RIBBON indicator When command of thermal transfer is sending to the printer the RIBBON indicator is ON for the normal operation ...

Page 11: ...PAUSE button then turning ON the power switch the printer will perform the media sensor calibration CANCEL Button The CANCEL button interrupts and deletes the current printing job If an error occurs pressing this button to cancel the error indication Holding down the CANCEL button then turning on the power switch the printer will perform a system reset all the parameters which are stored in EEPROM...

Page 12: ...oks AC power socket R 400 R 400K R 400plus R 400Kplus and R 600 For AC power connection USB connector USB port Connector for USB application Usually it is connected to the USB port of a PC R 400 plus R 400Kplus only Figure 3 2 Rear panel of R 400plus R 400Kplus Figure 3 3 Rear panel of R 200 R 200K AC Electrical Outlet Power socket RS232 Serial Port Parallel Port USB Power switch Parallel Port RS2...

Page 13: ...2204 R2A0 4 02 051105 R2A0 5 00 051806 R 400plus R 400kplus R 600 R3A0 3 02 041405 R3A0 3 03 021606 R3A0 3 04 060906 Table 4 1 A2 Cutter A2 Cutter Firmware Version PPLB Firmware Version PPLB R 200 R 200K R1B0 1 00 042005 R1B0 1 01 110605 R1B0 1 02 051506 R 400 R 400K R2B0 3 06 062905 R2B0 3 07 111505 R2B0 4 00 052606 R 400plus R 400kplus R 600 R3B0 3 05 092005 R3B0 3 06 022806 R3B0 3 07 060806 Tab...

Page 14: ...ay time a binary byte m 0x00 for A2 cutter default m 0x01 0xFF for A2 cutter 0x1E is recommended 4 2 FONT module Font module is used to store special fonts such as Traditional Chinese Simplified Chinese Korean and Japanese 4 3 Dispenser Dispenser provides the automatic peel off function 4 4 RTC module The RTC module consists of two major components A Real Time Clock with battery back up a on board...

Page 15: ...ter printer starts to print 5 The configuration report will be printed out as Figure 5 1 and Figure 5 2 6 To return the printer to normal operation please turn the power OFF and ON again or press the CANCEL button for one second otherwise the printer will enter dump mode all input data will not be interpreted Contents and information of R Series Self Test Label are as the following 1 Printer progr...

Page 16: ... With this you may check the print head warranty The value will not be reset even you replace the print head or any components It is changed only when the main board is replaced 10 Flash On Board This message shows the size of on board flash 11 Checksum Used to check the firmware flash is correct or not It should be 0000 12 H Position Adjust This message shows horizontal shift position 13 LAB LEN ...

Page 17: ...7 17 Expansion RAM This message shows expansion RAM size in the printer 18 No Of DL Soft Fonts This message shows the number of soft fonts downloaded in the printer Figure 5 1 R 400 Self test pattern Figure 5 2 R 200 Self test pattern 1 2 3 4 6 8 5 7 9 10 11 12 13 14 15 16 17 18 ...

Page 18: ...g the media calibration 6 inches of media will be fed out MEDIA indicator will be blinking for a few seconds during calibration is proceeding Then turn on printer again after the calibration is completed Without the proper calibration the gap detection will not stable especially for the small labels and special media After the calibration all the related parameters will be stored in the EEPROM whi...

Page 19: ...urn off the printer 2 Press and hold the CANCEL button then turn on the printer 3 Release the CANCEL button when RIBBON indicator blinks for three times and READY indicator blinks for on time The following parameters will be reset to the default value Label parameters Printing darkness Printing speed Symbol set Others for specific emulation ...

Page 20: ...determine the position and length of the label or ticked stock When using label with gap user can position the sensor anywhere in side the gap But when using media with notch or hole it may be necessary to reposition the media sensor 1 Open the print head module 2 Load the media properly 3 Adjust the sensor by moving the media sensor adjustment lever left or right 4 Close the print head module and...

Page 21: ... OPTIONAL PARTS INSTALLATIONS CAUTION The printer electronics are susceptible to static discharge Wear an anti static wrist and attach it to the printer chassis 7 1 Cutter Installation 1 Turn off the power switch 2 Remove the top cover and middle cover shown in Figure 7 1 Figure 7 1 ...

Page 22: ...he screw F 4 Remove the bracket peeler 71 from the module Figure 7 2 5 Secure two attached screws B for the cable connector as Figure 7 3 6 Add a cutter baby board to JP29 on the main board R 400 R 400K and R 600 Add a motor driver IC 3717 to U19 on the main board R 200 R 200K 7 Plug the cable connector into JP13 Figure 7 3 ...

Page 23: ... screws M for the cutter 11 Plug the cutter cable into external connector shown in Figure 7 4 Figure 7 4 Install the media and the ribbon after the cutter is properly installed 1 Put the media end on the roller 2 Close the printer module 3 Turn on the printer 4 Press the FEED button to let the media end to go through the cutter Cutter Cable External Connector ...

Page 24: ...r switch 88 into shaft peeler 87 and then insert it in hole on right side 6 Guide peeler switch 85 going through shaft peeler 87 7 Hook spring peeler 83 on the circle notch of shaft peeler 87 8 Put spring peeler 84 into the left hole of chassis 2 and lock screw F up 9 Put peeler switch 89 into shaft peeler 87 10 Hook spring peeler 84 on the circle notch of shaft peeler 87 11 Put back gear 27 and g...

Page 25: ... If the dispenser sensor is failed to detect label to calibrate the sensor is required There are two commands for this purpose Command ASCII Binary Remark Set sensor without label ESC R0 1BH 24H 52H 30H Command 0 Set sensor with label ESC R1 1BH 24H 52H 31H Command 1 Step 1 Put the label away from the sensor send command 0 and wait for 2 more seconds Step 2 Put a label under the sensor 10 mm below...

Page 26: ... only The Argox R Series basically can run three emulations PPLA DPL PPLB EPL2 and PPLZ ZPL2 It depends on which emulation is burned on the on board flash memory The following lists the supported emulation of each printer R 200 R 200K PPLB R 400 R 400K and R 600 PPLA and PPLB R 400plus R 400Kplus PPLA PPLB and PPLZ 8 1 Upgrade Utility and Diskette The diskette ZIP file contains the related files a...

Page 27: ...indows 3 C ARGOX PPLB 4 When Upgrade Complete message is displayed on the screen turn off the power until all LEDs go OFF then turn on the printer again 5 When update successfully please reset the printer press CANCEL button then turn on the power 8 1 3 Procedure to update firmware PPLZ emulation 1 Turn on the printer and wait for three seconds 2 Set PC to MS DOS exit from Windows 3 C ARGOX PPLZ 4...

Page 28: ...Time Out happens please check the communication cable that is securely connected to the printer and PC Then restart the printer and rerun all updating procedure For example Write fault error writing device LPT1 Abort Retry Ignore Fail You just type ctrl C and then Y to terminate the procedure Printer turn off and turn on the printer PC Abort the transmission and type PPLA or PPLB or PPLZ ...

Page 29: ...r 24 2008 Argox Information Co Ltd 29 8 2 Upgrade through Printer Utility 1 Start Argox application software Printer Utility 2 Select Download 3 Select printer model printer language and interface 4 Click on Browse button to choose the firmware ...

Page 30: ...R Series Technical Manual Rev 1 02 November 24 2008 Argox Information Co Ltd 30 5 Select Local Disk C ARGOX 400 b bin then click Open ...

Page 31: ...rmware 8 3 ROM files R 200 R 200K R 400 R 400K and R 600 Following procedures can generate the binary files for U8 and U9 1 EPROMA BAT This command will generate AU8 BIN and AU9 BIN 2 EPROMB BAT This command will generate BU8 BIN and BU9 BIN These binary files are used for burning the flash ROMs on the EPROM writer ...

Page 32: ...3 position 3 Put Add On Card it is a 2MB Flash Memory Card with Booter firmware on JP11 4 Turn on the printer and wait until MEDIA and RIBBON LEDs blinking alternately 5 Turn off the printer 6 Remove Add On Card from JP11 7 Put all the jumpers on JP5 to the NORMAL 1 2 position position again 8 Put top and middle covers back to reassemble the printer 9 Turn on the printer if READY LED blinks four t...

Page 33: ...c wrist and attach it to the printer chassis Situation Blinking LED Description PAUSE MEDIA The printer is at pause status Press PAUSE or CANCEL button to return to normal status MEDIA OUT MEDIA READY Both LEDs blink synchronously The media is not installed or used up Printer fails to detect the media gap RIBBON OUT RIBBON READY Both LEDs blink asynchronously The ribbon is not installed or end of ...

Page 34: ...All LEDs are OFF All LEDs are OFF Out of power or printer out of work Power connected Power switch is ON Yes Yes Power supply fuse broken Internal cable connected properly Power supply main board or panel board is out of work No Yes No Connect power No Switch ON Replace the fuse Yes No Connect the cable Switch power on then start printing ...

Page 35: ...tch power off Out of media No Media stuck or jammed No Fail to detect media gap No Yes Load a new media roll Yes Remove the stuck or jammed media Media loaded correctly Yes Yes Media sensor is at proper position Yes Continuous type of media is used Perform the media sensor calibration or the media sensor is out of work No No No Reload media Move the sensor to proper position Disable gap detection ...

Page 36: ... OUT RIBBON READY The ribbon is not installed or out of ribbon Switch power off Out of ribbon No Ribbon stuck or jammed No Ribbon is moving during printing No Check mechanism Yes Yes Yes Check the ribbon sensor Replace with new sensor if necessary Remove the stuck or jammed ribbon Load a new ribbon Switch power on then start printing ...

Page 37: ...nsistent between the printer and host Switch power on Is the baud rate consistent between PC and Printer Is the data bit number consistent between PC and Printer Is the parity type consistent between PC and Printer Yes Yes No No No Set the same baud rate in PC and Printer Set the same data bit number in PC and Printer Set the same parity type in PC and Printer Switch power on then start printing Y...

Page 38: ... faded To clean the print head wet a soft paper towel with isopropyl rubbing alcohol and use the damp towel to rub the dirt from the print head surface It is recommended to clean the print head after every roll of ribbon Platen roller If the roller becoms contaminated with grit label adhesive or ink printing quality may be adversely affected To clean the roller using a clean cloth and alcohol wipe...

Page 39: ...ceptible to static discharge Wear an anti static wrist and attach it to the printer chassis TPH thermal print head replacement To replace the print head please follow the procedure as shown on Figure 9 1 9 2 It is also possible to replace the TPH without remove the print head module 1 Remove the shaft tph 65 from the module Figure 9 1 ...

Page 40: ...Technical Manual Rev 1 02 November 24 2008 Argox Information Co Ltd 40 2 Release the screw E and A 3 Remove the print head cable from the print head 4 Remove the print head 56 from the bracket tph 55 Figure 9 2 ...

Page 41: ...ONAL THEROREM 10 1 System block diagram 10 1 1 System block diagram of R 400 R 400K and R 600 Figure 10 1 R 400 R 400K and R 600 System Block Diagram Parallel Port Serial Port Main Board Switching Power Panel Board Ribbon Sensor TPH Paper sensor Roller Cutter Peeler sensor 90 250 V AC Motor ...

Page 42: ... 3 System block diagram of R 200 R 200K Figure 10 3 R 200 R 200K System Block Diagram Parallel Port Serial Port Main Board Switching Power Panel Board Ribbon sensor TPH Paper sensor Roller Cutter Peeler sensor 90 250 V AC Motor USB 2 0 Full Speed Parallel Port Serial Port Main Board Panel Board Ribbon sensor TPH Paper sensor Roller Cutter Peeler sensor External AC Adaptor Motor ...

Page 43: ...K TPH 864 heat elements for R 400 R 400K R 400plus and 1248 heat elements for R 600 Each heat element can be turn on off individually Motor A bipolar hybrid stepping motor is used for carrying label and ribbon during printing Peeler sensor option An two layer PCBA consist of a reflective type object senosr designate to detect the printed label is removed or still exit Cutter assembly option Consis...

Page 44: ... Diagram Figure 10 5 R 400 R 600 Main Board Block Diagram Panel Board TPH Cutter Bipolar Motor Sensor Linear Adaptor PC TPH Cutter Motor Driver AC DC Converter 12Mhz MCU DC DC Regulator Extension DRAM Parallel Driver RS232 Driver Flash ROM 256KX16 A1 A20 D0 D15 Paper Media Peeler Signals Panel Board TPH Cutter Bipolar Motor Sensor Switching Power PC TPH Cutter Motor Driver DC DC Converter 20Mhz MC...

Page 45: ...R 200K main board 512K bytes FLASH on R 400 R 400K and R 600 main board to store the program characters and bar code fonts DRAM U10 A sixteen mega bits DRAM is selected as the medium of storage for the printing image In order to have fast access to the memory 16 bits data bus width is selected EEPROM U7 There are some parameters which are stored in EEPROM for printing communication ribbon and medi...

Page 46: ...nverter D1 C2 C3 C4 C5 R 200 R 200K only To convert the AC 19V to DC 24V for motor drivers TPH and option deice cutter usage DC DC regulator R 200 R 200K only To regulator the 24V input power to 5V to be used as the power supply for micro controller EPROM DRAM etc DC DC converter U20 L1 D2 To convert the 24V input power to 5V to be used as the power supply for micro controller EPROM DRAM etc Relay...

Page 47: ...nd three LED indicators for user s access status and error indication Figure 10 7 Panel Board Diagram 10 3 Sensor board diagram and description The circuit of all the sensor board Media sensor board Ribbon sensor board and Peeler board is identical A reflective sensor is used for these purposes Figure 10 8 Sensor Board Diagram JP10 FEED RIBBON READY CANCEL 5V Main Board PAUSE MEDIA ...

Page 48: ...200K Figure 10 10 Wiring Diagram R 400 R 400K and R 600 Panel Motor Main Board JP10 JP17 JP13 Cutter TPH JP18 JP12 Connect sensor Board JP1 Peeler sensor JP14 JP15 JP22 Ribbon Media Switching Power Panel Motor Main Board JP10 JP21 JP13 Cutter TPH JP18 JP12 Connect sensor Board JP1 Peeler sensor JP14 JP15 JP3 Ribbon Media Linear Adaptor ...

Page 49: ...2 November 24 2008 Argox Information Co Ltd 49 Figure 10 11 Wiring Diagram R400plus R400Kplus Panel Motor Main Board JP19 JP17 JP13 Cutter TPH JP18 JP12 Connect sensor Board JP1 Peeler sensor JP14 JP15 JP22 Ribbon Media Switching Power ...

Page 50: ... 50 20401 001 RS232 Cable 59 R2001 001 Linear Adaptor 59 R4003 001 Core Adapter Ribbon 59 R4002 001 Cutter Option 59 R4001 003 Dispenser Kit Option 42 R4020 011 Holder Paper Part Number Description 55 R4000 005 R series Main Board 55 R4005 002 R series Connect Sensor Board 55 R4001 001 R series Panel Board 55 R4002 001 R series Paper Sensor Board 55 R4003 002 R series Ribbon Sensor Board 23 80013 ...

Page 51: ... 20401 001 RS232 Cable 98 R4003 002 Switching Power Supply 59 R4003 001 Core Adapter Ribbon 59 R4002 004 Cutter Option 59 R4001 003 Dispenser Kit Option 42 R4025 001 Holder Paper Part Number Description 55 R4000 005 R series Main Board 55 R4005 002 R series Connect Sensor Board 55 R4001 001 R series Panel Board 55 R4002 001 R series Paper Sensor Board 55 R4003 002 R series Ribbon Sensor Board 23 8...

Page 52: ...R Series Technical Manual Rev 1 02 November 24 2008 Argox Information Co Ltd R 200 ...

Page 53: ...R Series Technical Manual Rev 1 02 November 24 2008 Argox Information Co Ltd 53 R 200K ...

Page 54: ...R Series Technical Manual Rev 1 02 November 24 2008 Argox Information Co Ltd 54 R 400plus ...

Page 55: ...R Series Technical Manual Rev 1 02 November 24 2008 Argox Information Co Ltd 55 R 400K plus ...

Page 56: ...R Series Technical Manual Rev 1 02 November 24 2008 Argox Information Co Ltd 56 R 600 ...

Reviews: