background image

PC Connection 

6


PC Connection 

OS Support 

This device supports Microsoft

®

 Windows

®

 Vista

™

  / XP SP2. 


Some USB 2.0 Host Controllers may require updated device driver files to operate 

properly. If you have problems with your USB connection, visit the Windows Update web 

site to make sure you have the latest Service Packs and device drivers installed on your 

PC before contacting technical support. 
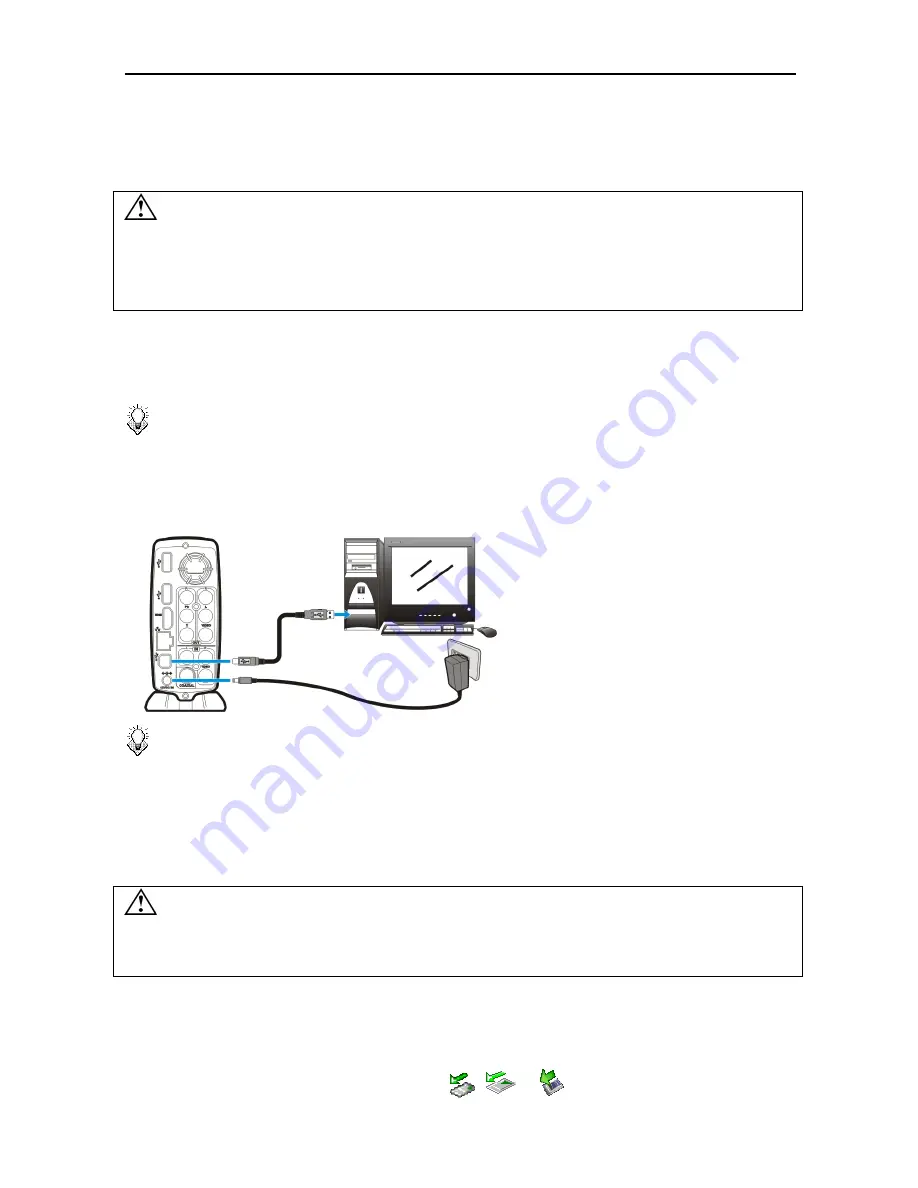
Connecting via USB 

1.


Connect the plug of AC adapter to the connector marked “

DC IN

”, plug the other end into 

an electric outlet. 

 Note:


When connecting the USB cable, be sure that the blue LED is off. 

2.


Connect the USB cable to the USB type B connector. Then connect the other end to 

computer’s USB port. 

3.


The computer will detect this device and you can start accessing the drive. 


 Note:


Always remove USB cable before activating this device. 

Transferring Files on a USB Connection 

Copy files into the internal HDD of this device just like using a USB external HDD. You can do 

it with Windows Explorer, Mac OS Finder, or any other applications appropriate for this job in 

your specific OS. 


Always check that files have been copied to the device successfully. Always keep two 

copies of important files (an original and a backup). We are not liable for data loss or 

damage during file transfer or while store on the device. 

Disconnecting from USB 

In Windows: 

1.


Close all programs or Explorer windows that are accessing this device. 

2.


Click the Safely Remove Hardware icon (

or 

) on the System Tray and select 

Summary of Contents for HV359

Page 1: ...User Manual V 1 4 ...

Page 2: ......

Page 3: ...nnecting from USB 6 Installing Software 7 Installing Firmware 7 Using the Utility Programs 7 Formatting the Internal HDD 9 Network Connection 10 Connecting Wired Ethernet 10 Connecting Wireless 10 Connecting to this device from a Networked Computer 11 TV Connection 13 Connecting to AV Equipments 13 Using the AV Playback Function 16 Browsing Media Files 16 AV Input Schedule 19 Setup 21 Language 21 ...

Page 4: ......

Page 5: ...nent video output Supports Music Slideshow Supports AV recording and scheduled recording Supports external USB storage media playback Supports playback via SAMBA Ethernet protocol Supports USB wireless dongle Supports Transcode utility for extended codec support of Ethernet playback System Requirements A desktop or notebook PC with Ethernet port Available USB connection 350 MHz Pentium class proce...

Page 6: ...ingernailn Hold and pull at the indentationo to take out the battery unit Load the new battery towards up The battery model of this remote control is CR2025 Refer to the illustration to insert the battery accurately with the positive terminal facing up see illustration below Insert the battery holder Place the new battery and make sure it is inserted and seated securely Note This device must be ac...

Page 7: ...ecording repeat press for record length setup 12 DELETE Delete files in browsing mode only 13 Cursor buttons 14 ENTER Play Pause the current selected file or folder 15 HOME Return to Home Menu 16 MENU Display DVD menu Show menu dialogue box in browsing mode only 17 STOP Stop current playback 18 Fast rewind Fast forward 19 Play the previous next file Previous page next page in browsing mode only 20...

Page 8: ...tputs digital video audio signals with a HDMI cable cable not provided 7 RJ45 connector Connect this device to Local Area Network LAN using a RJ45 cable cable not provided 8 USB type B connector Connecting this device with a PC using a USB cable 9 Power connector Connect to the AC adapter DC 12V 2A 10 Component video output connector Output component video signals The colors of the jacks are green...

Page 9: ...to your computer with the USB cable 3 Copy files just like using a USB external HDD You can do it with Windows Explorer or Mac OS Finder No additional software is needed 4 Disconnect this device from your computer using safe remove procedure of your OS How do I play media files on my TV 1 Connect this device to your TV with correct cables 2 Plug the AC adapter into the Power Connector 3 Press the ...

Page 10: ...hen connect the other end to computer s USB port 3 The computer will detect this device and you can start accessing the drive Note Always remove USB cable before activating this device Transferring Files on a USB Connection Copy files into the internal HDD of this device just like using a USB external HDD You can do it with Windows Explorer Mac OS Finder or any other applications appropriate for t...

Page 11: ...r 2 Insert the utility CD into computer s optical drive and then the CD Main Menu should automatically appear on the screen If the Main Menu doesn t show up go to My Computer and browse the CD By executing the index html file the Main Menu will appear 3 Click on Install Firmware and then follow the on screen instructions to complete installation program operation 4 Disconnect this device from USB ...

Page 12: ...lick the File menu and select Save or Save as Note If a playlist does not appear on the TV when navigating this device open it on your PC using the Playlist Manager and save it again Transcode Server The Transcode Server utility included with this device allows you to play media files of RMVB H 264 VC 1 codecs via network connection A RMVB H 264 file stored on your PC can be played on TV using thi...

Page 13: ...S to format the internal HDD You may need to refer to the manual of your OS for detailed instruction of its format utility Formatting the drive will erase all existing data If you have files on the drive you want to save move them to another drive before reformatting Note Do not partition the internal HDD leave it as a single large volume Partitioning the internal HDD may cause this device to halt...

Page 14: ...his device you need to connect to it using a computer on the network Connecting Wireless Note This device only supports wireless dongle with Realtek RTL8187B controller Please consult your local distributor or vendor website for a certified USB wireless dongle 1 Connect the wireless dongle to the USB host port on the back of this device 2 If you have not already done so connect this device to your...

Page 15: ...see a message indicating Test OK and Show Net Info and the Network Setup menu will display showing the IP address used by this device 13 Press the HOME button to return to Home Menu Connecting to this device from a Networked Computer Note The network computer must be on the same subnet or network segment as this device Manually mapping a drive letter from a Windows PC 1 If you have not already don...

Page 16: ...nd copy files from your network volumes onto this device Transferring Files to this device via the Network After mapping a drive letter to this device you can use the standard methods for your operating system to create folders on the drive then save or drag and drop files just as you would to any other drive attached to your computer By using a network connection you can transfer files to and fro...

Page 17: ...ack immediately Note Some TV sets are equipped with DVI input ports which will receive video signals only but these DVI ports use HDMI connectors instead of standard DVI connectors If you find no audio signal output while using HDMI connection connect the Composite Audio Connection or the Coaxial Audio Connection as an auxiliary Composite Audio Video Connection The composite audio video is compati...

Page 18: ...the correct one SCART Video Connection If your TV is equipped with SCART input connect the Composite connectors to a SCART adapter to output the audio video signal SCART adapter not provided Coaxial Audio Connection For a high quality digital audio you connect this connector to an AV receiver which equips a digital audio decoder RCA coaxial cable not provided Power Connection Connect the DC jack o...

Page 19: ...ain to return to Standby mode Note Always remove USB cable before activating this device When using the remote control point the remote control towards the front of this device When this device is off scheduled recordings will be off When turning the HDD into Standby mode please avoid moving it for 2 3 minutes due to spin down of the device Moving the HDD while it is still spinning may damage it W...

Page 20: ...rs and files located on an external USB device connected to the USB 2 0 host port on this device Note The USB device must be formatted NTFS or FAT32 to support playback on the TV If the USB drive is partitioned this device will read the first primary partition ONLY Network Browse shared network volumes via SAMBA protocol when this device is connected to network AV Input Switch the display to view ...

Page 21: ...been protected with CSS protection Always obey copyright and intellectual property rights Do not copy DVDs with copyright and do not distribute them to others Playing Media Files from Internal HDD External USB 1 Select a location to browse for the video file you want to play Select HDD if the file is saved on the internal HDD or External USB if the file is located on an external USB device connect...

Page 22: ...e recording would be 20080724_1900 mpg This device uses MPEG 2 as the file format for all AV recordings Use the following instructions to view an AV recording 1 Connect audio video out from this device to the appropriate input connections on your TV 2 Turn on your TV and change the input setting as needed to receive input from this device Refer to the manual that came with the TV if you are uncert...

Page 23: ...e Connecting to a Video Source The composite audio video AV input is compatible with most DV Cam TV Setup Box Home Video DVD and other video sources Yellow Video signal White Left audio channel Red Right audio channel Recording TV Programs or Other Video Input You can record an audio video signal from the TV or any other AV device connected to the composite input connectors on this device You can ...

Page 24: ...emote control to set the date and time you want recording to start 3 Use the buttons on the remote control to set the recording length in hours and minutes 4 If you want to record this program more than once set the Repeat option you want to use 5 When you have finished setting up the record schedule press the ENTER button on the remote control and confirm the schedule 6 30 sec before the start ti...

Page 25: ...fault audio when playing a DVD movie Subtitle Select the language for the default subtitle when playing a DVD movie Disc Language Select the language for DVD menus Audio Speaker 2 CH Outputs stereo audio 5 1 CH Select for use with Dolby Digital Night Mode Night Mode lowers the audio output and avoids rush sound OFF Turns off night mode or the comfort option ON Decreases audio output to a soft leve...

Page 26: ...a 16 9 ratio TV in PAL system countries 720P 60HZ Use the 720p output resolution with a 16 9 ratio TV in NTSC system countries 1080i 50HZ Use the 1080i output resolution with a 16 9 ratio TV in PAL system countries 1080i 60HZ Use the 1080i output resolution with a 16 9 ratio TV in NTSC system countries REC Quality Press the REC button repeatedly while recording to adjust recording time Option Vide...

Page 27: ... setting up your wireless AP Shared Key WPA2 WPA Enterprise and RADIUS with 802 1x authentication are not supported System Time Set time clock used by this device Use the number keys on the remote control to enter the year 4 digit format month 1 2 digits as needed and day 1 2 digits Enter the time in hours minutes and seconds on a 24 hour clock Restore Default Set all settings to default values ex...

Page 28: ...Setup 24 Folder Select playlist or folder containing music to play during slideshow ...

Page 29: ...Audio Support MP3 AC3 Dolby Digital Encoding WAV OGG WMA Video Support MPEG 1 MPEG 2 MPEG 4 AVI DivX 3 11 4 x 5 x 6 x HD Xvid MP4 MOV DVD Folder DVD ISO Photo Support JPEG baseline BMP DVD Folder DVD Menu Audio Subtitle Angle Selection DivX Subtitle Format IDX SUB SRT SSA SMI Music Slideshow Music playback during photo slideshow Max Content Resolution Video 1920 x 1080 pixels JPEG 5120 x 3840 pixe...

Page 30: ...ing firmware on the HDD for the first time The message will disappear in seconds 2 The partition on the installed HDD has been damaged or altered by other software Reinstalling the firmware again will solve this problem 3 The HDD is physically damaged or not properly installed Reinstalling the HDD may solve this problem consulting your HDD local distributor if you find HDD physically damaged Copyr...

Page 31: ...Memo 27 ...

Page 32: ...T7451360 50 ...

Reviews: