background image

86

86

86

86

Conteúdo da embalagem

Verifique se tem os seguintes itens na 

embalagem do seu produto:


-

ARCHOS 53 Platinum


-

Bateria


-

Headset


-

Micro adaptador de SIM


-

Cabo USB


-

Carregador


-

Guia do usuário


-

Garantia, avisos legais e de segurança

Os itens fornecidos com o seu dispositivo e 

os acessórios disponíveis podem variar entre 

regiões e fornecedores de serviços.

Os itens fornecidos foram concebidos 

exclusivamente para o seu dispositivo e podem 

ser incompatíveis com outros dispositivos.

O uso de acessórios não aprovados pode 

resultar em mau funcionamento do seu 

dispositivo.

ARCHOS_53_Platinum_book_quick.indd   86

23/04/2013   18:15:17

Summary of Contents for S3 Platinum

Page 1: ...n updating and improving our products your device s software may have a slightly different appearance or modified functionality than presented in this Quick Start Guide Package contents Description of the phone Assembling Getting started Through the wizard 3G WiFi connection Google account Contacts Troubleshooting 2 3 6 8 9 10 12 14 ARCHOS_53_Platinum_book_quick indd 1 23 04 2013 18 14 51 ...

Page 2: ...rranty Legal Safety notices The items supplied with your device and available accessories may vary depending on your region or service provider The supplied items are designed only for your device and may not be compatible with other devices Unapproved accessories may cause your device to malfunction ARCHOS_53_Platinum_book_quick indd 2 23 04 2013 18 14 52 ...

Page 3: ... 1 05 last modific NEW Rev O AC53 CONFIDEN DRAW 5 2 1 4 3 EN 1 Webcam Loudspeaker Volume buttons Microphone ON OFF button 2 3 4 5 Description of the phone ARCHOS_53_Platinum_book_quick indd 3 23 04 2013 18 14 53 ...

Page 4: ...cale 1 1 05 0 last modific NEW Rev O AC53 CONFIDEN DRAWI 8 9 Description of the phone Micro USB port Headset jack Camera Flashlight Loudspeaker 6 9 8 7 10 ARCHOS_53_Platinum_book_quick indd 4 23 04 2013 18 14 54 ...

Page 5: ... screen Home button short press to return to the Home screen press and hold to open the list of recent applications Back button return to the previous screen phone Menu button Home button Recent apps Back button 13 12 11 ARCHOS_53_Platinum_book_quick indd 5 23 04 2013 18 14 55 ...

Page 6: ...nwards in the 2G slot slot 2 3 To insert a Memory card push upwards the memory card slot and lift the cover Place the Memory card Close the cover and push it downwards 4 Align the battery s 4 contact points with those of the phone and gently press the battery down into place 5 Replace the battery cover clicking it back into position Before using your device for the first time charge completely its...

Page 7: ... to removed the bottom casing Picture to show how to insert the batter ture to show how to insert the battery pack Picture to show the scards position Slot1 Slot2 EN ARCHOS_53_Platinum_book_quick indd 7 23 04 2013 18 14 56 ...

Page 8: ...ract with the Google server 1 Press and hold the ON OFF button to turn on the device When you turn on your device a PIN code may be requested 2 Type the PIN code supplied with your SIM card Beware of typing a wrong PIN code 3 Select OK Turn OFF To turn off your device press and hold the ON OFF button and then select Power off OK Getting started ARCHOS_53_Platinum_book_quick indd 8 23 04 2013 18 14...

Page 9: ... To turn on the screen press the ON OFF button Through the wizard The first time you start up your ARCHOS the installation wizard will help you set up your device Language Date time WiFi connection Location service options 3rd party apps ARCHOS_53_Platinum_book_quick indd 9 23 04 2013 18 14 57 ...

Page 10: ... covered by your 3G provider s 3G or EDGE network When connected to the 3G network the 3G icon is displayed in the status bar To be able to access Internet the mobile data icon must be activated Drag down the status bar and touch the mobile data icon to activate it 3G WiFi connection ARCHOS_53_Platinum_book_quick indd 10 23 04 2013 18 14 57 ...

Page 11: ...o open the settings menu 3 In the Wireless networks if the WiFi is off slide the WiFi switch to the ON position Once the WiFi is on the ARCHOS will scan for WiFi networks in range 4 Touch WiFi to display available networks 5 Touch the name of network you want to connect to Private networks are shown with a lock icon and will require you to enter your password ARCHOS_53_Platinum_book_quick indd 11 ...

Page 12: ...information about the account Once the account is created you can access Play Store Gmail Talk Maps and many other apps 4 Go to Settings Accounts Google 5 Select your account The list of information that can be sync are displayed Make sure they are all checked in order to be sync Your data are backed up and you can get them back in case of loss of your device or SIM card Google Contacts ARCHOS_53_...

Page 13: ...ts in your phone 2 From a Home or All Apps screen select the People app 3 Touch the Menu button Import Export 4 In Import export contacts select Import from SIM card 5 Go to Settings Accounts Google 6 Select you Google account Make sure Contacts is checked 7 Select the Menu button then Sync now Your contacts are saved to your Google account ARCHOS_53_Platinum_book_quick indd 13 23 04 2013 18 14 57...

Page 14: ...n another location Verify the network coverage with your operator Unable to make outgoing calls Make sure your phone is connected to a network and the network is not overloaded or unavailable Unable to receive incoming calls Make sure your phone is switched on and connected to a network check for overloaded or unavailable network SIM card PIN locked Contact your network operator to obtain the PUK ...

Page 15: ... améliorons régulièrement nos produits le logiciel de votre appareil peut présenter une interface ou des fonctionnalités légèrement différentes de celles décrites dans ce guide Contenu de la boîte Description du téléphone Assemblage Mise en route Assistant de démarrage Connexion 3G WiFi Compte Google Contacts Dépannage 16 17 20 22 23 24 26 28 Table des matières ARCHOS_53_Platinum_book_quick indd 1...

Page 16: ...nties et des mentions légales Il se peut que les éléments fournis de même que les accessoires varient en fonction votre localité ou de votre opérateur Les éléments fournis sont conçus uniquement pour votre appareil et ils pourraient ne pas être compatibles avec d autres appareils Des accessoires non conformes peuvent la source d un mauvais fonctionnement ARCHOS_53_Platinum_book_quick indd 16 23 04...

Page 17: ...5 last modific NEW Rev O AC53 CONFIDEN DRAW 5 2 1 4 3 FR Description du téléphone 1 Caméra frontale Haut parleur Boutons de volume Bouton ON OFF Micro 2 3 4 5 ARCHOS_53_Platinum_book_quick indd 17 23 04 2013 18 14 58 ...

Page 18: ...scale 1 1 05 0 last modific NEW Rev O AC53 CONFIDEN DRAWI 8 9 6 8 7 Prise kit piéton Port Micro USB Caméra Flash Haut parleur 8 7 Description du téléphone ARCHOS_53_Platinum_book_quick indd 18 23 04 2013 18 14 59 ...

Page 19: ...Bouton Menu affiche une liste d options disponibles pour un écran donné Bouton Accueil appui court pour revenir à l écran d accueil appui long pour afficher une liste d applications récentes Bouton Retour retour à l écran précédent ARCHOS_53_Platinum_book_quick indd 19 23 04 2013 18 15 00 ...

Page 20: ...l emplacement SIM standard en orientant la face magnétique vers le bas emplacement 2 3 Pour insérer la carte mémoire poussez vers le haut le clip puis soulevez le Placez la carte mémoire Fermez le clip et poussez le vers le bas 4 Alignez les 4 points de contact de la batterie avec ceux du téléphone puis appuyez doucement pour insérer la batterie 5 Remettez en place la coque arrière Avant d utilise...

Page 21: ... to removed the bottom casing Picture to show how to insert the batter ture to show how to insert the battery pack Picture to show the scards position Slot1 Slot2 FR ARCHOS_53_Platinum_book_quick indd 21 23 04 2013 18 15 00 ...

Page 22: ...e bouton ON OFF pour allumer votre appareil Lorsque vous allumez votre appareil il se peut qu un code PIN vous soit demandé 2 Saisissez votre code SIM 3 Sélectionnez OK Eteindre Pour éteindre votre téléphone faites un appui long sur le bouton ON OFF puis sélectionnez Eteindre OK Mise en route ARCHOS_53_Platinum_book_quick indd 22 23 04 2013 18 15 00 ...

Page 23: ...our rallumer l écran appuyez sur le bouton ON OFF La première fois que vous allumez votre téléphone l assistant de démarrage vous permet de le paramétrer Langue Date heure Connexion WiFi Les options du service de localisation Applications tierces ARCHOS_53_Platinum_book_quick indd 23 23 04 2013 18 15 01 ...

Page 24: ...e zone de réseau 3G EDGE couverte par votre opérateur 3G Lorsque vous êtes connecté au réseau 3G l icône 3G est affichée dans la barre de statut Pour accéder à Internet l icône Données mobiles doit être activée Tirez vers le bas la barre de statut et sélectionnez l icône Données mobiles pour l activer ARCHOS_53_Platinum_book_quick indd 24 23 04 2013 18 15 01 ...

Page 25: ... s affiche 2 Sélectionnez Paramètres pour afficher la page des paramètresWiFi 3 Si leWiFi est éteint faites glisser l interrupteur WiFi sur la position OUI 4 Une fois que leWiFi est activé le téléphone recherche des réseauxWiFi à portée 5 Sélectionnez le nom du réseau auquel vous voulez vous connecter 6 Les réseaux privés sont affichés avec un cadenas Ils nécessitent un mot de passe ARCHOS_53_Plat...

Page 26: ...ions demandées Une fois que le compte est créé accédez aux applications Play Store Gmail Talk Maps et beaucoup d autres 4 Sélectionnez Paramètres Comptes Google 5 Sélectionnez votre compte La liste des informations qu on peut synchroniser est affichée Assurez vous que toutes les options à synchroniser sont cochées Vos données sont sauvegardées et vous pouvez les récupérer en cas de perte de votre ...

Page 27: ...e l écran Toutes les applications sélectionnez l application People 3 Sélectionnez le bouton Menu button Importer Exporter 4 Dans Importer exporter contacts sélectionnez Importer à partir de la carte SIM 5 Sélectionnez Paramètres Comptes Google 6 Sélectionnez votre compte Google Assurez vous que Contacts est coché 7 Sélectionnez le bouton Menu puis Synchroniser maintenant Vos contacts sont sauvega...

Page 28: ...iche Pas de service Tentez de vous connecter à partir d un autre endroit Vérifiez la couverture réseau avec votre opérateur Impossible de passer des appels Assurez vous que votre téléphone est connecté au réseau et que le réseau n est ni saturé ni indisponible Impossible de recevoir des appels Assurez vous que le téléphone est allumé et connecté au réseau Carte SIM bloquée mauvais code PIN Contact...

Page 29: ...FAQs auf www archos com Diese unbedingt durchlesen bevor Sie eine Rückgabe des Produkts in Erwägung ziehen Es könnte ein geringfügiges Problem vorliegen Da unsere Produkte kontinuierlich aktualisiert und weiterentwickelt werden kann die Software Ihres Gerätes in Erscheinung und Funktionalität geringfügige Abweichungen zu den Darstellungen in dieser Schnellstartanleitung aufweisen ARCHOS_53_Platinu...

Page 30: ...Sicherheitshinweise Die mit Ihrem Gerät mitgelieferten Elemente und das verfügbare Zubehör können je nach Region oder Dienstleister abweichen Die mitgelieferten Elemente wurden ausschließlich für Ihr Gerät entwickelt und sind mit anderen Geräten nicht kompatibel Nicht genehmigtes Zubehör kann zu einer Fehlfunktion Ihres Geräts führen ARCHOS_53_Platinum_book_quick indd 30 23 04 2013 18 15 04 ...

Page 31: ... 1 05 last modific NEW Rev O AC53 CONFIDEN DRAW 5 2 1 4 3 DE Beschreibung des Geräts 1 Webcam Lautsprecher Lautstärketasten Mikrofon EIN AUS Taste 2 3 4 5 ARCHOS_53_Platinum_book_quick indd 31 23 04 2013 18 15 04 ...

Page 32: ...1 1 05 0 last modific NEW Rev O AC53 CONFIDEN DRAWI 8 9 Kopfhöreranschluss Micro USB Anschluss Kamera Blitzlicht Lautsprecher 6 9 8 7 9 Beschreibung des Geräts ARCHOS_53_Platinum_book_quick indd 32 23 04 2013 18 15 05 ...

Page 33: ... auf dem aktuellen Bildschirm die Liste verfügbarer Optionen Home Taste Kurz drücken um zum Startbildschirm zu gelangen drücken und halten um eine Liste der neuesten Anwendungen zu öffnen Back Zurück Taste Zurück zum vorherigen Bildschirm ARCHOS_53_Platinum_book_quick indd 33 23 04 2013 18 15 05 ...

Page 34: ... in den 2G Slot schieben Slot 2 3 Um eine Speicherkarte einzuführen schieben Sie den Speicherkartenslot nach oben und heben die Abdeckung an Die Speicherkarte jetzt einlegen Die Abdeckung schließen und nach unten drücken 4 Richten Sie die 4 Kontaktpunkte des Akkus mit denen desTelefons aus und drücken Sie den Akku leicht in seine Position 5 Die Akkuabdeckung wieder anbringen und einrasten Vor der ...

Page 35: ... to removed the bottom casing Picture to show how to insert the batter ture to show how to insert the battery pack Picture to show the scards position Slot1 Slot2 DE ARCHOS_53_Platinum_book_quick indd 35 23 04 2013 18 15 05 ...

Page 36: ...Taste um das Gerät einzuschalten Beim Einschalten des Geräts muss eine PIN Nummer eingegeben werden 2 Geben Sie die mit Ihrer SIM Karte erhaltene PIN Nummer ein 3 Wählen Sie OK Ausschalten Um das Gerät auszuschalten drücken und halten Sie die EIN AUS Taste und wählen dann Power off Ausschalten OK Getting started ARCHOS_53_Platinum_book_quick indd 36 23 04 2013 18 15 05 ...

Page 37: ...en die grundlegenden Einstellungen vorzunehmen Sprache Datum Uhrzeit WLAN Verbindung Standortdienst Anwendungen von Drittanbietern Tipp Wird der Touchscreen über einen bestimmten Zeitraum hinweg nicht benutzt wird dieser vom Gerät abgeschaltet Um den Bildschirm wieder einzuschalten drücken Sie die EIN AUS Taste ARCHOS_53_Platinum_book_quick indd 37 23 04 2013 18 15 06 ...

Page 38: ...des 3G oder EDGE Netzwerks Ihres 3G Anbieters befinden Ist das Gerät mit dem 3G Netzwerk verbunden wird in der Statusleiste das 3G Symbol angezeigt Um auf das Internet zugreifen zu können muss das Mobildatensymbol aktiviert werden Ziehen Sie die Statusleiste nach unten und tippen Sie auf das Mobildatensymbol um es zu aktivieren ARCHOS_53_Platinum_book_quick indd 38 23 04 2013 18 15 06 ...

Page 39: ... WLAN Einstellungen zu öffnen 3 Wenn WLAN deaktiviert ist schieben Sie denWLAN Schalter in die Position EIN Sobald WLAN eingeschaltet ist sucht der ARCHOS nach Netzwerken in Reichweite 4 Berühren WLAN 5 Berühren Sie den Namen des Netzwerks mit dem Sie verbunden werden möchten Gesicherte Netzwerke werden mit einem Schlossß Symbol angezeigt und erfordern die Eingabe eines Passworts ARCHOS_53_Platinu...

Page 40: ... die Informationen für das Konto ein Nachdem das Konto erstellt wurde können Sie auf Play Store Gmail Talk Maps und viele andere Apps zugreifen 3 Gehen Sie zu Settings Accounts Google Einstellungen Konten Synchronisierung Google 4 Wählen Sie Ihr Konto aus Die Liste der synchronisierbaren Informationen wird angezeigt Um eine Synchronisierung zu erhalten müssen alle markiert sein Ihre Daten werden g...

Page 41: ...le Kontakte 3 Tippen Sie auf die Menütaste Import Export Importieren Exportieren Unter Import export contacts Kontakte importieren exportieren wählen Sie Import from SIM card Von SIM Karte importieren 4 Gehen Sie zu Settings Accounts Google Einstellungen Konten Synchronisierung Google 5 Wählen Sie Ihr Google Konto aus Contacts Kontakte muss markiert sein 6 Drücken Sie die Menu Menü Taste und dann ...

Page 42: ...inem anderen Standort Überprüfen Sie die Netzwerkabdeckung bei Ihrem Anbieter Keine ausgehenden Anrufe möglich Überprüfen Sie die Verbindung Telefon Netzwerk und ob das Netzwerk überlastet oder nicht verfügbar ist Eingehende Anrufe können nicht empfangen werden Überprüfen Sie ob das Telefon eingeschaltet und mit einem Netzwerk verbunden und ob das Netzwerk überlastet oder nicht verfügbar ist PIN d...

Page 43: ...mación consulte la sección de preguntas y respuestas en www archos com Examínela detenidamente antes de pensar en realizar cualquier devolución Puede que su problema tenga una fácil solución Al estar actualizando y mejorando constantemente nuestros productos el aspecto o el software de su dispositivo pueden variar ligeramente con respecto a lo descrito en esta guía de inicio rápido ARCHOS_53_Plati...

Page 44: ...ntos suministrados con su dispositivo y los accesorios disponibles pueden variar según la zona geográfica o proveedor de servicio utilizado Los elementos suministrados han sido desarrollados en exclusiva para este dispositivo y pueden no ser compatibles con otros dispositivos La utilización de accesorios no homologados podría ocasionar un funcionamiento defectuoso del producto ARCHOS_53_Platinum_b...

Page 45: ... last modific NEW Rev O AC53 CONFIDEN DRAW 5 2 1 4 3 ES Descripción del dispositivo 1 USB Webcam Altavoces Botones de volumen Micrófono Botón ON OFF 2 3 4 5 a ARCHOS_53_Platinum_book_quick indd 45 23 04 2013 18 15 08 ...

Page 46: ...cale 1 1 05 0 last modific NEW Rev O AC53 CONFIDEN DRAWI 8 9 46 Puerto micro USB Conector de headset Camera Flashlight 6 9 8 7 Descripción del dispositivo ARCHOS_53_Platinum_book_quick indd 46 23 04 2013 18 15 08 ...

Page 47: ...a lista de opciones disponibles en la pantalla actual Botón Inicio Pulse brevemente para volver a la pantalla de inicio mantenga pulsado para abrir la lista de aplicaciones recientes Botón Volver Vuelve a la anterior pantalla ARCHOS_53_Platinum_book_quick indd 47 23 04 2013 18 15 08 ...

Page 48: ...ara insertar una tarjeta de memoria presione hacia arriba la ranura de la tarjeta de memoria y levante la tapa Coloque la tarjeta de memoria Cierre la tapa y presione hacia abajo 4 Alinee los 4 puntos de contacto de la batería con los del teléfono y presione suavemente la batería hasta que quede acoplada en su sitio 5 Vuelva a colocar la tapa de la batería oirá un clic de cierre Antes de utilizar ...

Page 49: ... to removed the bottom casing Picture to show how to insert the batter ture to show how to insert the battery pack Picture to show the scards position Slot1 Slot2 ES ARCHOS_53_Platinum_book_quick indd 49 23 04 2013 18 15 10 ...

Page 50: ...iones que interactúan con el servidor de Google 1 Mantenga pulsado el botón ON OFF para encender el dispositivo Al encender el dispositivo se le pedirá que introduzca un código PIN 2 Introduzca el código PIN suministrado con su tarjeta SIM 3 Haga clic en OK Aceptar Apagado Para apagar el dispositivo mantenga pulsado el botón ON OFF y luego seleccione Power off OK Apagar Aceptar ARCHOS_53_Platinum_...

Page 51: ...r el dispositivo Idioma Fecha y hora Conexión WiFi El servicio de ubicación Aplicaciones de terceras partes Consejos El dispositivo desactiva la pantalla táctil tras un determinado periodo sin utilizar Para volver a activar la pantalla pulse el botón ON OFF ARCHOS_53_Platinum_book_quick indd 51 23 04 2013 18 15 11 ...

Page 52: ...que se encuentre en la zona de cobertura de su proveedor 3G o red EDGE Al conectarse a la red 3G aparecerá el icono 3G en la barra de estado Para poder acceder a Internet el icono de datos móviles debe estar activado Arrastre hacia abajo la barra de estado y pulse el icono de datos móviles para activarlo ARCHOS_53_Platinum_book_quick indd 52 23 04 2013 18 15 11 ...

Page 53: ...ivado deslice el interruptorWiFi para ajustarlo en la posición ON Una vez activado el sistemaWiFi el ARCHOS buscará redesWiFi que se encuentren dentro de su alcance 4 Toque WiFi 5 Toque el nombre de la red a la que desee conectarse Las redes privadas se muestran con un icono de candado y será preciso que introduzca su contraseña ARCHOS_53_Platinum_book_quick indd 53 23 04 2013 18 15 11 ...

Page 54: ...n pantalla para introducir los datos de la cuenta Una vez creada su cuenta podrá acceder a Play Store Gmail Talk Maps y muchas otras aplicaciones 4 Vaya a Settings Ajustes Accounts Cuentas Google 5 Seleccione su cuenta Aparecerá la lista de datos que puede sincronizar Asegúrese de marcarlos todos para proceder a su sincronización Se guardará una copia de seguridad de sus datos que podrá recuperar ...

Page 55: ...s aplicaciones seleccione la aplicación Contactos 3 Pulse el botón Menú Import Export Importar exportar 4 En Importar exportar contactos seleccione Import from SIM card Importar de USIM 5 Vaya a Settings Ajustes Accounts Cuentas Google 6 Seleccione su cuenta de Google Asegúrese de que Contacts Contactos está marcado 7 Seleccione el botón Menú y luego Sync now Sincronizar para guardar sus contactos...

Page 56: ...lugar Compruebe la cobertura de red de su operador No consigo hacer llamadas Asegúrese de que el teléfono esté conectado a una red y de que la red no esté sobrecargada o indisponible No consigo recibir llamadas Compruebe que su teléfono esté encendido y conectado a una red verifique que la red no esté sobrecargada o indisponible El PIN de mi tarjeta SIM está bloqueado Póngase en contacto con su op...

Page 57: ...fezione Descrizione del dispositivo Assemblaggio Introduzione Installazione guidata Connessione 3G WiFi Account Google e contatti Risoluzione dei problemi 58 59 62 64 65 66 68 70 ARCHOS_53_Platinum_book_quick indd 57 23 04 2013 18 15 12 ...

Page 58: ...lla sicurezza Gli articoli forniti con il dispositivo e gli accessori disponibili possono variare in base al Paese o al gestore telefonico Gli articoli in dotazione sono progettati esclusivamente per il dispositivo in questione e potrebbero non essere compatibili con altri dispositivi Accessori non approvati possono causare il malfunzionamento del dispositivo ARCHOS_53_Platinum_book_quick indd 58 ...

Page 59: ...st modific NEW Rev O AC53 CONFIDEN DRAW 5 2 1 4 3 59 IT Webcam Altoparlanti Pulsanti per il volume Microfono Pulsante ON OFF 1 3 2 5 4 Descrizione del dispositivo ARCHOS_53_Platinum_book_quick indd 59 23 04 2013 18 15 13 ...

Page 60: ...1 05 0 last modific NEW Rev O AC53 CONFIDEN DRAWI 8 9 60 Descrizione del dispositivo Jack per auricolare Porta micro USB Fotocamera Flash Altoparlanti 6 8 7 10 9 ARCHOS_53_Platinum_book_quick indd 60 23 04 2013 18 15 13 ...

Page 61: ...a di opzioni disponibili sulla schermata corrente Pulsante Home premere brevemente per tornare alla schermata principale premere e tenere premuto per aprire l elenco delle applicazioni recenti Pulsante Indietro ritorno alla schermata precedente ARCHOS_53_Platinum_book_quick indd 61 23 04 2013 18 15 13 ...

Page 62: ...ot 2G slot 2 3 Per inserire una scheda di memoria premere verso l alto lo slot della scheda di memoria e sollevare la copertura Inserire la scheda di memoria Chiudere la copertura e premerla verso il basso 4 Allineare i 4 punti di contatto della batteria con quelli del telefono e premere delicatamente la batteria in posizione 5 Riposizionare la copertura della batteria reincastrandola in sede Prim...

Page 63: ...to removed the bottom casing Picture to show how to insert the batter ture to show how to insert the battery pack Picture to show the scards position Slot1 Slot2 63 IT ARCHOS_53_Platinum_book_quick indd 63 23 04 2013 18 15 13 ...

Page 64: ...zioni che interagiscono con il server di Google 1 Premere e tenere premuto il pulsante ON OFF per accendere il dispositivo Quando si accende il dispositivo può essere richiesto un codice PIN 2 Digitare il codice PIN fornito con la scheda SIM 3 Selezionare OK Spegnimento Per spegnere il dispositivo premere e tenere premuto il pulsante ON OFF e quindi selezionare Power off OK ARCHOS_53_Platinum_book...

Page 65: ...positivo Lingua Data e ora Connessione WiFi Il servizio di localizzazione Applicazioni di altri produttori Suggerimenti Il dispositivo disattiva il touch screen quando non lo si utilizza per un periodo determinato Per attivare lo schermo premere il pulsante ON OFF ARCHOS_53_Platinum_book_quick indd 65 23 04 2013 18 15 13 ...

Page 66: ... trova in una zona coperta dalla rete 3G o EDGE del proprio provider 3G Quando è collegato alla rete 3G l icona 3G è visualizzata nella barra di stato Per poter accedere a Internet l icona dei dati mobili deve essere attivata Trascinare verso il basso la barra di stato e toccare l icona dei dati mobili per attivarla ARCHOS_53_Platinum_book_quick indd 66 23 04 2013 18 15 13 ...

Page 67: ...iFi 3 Se la reteWiFi è disattivata spostare il pulsante WiFi sulla posizione ON Una volta attivata la reteWiFi ARCHOS scansionerà le retiWiFi presenti 4 Selezionare WiFi 5 Selezionare il nome di rete a cui si desidera connettersi Le reti private vengono visualizzate con un lucchetto e richiedono l inserimento di una password ARCHOS_53_Platinum_book_quick indd 67 23 04 2013 18 15 13 ...

Page 68: ...ioni relative all account Una volta che l account è stato creato è possibile accedere a Play Store Gmail Talk Maps e molte altre applicazioni 4 Andare a Impostazioni Account Google 5 Selezionare il proprio account Viene visualizzata la lista di informazioni che possono essere sincronizzate Affinché siano sincronizzate assicurarsi che siano tutte selezionate Viene eseguito un backup dei dati che po...

Page 69: ...o 2 Da una schermata Home oTutte le Applicazioni selezionare l applicazione Persone 3 Toccare il tasto Menu Importa Esporta 4 In Importa Esporta contatti selezionare Importa da scheda SIM 5 Andare a Impostazioni Account Google 6 Scegliere il proprio account Google Assicurarsi che Contatti sia selezionato 7 Selezionare il pulsante Menu quindi Sincronizza ora I contatti sono salvati sul proprio acco...

Page 70: ...nettersi in un altro luogo Verificare la copertura di rete con l operatore Impossibile effettuare chiamate in uscita Assicurarsi che il telefono sia connesso a una rete e che la rete non sia sovraccarica o non disponibile Impossibile ricevere chiamate in arrivo Assicurarsi che il telefono sia acceso e collegato ad una rete controllare che la rete non sia sovraccarica o non disponibile PIN della sc...

Page 71: ...eeg voor meer informatie de veelgestelde vragen FAQ s op www archos com Lees eerst de antwoorden op deze vragen voordat u het product terugstuurt Uw probleem is dan mogelijk snel opgelost Aangezien wij onze producten regelmatig updaten en verbeteren kunnen de vormgeving en of de functies van uw apparaatsoftware afwijken van de software in deze Verkorte handleiding ARCHOS_53_Platinum_book_quick ind...

Page 72: ...n en veiligheidsvoorschriftem De onderdelen die bij het apparaat zijn meegeleverd en de accessoires die verkrijgbaar zijn verschillen per land en per service provider De meegeleverde onderdelen zijn uitsluitend bestemd voor uw apparaat en zijn mogelijk niet compatibel met andere apparaten Niet goedgekeurde accessoires kunnen tot storingen van het apparaat leiden ARCHOS_53_Platinum_book_quick indd ...

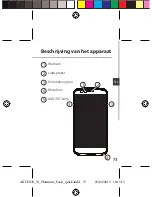
Page 73: ... last modific NEW Rev O AC53 CONFIDEN DRAW 5 2 1 4 3 NL akking Beschrijving van het apparaat Webcam Luidspreker Volumeknoppen Microfoon AAN UIT knop 1 3 2 5 4 ARCHOS_53_Platinum_book_quick indd 73 23 04 2013 18 15 15 ...

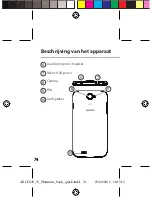
Page 74: ... 05 0 last modific NEW Rev O AC53 CONFIDEN DRAWI 8 9 74 Aansluiting voor headset Micro USB poort Camera Flits Luidspreker 6 8 7 10 9 Beschrijving van het apparaat ARCHOS_53_Platinum_book_quick indd 74 23 04 2013 18 15 15 ...

Page 75: ...enu opties van het huidige scherm weergeven Home knop kort indrukken om terug te keren naar het beginscherm Ingedrukt houden om het overzicht van recente toepassingen weer te geven Back knop terug naar het vorige scherm ARCHOS_53_Platinum_book_quick indd 75 23 04 2013 18 15 15 ...

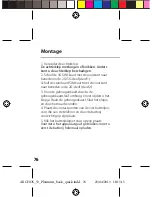
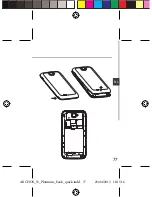
Page 76: ...euf sleuf 2 3 Voor de geheugenkaart duwt u de geheugenkaartsleuf omhoog en verwijdert u het klepje Plaats de geheugenkaart Sluit het klepje en duw het naar beneden 4 Plaats de contactpunten van de vier batterijen voor die van de telefoon en duw de batterij voorzichtig op zijn plaats 5 Klik het batterijklepje terug op zijn plaats Voordat u het apparaat gaat gebruiken moet u eerst de batterij helema...

Page 77: ... to removed the bottom casing Picture to show how to insert the batter ture to show how to insert the battery pack Picture to show the scards position Slot1 Slot2 NL ARCHOS_53_Platinum_book_quick indd 77 23 04 2013 18 15 16 ...

Page 78: ... via de Google server te kunnen gebruiken 1 Houd de AAN UIT knop ingedrukt om het apparaat in te schakelen Mogelijk moet u een pincode invoeren nadat u het apparaat heeft ingeschakeld 2 Voer de pincode in die is meegeleverd bij uw SIM kaart 3 Kies OK Uitschakelen Om het apparaat uit te schakelen houdt u de AAN UIT knop ingedrukt en kiest u Power off Uitschakelen OK ARCHOS_53_Platinum_book_quick in...

Page 79: ...n van uw apparaat Taal Datum en tijd WiFi verbinding De locatieservice Toepassingen van derden Tip Als u het apparaat gedurende een ingestelde tijdsduur niet gebruikt wordt het scherm uitgeschakeld Om het scherm weer in te schakelen drukt u op de AAN UIT knop ARCHOS_53_Platinum_book_quick indd 79 23 04 2013 18 15 16 ...

Page 80: ... uw 3G aanbieder of EDGE netwerk Wanneer u bent verbonden met het 3G netwerk wordt het 3G pictogram weergegeven in de statusbalk Om verbinding te maken met het internet moet het pictogram voor mobiele data geactiveerd zijn Sleep de statusbalk naar beneden en tik op het pictogram voor mobiele data om het te activeren ARCHOS_53_Platinum_book_quick indd 80 23 04 2013 18 15 16 ...

Page 81: ...en 2 Tik op Instellingen om het menuWiFi instellingen te openen 3 Als deWiFi is uitgeschakeld schuift u deWiFi schakelaar in de stand AAN Zodra deWiFi is ingeschakeld gaat de ARCHOS zoeken naarWiFi netwerken die zich binnen het bereik bevinden 4 Tik opWiFi 5 Tik op de naam van het netwerk waarmee u verbinding wilt maken Privé netwerken worden weergegeven met een slotje en vragen u om uw wachtwoord...

Page 82: ...e accountgegevens in te voeren Nadat u een account heeft aangemaakt heeft u toegang tot Play Store Gmail Talk Maps en diverse andere apps 4 Ga naar Settings Instellingen Accounts Google 5 Kies uw account De lijst met informatie die kan worden gesynchroniseerd wordt weergegeven Selecteer alle onderdelen die u wilt synchroniseren Er wordt een back up gemaakt van uw gegevens Zo blijven uw gegevens be...

Page 83: ...ps kiest u de app People Contactpersonen 3 Tik op de menuknop Import Export Importeren Exporteren 4 Bij Import export contacts Contacten importeren exporteren kiest u Import from SIM card Importeren van SIM kaart 5 Ga naar Settings Instellingen Accounts Google 6 Kies uw Google account Controleer of Contacts Contacten is geselecteerd 7 Tik op de menuknop en dan Sync now Nu synchroniseren Uw contact...

Page 84: ...n andere locatie verbinding te maken Informeer bij uw beheerder naar uw netwerkdekking Ik kan geen uitgaande gesprekken voeren Controleer of uw telefoon is verbonden met een netwerk en of het netwerk overbelast of niet beschikbaar is Ik kan geen inkomende gesprekken ontvangen Controleer of uw telefoon is ingeschakeld en is verbonden met een netwerk controleer of het netwerk overbelast of niet besc...

Page 85: ...guntas frequentes FAQs em www archos com Certifique se de que as lê antes de devolver qualquer produto O seu problema ter uma resolução muito simples Como atualizamos e melhoramos frequentemente os nossos produtos o software do seu dispositivo pode ter uma aparência ou funcionalidade ligeiramente diferente daquela que é apresentada neste Guia de Referência Rápida ARCHOS_53_Platinum_book_quick indd...

Page 86: ...ais e de segurança Os itens fornecidos com o seu dispositivo e os acessórios disponíveis podem variar entre regiões e fornecedores de serviços Os itens fornecidos foram concebidos exclusivamente para o seu dispositivo e podem ser incompatíveis com outros dispositivos O uso de acessórios não aprovados pode resultar em mau funcionamento do seu dispositivo ARCHOS_53_Platinum_book_quick indd 86 23 04 ...

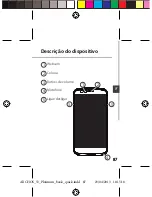
Page 87: ...05 last modific NEW Rev O AC53 CONFIDEN DRAW 5 2 1 4 3 PT 87 agem Descrição do dispositivo Webcam Coluna Botões de volume Microfone Ligar desligar 1 3 2 5 4 ARCHOS_53_Platinum_book_quick indd 87 23 04 2013 18 15 18 ...

Page 88: ...e 1 1 05 0 last modific NEW Rev O AC53 CONFIDEN DRAWI 8 9 88 Entrada do auricular Porta Micro USB Câmara Flashlight Coluna Descrição do dispositivo 6 8 7 10 9 ARCHOS_53_Platinum_book_quick indd 88 23 04 2013 18 15 18 ...

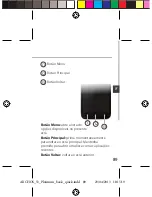
Page 89: ...u abre a lista de opções disponíveis no presente ecrã Botão Principal prima momentaneamente para voltar ao ecrã principal Mantenha premido para abrir uma lista com as aplicações recentes Botão Voltar voltar ao ecrã anterior ARCHOS_53_Platinum_book_quick indd 89 23 04 2013 18 15 19 ...

Page 90: ... ranhura 2 3 Para introduzir um cartão de memória empurre a ranhura para cartões de memória para cima e levante a tampa Introduza o cartão de memória Feche a tampa e empurre para baixo 4 Alinha os quatro pontos de contacto da bateria com os pontos de contacto do dispositivo e empurre levemente a bateria até encaixar 5 Reponha a tampa da bateria empurrando a para o lugar até ouvir um estalido Carre...

Page 91: ... to removed the bottom casing Picture to show how to insert the batter ture to show how to insert the battery pack Picture to show the scards position Slot1 Slot2 PT ARCHOS_53_Platinum_book_quick indd 91 23 04 2013 18 15 19 ...

Page 92: ...sua conta Google ou criar uma conta nova 1 Mantenha premido o botão ligar desligar para ligar o dispositivo Pode ser solicitado o código PIN quando liga o seu dispositivo 2 O código PIN é fornecido com o seu cartão SIM 3 Selecione OK Desligar Mantenha premido o botão ligar desligar para ligar o dispositivo e em seguida selecione Power off Desligar OK ARCHOS_53_Platinum_book_quick indd 92 23 04 201...

Page 93: ...á ajudá lo a configurar o seu aparelho Idioma Data e hora Rede WiFi Minha localização Aplicações de terceiros Dicas O ecrã tátil é desligado automaticamente após um determinado período de inatividade Prima o botão ligar desligar para ligar o ecrã ARCHOS_53_Platinum_book_quick indd 93 23 04 2013 18 15 20 ...

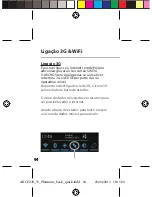
Page 94: ...tiver cobertura 3G ou EDGE por parte da sua operadora móvel Enquanto estiver ligado à rede 3G o ícone 3G será exibido na barra de estados O ícone de dados móveis deve estar ativo para ser possível aceder à Internet Arraste a barra de estados para baixo e toque no ícone de dados móveis para ativá lo ARCHOS_53_Platinum_book_quick indd 94 23 04 2013 18 15 20 ...

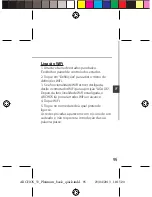
Page 95: ...dadeWiFi estiver desligada deslie o comutadorWiFi para a posição LIGADO Depois da funcionalidadeWiFi estar ligada o ARCHOS irá procurar redesWiFi ao alcance 4 ToqueWiFi 5 Toque no nome da rede à qual pretende ligar se As redes privadas aparecem com o ícone de um cadeado e irão requerer a introdução da sua palavra passe ARCHOS_53_Platinum_book_quick indd 95 23 04 2013 18 15 20 ...

Page 96: ...a introduzir os dados da sua conta A conta permita lhe aceder a serviços como a Play Store Gmail Talk Maps e muitas outras aplicações 4 Vá a Settings Definições Accounts Contas Google 5 Selecione a sua conta É exibida a lista das informações que podem ser sincronizada Verifique se marcou todos os campos que deseja sincronizar Será feita uma cópia de segurança dos dados e pode reavê los em caso de ...

Page 97: ...plicativos selecione a aplicação People Pessoas 3 Toque no botão Menu Import Export Importar Exportar Em Import export contacts Importar exportar contactos selecione Import from SIM card Importar do cartão SIM 4 Vá a Settings Definições Accounts Contas Google 5 Selecione a sua conta Google Verifique se a opção Contacts Contactos está marcada 6 Selecione o botão Menu e depois Sync now Sincronizar a...

Page 98: ...ensagem Sem cobertura de rede Tente ligar em outro local Verifique a cobertura de rede da sua operadora Não é possível fazer chamadas Verifique se o seu telemóvel está ligado a uma rede e se essa rede está disponível Não é possível receber chamadas Verifique se o seu telemóvel está ligado e tem uma ligação a uma rede verifique se a rede está disponível PIN do cartão SIM bloqueado Contacte a sua op...

Page 99: ...асто задаваемых вопросов на веб странице www archos com Обязательно прочитайте их прежде чем принимать решение о возврате изделия Возможно проблема с которой вы столкнулись не представляет собой ничего сложного Поскольку мы часто обновляем и совершенствуем свои изделия программное обеспечение на вашем устройстве может незначительно отличаться по внешнему виду или функциональности от представленног...

Page 100: ... входящие в комплект поставки устройства и доступные аксессуары могут различаться в зависимости от региона или поставщика услуг Компоненты входящие в комплект предназначены для использования только с данным устройством и могут быть несовместимыми с другими устройствами Использование аксессуаров которые не были разрешены к применению с данным устройством может привести к его неисправности ARCHOS_53...

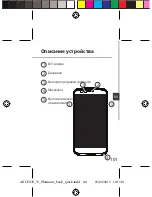
Page 101: ... modific NEW Rev O AC53 CONFIDEN DRAW 5 2 1 4 3 RU Описание устройства Веб камера Динамики Кнопкирегулировкигромкости Микрофон 1 3 2 5 4 Кнопкавключения ивыключения ARCHOS_53_Platinum_book_quick indd 101 23 04 2013 18 15 21 ...

Page 102: ...e 1 1 05 0 last modific NEW Rev O AC53 CONFIDEN DRAWI 8 9 102 Описание устройства Гнездодлягарнитуры Портmicro USB Камера Фонарик 6 8 7 10 9 громкоговоритель ARCHOS_53_Platinum_book_quick indd 102 23 04 2013 18 15 21 ...

Page 103: ...еню ткрытие списка функций доступных на текущем экране Кнопка Home Нажмите для возврата к главному экрану нажмите и удерживайте для открытия списка последних приложений Кнопка Назад Возврат к предыдущему экрану ARCHOS_53_Platinum_book_quick indd 103 23 04 2013 18 15 21 ...

Page 104: ...обы установить карту памяти надавите на гнездо для карты памяти в направлении вверх и откройте крышку Установите карту памяти Закройте крышку и задвиньте ее вниз 4 Совместите 4 точки контактов аккумулятора с соответствующими точками на телефоне и осторожно надавите на аккумулятор вниз чтобы задвинуть его на место 5 Установите крышку аккумулятора так чтобы она со щелчком стала на место Перед первым...

Page 105: ... to removed the bottom casing Picture to show how to insert the batter ture to show how to insert the battery pack Picture to show the scards position Slot1 Slot2 RU ARCHOS_53_Platinum_book_quick indd 105 23 04 2013 18 15 22 ...

Page 106: ...ь учетную запись Google 1 Нажмите и удерживайте кнопку включения и выключения чтобы включить устройство При включении устройства может появиться запрос на ввод PIN кода 2 Введите PIN код предоставляемый с SIM картой 3 Нажмите OK Выключение Чтобы выключить устройство нажмите и удерживайте кнопку включения и выключения а затем выберите Power off OK Выключение OK ARCHOS_53_Platinum_book_quick indd 10...

Page 107: ...йку Язык Дата и время Соединение Wi Fi Опции службы геолокации Сторонние приложения Подсказки Если устройство не используется в течение определенного времени сенсорный экран выключается Чтобы включить экран нажмите кнопку включения и выключения ARCHOS_53_Platinum_book_quick indd 107 23 04 2013 18 15 22 ...

Page 108: ...ытия сети 3G или EDGE поставщика услуг связи 3G При подключении к сети 3G на панели состояния отображается пиктограмма 3G Чтобы иметь возможность доступа к Интернету необходимо активировать пиктограмму мобильных данных Перетащите строку состояния вниз и коснитесь пиктограммы мобильных данных чтобы активировать ее ARCHOS_53_Platinum_book_quick indd 108 23 04 2013 18 15 22 ...

Page 109: ...оступа к настройкам 3 Если связьWi Fi выключена переместите переключательWiFi в положение ON ВКЛ После включения устройство ARCHOS выполнит поиск доступных сетейWi Fi 4 ВыберитеWi Fi 5 Выберите ту сеть к которой хотите подключиться Частные сети отображаются в виде значка с замком и для них потребуется ввести пароль ARCHOS_53_Platinum_book_quick indd 109 23 04 2013 18 15 22 ...

Page 110: ...укции на экране для ввода информации об учетной записи Как только учетная запись будет создана вы будете иметь доступ к Play Store Gmail Talk Maps и многим другим приложениям 4 Перейдите к разделу Settings Accounts Google Настройки Учетные записи Google 5 Выберите учетную запись Будет отображен список данных которые могут быть синхронизированы Убедитесь что все они отмечены флажком для синхронизац...

Page 111: ...е People Контакты 3 Коснитесь кнопки Меню Import Export Импорт Экспорт 4 В разделе импорта экспорта контактов выберите Import from SIM card Импорт с SIM карты 5 Перейдите к разделу Settings Accounts Google Настройки Учетные записи Google 6 Выберите вашу учетную запись Google Убедитесь что пункт Contacts Контакты отмечен флажком 7 Нажмите кнопку Меню затем выберите Sync now Синхронизировать сейчас ...

Page 112: ...личие покрытия сети Проверьте у оператора действительна ли ваша SIM карта Попытайтесь выбрать доступную сеть сети вручную Попытайтесь установить соединение позже если сеть перегружена Не удается выполнять исходящие вызовы Убедитесь что телефон подключен к сети и что сеть доступна и не перегружена Не удается принимать входящие вызовы Убедитесь что телефон включен и подключен к сети проверьте что се...

Page 113: ...licensing terms You may obtain a copy of Apache License Version 2 0 at http www apache org licenses LICENSE 2 0 You may also obtain a copy of GNU General Public License Version 2 at the Free Software Foundation INC 51 Franklin Street Fifth Floor Boston MA 02110 1301 USA Until the date that is three years after our last shipment of this product you may obtain a copy of the source code corresponding...

Page 114: ...mW e i r p within the band 2454 2483 5 MHz Military Radiolocation use Refarming of the 2 4 GHz band has been ongoing in recent years to allow current relaxed regulation Full implementation planned 2012 Italy None If used outside of own premises general authorization is required Luxembourg None General authorization required for network and service supply not for spectrum Norway Implemented This su...

Page 115: ...stricted to indoor use in France Consult the declaration of conformity on http www archos com products declaration_conformity html SAR After the labortory measurement this mobile phone SAR value is MAX SA Head 0 326 W kg Body 0 749W kg ARCHOS_53_Platinum_book_quick indd 115 23 04 2013 18 15 23 ...

Reviews: