background image

     PAGE 22

MODES

MODES

Dolby Digital

Dolby Digital from a DVD, or Laser Disc player can be anywhere from 1 channel where

just the Center channel is active, to 5.1 discrete audio channels.  When in Dolby Digital
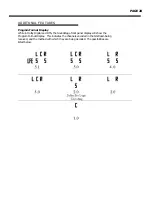
mode, the Soundstage front panel will show a Program Format Display, which indicates

which channels the bitstream is encoded with.  (see Program Format Display for details)

Dolby specifications require that a 2.0 Dolby Digital soundtrack that is Pro Logic encoded

must be decoded in Pro Logic by default.  By pressing the STEREO button, you can get
standard two-channel output.  Dolby Digital 2.0 soundtracks that are not Pro Logic

encoded will decode in two channel by default.  Pressing the P.LOGIC button on the

remote will decode the signal in Pro Logic.

Dolby Digital decoding allows for an adjustable compression scheme to be used for

playback in various environments.  The Soundstage is set up to decode Dolby Digital with

the maximum dynamic range possible.  To accommodate a situation where there is an
excess amount of noise present, or where it is desirable to lower the level of high level

sounds such as explosions, a "late night" mode is available.  By pressing the NIGHT

button on the remote while in Dolby Digital, the overall volume level remains the same,
however the level of the quite sounds is raised, and the level of the louder sounds is

brought down.  This allows the dialog to remain intelligible, and the more subtle sounds

to be heard, while keeping louder sounds from being obtrusive.  Late night mode is

indicated to the left of the Program Format display as an "N"

Stereo Direct

The Soundstage contains a two channel analog preamplifier based on the design of the

Aragon Aurum preamplifier.  The Stereo Direct mode allows for uncompromised two
channel analog performance, and a seamless integration of your high-end two channel

and home theater systems.  While in the Stereo Analog mode, pressing the STEREO

button on the remote control will enter the Stereo Direct mode.  Each analog input on

the Soundstage can be assigned as a Stereo Direct input.  In Stereo Direct, the analog
signal bypasses the DSP module avoiding unnecessary conversion of the signal to digital,

and then back to analog.  Separate level settings are allowed for the Stereo Direct mode

to accommodate for any gain differences that you may encounter.  Press the SETUP
button to access the channel balance menu.  The LVL UP and LVL DN keys are used to

make adjustments to the Front Left, Front Right, and Subwoofer channels.  Lowering the

volume down below the -10 dB point turns off the subwoofer.  These adjustments apply

only to the Stereo Direct mode.  To save the settings and exit the Setup Menu, press
SETUP on the remote again.

Six Channel Analog Input

The Soundstage is equipped with a DB-25 connector on the rear panel allowing a DVD

player with a built in decoder to be plugged in.  If the DVD player does not have a DB-25
output, than a Six RCA connector to DB-25 connector cable should be used.  The Six

Channel Analog Input bypasses the DSP module, so any necessary bass management

should be performed in the DVD player, and the Variable Equalizer, and Fixed Equalizer

are not available in this mode.  Separate level settings are available for the Six Channel
Input, although because the DSP module is bypassed, there are no Test Tones generated

in this mode.  Press the SETUP button to enter the Setup Menu, and adjust your channel

Summary of Contents for ARAGON SOUNDSTAGE

Page 1: ...ndialdesigns com aragon on the Soundstage page in pdf format Adobe Acrobat Reader is required to download this file and view it on your computer and a link is provided on the website to download this free reader Please be sure to send in your warranty card so we can keep you informed about updates to the Soundstage On the website you can also add your email address to our email update list to be s...

Page 2: ...3 DIGITAL INPUTS 13 ANALOG INPUTS 13 VIDEO INPUTS 13 MULTI CHANNEL ANALOG INPUT 13 VIDEO EXPANSION PORT 14 SUGGESTED CONNECTION DIAGRAM 14 GENERAL OPERATION 15 INPUT SELECTION 15 AUTO FORMAT DETECTION 15 VOLUME ADJUSTMENT BY SOURCE 15 VARIABLE EQUALIZER 15 ON THE FLY ADJUSTMENTS 15 EQUALIZER 15 STEREO DIRECT 16 SIX CHANNEL ANALOG INPUT 16 NIGHT MODE 16 DISPLAY 16 DIGITAL ANALOG SELECT 16 MUSIC MOD...

Page 3: ...NPUT SWITCHING 18 SYSTEM LOCK 18 FRONT REAR BALANCE 18 CUSTOM MENUS 18 1 SCROLL TEST TONES 18 2 TEST TONE OFF 19 3 SEPARATE ON OFF 19 4 AUTO POWER ON 19 5 POWER ON VOLUME 19 6 AUTOMUTE ON INPUT 19 7 CUSTOM INPUT NAMES 19 ADDITONAL FEATURES 20 PROGRAM FORMAT DISPLAY 20 REMOTE CONTROL 21 MODES 22 DOLBY DIGITAL 22 STEREO DIRECT 22 SIX CHANNEL ANALOG INPUT 22 PARTY 23 HALL 23 ...

Page 4: ...ll formats Fully Hardware and Software Upgradable Design As the market changes the Soundstage can change with it With a modular design and upgradable software we can implement changes in the design to accommodate new formats or changes to old formats and apply these changes to the Soundstage The analog output section is set up with 2 channel output cards that can be modified or more can be added t...

Page 5: ...ain the result would be a loss of dynamic range due to attenuation in the DSP processor Adjustable Crossover Point The Soundstage allows you to choose between Large and Small speakers for each set of speakers Front Rear and Center and to adjust the crossover frequency that these small speakers utilize There are nine different crossover frequencies to choose from Separate crossovers can be selected...

Page 6: ...ollowing steps SPEAKERS YOU HAVE SEL PLAY TO CONTINUE In this section you will select the speakers that you have in your system and indicate the size of these speakers For more information on speaker size please see the section on Bass Management Press the SEL PLAY button to begin this portion of the setup procedure CENTER LARGE You can select Large Small or None Use the LVL UP and LVL DN buttons ...

Page 7: ... accurate method will depend on your listening room as well as your particular speakers The test tones will scroll to each speaker in two second intervals The LVL UP and LVL DN keys are used to adjust the level of each channel While seated at the listening position you should adjust the speaker settings to output the same level from each channel Once this has been completed for all channels exit t...

Page 8: ...will increment or decrement the volume by 1 or 5 depending on the current position of the volume level 3 Mute Pressing Volume and Volume simultaneously will toggle the Soundstage in and out of MUTE 4 Input Selection Pressing any of these buttons TV DVD selects the input at the corresponding rear panel connection as the current input 5 Front Panel Display The display on the Soundstage is a Vacuum T...

Page 9: ...ded on the rear panel When a source is selected the corresponding video input is also selected and routed to the Monitor and Record outputs Video inputs can also be selected independently form the audio input See selecting a separate video source 5 VIDEO EXPANSION PORT The Video Expansion Port when available allows switching of three different Component video RGB Video or HDTV video signals The Vi...

Page 10: ...cording purposes 5 ANALOG RECORD OUTPUTS Two sets of outputs are provided on the rear panel to connect to recording devices such as VCR s and Tape Decks The analog signal from the selected source is routed to both record outputs Caution should be used when connecting these to a VCR line input with the VCR as the selected source while lien in is selected on the VCR This can cause a feedback loop 6 ...

Page 11: ...ggles menu settings 20 SEL PLAY Enters the Analog Input Level adjustment when accessing an analog signal Continues to next menu option in the Setup Guide 21 GUIDE LEFT Enter Exits the Setup Guide Selects the Left Front channel for level adjustment 22 MENU RIGHT Enters Exits the Custom Menu options Selects the Right Front channel for level adjustment 23 L REAR Selects the Left Rear channel for leve...

Page 12: ... a PCM or Analog Signal selects Pro Logic as the current decoding mode When accessing a Dolby Digital signal switches to Pro Logic decoding of two channel signals 39 STEREO When accessing a PCM or Analog Signal selects Stereo as the current decoding mode When accessing a Dolby Digital signal switches to Stereo 40 SETUP Enters and exits the Setup Menu 41 48 Input Selections Selects the current inpu...

Page 13: ... digital connection the Toslink will take precedence It is possible to connect both a Toslink and a Coaxial digital signal to a single source input but only one can be operational at a time There is no need to assign the digital inputs as one is provided for each source connection For easiest operation the digital output of the source should be connected to the same source input lined up verticall...

Page 14: ...t A slot has been provided for future video switching This input will allow the switching of three Component Video RGB Video or HDTV video input signals or all three types depending on your television SUGGESTED CONNECTION DIAGRAM ...

Page 15: ...y set level for that particular input Variable Equalizer Bass and Treble Equalizer adjustments are available with 6dB of attenuation to 6 dB of gain in 1 dB steps Pressing the TREBLE or BASS button allows adjustment of these settings The LVL up FF and LVL DN REW buttons adjust the selected EQ The Bass EQ is centered around 200 Hz and the Treble EQ is centered around 5700 Hz The Variable Equalizer ...

Page 16: ... to the Six Channel analog input Any or all of the analog inputs can be defaulted to the Six Channel Analog in Separate level adjustments are available for the Six Channel Analog input and are accessed through the Setup Menu see advanced features Night Mode Pressing the NIGHT button while in Dolby Digital places the processor in a Late Night listening mode In this mode quieter sounds are raised up...

Page 17: ...ubwoofer If no subwoofer is selected the bass frequencies will be diverted to those speakers selected as large Once each set of speakers has been indicated as LARGE or SMALL pressing the BMGMT button a second time will allow you to adjust the crossover frequency All speakers listed as small will utilize this crossover frequency The subwoofer output will utilize this frequency as the low pass filte...

Page 18: ...buttons depressed press the power button This will toggle the Soundstage between Locked indicated by a capital L on the front panel display and Unlocked mode indicated by a capital U on the front panel display Once you have the processor in the correct mode you can release all buttons The mode indication will remain on the front panel display until the Soundstage is powered on again Front Rear Bal...

Page 19: ...g the processor to power up at that particular volume level 6 AutoMute On Input The default setting is YES The Auto Format Detection of the Soundstage requires that it read a flag from the digital bitstream This can cause a slight delay in the detection of a standard PCM signal from a CD player To eliminate this delay set to NO This may cause a short burst of noise to emit from the main speakers b...

Page 20: ...hile in Dolby Digital and DTS the Soundstage front panel display will show the Program Format Display This indicates the channels encoded in the bitstream being received and the method with which they are being decoded The possibilities are listed below ...

Page 21: ...like an aerial view of the system The FF LVL UP and REW LVL DN buttons allow adjustment of the current menu selection While in a menu such as the Setup Menu or the Bass Management Setup pressing one of the speaker buttons will allow you to adjust the parameter for that particular speaker For On The Fly adjustments pressing the Center or Subwoofer button allows you to make temporary adjustments to ...

Page 22: ...ndstage contains a two channel analog preamplifier based on the design of the Aragon Aurum preamplifier The Stereo Direct mode allows for uncompromised two channel analog performance and a seamless integration of your high end two channel and home theater systems While in the Stereo Analog mode pressing the STEREO button on the remote control will enter the Stereo Direct mode Each analog input on ...

Page 23: ... pressing the SETUP button on the remote After making any adjustments pressing the SETUP but again will exit the Setup Menu and save the new settings Hall The Hall mode sends a L R signal to the center channel as well as to each surround channel The surround channel signal runs through a reverb algorithm to simulate a large hall Front Rear balance is critical in this mode as the proper setting wil...

Reviews: