background image

14

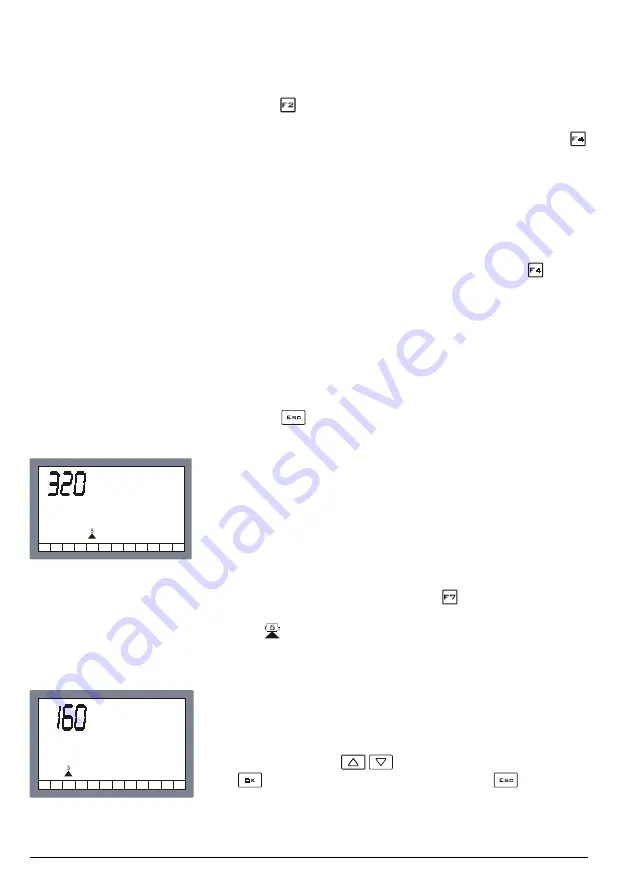
Fig.14:
Setting the tank filling level

Fig.15:
 ISO11002 nozzle selection

Pressing the 

 keys sets the tank level at the maximum filling

level envisaged by the manufacturer.
To set a level different from the maximum filling value, press 
so that the liquid in tank value flashes and use the modification
keys to change it.

Filling the tank by means of the flowmeter
So the computer stores the exact quantity of liquid put into the
tank, it is possible to fill the tank up with the specific flowmeter.

To do this, access the filling up menu by pressing the 

 key

on the main screen page until the screen page shown in Fig.
13 appears.
Now fill the tank up by starting the loading pump.
The computer shows in real time the quantity of liquid that has
been put inside the tank which is added to the liquid that is
already inside it,  until the loading pump stops. (In the example
given in Fig. 13 there are 2,588 litres inside the tank).
Once filling up is finished, return to the main screen page by
pressing key 

.

Selecting the nozzle
The user will have selected the nozzle to be used for the
treatment on the basis of the speed at which the treatment is to
be performed and the quantity of liquid per hectare to be used.
This information is fundamental if using a pressure transducer
to regulate the distribution, but with a flow-meter alone, it is
only used to correct display of the pressure value calculated by
the computer (it does not affect the distribution setting).
Nozzle setting is begun by pressing the 

 function key for one

second, until the screen shown in fig14 appears.
A flashing 

 symbol appears in the bottom of the screen,

indicating the type of nozzle selected (in the example, number
5).

The flashing symbol is underneath coloured indicators repre-
senting the standard ISO nozzle colours.
If the nozzle chosen is ISO, e.g. ISO11002 (yellow), simply
bring the flashing symbol above the rectangle of the same
colour (yellow) with the 


 keys.

Press 

 to confirm the new nozzle and exit or  

 to abort.

Summary of Contents for BRAVO30 Series

Page 1: ...Software No 54 GB 46730X 46730X 46730X 46730X 46730X SPRAY CONTROL USE AND MAINTENANCE USE AND MAINTENANCE USE AND MAINTENANCE USE AND MAINTENANCE USE AND MAINTENANCE...

Page 2: ...ing instructions must be observed Do not spray water on the equipment Do not use solvent or benzenes to clean the outer parts of the container Observe the foreseen power supply voltage 12 Vdc When arc...

Page 3: ...y calibration 12 Nozzle delivery rate 13 Settings preliminary to treatment 13 Field number 13 Resetting the field counters 14 Setting the amount of liquid placed in the tank 14 Filling up by means of...

Page 4: ...y Introduction BRAVO30X is a computer capable of controlling distribution of chemical products on sprayers equipped with valve control unit from 1 to 5 section valves It is composed of a control panel...

Page 5: ...the same time sends the data to the flow meter F and or pressure trasducer M so that the control panel A can handle the control unit BRAVO30X has a large backlit multifunction display on which the us...

Page 6: ...o the user programming menu Alternates display of the following data on the display Tank level Liquid distributed Battery voltage Alternates display of the following data on the display Flow rate Pres...

Page 7: ...Controls opening closing of sections Increase Decrease of quantity for distribution Increases the digit of the value for modification Decreases the digit of the value for modification Moves on to the...

Page 8: ...itches to the main menu page fig 5 Setting the contrast To modify the display contrast press the and keys to increase or and to decrease Fig 3 Display test Fig 4 Software release Treatment data displa...

Page 9: ...e wheel changes In this case the constant on the BRAVO30X has to be changed to allow it to measure the distance travelled correctly and thus make a correct calculation of the quantity of liquid delive...

Page 10: ...tor with the tank 50 full the test can be carried out with just water 2 Drive the tractor to the start of the straight track of known length and stop 3 If the length of the track is different from tha...

Page 11: ...e factor is 1 00 Press to confirm the value and exit or to exit without modifying Automatic density calibration The automatic density calibration procedure is carried out as follows 1 Fill the tank wi...

Page 12: ...ate to the nozzle in use To restore the ISO value simply press the key and confirm the values with the key See appendix for table 1 showing the relationship between pressure and flow rate for ISO nozz...

Page 13: ...rts the selection made and returns to the main menu screen Resetting the field counters The key can be pressed to reset the display of one or more of the counters relating to the field currently selec...

Page 14: ...are 2 588 litres inside the tank Once filling up is finished return to the main screen page by pressing key Selecting the nozzle The user will have selected the nozzle to be used for the treatment on...

Page 15: ...ete with calibrated return and if BRAVO30X has been programmed for operation with calibrated return during installation of the system at each nozzle change the flashing message rEG appears on the righ...

Page 16: ...nfirm the data and exit or press to exit without changing the data return is shown beside In the example if fig 19 this is 8 8 At this point the calibrated return has to be adjusted so that the two va...

Page 17: ...ment controlled in manual mode To perform a treatment in manual mode proceed as follows 1 Check that the symbol has illuminated in the centre of the display or press the so that it appears 2 Open the...

Page 18: ...be used to measure the distance between the field and the operator s home or to measure the length of a field N B the time worked count can be stopped or started by pressing the key When the count is...

Page 19: ...Total time 3 32 hhhh mm Counters printout If the printer code 467001 or the download software of data on the personal computer code 467002 is connected to BRAVO30X it will be possible to print the da...

Page 20: ...and the Bravo 300 In AUTO mode the master valve switch is on ON but the machine is not moving Put the machine in motion 5 and and In AUTO mode the Bravo 300 is not receiving the speed sensor and flow...

Page 21: ...t e n g a m f o o n e h t k s t e n g a m n e e w t e b e c n a t s i d e h t k c e h C r o s n e s d n a 5 t n a t s n o c t a n e v e e l b a t s n u s i y a l p s i D d e e p s s t e n g a m f o r...

Page 22: ...i Flow rate Litres min t min Gal min Speed Km h Km h Miles h Distribution Litres Ha t Ha Gal Acre Sect width metres metres feet Nozzle dist metres metres inches Flow constant pulse l pulse t pulse Gal...

Page 23: ...ns damage deriving from using unsuitable liquids failures caused by negligence tampering user incapability or repairs made by non authorized personnel installation and adjustment system references or...

Page 24: ...42048 RUBIERA Reggio Emilia ITALY Via Palladio 5 A Tel 0522 622011 Fax 0522 628944 Home page http www aragnet com E Mail info aragnet com D20033 GB m03 07 2005...

Reviews: