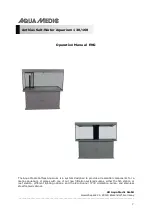

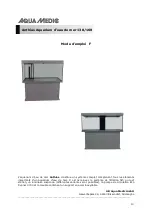
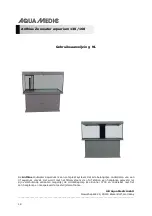


8
Type
Dimensions
Volume
Anthias 130
136 x 68 x 142.5 cm | 53.5 x 26.5 x 56 in
525 ltr | 130 gal
Anthias 160
163 x 69 x 146 cm | 64 x 27 x 57.5 in
750 ltr | 195 gal
1. Components
•
Anthias Aquarium
•
Filtration system / sump, including the protein skimmer, trickle filter, and our patented pre-
filter system (see separate manual provided).
•
Circulation pump Eco Runner 3700 (instructions for this are enclosed in the packaging of the
pump).
•
Stainless steel framed cabinet finished in either beech or silver MDF.
•
25 litres AM Bactoballs
•
1 length of 15 mm Ø flexible rubber pipe
•
Drainage fitting including tank connector, flexi pipe and ‘0’ ring.
•
Tank connector for back flow into the aquarium (with 25 mm pipe).
•
Length 25 mm pipe including elbow with anti-siphon fitting (blue elbow).
•
40 mm strainer pipe
•
Jubilee clips
•
Steel reinforcing strut for cabinet
•
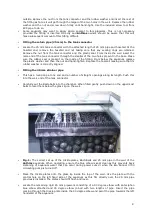
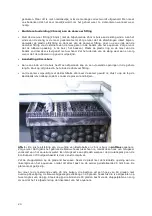
2 x 15 cm x 15 cm trickle plates. One with central hole sleeved with 32 mm pipe.
•
Lighting system
•
2 pcs. of screwing tool made of PVC pipe to fix the tank unions.
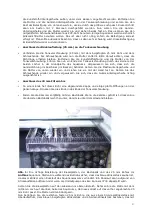
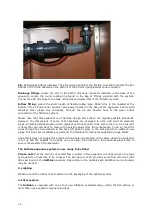
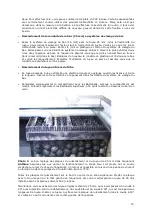
2. Unpacking and set up (leveling, tightening connections and filling)
Check the aquarium and sump thoroughly for damage that might have incurred through
transportation before assembly and afterwards prior to filling.
The aquarium is already mounted to the cabinet. The load carrying frame can be leveled via its
adjustable legs. Be sure all bulkhead connections are tightened before it is filled with water. We
provided special tools for the bulkhead connections inside the overflow box.
In case the aquarium needs to be disassembled for easier transportation, loosen the bulkhead
connections inside the overflow box. The aquarium together with the bottom plate can be lifted up
and removed.
Be sure to install all bulkheads and hose connections properly to avoid any leakages which could
cause damages to the cabinet. The plastic ring needs to be on the same side as the tightening nut,
the rubber O-ring/gasket needs to be located on the opposite side of the bulkhead. We do
recommend to consult a professional maintenance company for proper installation. Leakages
caused by improper installation are not warrantied by Aqua Medic.
However, the combined weight of components will necessitate dismantling before it can be placed
in the desired place in your home.
•
Remove aquarium from the cabinet.
•
Remove the filtration system from the cabinet.
•
Site the cabinet
in the area that you have chosen to locate the
Anthias
aquarium.
•
Replace the filtration system in the cabinet once the latter is correctly placed. Do this before
attempting to position the aquarium itself.
•
Replace and position the aquarium on the cabinet. The base of the
Anthias
aquarium is
incorporated into the glass structure for stability, quality of finish and overall strength. There
are wooden blocks located on the underside of the base to ensure that the aquarium locks into
the correct position. Gently lower the aquarium into place.
•
Insert the separate steel reinforcing strut between the upper and lower horizontal box steel
elements of the front section of the cabinet. This will provide extra support to the cabinet once
the aquarium is in place and filled. Using a spanner, adjust the length of the support legs so
that the strut is vertical and holds its position.
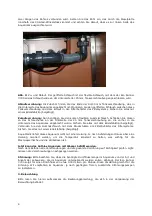
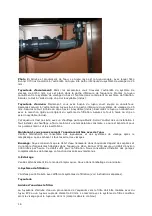
•
The 40/50 mm tank connector drainage fitting can be inserted when the aquarium is off or on
the cabinet. If you intend to install this component before placing the aquarium you must avoid
damage to the fitting. Insertion of the fitting when the aquarium is in place is advisable but
may require two people, one working in the cabinet and one in the aquarium weir.
•
Fitting the 40/50 mm tank connector
.
The tank connector has a rubber and plastic washer-type
sealing ring. The rubber washer should be placed on the inside of the aquarium, the plastic one


