70
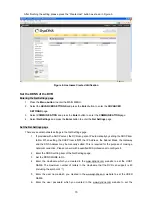
After finishing the setting, please press the “Create Host” button as shown in Figure 5.
Figure 6- Hostname Created Verification
Set the DDNS of the DVR
Entering the Net Settings page
1. Press
the
Menu button
to enter the MAIN MENU.
2. Select
the
ADVANCED SETTINGS
and press the
Enter
button to enter the
ADVANCED
SETTINGS
page.
3. Select
COMMUNICATION
and press the
Enter
button to enter the
COMMUNICATION
page.
4. Select
Net Settings
and press the
Enter
button to enter the
Net Settings
page.
Set the Net Settings page
There are several network settings in the Net Settings page.
1. If provided with a DHCP server, the DVR can get an IP automatically by setting the DHCP item
to
On
. When setting the DHCP item to
Off
, the IP Address, the Subnet Mask, the Gateway
and the DNS Address may be manually edited. This is required for the purpose of making a
network connection. Please consult with a qualified MIS professional to configure it.
2. Enter the DDNS setting item of the Net Settings page.
3. Set the DDNS MODE to On.
4. Enter the Hostname which you created in the www.dyndns.com website to set the HOST
NAME. The maximum number of letters in the Hostname that the DVR can support is 40
(including the symbol of “
.
”).
5. Enter the user name which you created in the www.dyndns.com website to set the USER
NAME.
6. Enter the user password which you created in the www.dyndns.com website to set the
Summary of Contents for DVR-3254S
Page 2: ......
Page 74: ...72 Figure 7 Verifying IP Address of DVR RMN0400372 V1 2 ...

