Apantac KVM-SET-14 Manual Download Page 12

KVM-SET-14 

APANTAC LLC, 10200 SW ALLEN BLVD STE C, BEAVERTON, OR 97005 

[email protected]

, TEL:    +1 503 968 3000, FAX:    +1 503 389 7921 

11 

4.5  Video Wall Configuration (Rx) 

The HDMI over IP Receiver comes with Video-Wall feature for broadcasting one video stream to multiple screens in a 

grid. You can setup the Video-Wall either by using OSD (On Screen Display) or the Web page. 

For the OSD setup and operation, please refer to “HDMI over IP Video-Wall OSD Quick Setup Guide”. 

The following section provides information for the Web page setup. 


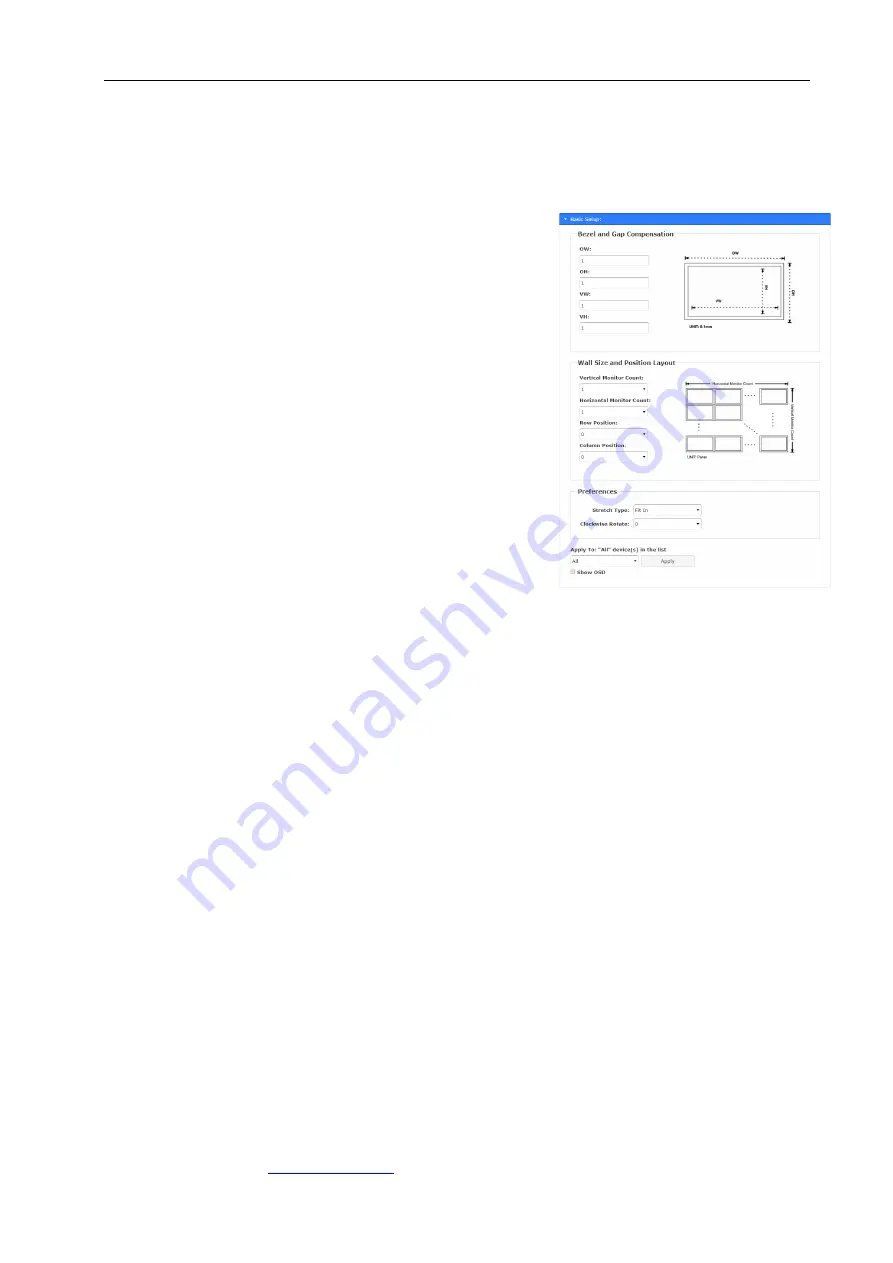
Video-Wall Basic Setup 

Enter RX Web page ---> [Video Wall] ---> [Basic Setup]. 


Bezel and Gap Compensation 

Enter the value for OW (Outside Width), OH (Outside 

Height), VW (View Width), VH (View Height) in 0.1mm 

unit ---> [Apply]. 


Wall Size and Position Layout 

Select the value for Vertical Monitor Count, Horizontal 

Monitor Count, Row Position, Column Position from the 

drop-down menu ---> [Apply]. 


Stretch and Rotation Preferences 

[Preferences] ---> [Stretch Type]: Select ”Fit In” or “Stretch 

Out” ---> [Apply] 

[Clockwise Rotate]: Select 0, 180, 270 --> [Apply] 

Note: 

Fit In: Stretches or compresses the broadcast screen to 

fill the whole wall. 

Keep Aspect: keeps strict picture aspect ratio. If there is 

a mismatch, some image may fall beyond screen edges. 


Show OSD 

To identify the screen, check the “Show OSD” and select the device then click [Apply] button. 


Summary of Contents for KVM-SET-14

Page 1: ...LLC 10200 SW Allen BLVD STE C BEAVERTON OR 97005 INFO APANTAC COM TEL 1 503 968 3000 FAX 1 503 389 7921 KVM SET 14 4K HDMI with USB KVM Extenders Over Gigabit Ethernet Manual and Setup Guide Firmware...

Page 2: ...nd Apantac s sole obligation under this warranty is expressly limited at Apantac s sole option to a repair the defective Product without charge for parts and labor or b provide a replacement in exchan...

Page 3: ...to any defect failure or damage a Caused by improper use of the Product or inadequate maintenance and care of the Product b Resulting from attempts by those other than Apantac representatives to inst...

Page 4: ...3 Table of Contents 1 0 What s in the Box 4 2 0 Key Features 4 3 0 Panels and Connectors 5 4 0 Configuraitons 6 4 1 Setup Mode 6 4 2 Operation Mode 7 4 3 Network Configuration 8 4 4 Function Configur...

Page 5: ...eters when used with a GigE switch Supports HDMI inputs and output signals Suports point to point Unicast point to multi point Multicast for audio video distribution Receivers has 4 USB ports that sup...

Page 6: ...System is ready but TX RX not connected Green On Amber Blinking TX RX connected but waiting for HDMI input Green On Amber On TX RX connected HDMI input is ready 9 RS 232 Phoenix Provide Serial over I...

Page 7: ...ng 1 Reset to the Factory default 2 Enter Setup and Firmware upgrade mode in 192 168 0 88 11 USB 1 1 Host 2 USB A ports for USB 1 1 devices like Keyboard Mouse Printer 12 USB 2 0 Host 2 USB A ports fo...

Page 8: ...RX to be backward compatible with 950 or 9510 Enter TX RX Web page System Utilities Compatibility mode select the mode from drop down menu 1500 compatibility mode 1510 compatibility mode or 152x oper...

Page 9: ...on Method from First Available OSD Transmitter List TX IP and Direct Connection First Available the RX will connect to the first available TX when powered on Multicast IP 225 0 10x xxx the RX will con...

Page 10: ...ctions Hotkey select the Hotkey from the list Ctrl Ctrl Shift Shift Alt Alt or Scroll Scroll default Ctrl Ctrl Video over IP TX Enter TX Web page Functions Video over IP check uncheck the following op...

Page 11: ...Line Out of the RX Enter RX Web page Functions Audio Output check HDMI Audio De Embedder Click Apply to save the setting and reboot default Disabled IR over IP RX It is possible to assign the IR sign...

Page 12: ...ter RX Web page Video Wall Basic Setup Bezel and Gap Compensation Enter the value for OW Outside Width OH Outside Height VW View Width VH View Height in 0 1mm unit Apply Wall Size and Position Layout...

Page 13: ...re aspect ratio some image may spill off screen if needed Clockwise Rotate 0 No rotate 180 clockwise rotate 180 degrees 270 clockwise rotate 270 degrees Screen Layout Row x Column Define the Video Wal...

Page 14: ...connecting with TX Then power ON other RX units sequentially 4 2 Refer page 7 enable Copy EDID from this Video Output to assign a specific RX as EDID Master 4 3 Refer page 5 enable Copy EDID from 1st...

Page 15: ...ter List menu by short pressing the RX s Link button as the below left screenshot Short press the button to move the highlight arrow to select the TX the RX will connect to the selected TX after 3 sec...

Page 16: ...IP OSD Transmitter List and Direct Connection The Unicast RX supports 4 possible connection methods First Available OSD Transmitter List Dedicated TX IP and Direct Connection Press the Link button to...

Reviews: