AnyNet AnyNet-12824 System Operation Manual Download Page 70


70


Step 5.


Click “

Save

” or “

Cancel

” icon to finish and exit the setting process.


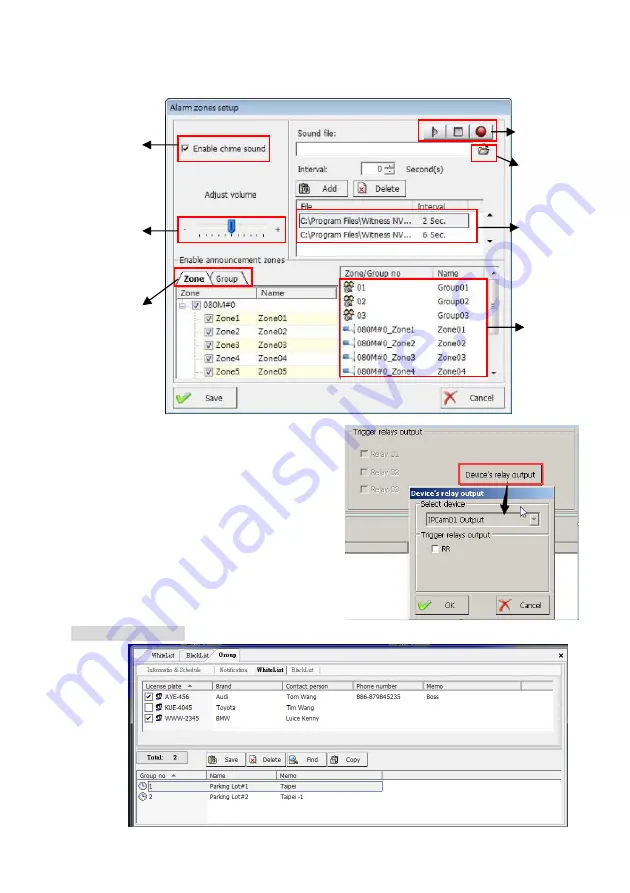
Device  relay  output: 

The  user  can  select  the 

output relays from each IP camera when the event 

is triggered.


White list / Blacklist:

 You can add or delete the White list (Blacklist) database from here.


Play

s chime sound 

before alarm voice


Adjust alarm voice 

volume 


List selected zones 

and groups


Select announcement 

area by zone and 

group


Record/Play alarm 

sound file 


List selected alarm 

sound files


Browse /Select the 

existed sound file


Summary of Contents for AnyNet-12824

Page 1: ...1 Version 5 3 Doc No 2020031501...

Page 2: ...ystem 25 3 1 NVR System Control Panel Configuration 26 3 2 NVR Main Program 37 3 3 Program Overview 38 Chapter4 OperateAuto Number Plate Recognition System 52 4 1 How to get the criteria to image for...

Page 3: ...Access setup 141 6 7 System Configuration 147 6 8 User access setup 156 6 9 Application logs 160 6 10 Peripherals setup 162 6 11 Stop alarm siren 164 6 12 Storage configuration 164 6 13 Public address...

Page 4: ...ce pursuant to Part 15 of the FCC Rules These limits are designed to provide reasonable protection against harmful interference in a residential installation This equipment generates uses and can radi...

Page 5: ...otherwise transfer the Witness FreeView Pro and AnyView Pro 1 2 Reverse Engineering You may not reverse engineer decompile or otherwise disassemble the Witness FreeView Pro and AnyView Pro except to t...

Page 6: ...lated software even if I View has been advised of the possibility of such damages 1 8 Please acknowledge that the laws and regulations of the Taiwan R O C restrict the export and re export of commodit...

Page 7: ...ise with the use of our products in which you and your vendor cannot resolve please try the following If you have an Internet connection visit the I View website http www i view com tw Taiwan for any...

Page 8: ...ird party IP devices digital video recorder provide 16 hot swap SATAdrive bays up to 160 TB HDD capability 10TB x16 with Raid 0 1 5 6 10 function AnyNet 6424 64 channels I View s IP devices and or 64...

Page 9: ...r manual Power cable Screws for HDD installation Mouse If any of the above items is damaged or missing contact your retailer 1 3 Recommend HDD List Seagate Model Size Type ST4000NM0035 4TB SATA6 Gb Se...

Page 10: ...DVD drive 2 Remove Hot swap HDD 3 USB 3 0 ports 4 Power Switch 5 System reset button 6 Alarm Mute button Revised 7 System HDD Activity indicator LED 8 Power indicator LED 9 Failed indicator LED Revis...

Page 11: ...output port 8 VGA port 15 pins ports for VGA monitor or device 9 DVI DL port Support DVI D Signal output only 10 e SATA port Plug e SATA devices 11 RJ 45 LAN port 1 Connect to Switching HUB The defau...

Page 12: ...12 Anynet 1604 3204 Front Panel Anynet 1604 0804 Lite Front Panel 1 Remove Hot swap HDD 2 Power Switch 3 System reset button 4 Power indicator LED 5 HDD indicator LED 6 USB 3 0 ports 1 1 5 2 3 6 6 4...

Page 13: ...ine in Blue This port connects to CD DVD audio source Speaker out Lime This port connects to speaker Microphone in Pink This port connects to microphone 7 Supplied power cord Connect one end to the AC...

Page 14: ...e top cover of NVR Pull the lever to latch HDD tray Slide tray from HDD tray Remove protect tray from the tray Insert the HDD on the tray Attach with 4 screws to fix HDD Push the lever to latch HDD tr...

Page 15: ...As this process which you can modify the Raid card setting from NVR s O S Operation System Step 1 Click the IP address and the default the IP address is 127 0 0 1 then enter the User name Password to...

Page 16: ...select Virtual Device item Right click Mouse and then choice the Set Virtual Drive Properties icon Step 3 Setup Raid 5 or 6 or others mode then Ctrl HDD list to choose multi HDDs at a time Click the...

Page 17: ...17 Step 4 Click the Create Drive Group icon and then click the Next Step 5 Check the parameters of setting same as below or not If yes please click the Next icon...

Page 18: ...18 Step 6 Click Yes to confirm the Raid parameters setting and then the Raid mode will show as below...

Page 19: ...19 Step 7 Click the Finish icon and Ok to confirm the Raid setting...

Page 20: ...esses the same as Windows 7 You can follow up the process Step 1 Click button from Control panel the diagram of HDD setting will pop up as below Move the Mouse to Format icon and then right click of M...

Page 21: ...21 Step 3 Specify volume size which you want to the format for the HDD Step 4 Assign drive letter or path Step 5 Format the HDD partition you can refer the setting as diagram setting as the right side...

Page 22: ...22 Step 6 Click the Finish button to finish HDD format Step 7 Press the Save System Setting icon and reboot the system to complete the changes...

Page 23: ...follow the steps shown as below Step 1 The Witness Pro program will pop up an error message and Sound warning Step 2 Click Raid HDD status icon from Storage configuration field you will find outthede...

Page 24: ...24 Step 3 Click the Rebuild icon to start to rebuild the HDDs Step 4 When the rebuilt process is finished the status will show OPTIMAL...

Page 25: ...n Take note of the following precaution before you start to configure the NVR system 1 The AnyNet provides a Bar bond system for the distributor therefore it does NOT include the HDD and License of Em...

Page 26: ...d the HDD installation please click the Control Panel icon from the right side bottom corner of the NVR system main screen to configure the NVR system NVR System Main Screen NVR System Control Panel C...

Page 27: ...system sound volume Setup Raid Parameter Press to create or maintain the Raid HDD system Save System Setting Press this icon and reboot the system to make O S Operation System configuration change eff...

Page 28: ...28 3 1 1 Adjust Date Time Please click icon from Control Panel to set NVR system Date Time Time Zone and Internet Time Fig 3 1 1 1 Adjust Date Time...

Page 29: ...ontrol panel to enter Network Connection configuration display 2 Click mouse right button on the Local Area Connection icon and select Properties item to enter the LocalArea Connection Properties disp...

Page 30: ...orientation for each monitor You can drop and drag Mouse to re arrange the position of Monitors and all monitors should be at the same resolution and Full HD is strong recommended 1 Connect all monito...

Page 31: ...ce 2 Click the mouse right button on the new installing HDD and select New partition item 3 Press Next to start the format process 4 Select Extended partition item and click Next button to continue 5...

Page 32: ...k Next to continue 9 Select Logical drive partition type and clicks Next to continue Fig 3 1 4 4 Select Logical drive 10 Select Assign the following drive letter item and click Next to continue Fig 3...

Page 33: ...t to continue 12 Click Finish to complete hard disk partition and format process 13 Repeat Step 1 12 to format another Hard disk 14 Press the Save System Setting icon and reboot the system to complete...

Page 34: ...rs interface 2 Select Shares folder and click the Action button form the top then select the New and File Share item to continue 3 While the system displays a Create AShared Folder Wizard please click...

Page 35: ...ayback via LAN 2 You MUST share the Folder for backup the video clips to Remote HDD via LAN when using the ezBackup program 3 There is a user account for remote access Backup and playback video clips...

Page 36: ...modifying each Operation System configurations of the CMS server the user needs to press the Save System Setting icon and reboot the system to complete the changes This process just for the Operation...

Page 37: ...37 3 2 NVR Main Program 3 2 1 System Configuration Diagram...

Page 38: ...lication software program that provides on site live video viewing scheduled or motion triggered video recording and much more It can also be utilized as a central video server to transmit video strea...

Page 39: ...phone Blackberry phone You can refer to Chapter 7 1 for the detail process Video Transfer Server ezVideoTrans Let remote PC to access the NVR cameras video or access IPcamera video directly via ezVide...

Page 40: ...HDD s current health status disk reliability failure prediction and related statistical information Please refer to chapter 5 6 for in depth details FingerprintAccess Controller ezFingerKey Manage th...

Page 41: ...onnect the Internet when turn on the Witness Pro NVR program Auto enable program when turn on the DVR Enable Modem Entry the password and user name for auto login Auto to Dialup 3G Entry the phone Han...

Page 42: ...hen you first time run the Witness Pro NVR program and there is no IP camera setting on the system so the NVR will pop up the ezSetup program for the IP cameras configuration This setup window may dif...

Page 43: ...synchronize the time of IP camera with NVR when run the NVR program Video system Select the video system of IP camera to match your country Auto assign IP address section Click this icon to assign the...

Page 44: ...IP camera for I View s and the other brand Disable channel This will disable the selected channel when enabling this function Install video codec Install the video codec of this IP camera when you co...

Page 45: ...for the connected IP camera If you do not know the IP camera s IP address you can click the Find icon to find out the currently connected IP cameras User name Password The user name and password must...

Page 46: ...ution for split video and higher resolution same as recording resolution for a pop up to single video on the screen This Dual streaming mode allows display multi video and saves a huge CPU loading Cod...

Page 47: ...47...

Page 48: ...card configures and description as below f Format Click this icon will format the SD card You need to stop the recording video clip from I E Browser before you do this process g Click this icon to sav...

Page 49: ...ck Register code and inform the MAC ID for your vendor to get the code b Fill the code and click Register After registering the number of supported IP cameras will be shown on the Port area c Double c...

Page 50: ...er the Register code Please follow the process to set up the Onvif IP camera Step 1 Select the Video channel and uncheck Disable channel then select Onvif from Vendor and Model section Click the Find...

Page 51: ...4 Click the Onvif setup icon from Mainstream and Substream to select the resolution and streaming The setup screen should different when you use a difference brand Then click Ok to set up the Onvif pr...

Page 52: ...u to set up the parameters ofALPR Automatic Number Plate Recognition Please follow the process to setup the ALPR function What is the good contrast Image In order to be able to differentiate the chara...

Page 53: ...h so that the pixels within a character are irrelevant in terms of shape pattern recognition These are just pixels that waste the resources of computation Therefore the resolution is optimized for a c...

Page 54: ...in drop and sooner or later will reach 0 QuickPark engine is very robust therefore it has the capability of filtering noise from the image A dot if it is too small can be recognized by the engine as n...

Page 55: ...e engine should meet the following requirements A consecutive average difference in contrast Adequate sharpness Minimal distortion Is taken under good lighting conditions The picture has to contain th...

Page 56: ...allation and get the optimal image for the ALPR system Please take notes as below when install theALPR camera 1 License plate character recommended height for good recognition rate is 20 pixels 2 Came...

Page 57: ...VR already if you Ghost the O S of NVR or want to add moreALPR channels please call your vendor to service you You also can refer to the below page to enter the Register code when you get the password...

Page 58: ...ble license Plate icon to enable NPR function for this IP camera click Save to save the setting Repeat the same process to enable another IP camera forALPR if the password provides more than one ALPR...

Page 59: ...e when detects the image motion it will reduce the CPU loading and this function suitable for theALPR of parking lot entrance e You can select the country code from the drop menu bar The default is Au...

Page 60: ...be ignored when they detect characters less or higher than setting value How to measure the pixels of number plate characters a Take 2 photos of number plate which are the farthest and the nearest to...

Page 61: ...o show the result table ofALPR function a Click the number license plate from the Event Log table will see the detail information such as photo number plate and time b Search the logs via time period...

Page 62: ...list car number plate Information Please follow up the process to set up the White list Blacklist database 1 Input the License number Brand Color and import the photo of the car 2 Input contact inform...

Page 63: ...k or modify for each car of the White list Blacklist database from here Group Information Schedule setup Please follow up the process to set up the Group 1 Input Group number name and from this sectio...

Page 64: ...sage email notifies upload to FTP server and live videos transferred to a remote site PC when motion detection is triggered Notify by Video transfer Upon motion detection the NVR system will automatic...

Page 65: ...2 through 6 to add another Remote transfer live video notification entry The TCP IP port number you choose must match the one setup in FreeView Pro program at the remote PC otherwise the connections...

Page 66: ...tamp Please follow the steps below to set up FTP server notification entries Step 1 Click FTPnotify field Step 2 Input the DNS name and port number default is port 21 which the user wishes to send the...

Page 67: ...ystem file the warn wav file should support 8000Hz 16 bit and Mono format 3 Each phone call notification entry can have its own unique audio stream and each phone call automatically disconnects after...

Page 68: ...use an approved 3G Modem for sending SMS message to mobile phone Enable third party Program Upon motion detection the NVR system can enable the pre installation third party program Please follow the...

Page 69: ...connected to the NVR The public address server will announce to the camera site via group s or zone s automatically when the NVR is triggered Follow up the steps shown as below to setup announcement a...

Page 70: ...a when the event is triggered White list Blacklist You can add or delete the White list Blacklist database from here Plays chime sound before alarm voice Adjust alarm voice volume List selected zones...

Page 71: ...ages can be used to perform searches For example face images of suspicious people detected on the sales floor can be searched to track information on a timeline including what time they enter the stor...

Page 72: ...eliminates the need for large bandwidth Performing facial recognition on the NVR server using theAI face recognition function reduces server load and hard drive capacity requirements as well as permit...

Page 73: ...at the smallest unit that defines the recognized face has to be 80x80 pixels In terms of face recognition the smallest unit is the width and height of face that compromises the image on the face recog...

Page 74: ...ront face 4 The pixels between ears must be larger than 260 pixels 5 The background should be a single color How to measure the pixels of the face a Take 2 photos of the face which are the farthest an...

Page 75: ...series to AnyNet QuickFace NVR first 2 Login the face recognition IP cameras via I E Browser then select the Face section Face Recg Config then you will see the below diagram window 3 Press Check the...

Page 76: ...who in the database of face Largest only The camera processes the face recognition processing for the largest one among face when enabling this function The reset face of the image will be ignored Ful...

Page 77: ...te a new Face ID into the database 1 Click the New ID icon to generate a new face ID 2 Browsers the face photos file for save into the Database 3 Input basic personal information such as No Name phone...

Page 78: ...s of BaseID and paste it into the Face ID Field 2 a Select the Face ID which you want to synchronize with BaseID synchronize to 1 selected ID b Click Copy icon and then check the copy items You also c...

Page 79: ...VR c Click OK to complete the setting The Face Recognition cameras want to receive the export Face ID data from NVR which cameras must check from the Assign camera to sync this face ID field of Face I...

Page 80: ...the schedule setting 3 Click the Save icon to complete the group information setting Or select the existing group then click the Delete icon to cancel the group Group Blacklist Whitelist Follow up th...

Page 81: ...icon to synchronize all groups 3 Click Ok icon to complete the setting 4 Parameter Setup the similarity value of face recognition to enable the notification 1 Check Enable icon from whitelist or blac...

Page 82: ...ble CMS platform This function for a large system and the control center has more than CMS platform Please make sure the ezDispatch had been enable or not when you want to use this function Step 10 If...

Page 83: ...d for sending the notification emails Step 5 Type the email address for sending the notification emails in From mail field Step 6 Type the email address for receiving the notification emails in Mail t...

Page 84: ...Step 2 Input the DNS name and port number default is port 21 which the user wishes to send the triggered information to this FTP server Step 3 Entry the User name and Password of FTP server for login...

Page 85: ...at step 2 through 4 to add other phone call notification entries 1 If the user would like to record his own voice message the WAV file format must be 8000Hz 16 bit and Mono for phone call notify 2 If...

Page 86: ...Repeat steps 2 through 5 to add another SMS message notification entry You must use an approved 3G Modem for sending SMS message to mobile phone Enable third party Program Upon motion detection the NV...

Page 87: ...en files and press Add icon to save the file Click the selected files and click Delete to remove the selected alarm sound file Step 2 Enable chime sound if you want to play chime sound before alarm so...

Page 88: ...88 Device relay output The user can select the output relays from each IP camera when the event is triggered White list Blacklist You can add or delete the White list Blacklist database from here...

Page 89: ...gnition Follow up the steps shown as below to import the face similarity into the specify face recognition cameras 1 Click the Setup field and Input the value for the database of white list and blackl...

Page 90: ...ce log field and click Search log section will show the window as below Face application log Search Face detection Click the Face detection field and then select the date from Event day drop box then...

Page 91: ...og section and Face recognition field Select the search criteria such as the Search period Camera Group and Name and then click the Search icon the search result will list on the window as below Click...

Page 92: ...log section and Face detection field Select the search criteria such as the Search period Camera Group and Name and then click the Search icon the search result will list on the window as below Click...

Page 93: ...og section and Face recognition field Select the search criteria such as the Search period Camera Group and Name and then click the Search icon the search result will list on the window as below Click...

Page 94: ...recognition when the face is recognized Please follow up on the process below 1 Click the system configuration icon 2 Check the Pop up event notification icon 3 Check License plate Face recognition fr...

Page 95: ...ecording motion detection alarm notifications E map for easy site management events logs schedule recording remote surveillance connection via WAN LAN Internet Intranet etc Please see the instructions...

Page 96: ...s and control panel Click to fix this control bar on the screen 3 Exit Button Exit Witness Pro program If a crossed hand icon appears instead you must first log out and next log in as a user with exit...

Page 97: ...to Chapter 6 13 for detail instruction 17 Video Display Screen Display your enabled video channels Double click on any video channel to enlarge its video images and double click again to come back to...

Page 98: ...and the click any point of image the image will move to central area and zoom in The IP camera will pop up video at a time but analog camera will not Click the roller again will go back original video...

Page 99: ...nitors This function just can be enabling when the NVR connected more than 1 monitor Clear border Remove the surrounding red border around the currently selected video channel Please note that this re...

Page 100: ...ck Default icon the video display position will go back default 2 Move the Mouse to the video then press right button of Mouse and drag to the video channel which you want to swap then release the but...

Page 101: ...low up on the process as below when you use the Fisheye IP camera Pre setup 1 Choice the 360 180 Panorama viewing mode from the ezSetup program The Ceiling Mount should select 360 and Wall Mount shoul...

Page 102: ...ceed the image otherwise the image will show a dark image The video will be changed when you adjust the video angle so you can get the biggest view angle as possible without the dark area For 180 degr...

Page 103: ...n the screen when showing the split video on the screen double click the fisheye camera video will pop up the selected video mode on the screen The software provides 12 types of image display way the...

Page 104: ...theWitness Pro surveillance program You can also change the username and password when you log in To log out simply click the same button The default login username and password are root lowercase an...

Page 105: ...live audio via a 2Vp p microphone Duplicate another camera s settings to the current camera Select icon type and view angle on eMap Enter camera name and check name time stamp to show video stream Set...

Page 106: ...the videos for 24 hours Section 1 Camera Choice the camera which you want to setup the recording schedule and mode Continuous recording Non stop record videos Motion triggered recording Record only u...

Page 107: ...rding with slow frame rate without any triggered You can select the frame rate from No motion recording field as well to record continuously no matter the motion is triggered or not Using this recordi...

Page 108: ...y incidents It is advised to set a much lower recording frame rate here to save disk space Save pending live videos when motion is triggered When motion is triggered the pending video stream will auto...

Page 109: ...the recording schedules See Schedule Setup from Recording The user can verify if you have properly activated the recording schedule for certain cameras from its number button on the Video control pane...

Page 110: ...delete other detection areas repeat step 1 and 2 If you don t define specific detection areas the entire view of the video will be the detection area Hardware detection Via IP camera You can use hardw...

Page 111: ...two instances will be combined into one alarm recording session Pre alarm The camera will start a new motion triggered recording session at least 1 99 seconds in advance when the event occurs The pre...

Page 112: ...n Make sure your NVR is equipped with a pair of PC speakers Click button for setup Exit without saving your audio selection Record your voice message via your PC s microphone Halt the current playing...

Page 113: ...h Server and distribute the live video to the available CMS platform This function for a large system and the control center has more than CMS platform Please make sure the ezDispatch had been enable...

Page 114: ...n emails in Mail to field Step 7 Fill Subject and Message fields to identify the email messages Step 8 Check if the user would like to receive the attached snapshot picture Step 9 Click the Save butto...

Page 115: ...ing entry This entry will be listed at the bottom section of this window Step 7 Repeat step 2 through 4 to add other phone call notification entries Notify by Phone Call Upon motion detection the NVR...

Page 116: ...se an approved Voice Capable Dial Up Modem 7 If the user s telephone system requires an extension number to be inputted please use one or several commas to separate the phone number and the extension...

Page 117: ...red Shift PTZ position Upon motion detection the PTZ camera can automatically move to the aiming position s of one or more or whatever the preset position s the user has defined Please define the pres...

Page 118: ...ice Zone and Group where will announce when NVR is triggered The detail setting process of Zone and Group please refer to Public address configuration chapter Step 2 Record or choice the existed alarm...

Page 119: ...ler board or select the output relays from each IP camera or NC 180AZ PTZ receiver module Video Loss The NVR can send an alarm or other kinds of notifications if there is any video signal loss from th...

Page 120: ...r more of your connected PTZ cameras to move for one or more preset positions when video loss occurs on this particular camera Trigger output relays Select the output relays from Relay board or the al...

Page 121: ...g table Tripwire detection Check this function to detect the object cross the tripwire Color distortion detection Check this function to detect the video color cast problem of the camera Video overexp...

Page 122: ...cess Controller field from Camera configuration and follow the instructions below for setup Font Click icon to specify the font size of text on the video clips Clear Click icon to erase the POS text s...

Page 123: ...ted text 6 Keep text records Setup the retained period for text This text record will be shown on the Text insert Playback and used for searching text on videos 7 Enable video recording when transacti...

Page 124: ...ion triggered recording for each camera If there is no preset schedule the NVR will enable instant recording for each camera in 24 hours Disable all recording schedule Click to disable all recording s...

Page 125: ...s by date The red color button of the date indicates recorded video data or select the time period which you want to selectfor playback 2 Select cameras Select the cameras which you want to playback 3...

Page 126: ...each event 8 Image window Select the play point from Time bar the image of the selected time point will show on this window double click on this image window to enable single playback program the use...

Page 127: ...NVR server CMS server Network HDD or User specify the path The description as below NVR NVR server You can playback the video clips of NVR HYBRID NVR CMS server You can playback the video clips of the...

Page 128: ...searching list To add more network sharing folder please repeat this step again You must share the HDDs right for this PC first which installs the ezPlayback program User specify path You can playbac...

Page 129: ...creen 6 8 10 13 Way split display Click this icon to display 46 8 10 13 split playback videos screen 9 Way split display Click this icon to display 9 split playback videos screen 16 Way split display...

Page 130: ...ersion timestamp format and position The text just can show on the video clips when using I View s playback program only Previous video clip Jump to the previous video clips Next video clip Jump to th...

Page 131: ...ame Jump to the previous frame Next frame Jump to next frame Zoom in Click this icon to zoom in Zoom out Click this icon to zoom out Snapshot Capture the video screen and save as a BMP or JPEG file Co...

Page 132: ...video clip Jump to the previous video clip Next video clip Jump next video clip Smart search video Mark the objects in a selected region for searching in a recorded video clips The events will be lis...

Page 133: ...e you can set up the video clips range for searching Stop to search when object is detected The system will stop the search process when the marked object is detected Event list The system will displa...

Page 134: ...to the desired point of the Start frame Repeat the same procedure to set up the point of the end frame 2 Repeat the 1 step to make another merge video clips click the Add clip icon to create this clip...

Page 135: ...t the certain portion of one video clip or click to type the start end frame to select the desire portion of video clip 6 Show the time frame and frame number for the selected start frame 7 Show the t...

Page 136: ...clips Create backup shortcut Create a shortcut of selected backup videos for the other storage devices such as CD RW DVD RW Back up video clips Back up video clips to Hard Disk Setup auto backup sche...

Page 137: ...own menu and time range then click search to find the clips among the selected time period Step 3 Select All video clips click search will pop up the right window for camera selection Step 4 Click Sea...

Page 138: ...to another HDD a Click to show Back up video clips window b Check Copy playback program if you would like to copy the playback program at the same time c Select the HDD from Storage drive and then Cli...

Page 139: ...revious day f Select the backup camera s and source disk g Select Target disk for backup the video clips If the Target disk is NAS or another PC please click icon to display Map Network Drive and foll...

Page 140: ...140 detail setup notify instructions i Set up for Second notify to CMS when backup HDD less than if needed Step 6 Click to complete backup setup...

Page 141: ...a static IP address assigned to the NVR the ID Code may redirect browsers to the NVR by announcing its current IP address to the IP Dynamic Server What is the dynamic IPServer When the Auto connect t...

Page 142: ...ult LAN card The user can un check Select default LAN card if there is another LAN card for selection Maximum TCP IP users Set up the maximum users for connecting NVR via IE browser or CMS FreeView Pr...

Page 143: ...e a BMP PNG or JPG file Click the or icon to zoom in zoom out the size of map to suit for the window size You also can click the icon to cancel the selected map file 6 Select the available devices to...

Page 144: ...deo playback video file and event status directly from Map Click NVR status field to show the floor plan of eMap detail information of NVR and status of view logs and current remote users Click from c...

Page 145: ...145 3 NVR information This window will show the detail NVR information 4 NVR health Click NVR health field to check the CPU usage Network traffic and HDD information...

Page 146: ...ote connection If the IP address of the remote connection CMS server is not listed in this window a pop up error message Limit error will be displayed when connection Please note that if this feature...

Page 147: ...by hardware or software problem it will reboot NVR and go back to the original setting Auto start this NVR application The Witness Pro will auto start when the system starts up Logout when minimizing...

Page 148: ...playback the instant video file without waiting Please note it will make your video files with different lengths from the set video interval Enable on screen Keyboard Display the On Screen Keyboard w...

Page 149: ...VR over the set duration NetCom Module Model Select the type of control board for the PTZ camera D I and D O devices based on the installed models Checksum It depends on the type of Speed dome camera...

Page 150: ...he modem will occupy the phone line always Select the dial up modem model for phone call notification Select language You can s select a different language from this section and the software will rebo...

Page 151: ...e cameras for spiltdisplay Step 1 Select the output display from Output drop down menu Step 2 Click the camera from Position display field Step 3 Move the mouse and click the camera number which would...

Page 152: ...ation time for the display screen How to set up the rotation forthe output display Step 1 Select the output display from Output drop down menu Step 2 Select the way of display for rotation from Split...

Page 153: ...to get the balance loading for each CMS server The ezDispatch can be installed on one of CMS or any kinds of PC stations Please refer to for ezDispatch setup Follow the steps below to connect ezDispa...

Page 154: ...et file in local disk and click Load to restore the backup configuration setting from local disk or other NVR 6 7 5 PTZ Joystick setup You need to register the password from here when you use the FSKY...

Page 155: ...applications you can enable these programs from this path The accessories programs including ezVideoTrans ezWebServer ezMobileServr ezRserver ezClock ezReboot ezHDDSmart ezTalk and ezUPScheck etc We w...

Page 156: ...rvisor name and password are listed as below Username root Password 123 Enable NVR access Allow the user to access the Witness Pro program Enable Remote access Allow the user to remotely connect NVR v...

Page 157: ...rivileges for users to access control or setup for NVR 2 Authorized cameras Select cameras for the users to setup and control in Witness and remote live view via CMS FreeView Pro or IE browser or mobi...

Page 158: ...the remote access period if needed Select Daily Weekly and Special Duration for the access schedule 4 Remote control Set up the maximum bandwidth and connection time to allocate and control the bandwi...

Page 159: ...lick Remote control to set up maximum bandwidth and connection time limit and select cameras for remote listen if required Step 6 To create other users please repeat step 1 to 5 Step 7 Click to search...

Page 160: ...he user can double click the event to view the recording video of motion triggered 3 Video loss Show the status of the video signals 4 Intelligent detection Show the trigger event which comes from i V...

Page 161: ...timing and also can search the other cameras or schedule video file Search logs Search the logs via time date log type or simply type the keywords of events and devices for search 1 Click the Search...

Page 162: ...er function Section 1 Relay output setup Select the device from the drop window then enter a device name and set up a transient time when the event is triggered If the trigger device is the relay outp...

Page 163: ...he transient switching time is set to 0 Section 3 Sensor input setup Choose the device and named then choose the NC or NO from the Type drop window Check Enable sensor and then set up the activate sch...

Page 164: ...stop alarm and adjust the audio volume or check Mute 6 12 Storage configuration Click icon to set up storage from Storage configuration setup will show the diagram as below then Storage configuration...

Page 165: ...se at once Recommend is 3000M When the hard disk space is lower than the input value the system will delete the oldest video file automatically The delete hard disk size each time will the same as the...

Page 166: ...ter The detail setting please refer to the previous chapter Renew database Click Renew database to detect new storage device and rebuild the database of NVR NVR system This button must be clicked afte...

Page 167: ...rd 3 The system will enable alarm sound and pop up the error message automatically when the HDD defect and the Event log table will show the defect HDD number You can change a new HDD and the system w...

Page 168: ...oring the video through the Internet from anywhere at any time The ability of remote visual broadcasting makes a wide variety of applications for different environments Public address configuration Op...

Page 169: ...ed with this alarm zone Step 6 Click Save icon to finish and exit the setting Group Click Group field to show the diagram as below follow up the process to setup the announcement groups Step 1 Double...

Page 170: ...hardware configuration please refer to the PAC 080M installation menu Step 2 Click the Save icon to finish and exit the setting Schedule Click the Schedule field to show the diagram below You can set...

Page 171: ...nd enable chime sound function if it is needed Step 6 Browse the sound files from exist files or record sound file by user select interval period and click Add icon to save announcement files Step 7 S...

Page 172: ...k this field to show the below diagram Please follow up on the process to set up the parameters of instant announcement Step 1 Choice the voice source of instant announcement via the Microphone or Sou...

Page 173: ...instant the announcement Select announcement area by zone and group List selected zones and groups Record Play alarm sound file Click Start to make an announcement and Stop to finish an announcement B...

Page 174: ...screen rotation for Live video Select different display mode for viewing all connected cameras Switch to next camera or split screen The channel selection buttons present live viewing without recordin...

Page 175: ...P PTZ camera number and the camera number will be shown on the black circle when the PTZ camera is selected 3 Click the Arrows icon to move the Pan Tilt direction and click the Zoom icon or Focus icon...

Page 176: ...on Click the Set icon to save the present location You can click the Del icon to cancel the preset click Goto icon the PTZ camera will move the preset which has been saved on the preset number Click i...

Page 177: ...s manual for detail information Click this icon to enable 2 point scan support 8 scan setting Click this icon to enable Pattern scan support 4 Pattern scan Click this icon to stop the running scan En...

Page 178: ...ezVideoTrans This program just suits for the IP camera only it is an alone program which allows the remote user to access the IP cameras from the remote site Using this program will not occupy the NV...

Page 179: ...e remote sites it will reduce the ezVideoTrans program loading Please enter the P2P code for the P2PApp service you can buy the P2P code from your local dealer As for theApp please download the MKVisi...

Page 180: ...em every time Step 3 Click the Set up ezWebServer and fill out the NVR s IP address for the Web IP address section For detail about the static IP address please contact your ISP provider Step 4 Click...

Page 181: ...remote PC Add site book Save the connection information to this NVR in the site book The users can select the NVR from the list of Site Menu for remote connection via the IE browser NVR version There...

Page 182: ...name in Site name type NVR IP address or ID code TCP IP port number User name and Password and click Connect to start the connection Browser Viewing Tools Function Description Display mode selections...

Page 183: ...d for login for configure the ezRserver program Step 6 Click OK to enable the ezRserver function and complete the setting Disconnect all clients button Disconnect all remote connections Exit button Di...

Page 184: ...would like to view the NVR s screen without any interruption Step 6 Click Add to save the connection information of this NVR on the list The user can simply click the NVR s name from the list for conn...

Page 185: ...authorized user in the list Step 4 Click Delete to remove the user from the list Step 5 Click Exit to leave the setup window View Logs Step 1 Select the date in which the user wants to view the logs...

Page 186: ...from ezTools Step 2 Check Run ezSTalk when windows starts icon to automatically run ezSTalk when the user turn on the NVR Step 3 Type the TCP IP port for remote client connection The default port is...

Page 187: ...quality with 16K audio rate but occupy higher bandwidth Oppositely it will only have a normal audio quality with 8K audio rate but less bandwidth Step 5 Check the Talk and Listen function for Two way...

Page 188: ...background with an icon on the system tray b Enable system restart schedule Enable your preset reboot scheduled activity Step 3 Click System Restart Schedule Setup to set up the system reboot schedul...

Page 189: ...tep 2 Check Run ezClcok when windows starts to automatically run ezClock when the user turns on the PC Step 3 Click ezClock Setup button and type the user s favorite Time Server s DNS address or IP ad...

Page 190: ...as been powered on It compares these attributes to a corresponding set of thresholds If an attribute drops below its threshold the drive is no longer considered fit for use and should be replaced imme...

Page 191: ...ro will pop up an error message to notify any failures which could require your prompt attention when checked There are two failure levels dangerous and warning only Please respond to the error messag...

Page 192: ...il profile Step 8 Click the Send test e mail button to test the user s settings Step 9 Click the Save button to keep the user s new e mail profiles This will automatically exit the e mail settings win...

Page 193: ...uto run system to automatically run the ezUPSCheck when you turn on the PC Step 3 Check the UPS status If the UPS is well connected to NVR the statusof UPS will be automatically shown on the ezUPSChec...

Page 194: ...194 when thepower comes back Click to locate Witness Pro from the Source field Step 7 Click View logs to view the status of ezUPSCheck Step 8 Click OK to leave the setup window...

Page 195: ...clips to playback The functions almost the same as the ezLANplayback so you can refer to the previous description Access Control ezFingerKey While the NVR integrate with the fingerprint access control...

Reviews: