


6
P/N 1011369 Rev. B 07/17
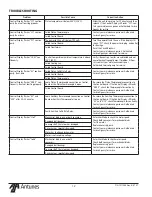
LIGHT/DARK ADJUSTMENTS
The light/dark value can be adjusted when the
unit is displaying “LO” or “USE”. To adjust
the light/dark value, press the
LIGHTER
or
DARKER
button. The display will change to
show the current light/dark value.
NOTE: The default light/dark value is d0.
Press the
LIGHTER
or
DARKER
button to
change the light/dark value. The adjustment
range is L1-L9 and d0-d9. L9 is the lightest, d0
is the middle, and d9 is the darkest setting.
To save the light/dark value, press the
PROGRAM
button or wait 5 seconds until the
screen displays “LO” or “USE”.
NOTE: Adjusting the light/dark value does
NOT change the temperature. It changes
the speed of the conveyors. The light/dark
value will reset to the d0 value when the
unit is turned off.
USER MODE
User Mode allows an operator to view the
toaster settings but does not permit any
adjustments.
1. Press and hold the
PROGRAM
button
for 5 seconds. After 5 seconds, the dis-
play will show the actual temperature
of the Platen Heater.
2. Press the
LIGHTER
button to view the
setpoint of the Platen Heater.
3. Press the
PROGRAM
button to pro-
ceed to the Auxiliary Heater menu. The
display will show the actual tempera-
ture of the Auxiliary Heater.
4. Press the
LIGHTER
button to view the
setpoint of the Auxiliary Heater.
5. Press the
PROGRAM
button to pro-
ceed to the Motor Menu. The display
will show the actual speed of the
motor.
6. Press the
LIGHTER
button to view the
setpoint of the motor.
NOTE: The unit will exit User Mode after 5
seconds of keypad inactivity.
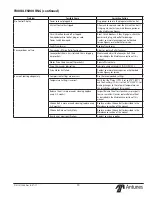
MANAGER MODE
Manager Mode allows an operator to view
and adjust the following settings:
• Platen Heater Temperature
• Auxiliary Heater Temperature
• Motor Speed
• Temperature Units
Manager Mode also allows an operator to
view (but not adjust) the Ambient Temperature
of the Control Compartment..
1. Turn the unit off.
2. Turn the power on while holding the
PROGRAM
button. Continue to hold
the button until “ENA” appears on
the display (after approximately 10
seconds).
3. Release the
PROGRAM
button. The
display now shows the Platen Setpoint
Temperature.
4. To adjust the Platen Setpoint, press
the
LIGHTER
or
DARKER
buttons to
reach the desired temperature.
NOTE: The recommended temperature
setting for the Platen Heater is 570°F
(299°C).
5. Press the
PROGRAM
button to pro-
ceed to the Auxiliary Heater Setpoint
Temperature.
6. To adjust the Auxiliary Heater Setpoint,
press the
LIGHTER
or
DARKER
but-
tons to reach the desired temperature.
NOTE: The recommended temperature
setting for the Auxiliary Heaters is 400°F
(204 °C).
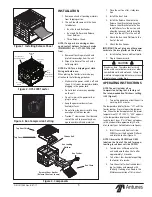
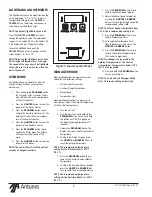
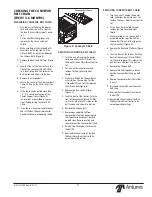
LIGHTER
PROGRAM
DARKER
Figure 5. Toaster Control Panel
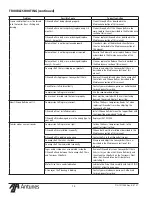
7. Press the
PROGRAM
button to pro-
ceed to the Motor Speed Setpoint.
8. Adjust the Motor Speed Setpoint by
pressing the
LIGHTER
or
DARKER
buttons to reach the desired speed. the
recommended setting is
d0
.
NOTE: The Motor Speed is adjustable from
1-100. The recommended setting is 67.
9. Press the
PROGRAM
button to pro-
ceed to Temperature Units.
10. To change the Temperature Units
from Fahrenheit or Celsius, press the
LIGHTER
or
DARKER
button.
11. Press the
PROGRAM
button to pro-
ceed to the Ambient Temperature of
the Control Compartment.
NOTE: No changes can be made to the
Ambient Temperature of the Control
Compartment. Temperatures under 150°F
(66°C) are acceptable.
12. Press and hold the
PROGRAM
button
to save any changes.
NOTE: The unit will exit Manager Mode
after 30 seconds of keypad inactivity.


