


11
P/N 1011369 Rev B 07/17
CHECKING THE CONVEYOR
BELT CHAIN
(EVERY 3–6 MONTHS)
MEASURING CONVEYOR BELT CHAIN
1. Turn the unit off, unplug the power
cord, and allow the unit to cool. Set
the Bun Thickness Adjustment Control
to 7.
2. Put on Heat Resistant gloves and
remove the Top Cover and Heat
Shield.
3. Make sure flap of the Silicone Belt is
accessible on the top side. Pull the
Silicone Belt Pins out of the zipper on
the Silicone Belts (Figure 6).
4. Remove the Bun Load Platform (Figure
2).
5. Face the front of the toaster. Push the
front of the conveyor IN and DOWN
so it locks into place. This releases the
belt tension and allow it to be free.
6. Remove the Silicone Belt.
7. Locate the center of the Conveyor Belt
Chain. Pull up on the chain to test the
slack.
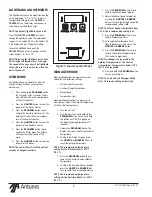
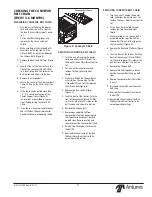
8. If the chain can be pulled more than
1.5" (3.8 cm) above the top of the
Center Support Cover (Figure 8),
remove links as described in the sec-
tion titled Adjusting Conveyor Belt
Chain.
9. If the chain is okay, reassemble the unit
and set the Bun Thickness Adjustment
Control to the normal operating setting.
ADJUSTING CONVEYOR BELT CHAIN
1. Turn the unit off, unplug the power
cord, and allow the unit to cool. Set
the Bun Thickness Adjustment Control
to 7.
2. Put on Heat Resistant gloves and
remove the Top Cover and Heat
Shield.
3. Make sure flap of the Silicone Belt is
accessible on the top side. Pull the
Silicone Belt Pin out of the zipper on
the Silicone Belt (Figure 6).
4. Remove the Bun Load Platform
(Figure 2).
5. Face the front of the toaster. Push the
front of the conveyor IN and DOWN
so it locks into place. This releases the
belt tension and allow it to be free.
6. Remove the Silicone Belt.
7. Remove one complete link from
Conveyor Belt Chain by squeezing two
links together to disconnect the chain
on both sides. Remove one link and
then reconnect the Conveyor Belt Chain.
8. Reinstall the Silicone Belt. Secure with
the Belt Pin.
9. Reassemble the unit and set the Bun
Thickness Adjustment Control to the
normal operating setting.
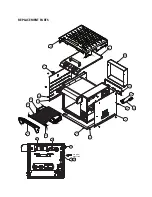
REPLACING CONVEYOR BELT CHAIN
1. Turn the unit off, unplug the power
cord, and allow the unit to cool. Set
the Bun Thickness Adjustment Control
to 7.
2. Put on Heat Resistant gloves and
remove the Top Cover and Heat
Shield.
3. Make sure flap of the Silicone Belt is
accessible on the top side. Pull the
Silicone Belt Pin out of the zipper on
the Silicone Belt (Figure 6).
4. Remove the Bun Load Platform (Figure
2).
5. Face the front of the toaster. Push the
front of the conveyor IN and DOWN
so it locks into place. This releases the
belt tension and allow it to be free.
6. Remove the Silicone Belt.
7. Squeeze two links together to discon-
nect the Conveyor Belt Chain on both
sides.
8. Remove the Conveyor Belt Chain from
the unit.
9. Install and connect the new Conveyor
Belt Chain.
10. Reinstall the Silicone Belt. Secure with
the Belt Pin.
11. Reassemble the unit and set the Bun
Thickness Adjustment Control to the
normal operating settings
Figure 8. Conveyor Chain
Conveyor Belt Chain


